
Getting Started
Balsam Medico:
Balsam Medico is a Clinic Management System that is designed to be simple and intuitive. A lot of effort has been put into creating a system that anyone can use, even with no prior technical knowledge. That being said, Medico is a powerful and flexible system that can be adjusted to fit any flow.
Roles:
Roles in Medico are quite different from other clinic management systems. They use specific privileges for each account. This means assigning specific privileges to each team member and determining the extent of their access to the clinic’s management system.
Our 3 default roles:
- Admin
With access to all the features of Medico, the admin can control the access and data to whom it may show. They have access to the Dashboard, Admin Area, Reports, Appointments, Patients List, Finance, Planner and My schedule, and Lab cases tracking, and Inventory Management.
- Doctor
Their main job is treating the patient, giving them access to the Planner, My Schedule, Patients, Lab cases tracking, and Inventory Management.
- Receptionist
Their responsibility is the Patient and Appointment management. They can access Appointments, Patients List, Finance, Lab cases tracking, and Inventory Management.
*Note: The roles and what they can access can be edited and made specific to each account.
Features:
The system consists of the following features:
- Appointments
- Planner and My Schedule
- Electronic Medical Record (EMR)
- Finance
- Insurance
- Dashboard and Reports
- Lab Cases Tracking
- Inventory Management
- Admin Area
Basic Interface:
Basic Components
The basic interface component in Balsam Medico allows you to navigate to the different features in the system.
These components are shown below:
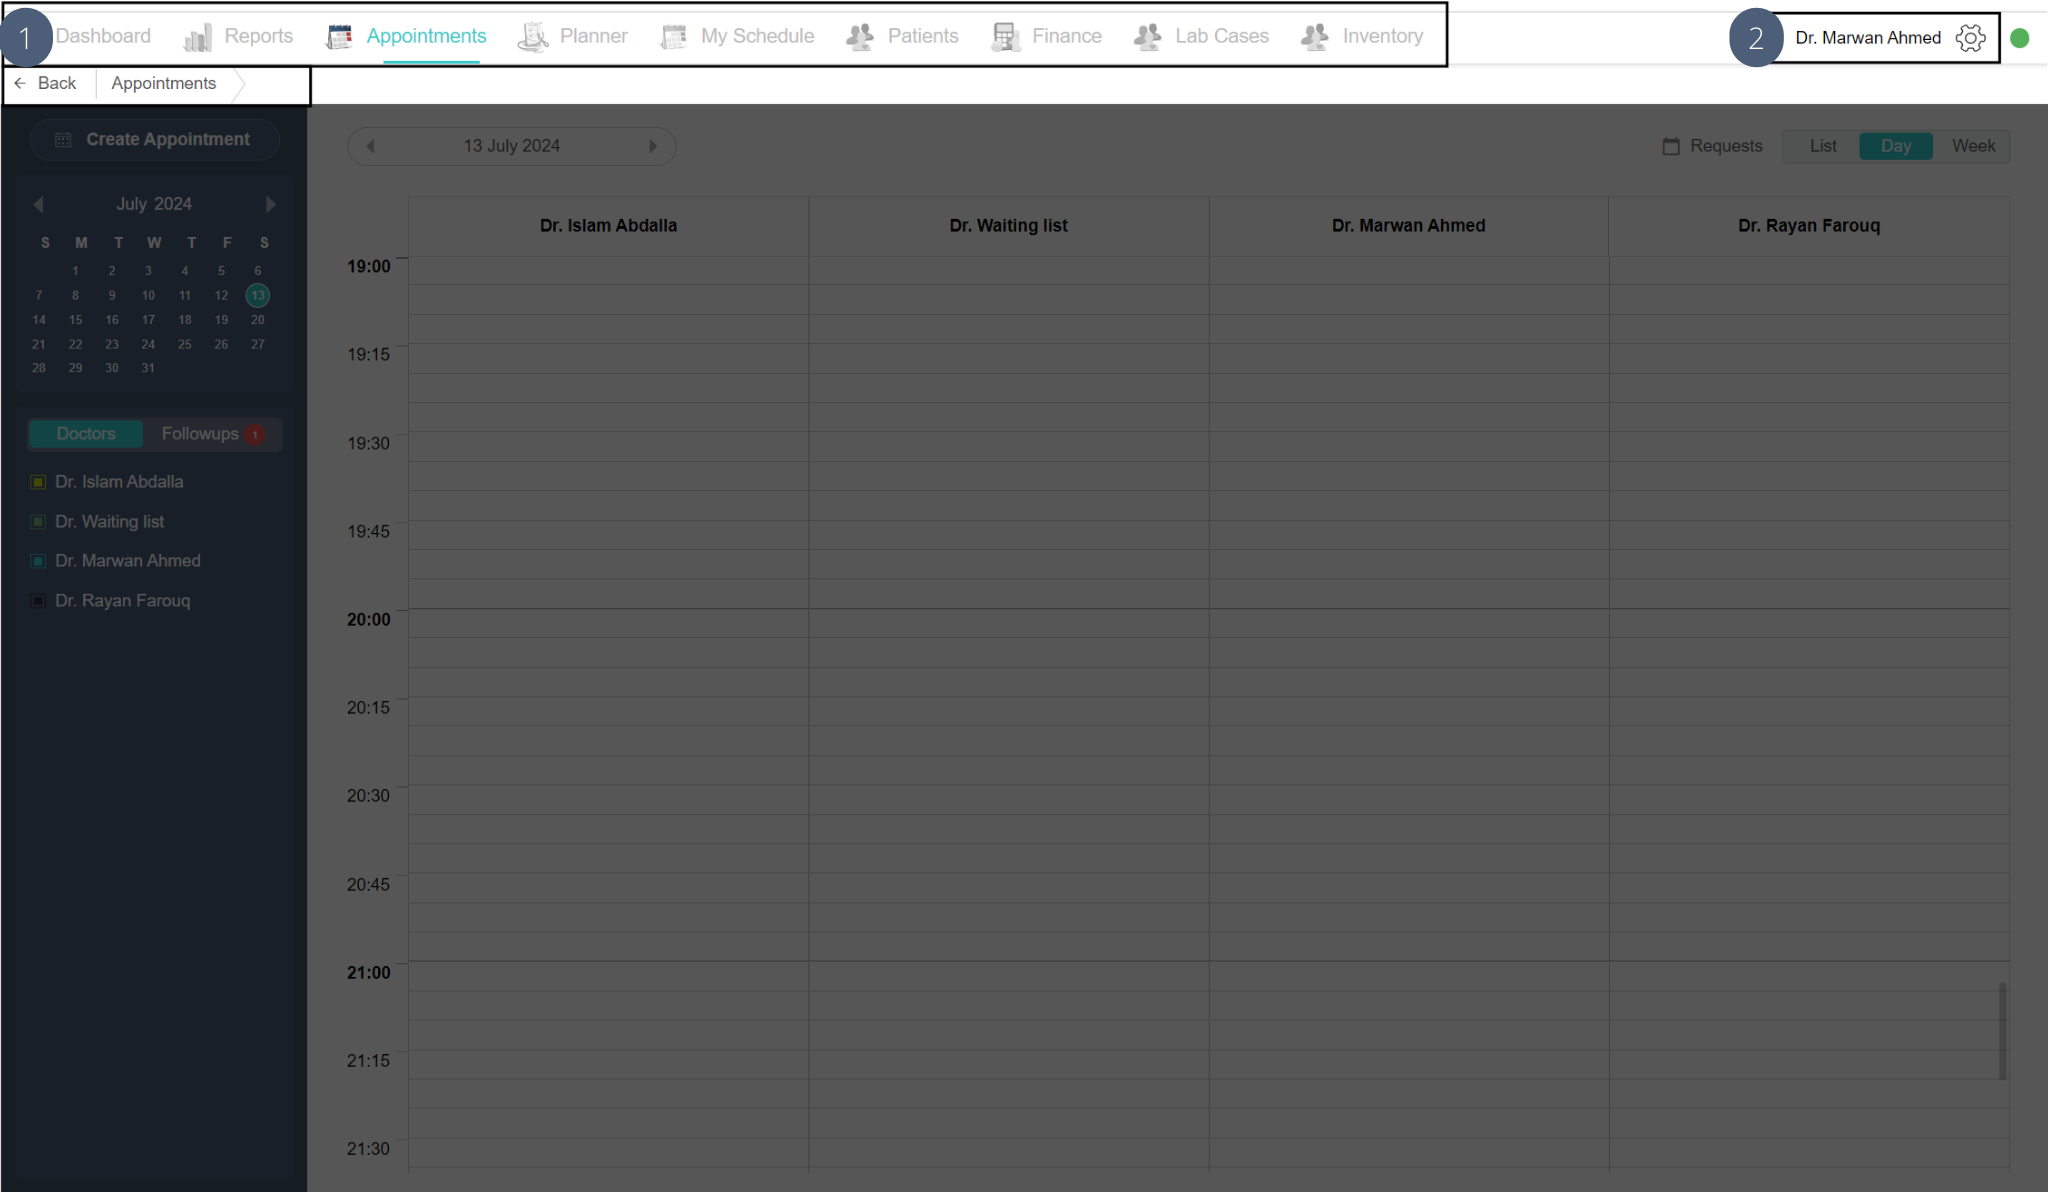
1. The Main Tabs
Depending on your role, the tabs displayed might be different.
Clicking on the top menu will show the following drop-down list
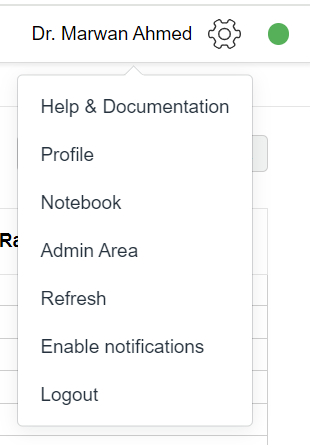
With links to the profile, Notebook, Admin Area (if you have an Owner role), Refresh, Logout and Help & Documentation.
To take you back to the page previously opened.
This shows the pages you opened to get to your current page.
Logout
To logout, click on the Top Menu, and then click on Logout.
Appointments
A receptionist is usually in charge of creating appointments for the doctors and scheduling follow-ups.
Appointments tab
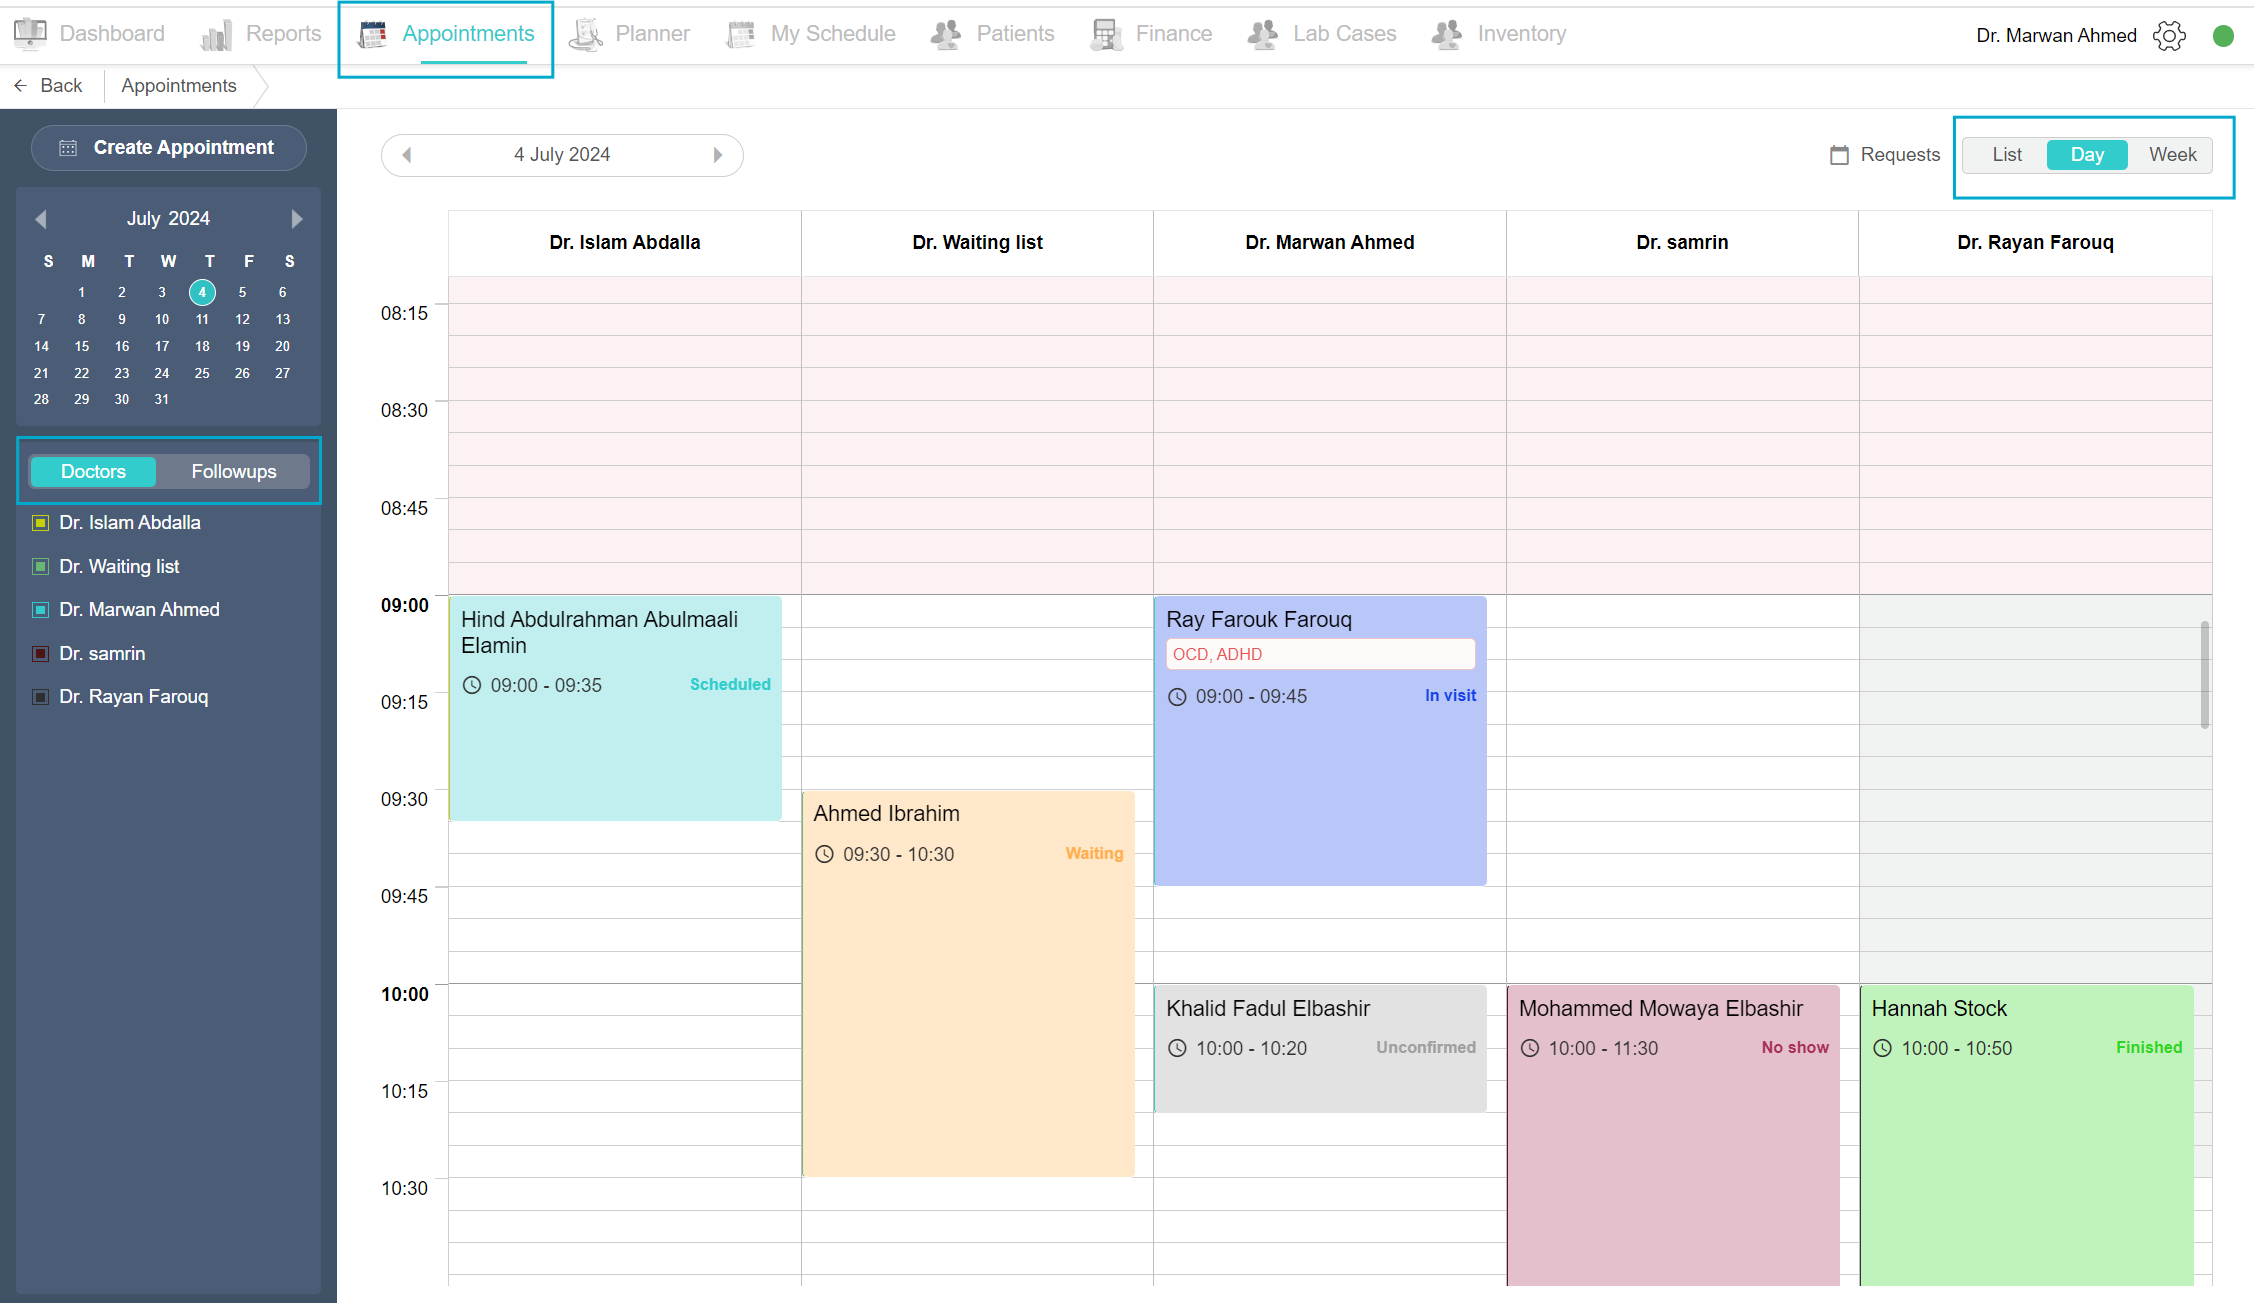
A receptionist is usually in charge of creating appointments for the doctors and scheduling follow-ups. Click on the Appointment tab on the top menu. All you need is one page.
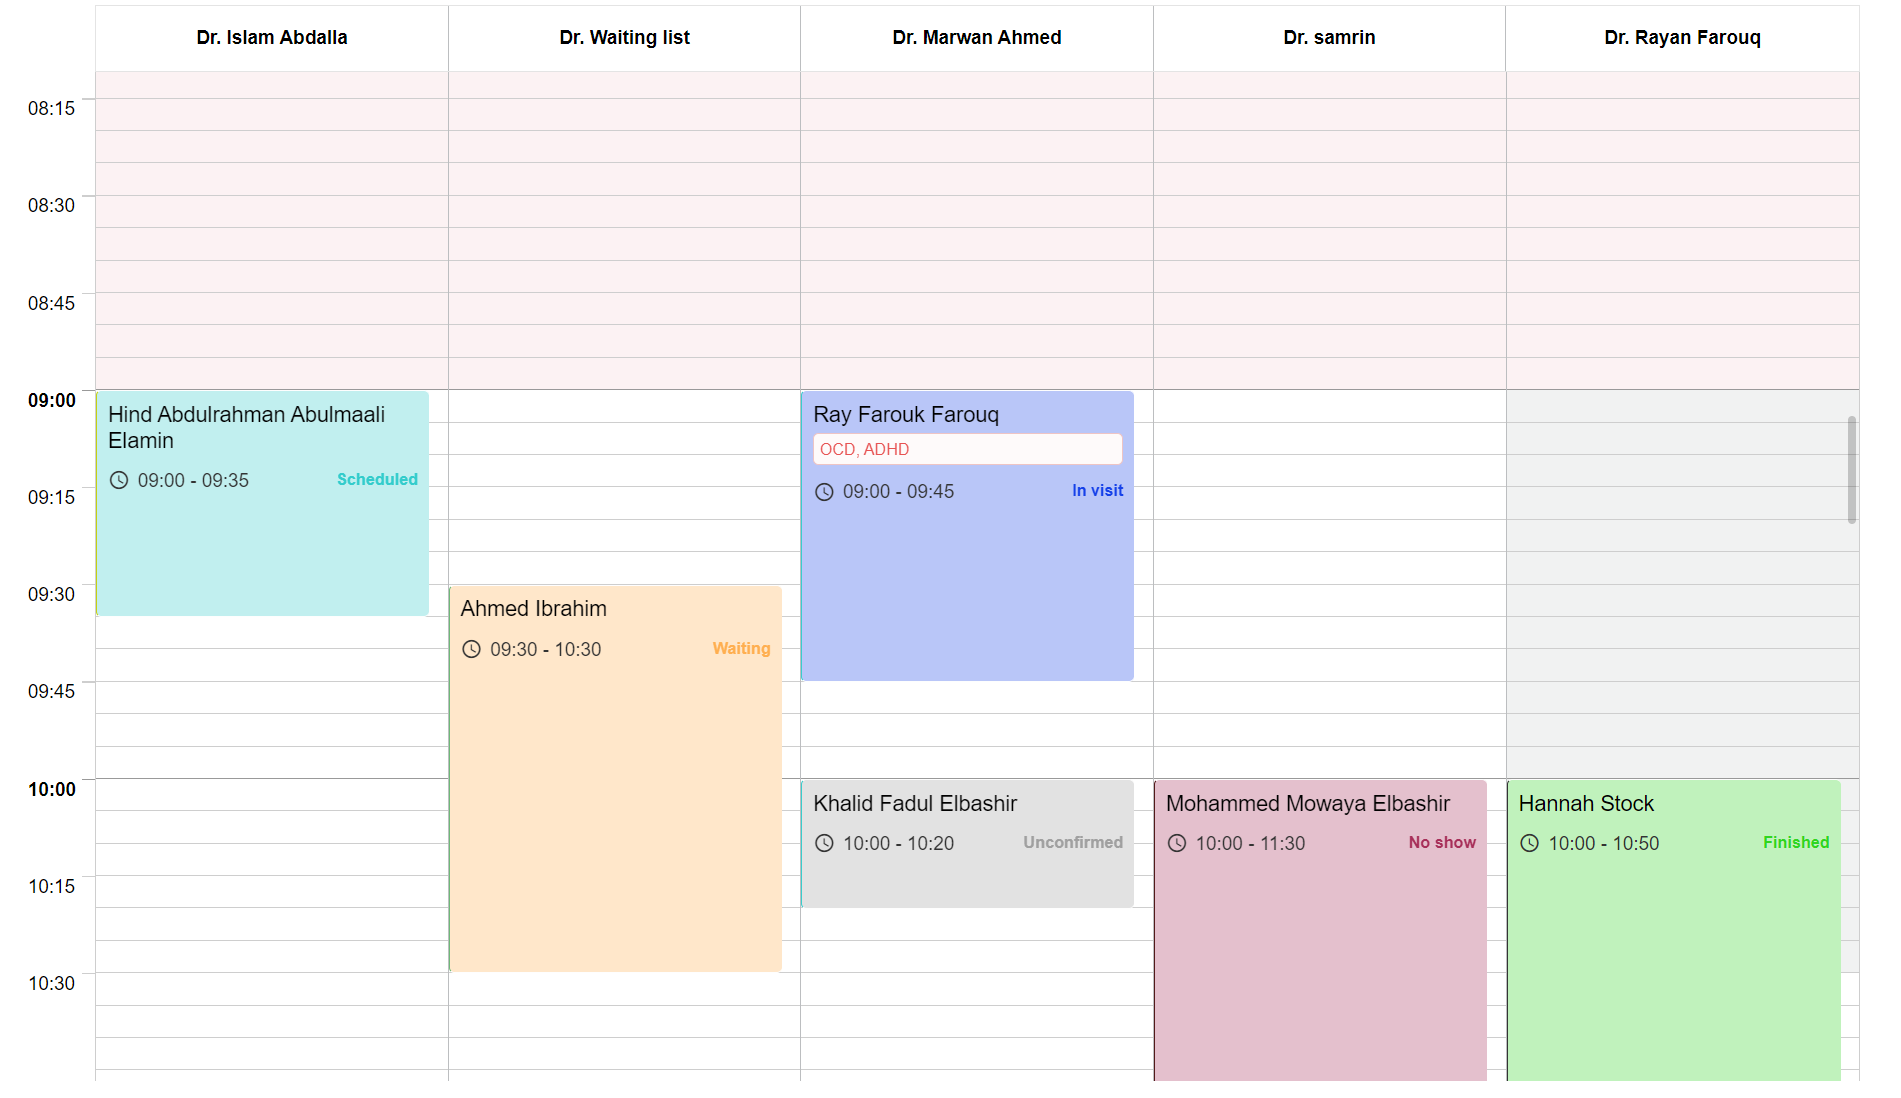
The calendar is in Day View as a default and you’ll be able to see all the scheduled appointments for the day. You can select a Week to view the week's appointment schedule and click the List to view all appointments made in a list view.
In the calendar, the red shade indicates the time is out of the clinic’s working hours and the grey shade indicates the time is out of the doctors’ working hours.
When you click the appointment, an Appointment details box pops up. Here you can view the appointment details, edit the details, change the appointment status, go to the patient invoice or cancel the appointment.
On the left side of the page, you’ll find the Create appointment button, a Calendar beneath it, a Doctors list where you can click to view the doctors' appointments schedule in the day view, and the Followups tab which contains all follow-up appointments requested by the doctor for their patients.
Create a new appointment
For every visit, create an appointment in the Appointment tab. There are 2 ways to create an appointment.
a. Using the Create Appointment button
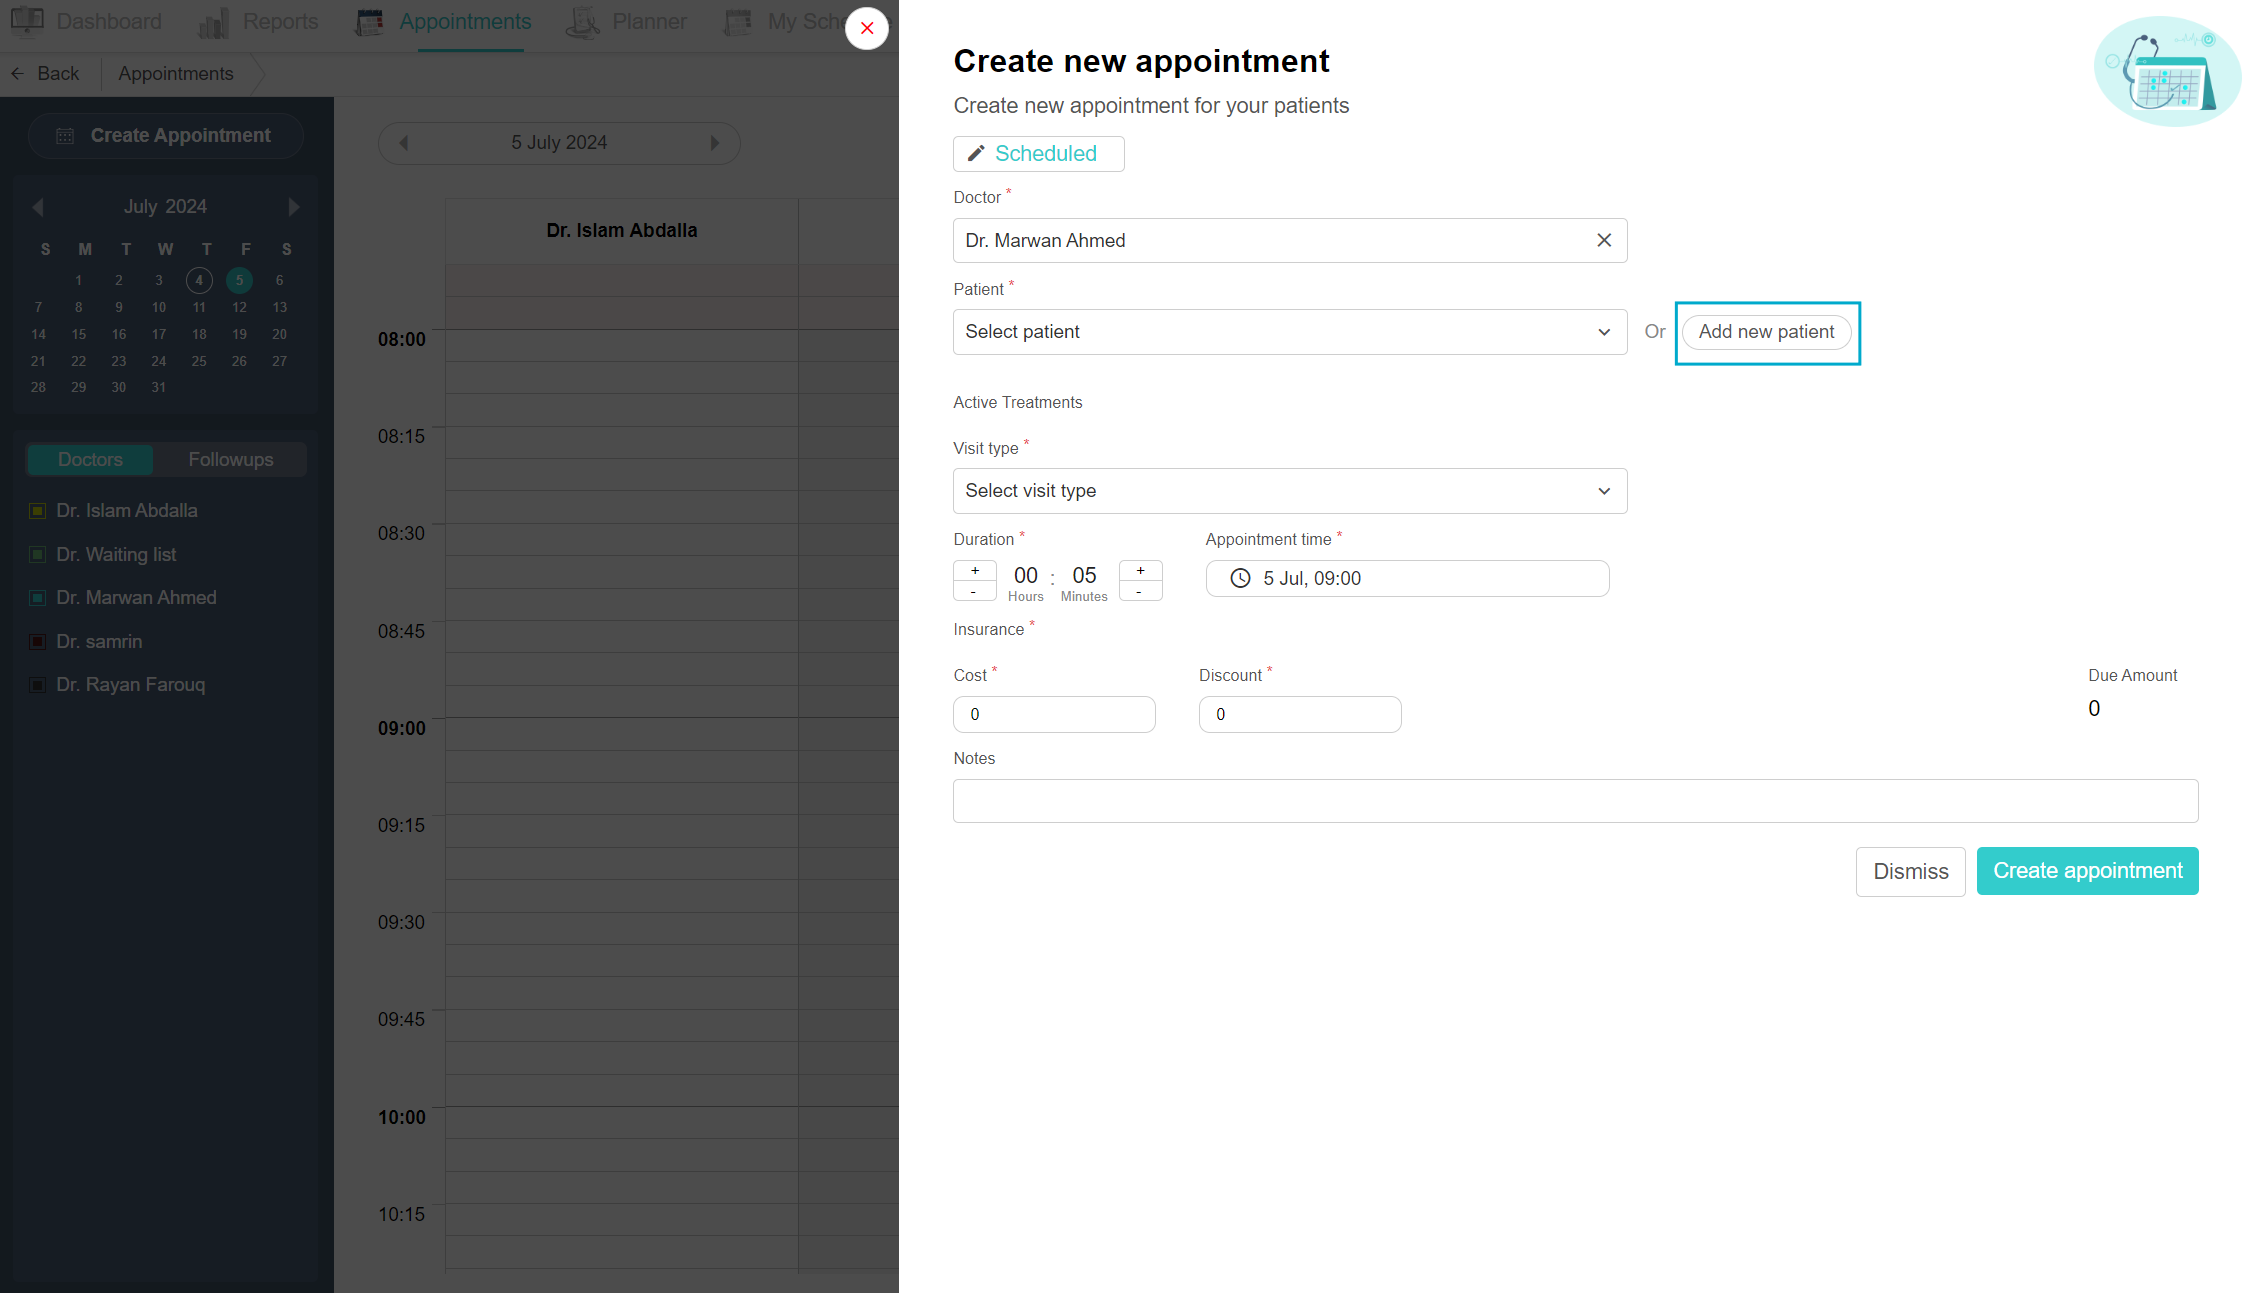
Open the appointment tab, on the top of the left side of the page, and click the “Create Appointment” button. A pop-up box appears from the right side of the page. On the top is the appointment status, you can switch from “Scheduled” to “unconfirmed”, “waiting” or more. Select Doctor from the drop-down list. Choose the patient by searching their name, phone number, Emirates ID number, or patient file number, and for a new patient, click the “add new patient” button. Add the required patient information such as name, phone number, etc, and click the “add patient” button. Continue creating the appointment by choosing a visit type, the appointment duration and cost are added automatically and are dependent on the visit type. Choose the appointment time and date, add a discount (if required), and a note (if any) and finally click “Create an appointment”. You can see the appointment in the day view.
b. From Day View
Another way to create an appointment is from the day view. Select the date from the calendar on the left side of the page, and scroll up and down to the desired or free time. Select the time row under the desired doctor’s column. The Create New Appointment page appears from the right side of the page, you can see the status, doctors’ name and appointment time filled out automatically. Select the patient or add a new patient in the same way mentioned above. Continue the rest and click the “Create appointment” button. Now you can view the appointment under the doctor’s column.
Add New Patients
There are 2 ways to add a new patient to Balsam Medico.
1. In Create Appointment View
The first way is to add the patient when you create an appointment. After clicking the “Create Appointment” button, click the “Add new patient” button. An add new patient pop-up box appears, start filling out the required information. Add the First and Last name, phone number, email, gender and date of birth from the calendar. You can continue filling in the additional info you desire, which includes Emirates ID and notes [These are customizable for each clinic]. You can add an insurance plan if the patient has one, click the “add insurance plan” button, select the insurance plan, add the insurance card number and the card’s expiration date and click save. After including all the necessary information click the “add patient” button on the bottom. And there you have it, you added a new patient.
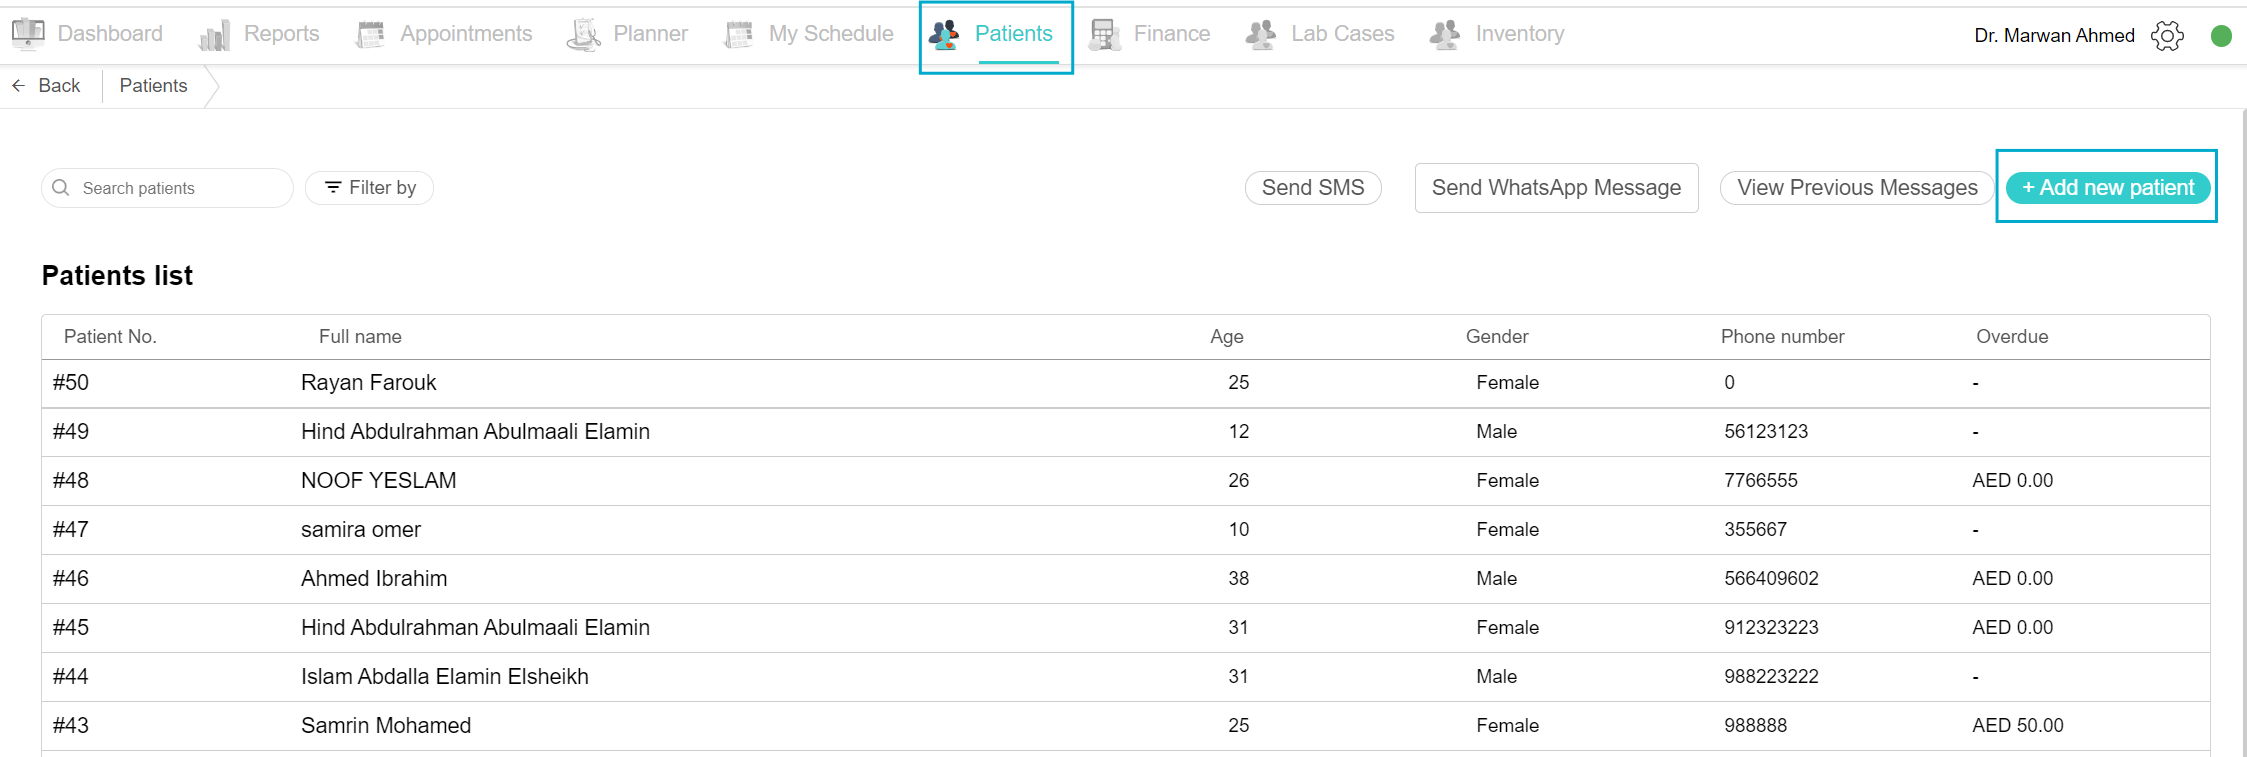
2. In the Patients List View
Click on the Patients tab on the top menu. On the top right-hand side of the page, there is an “add new patient” button. When you click on it, a popup page appears from the right. Start filling out the fields, making sure to fill the required fields with a star. Start with First and Last Name, the phone number, email, gender and date of birth from the calendar. You can continue filling in the additional info you desire, which includes Emirates ID and notes [These are customizable for each clinic]. You can add an insurance plan if the patient has one, click the “add insurance plan” button, select an insurance plan, add the insurance card number and the card’s expiration date and click save. After including all the necessary information click the “add patient” button on the bottom. And there you have it, you added a new patient.
Cancel Appointment
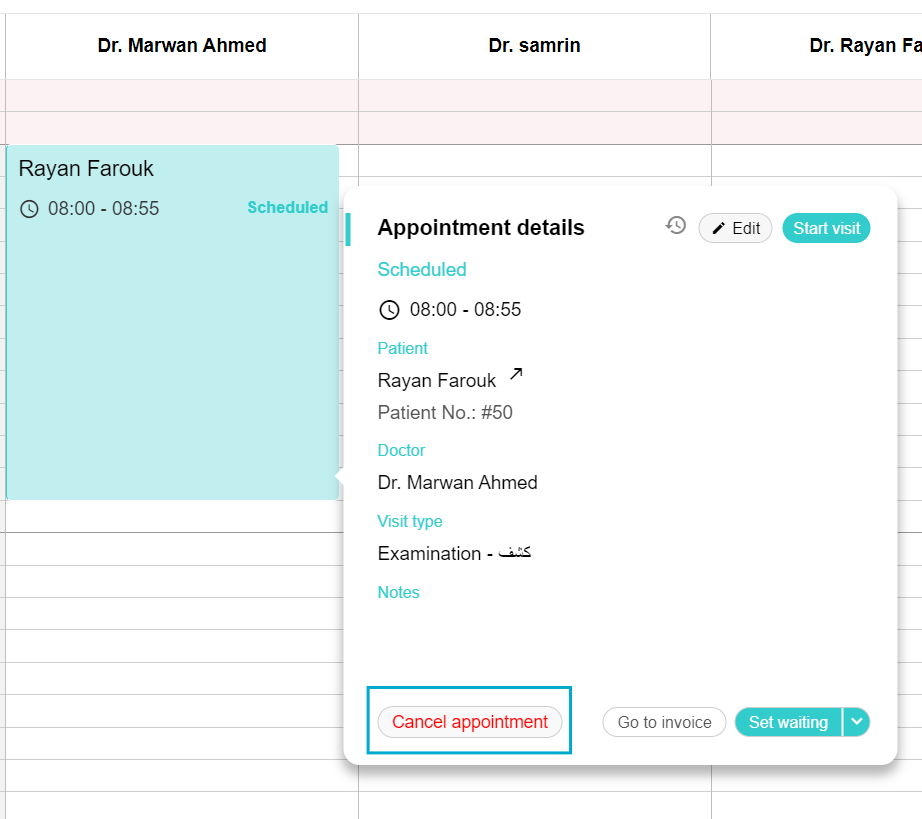
After scheduling an appointment, you can cancel it for numerous reasons such as per patient request or overbooking on the clinic’s side or many other reasons. You can cancel an appointment from the day view or from the list view.
In the day view, click on the desired appointment, and the appointment details box pops up. This includes all the information about the appointment. At the bottom of the box, a red button “Cancel an appointment” is visible. A confirmation box appears, click on the “Yes, cancel this appointment” button to continue the process.
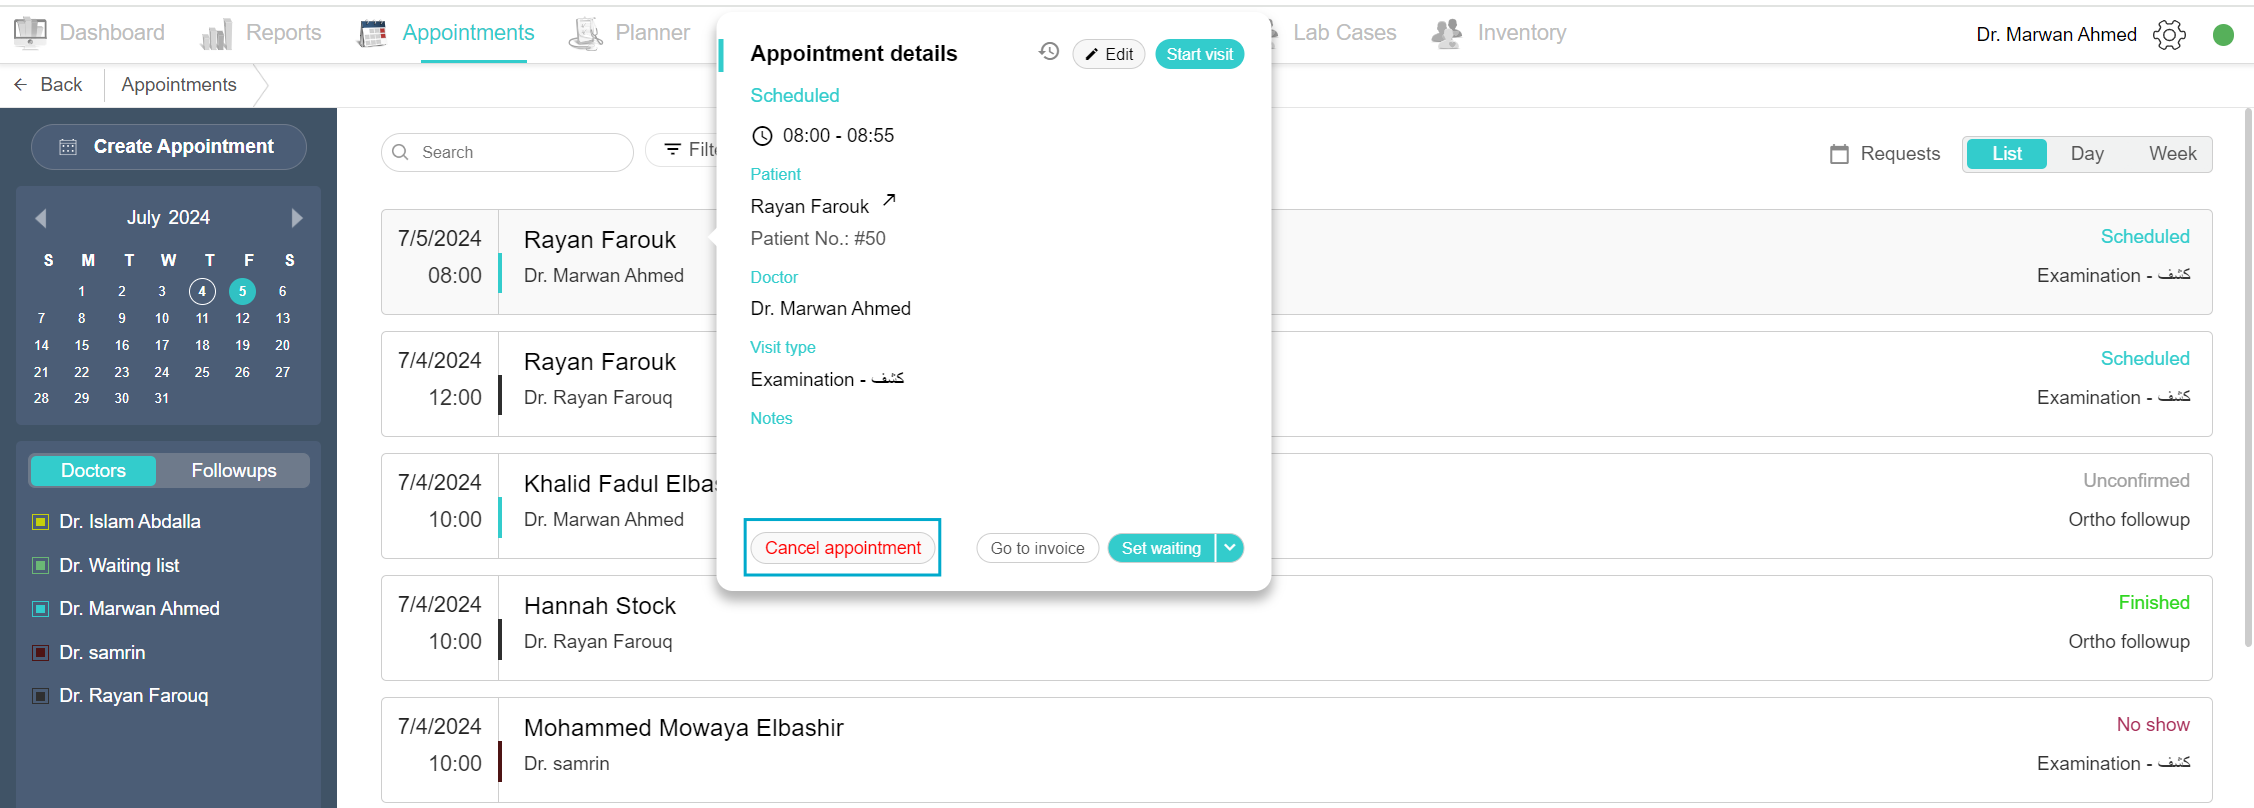
You can do the same procedure on the list view, click the desired appointment, and the appointment details box appears and continue in the same form. When you cancel an appointment, it’s removed from the day view but the record is not deleted and is found in the list view. You can view all the cancelled appointments by filtering appointment statuses, clicking on “Canceled” and the full list shows up.
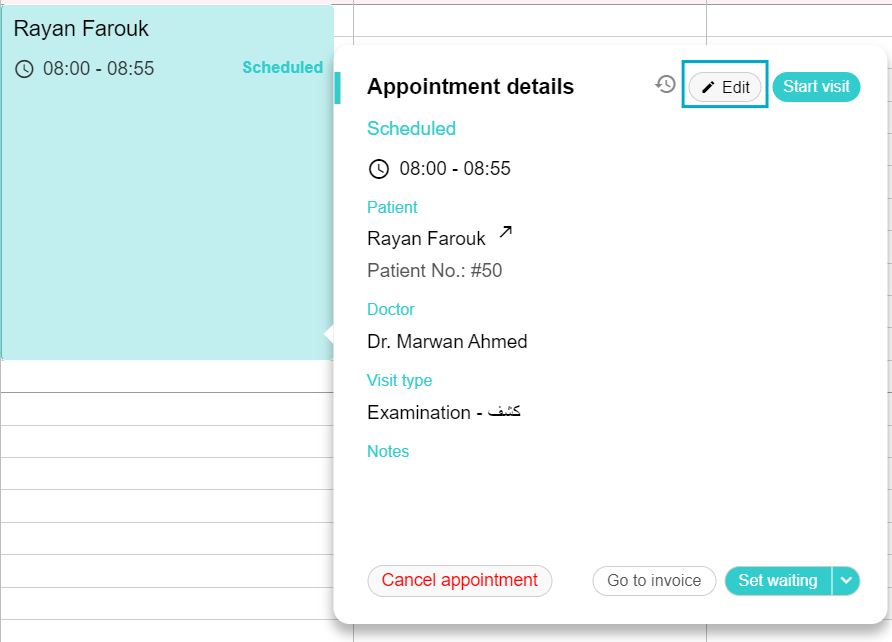
Edit Appointment
To edit or reschedule an appointment, select the desired appointment. In the Appointment details box, at the top, you’ll find the edit button. When clicked you can start editing, on the top there are the statuses, you can edit the doctor from the drop-down list, the visit type, the appointment duration – you can increase the minutes or decrease it – and change the appointment date and time. Finally, click the save button.
Change Appointment Status
There are different appointment statuses that can be set.
1. Scheduled: When the appointment has been made and confirmed by both sides
2. Waiting: When the patient arrives at the appointment and is in the waiting area of the clinic
3. Unconfirmed: When the appointment is made but unsure if the patient will commit or not
4. In visit: When the patient has entered the examination room and has started the visit
5. Finished: When the visit is complete and the patient has left the examination room
6. No show: When the appointment is made but the patient has not shown up to it
You can change the status in the appointment details pop-up box, at the bottom of the box, you can find a Set button, when clicked, a drop-down list shows all the statuses. Select the desired status and the appointment status will be changed.

View today’s appointments with their statuses in Today’s schedule
In the day view, you will be able to view today’s appointments with their statuses. Each status has its own colour that corresponds to it. Each appointment will include the status next to the name and timing without the need to click to view the appointment details. You can change the status and set the appointment to the different statuses by clicking the appointment to view the appointment details popup box, at the bottom select the “set” drop-down list and choose the desired.
Select the doctor to see in the scheduling view
On the left side of the appointment page, there’s a doctor's tab. Under the doctors tab, a list of doctors names can be found. Every doctor has a colour that can be selected in the admin area.
To view the doctor in the scheduling view, click the box near their name. When selected, the doctor’s schedule appears in the day view.
To remove a doctor from the scheduling view, simply untick the box next to their name and the doctor’s column is removed from Day View.
Followups tab
Create a new appointment from the Followups tab
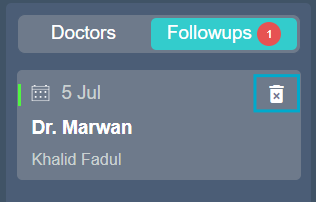
When the doctor schedules a follow-up at the end of the visit, the receptionist receives a notification in the follow-up tab. The followup request appears as a box with the patient's name, the doctor’s name, and the requested date. You can create an appointment or delete the appointment.
To create the follow-up appointment, click on the appointment, and a create new appointment side page appears. Choose the visit type and appointment duration and since the date is already chosen, just select the appropriate time and click the “Create an appointment” button. Now a new followup appointment has been created.
Delete Followups appointment
Sometimes an appointment could be requested mistakenly and the doctor asks to delete it and create another one.
To delete the followup appointments, open the Followups tab. Hover over the desired appointment, and click on the delete icon in the corner of the appointment box. Now the followup request has been deleted.
Navigate to a different date
In the day view, you can navigate to another date by either navigating the calendar on the left side or by moving between the months and clicking the desired date. Or by changing between days in the date box above the doctors' schedule view, just click the right or left arrows on the side to move forward or backwards on the days.
Outside Working Hours
Create an appointment outside the working hours of the clinic
The working hours are set by the admin in the admin area. In the scheduling view, the red shade indicates the clinic is not working at these times. However, you can still book an appointment during these hours. The first way is to create an appointment from the “create appointment” button on the top left side of the page, when selecting the appointment time, if the desired time is in the red shade, click the time, and a confirmation box appears to alert you it’s outside working hours, click “Yes, book anyway” and continue the process and click save. Another way is to create an appointment from the day view, choose the doctor of choice, scroll to the desired time, and click on it, the confirmation box appears again, click the “Yes, book anyway” button and finish up the new appointment creation. Now there you have it, you have created an appointment outside the working hours of the clinic.
Create an appointment outside of the doctor’s working hours
The doctors’ working hours are set by the admin in the admin area. In the scheduling view, the grey shade indicates the doctor is not working at these times. However, you can still book an appointment during these hours. The first way is to create an appointment from the “create appointment” button on the top left side of the page, when selecting the appointment time, if the desired time is in the grey shade, click the time, and a confirmation box appears to alert you it’s outside the doctor’s working hours, click “Yes, book anyway” and continue the process and click save. Another way is to create an appointment from the day view, choose the doctor of choice, scroll to the desired time, and click on it, the confirmation box appears again, click the “Yes, book anyway” button and finish up the new appointment creation. Now there you have it, you have created an appointment outside the working hours of the doctor.
List view of all the appointments made
1. View patient appointments using search in the List view
To view all the appointments in a list view, open the appointments tab, and select the List option on the top right side. A complete list of all the appointments made by the clinic is shown. To search for a specific appointment, use the search field, you can search using the patient name, and phone number to view all the appointments under that patient's name.
2. View filtered appointments in List view by appointment status
To view filtered appointments in the list view by appointment status, select the “Filter by” option next to the search field. There are several appointment statuses to choose from, “Unconfirmed”, “Scheduled”, “Waiting”, “In visit”, “Finished”, “Canceled”, or “No show”. Select one and now you can view all the appointments under that status.
View patients’ invoices from the appointment popup box
An easy access to patient invoices is to open it through the appointment pop up box. Choose the desired appointment, and click the appointment to open the appointment pop up box. On the bottom of the box, click the “Go to invoice” button. The patient invoices open up, the latest invoice is the default and appears upfront. You can edit, save drafts and generate invoices. On the right side, you can add a payment after generating the invoice. On the left side of the page are all the invoices of the patients, draft, generated and paid ones. You can move around the invoices and select the desired one.
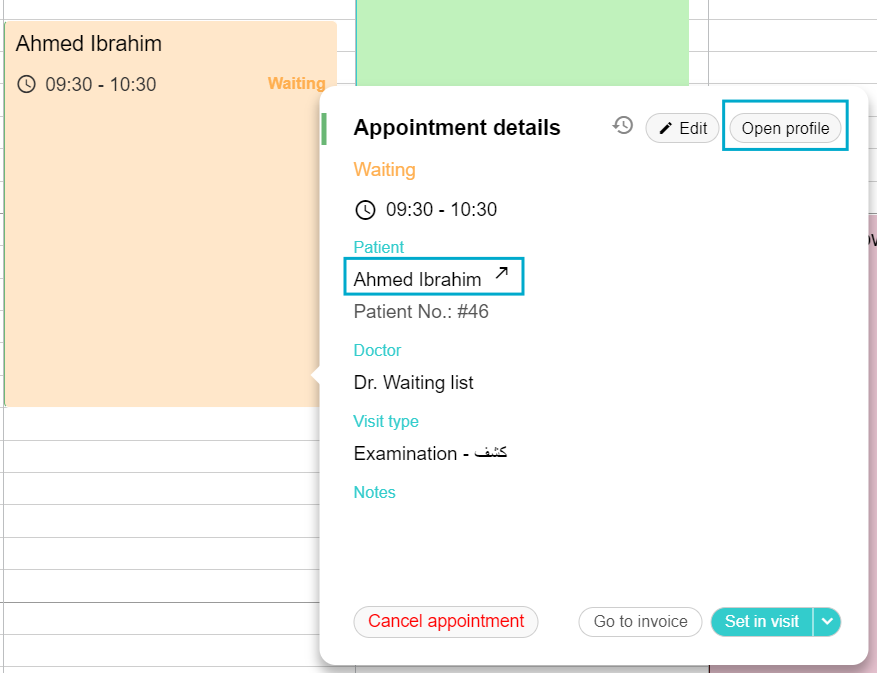
Open patient profile from appointment details
To open a patient profile, choose the appointment of the patient. Click on the appointment to view the appointment details popup box, at the top is the Open Profile button, this will take you to the patient’s profile. Additionally, next to the patient's name is an arrow pointing sideways. This arrow is a shortcut to open the patient profile. The patient profile will open up.
Notification of appointment status changes when made by a doctor
The moment the patient enters the clinic, the appointment statuses should be changed to keep up with the process. On the occasion that the doctor has changed the status, either by starting the visit or finishing it up, the reception will immediately get a notice. A notification on the bottom left of the page will appear along with a sound effect to alert you of the changes. Then you can check the appointment to view the changes made.
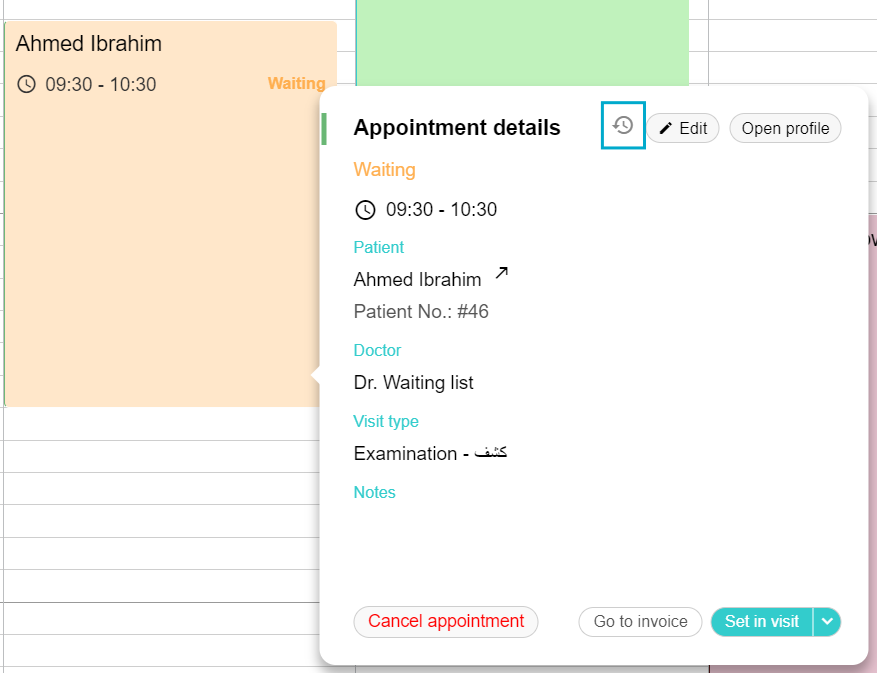
View Appointment Log
An appointment log serves to efficiently manage and help in communication and documentation, while also helping in improving planning and accountability in both personal and professional settings.
To view each appointment log, choose the desired appointment and click to open the appointment details popup box. On the top of the box, you’ll find a clock icon next to the edit button. Click on the icon and observe the appointment log.
To select a log entry to view, simply click on the log entries on the left side of the box. All the necessary information you need to know will be visible, starting with the date of the appointment log entry, the user who made the action, and many more. This will help the management in holding someone accountable when a mistake occurs.
Start patient visit
The doctor’s account can start the patient visit from the Planner tab and it can also be started from the appointment page.
Click on the appointment to show the details box, on the top is the Start visit in a coloured button. Once clicked, this will take you to the Current visit view for the patient. This option is only visible for the doctor’s account. Any other account will have the Open profile button instead.