Getting Started
Balsam Medico:
Balsam Medico is a Clinic Management System that is designed to be simple and intuitive. A lot of effort has been put into creating a system that anyone can use, even with no prior technical knowledge. That being said, Medico is a powerful and flexible system that can be adjusted to fit any flow.
Roles:
Roles in Medico are quite different from other clinic management systems. They use specific privileges for each account. This means assigning specific privileges to each team member and determining the extent of their access to the clinic’s management system.
Our 3 default roles:
- Admin
With access to all the features of Medico, the admin can control the access and data to whom it may show. They have access to the Dashboard, Admin Area, Reports, Appointments, Patients List, Finance, Planner and My schedule, and Lab cases tracking, and Inventory Management.
- Doctor
Their main job is treating the patient, giving them access to the Planner, My Schedule, Patients, Lab cases tracking, and Inventory Management.
- Receptionist
Their responsibility is the Patient and Appointment management. They can access Appointments, Patients List, Finance, Lab cases tracking, and Inventory Management.
*Note: The roles and what they can access can be edited and made specific to each account.
Features:
The system consists of the following features:
- Appointments
- Planner and My Schedule
- Electronic Medical Record (EMR)
- Finance
- Insurance
- Dashboard and Reports
- Lab Cases Tracking
- Inventory Management
- Admin Area
Basic Interface:
Basic Components
The basic interface component in Balsam Medico allows you to navigate to the different features in the system.
These components are shown below:
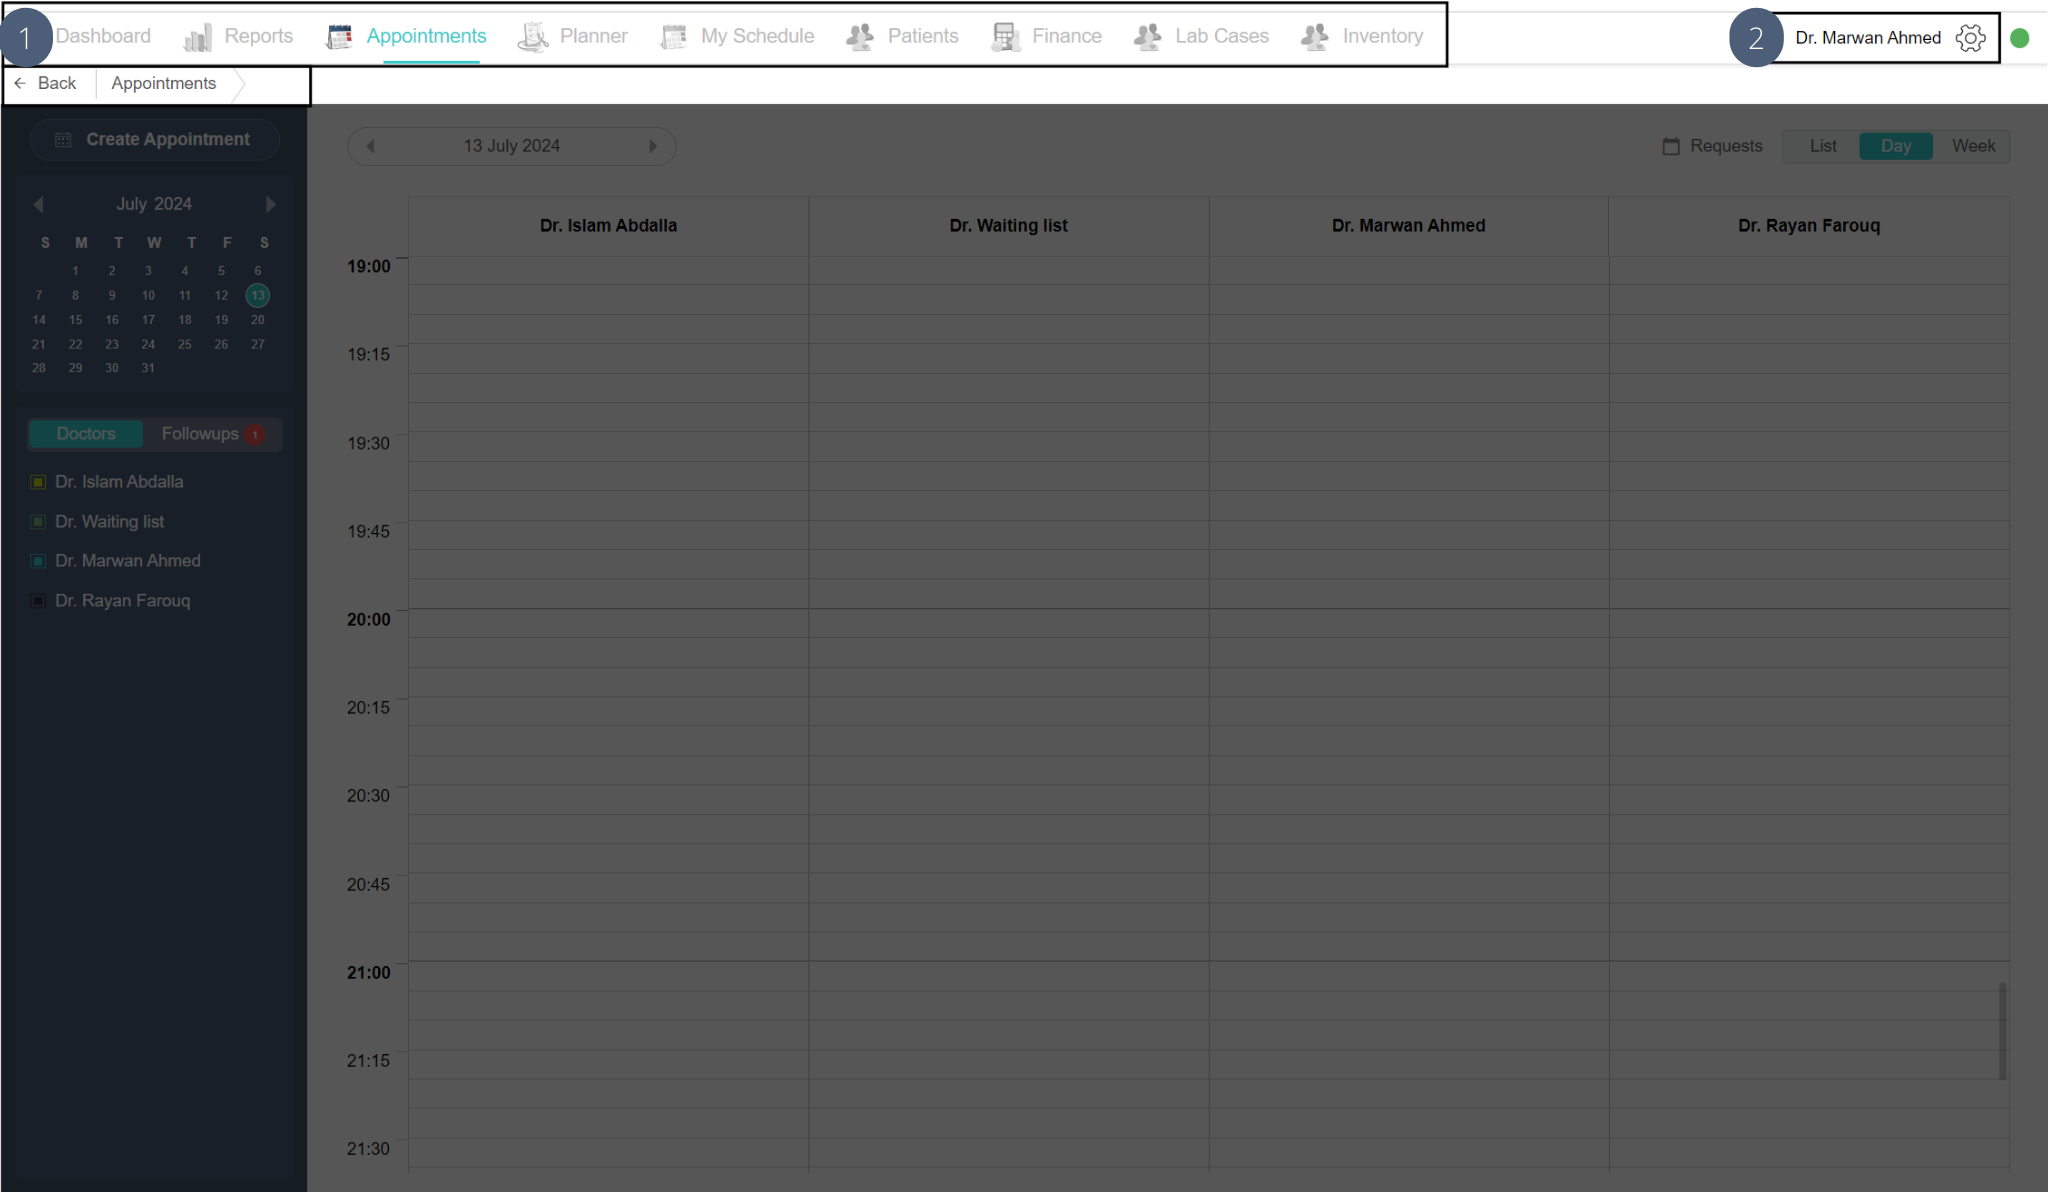
1. The Main Tabs
Depending on your role, the tabs displayed might be different.
Clicking on the top menu will show the following drop-down list
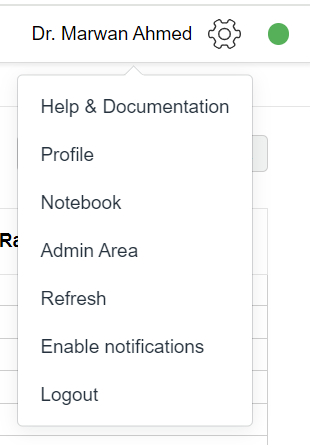
With links to the profile, Notebook, Admin Area (if you have an Owner role), Refresh, Logout and Help & Documentation.
To take you back to the page previously opened.
This shows the pages you opened to get to your current page.
Logout
To logout, click on the Top Menu, and then click on Logout.
Appointments
A receptionist is usually in charge of creating appointments for the doctors and scheduling follow-ups.
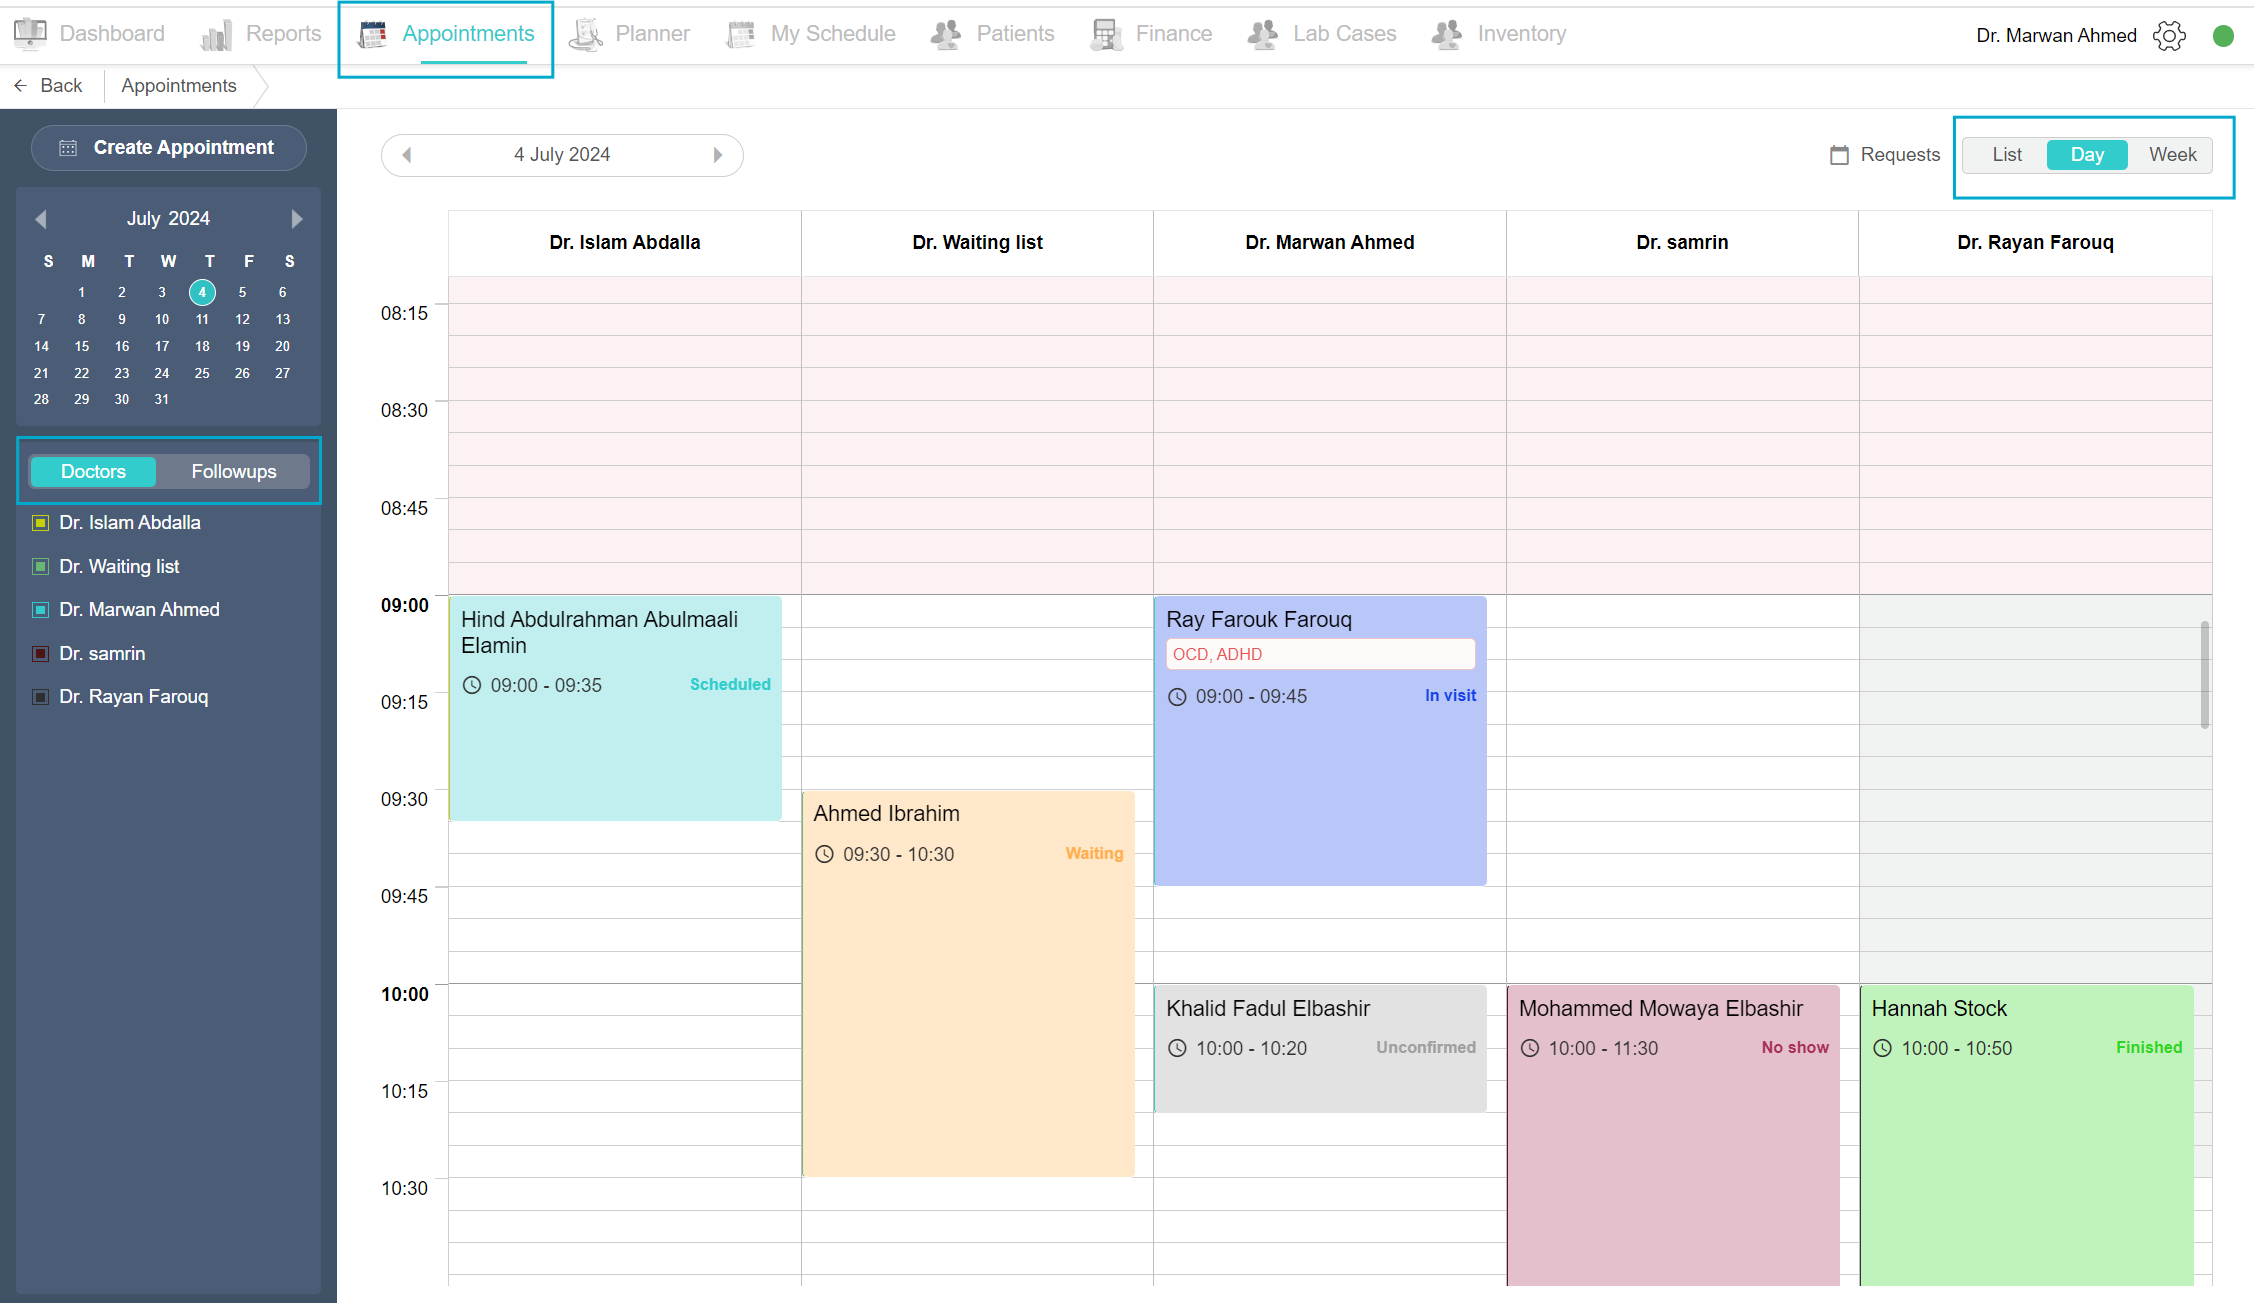
Appointments tab
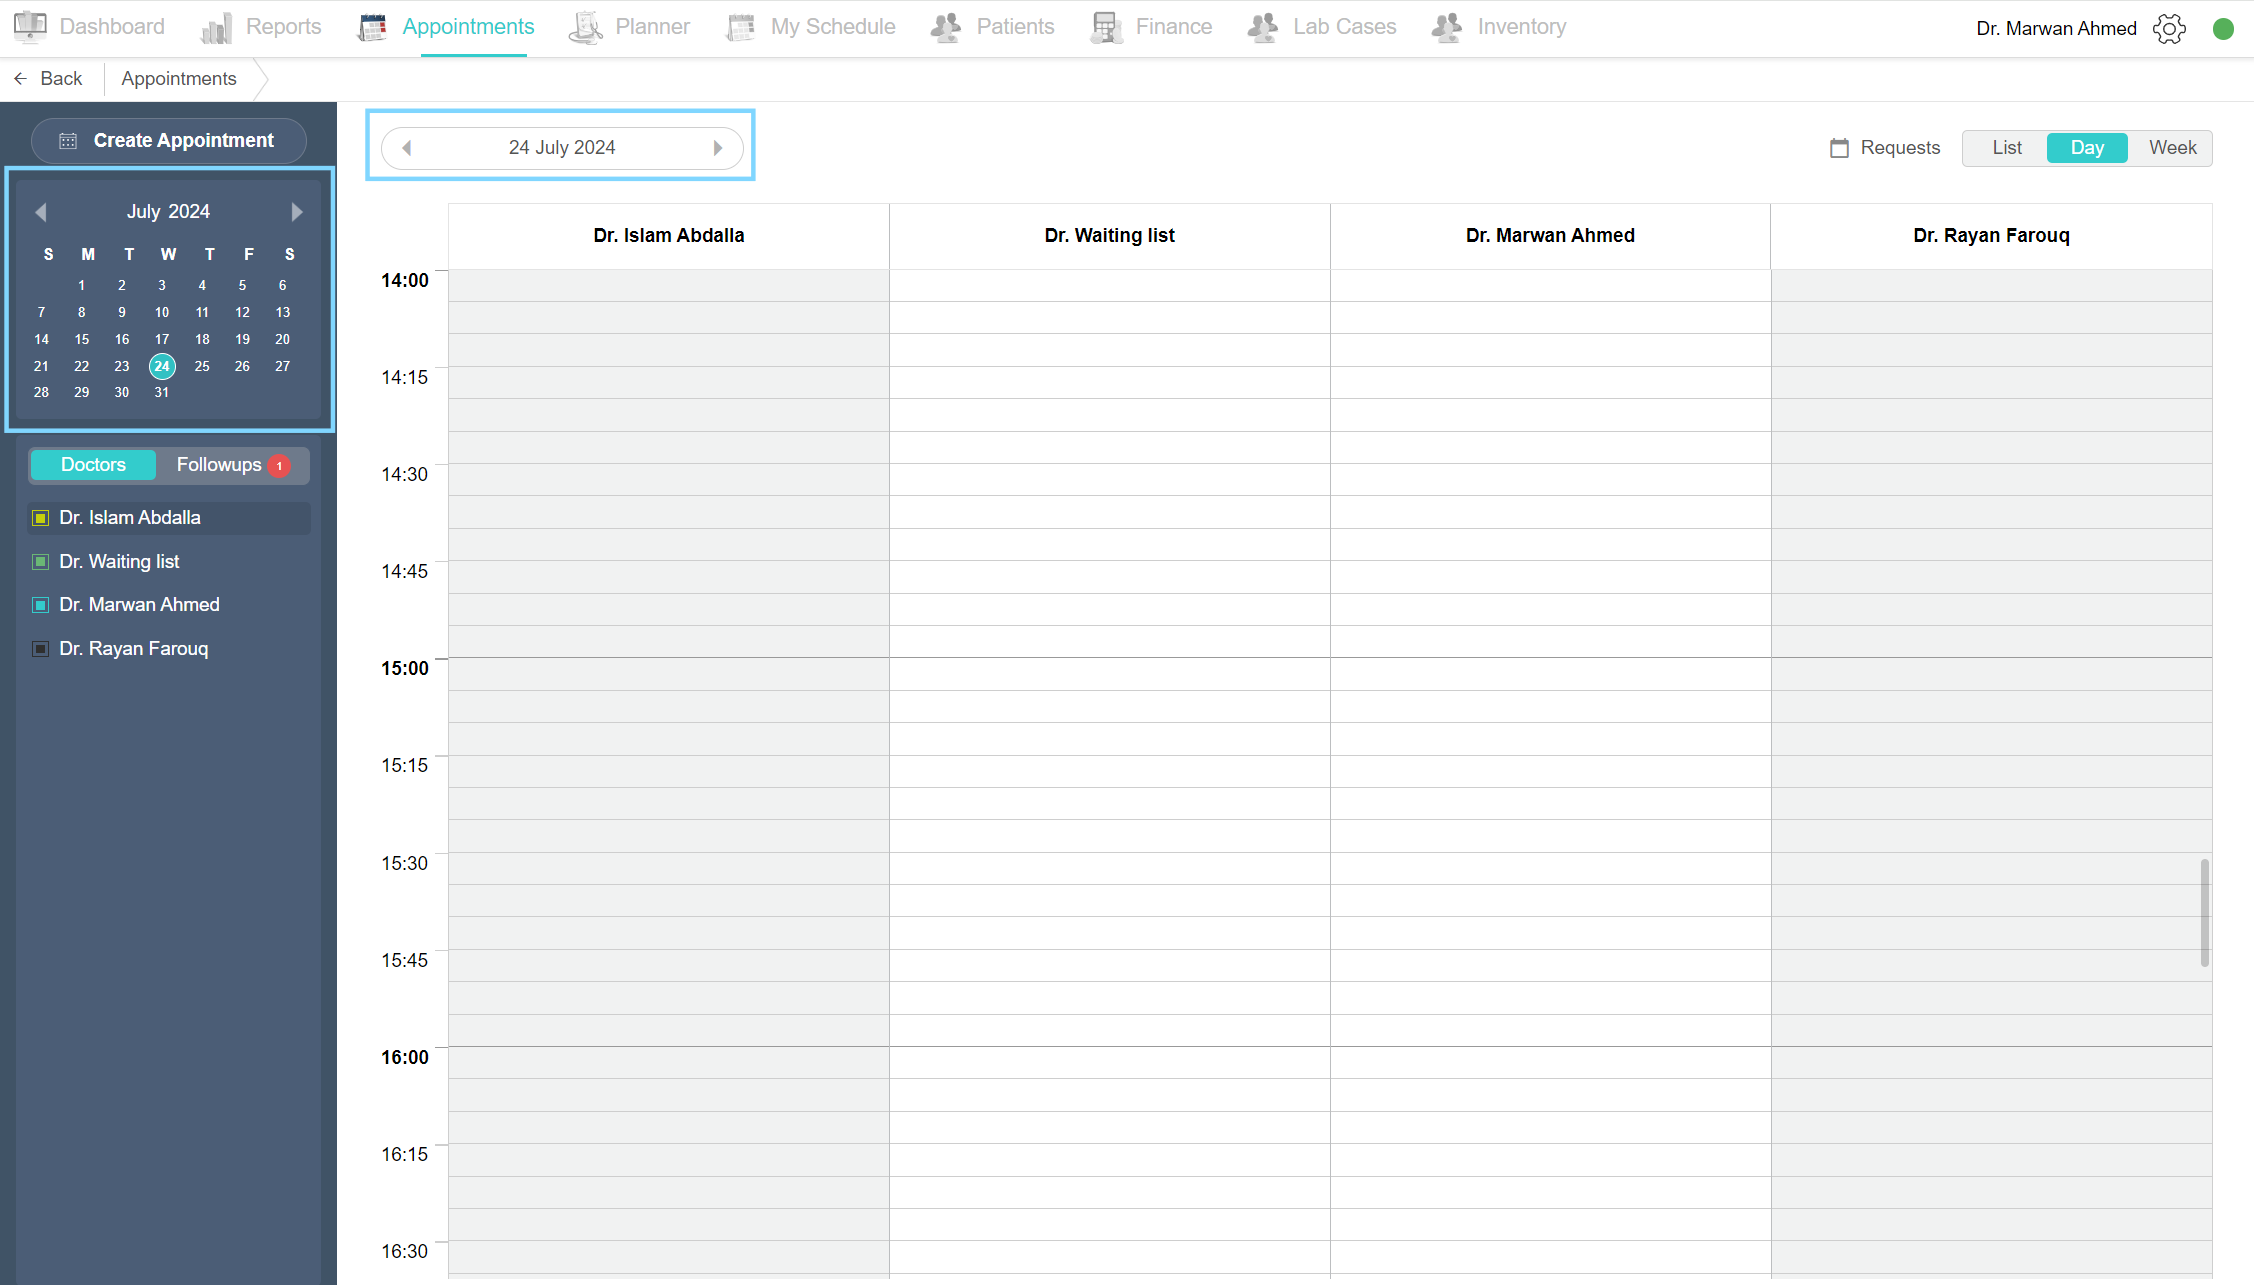
A receptionist is usually in charge of creating appointments for the doctors and scheduling follow-ups. Click on the Appointment tab on the top menu. All you need is one page.
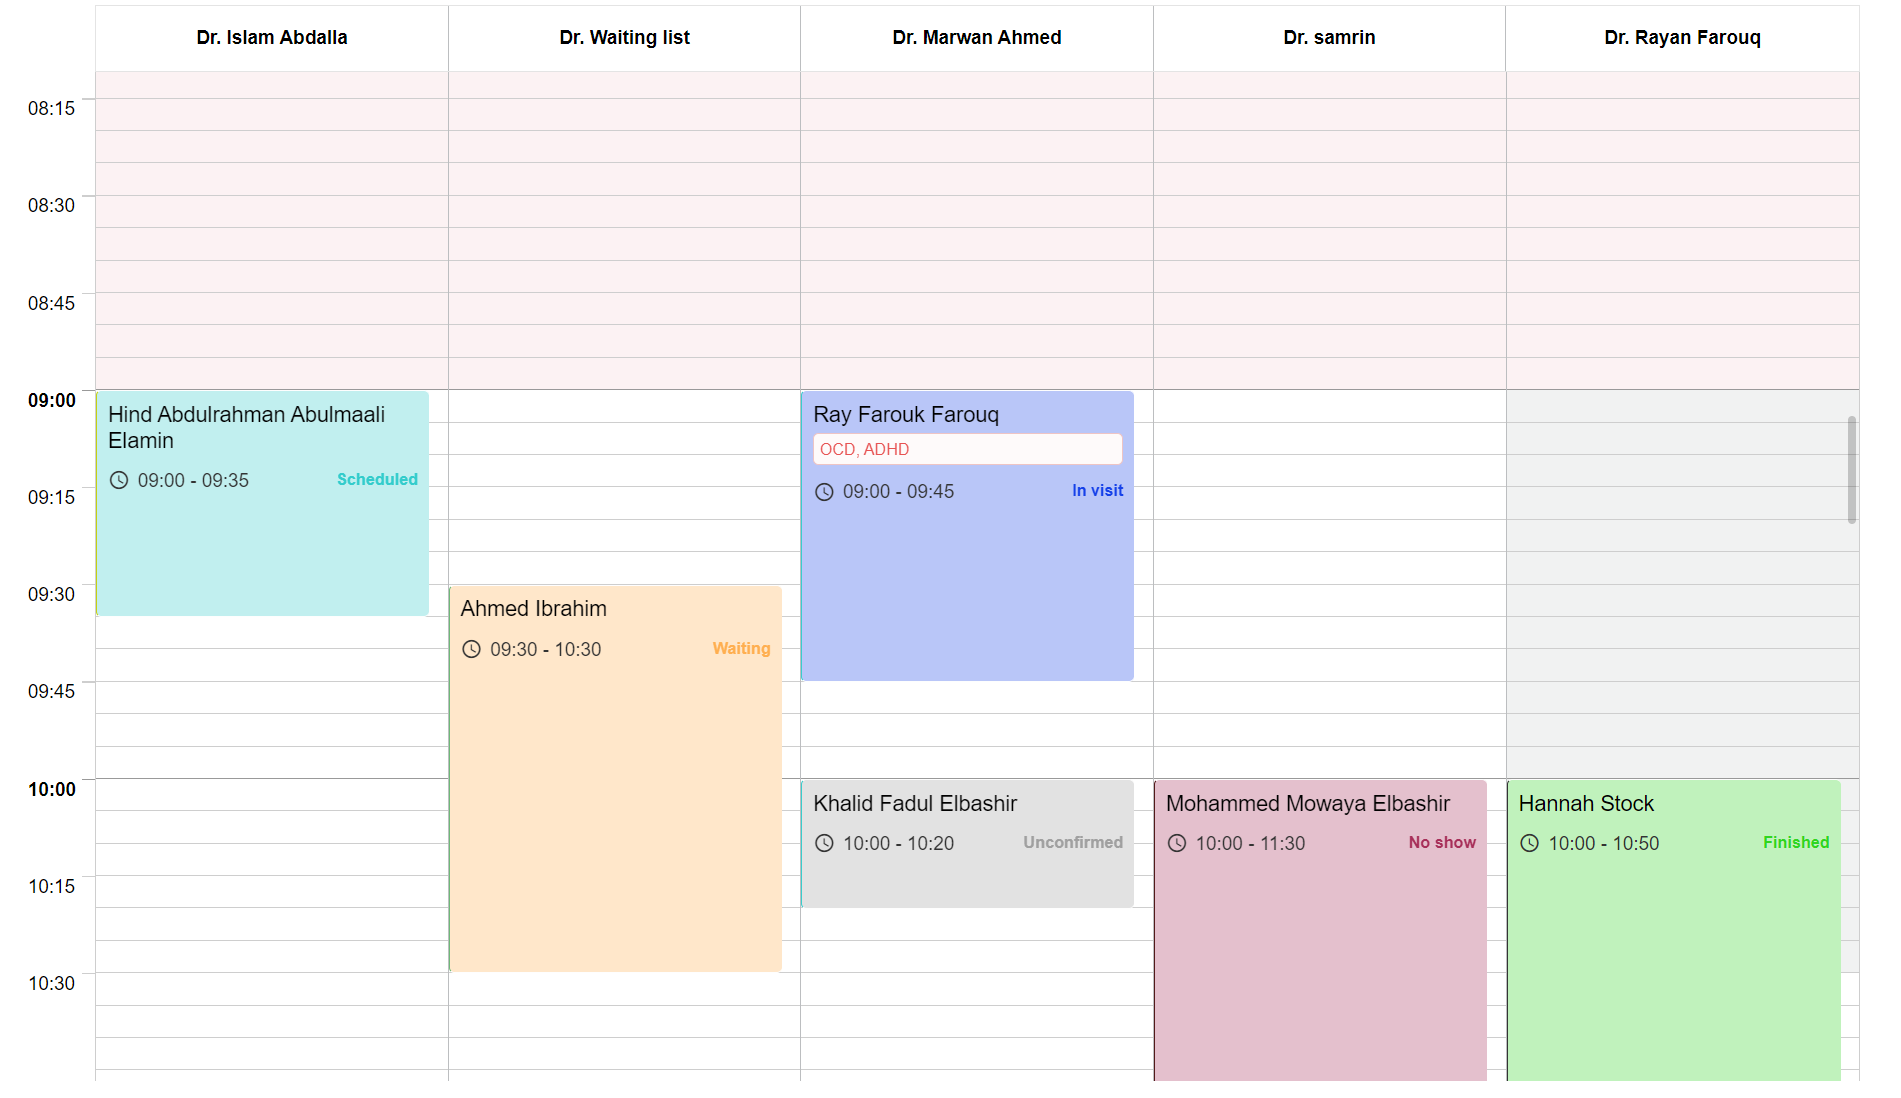
The calendar is in Day View as a default and you’ll be able to see all the scheduled appointments for the day. You can select a Week to view the week's appointment schedule and click the List to view all appointments made in a list view.
In the calendar, the red shade indicates the time is out of the clinic’s working hours and the grey shade indicates the time is out of the doctors’ working hours.
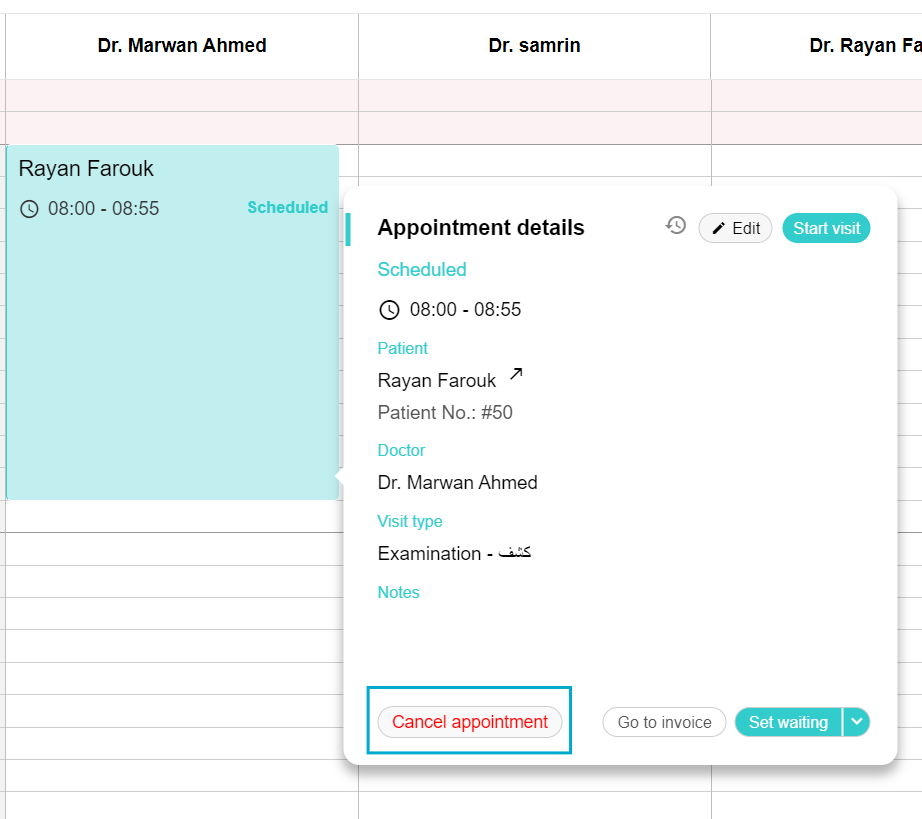
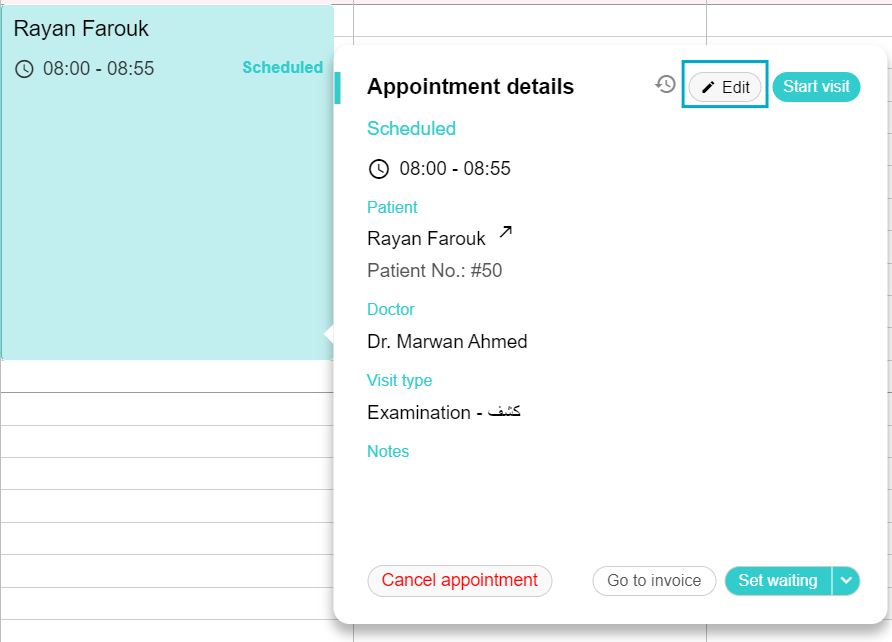
When you click the appointment, an Appointment details box pops up. Here you can view the appointment details, edit the details, change the appointment status, go to the patient invoice or cancel the appointment.
On the left side of the page, you’ll find the Create appointment button, a Calendar beneath it, a Doctors list where you can click to view the doctors' appointments schedule in the day view, and the Followups tab which contains all follow-up appointments requested by the doctor for their patients.
Create a new appointment
For every visit, create an appointment in the Appointment tab. There are 2 ways to create an appointment.
a. Using the Create Appointment button
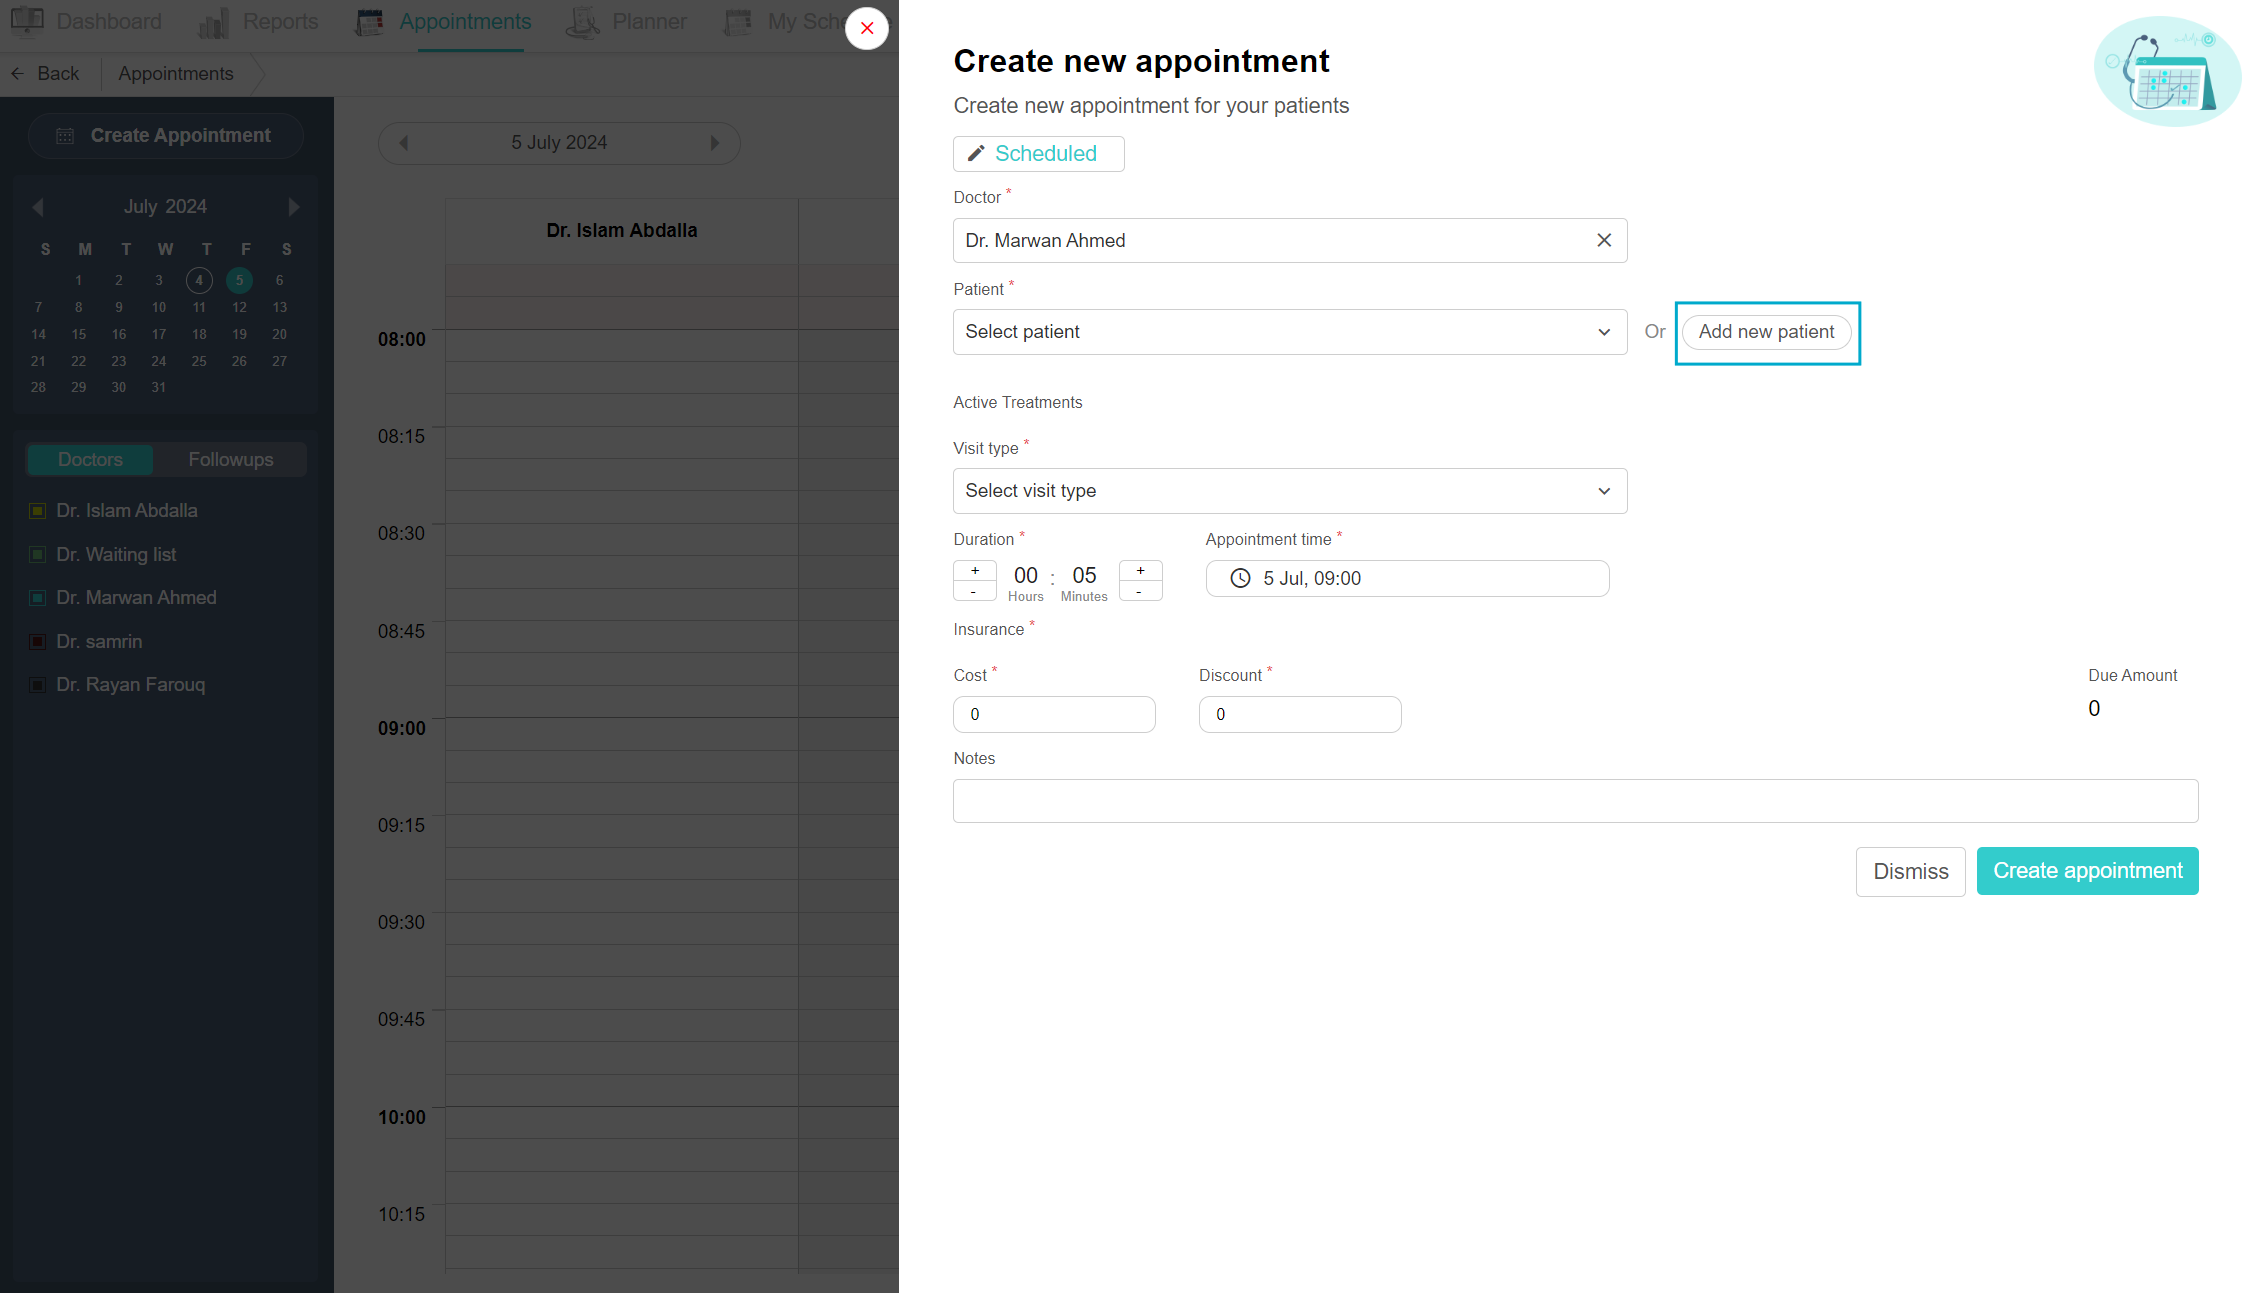
Open the appointment tab, on the top of the left side of the page, and click the “Create Appointment” button. A pop-up box appears from the right side of the page. On the top is the appointment status, you can switch from “Scheduled” to “unconfirmed”, “waiting” or more. Select Doctor from the drop-down list. Choose the patient by searching their name, phone number, Emirates ID number, or patient file number, and for a new patient, click the “add new patient” button. Add the required patient information such as name, phone number, etc, and click the “add patient” button. Continue creating the appointment by choosing a visit type, the appointment duration and cost are added automatically and are dependent on the visit type. Choose the appointment time and date, add a discount (if required), and a note (if any) and finally click “Create an appointment”. You can see the appointment in the day view.
b. From Day View
Another way to create an appointment is from the day view. Select the date from the calendar on the left side of the page, and scroll up and down to the desired or free time. Select the time row under the desired doctor’s column. The Create New Appointment page appears from the right side of the page, you can see the status, doctors’ name and appointment time filled out automatically. Select the patient or add a new patient in the same way mentioned above. Continue the rest and click the “Create appointment” button. Now you can view the appointment under the doctor’s column.
Add New Patients
There are 2 ways to add a new patient to Balsam Medico.
1. In Create Appointment View
The first way is to add the patient when you create an appointment. After clicking the “Create Appointment” button, click the “Add new patient” button. An add new patient pop-up box appears, start filling out the required information. Add the First and Last name, phone number, email, gender and date of birth from the calendar. You can continue filling in the additional info you desire, which includes Emirates ID and notes [These are customizable for each clinic]. You can add an insurance plan if the patient has one, click the “add insurance plan” button, select the insurance plan, add the insurance card number and the card’s expiration date and click save. After including all the necessary information click the “add patient” button on the bottom. And there you have it, you added a new patient.
2. In the Patients List View
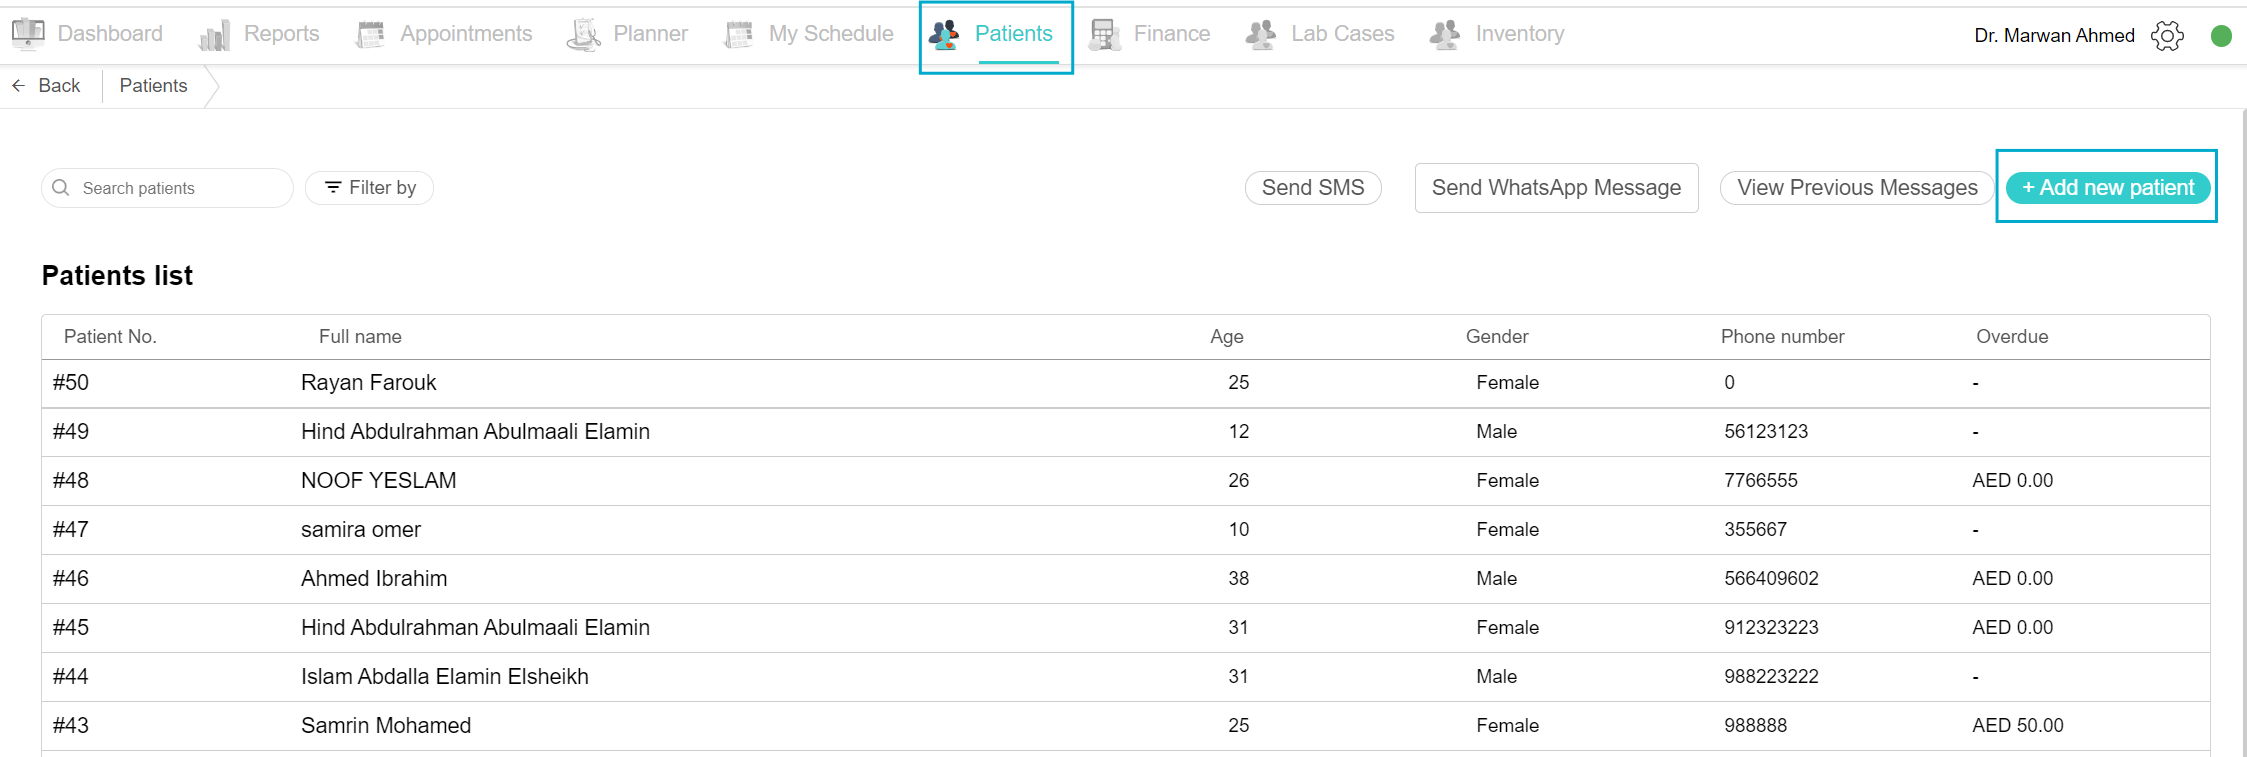
Click on the Patients tab on the top menu. On the top right-hand side of the page, there is an “add new patient” button. When you click on it, a popup page appears from the right. Start filling out the fields, making sure to fill the required fields with a star. Start with First and Last Name, the phone number, email, gender and date of birth from the calendar. You can continue filling in the additional info you desire, which includes Emirates ID and notes [These are customizable for each clinic]. You can add an insurance plan if the patient has one, click the “add insurance plan” button, select an insurance plan, add the insurance card number and the card’s expiration date and click save. After including all the necessary information click the “add patient” button on the bottom. And there you have it, you added a new patient.
Cancel Appointment
After scheduling an appointment, you can cancel it for numerous reasons such as per patient request or overbooking on the clinic’s side or many other reasons. You can cancel an appointment from the day view or from the list view.
In the day view, click on the desired appointment, and the appointment details box pops up. This includes all the information about the appointment. At the bottom of the box, a red button “Cancel an appointment” is visible. A confirmation box appears, click on the “Yes, cancel this appointment” button to continue the process.
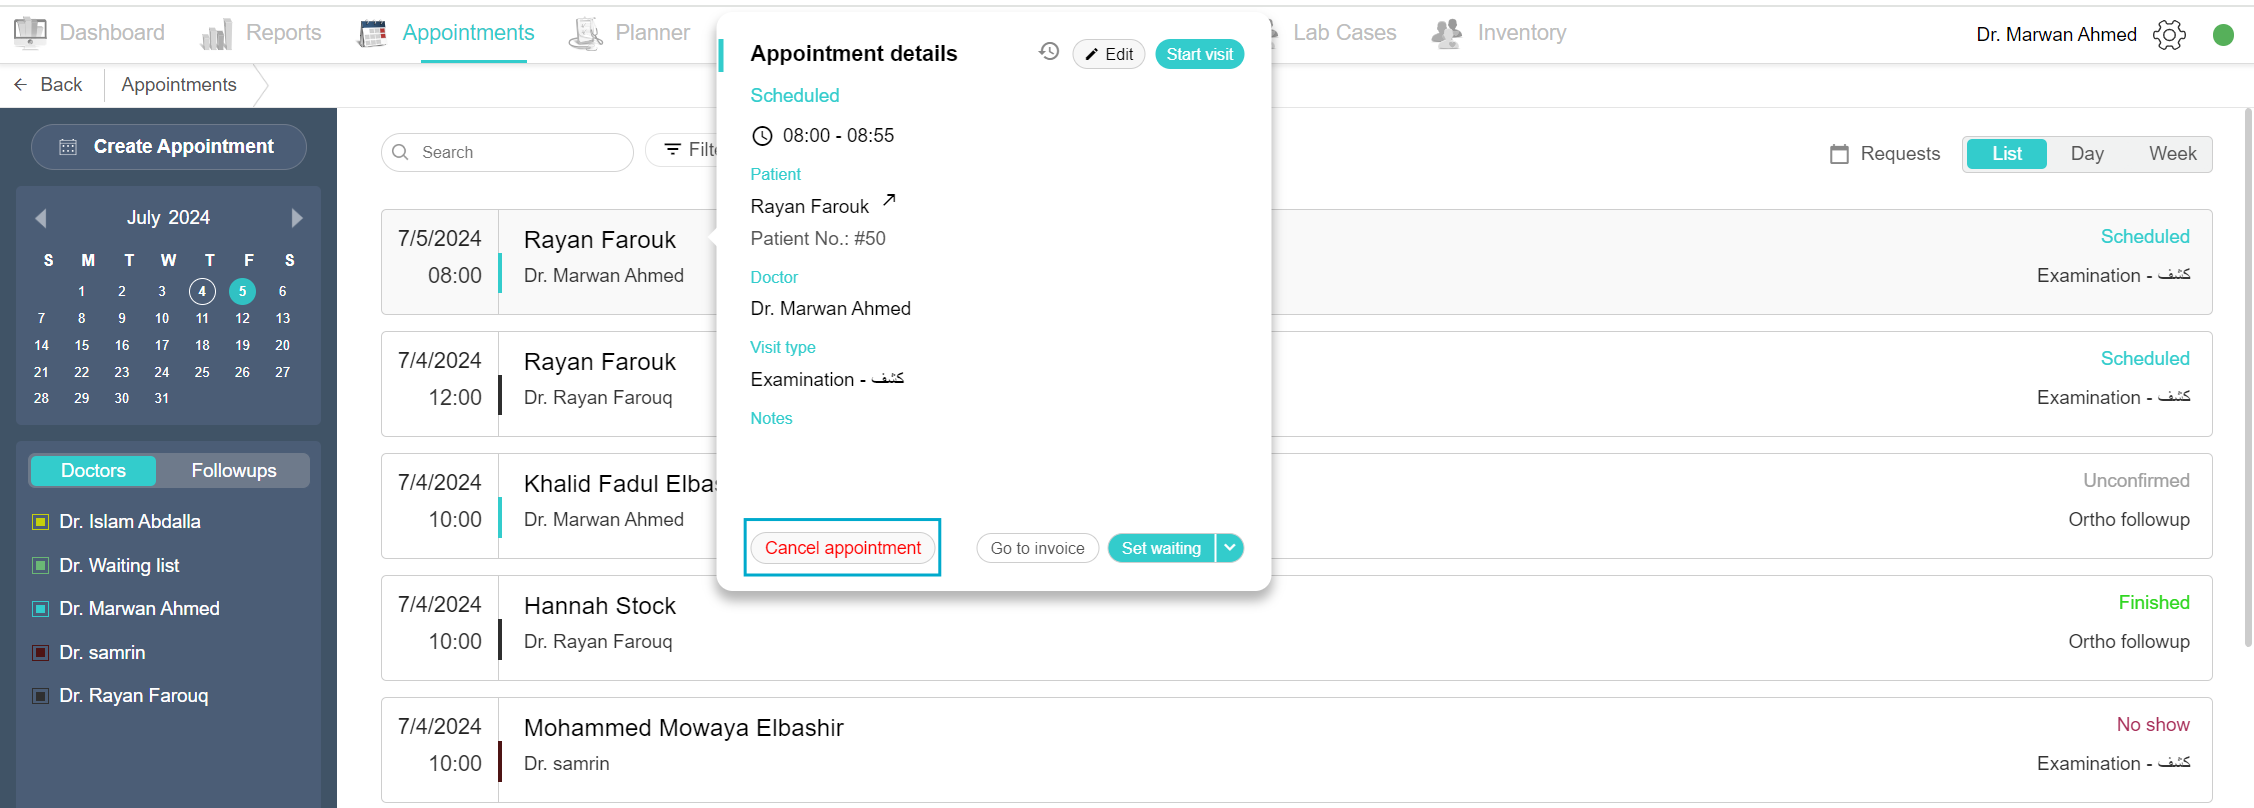
You can do the same procedure on the list view, click the desired appointment, and the appointment details box appears and continue in the same form. When you cancel an appointment, it’s removed from the day view but the record is not deleted and is found in the list view. You can view all the cancelled appointments by filtering appointment statuses, clicking on “Canceled” and the full list shows up.
Edit Appointment
To edit or reschedule an appointment, select the desired appointment. In the Appointment details box, at the top, you’ll find the edit button. When clicked you can start editing, on the top there are the statuses, you can edit the doctor from the drop-down list, the visit type, the appointment duration – you can increase the minutes or decrease it – and change the appointment date and time. Finally, click the save button.
Change Appointment Status
There are different appointment statuses that can be set.
1. Scheduled: When the appointment has been made and confirmed by both sides
2. Waiting: When the patient arrives at the appointment and is in the waiting area of the clinic
3. Unconfirmed: When the appointment is made but unsure if the patient will commit or not
4. In visit: When the patient has entered the examination room and has started the visit
5. Finished: When the visit is complete and the patient has left the examination room
6. No show: When the appointment is made but the patient has not shown up to it
You can change the status in the appointment details pop-up box, at the bottom of the box, you can find a Set button, when clicked, a drop-down list shows all the statuses. Select the desired status and the appointment status will be changed.

View today’s appointments with their statuses in Today’s schedule
In the day view, you will be able to view today’s appointments with their statuses. Each status has its own colour that corresponds to it. Each appointment will include the status next to the name and timing without the need to click to view the appointment details. You can change the status and set the appointment to the different statuses by clicking the appointment to view the appointment details popup box, at the bottom select the “set” drop-down list and choose the desired.
Select the doctor to see in the scheduling view
On the left side of the appointment page, there’s a doctor's tab. Under the doctors tab, a list of doctors names can be found. Every doctor has a colour that can be selected in the admin area.
To view the doctor in the scheduling view, click the box near their name. When selected, the doctor’s schedule appears in the day view.
To remove a doctor from the scheduling view, simply untick the box next to their name and the doctor’s column is removed from Day View.
Followups tab
Create a new appointment from the Followups tab
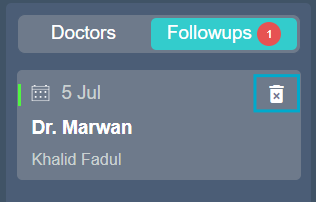
When the doctor schedules a follow-up at the end of the visit, the receptionist receives a notification in the follow-up tab. The followup request appears as a box with the patient's name, the doctor’s name, and the requested date. You can create an appointment or delete the appointment.
To create the follow-up appointment, click on the appointment, and a create new appointment side page appears. Choose the visit type and appointment duration and since the date is already chosen, just select the appropriate time and click the “Create an appointment” button. Now a new followup appointment has been created.
Delete Followups appointment
Sometimes an appointment could be requested mistakenly and the doctor asks to delete it and create another one.
To delete the followup appointments, open the Followups tab. Hover over the desired appointment, and click on the delete icon in the corner of the appointment box. Now the followup request has been deleted.
Navigate to a different date
In the day view, you can navigate to another date by either navigating the calendar on the left side or by moving between the months and clicking the desired date. Or by changing between days in the date box above the doctors' schedule view, just click the right or left arrows on the side to move forward or backwards on the days.
Outside Working Hours
Create an appointment outside the working hours of the clinic
The working hours are set by the admin in the admin area. In the scheduling view, the red shade indicates the clinic is not working at these times. However, you can still book an appointment during these hours. The first way is to create an appointment from the “create appointment” button on the top left side of the page, when selecting the appointment time, if the desired time is in the red shade, click the time, and a confirmation box appears to alert you it’s outside working hours, click “Yes, book anyway” and continue the process and click save. Another way is to create an appointment from the day view, choose the doctor of choice, scroll to the desired time, and click on it, the confirmation box appears again, click the “Yes, book anyway” button and finish up the new appointment creation. Now there you have it, you have created an appointment outside the working hours of the clinic.
Create an appointment outside of the doctor’s working hours
The doctors’ working hours are set by the admin in the admin area. In the scheduling view, the grey shade indicates the doctor is not working at these times. However, you can still book an appointment during these hours. The first way is to create an appointment from the “create appointment” button on the top left side of the page, when selecting the appointment time, if the desired time is in the grey shade, click the time, and a confirmation box appears to alert you it’s outside the doctor’s working hours, click “Yes, book anyway” and continue the process and click save. Another way is to create an appointment from the day view, choose the doctor of choice, scroll to the desired time, and click on it, the confirmation box appears again, click the “Yes, book anyway” button and finish up the new appointment creation. Now there you have it, you have created an appointment outside the working hours of the doctor.
List view of all the appointments made
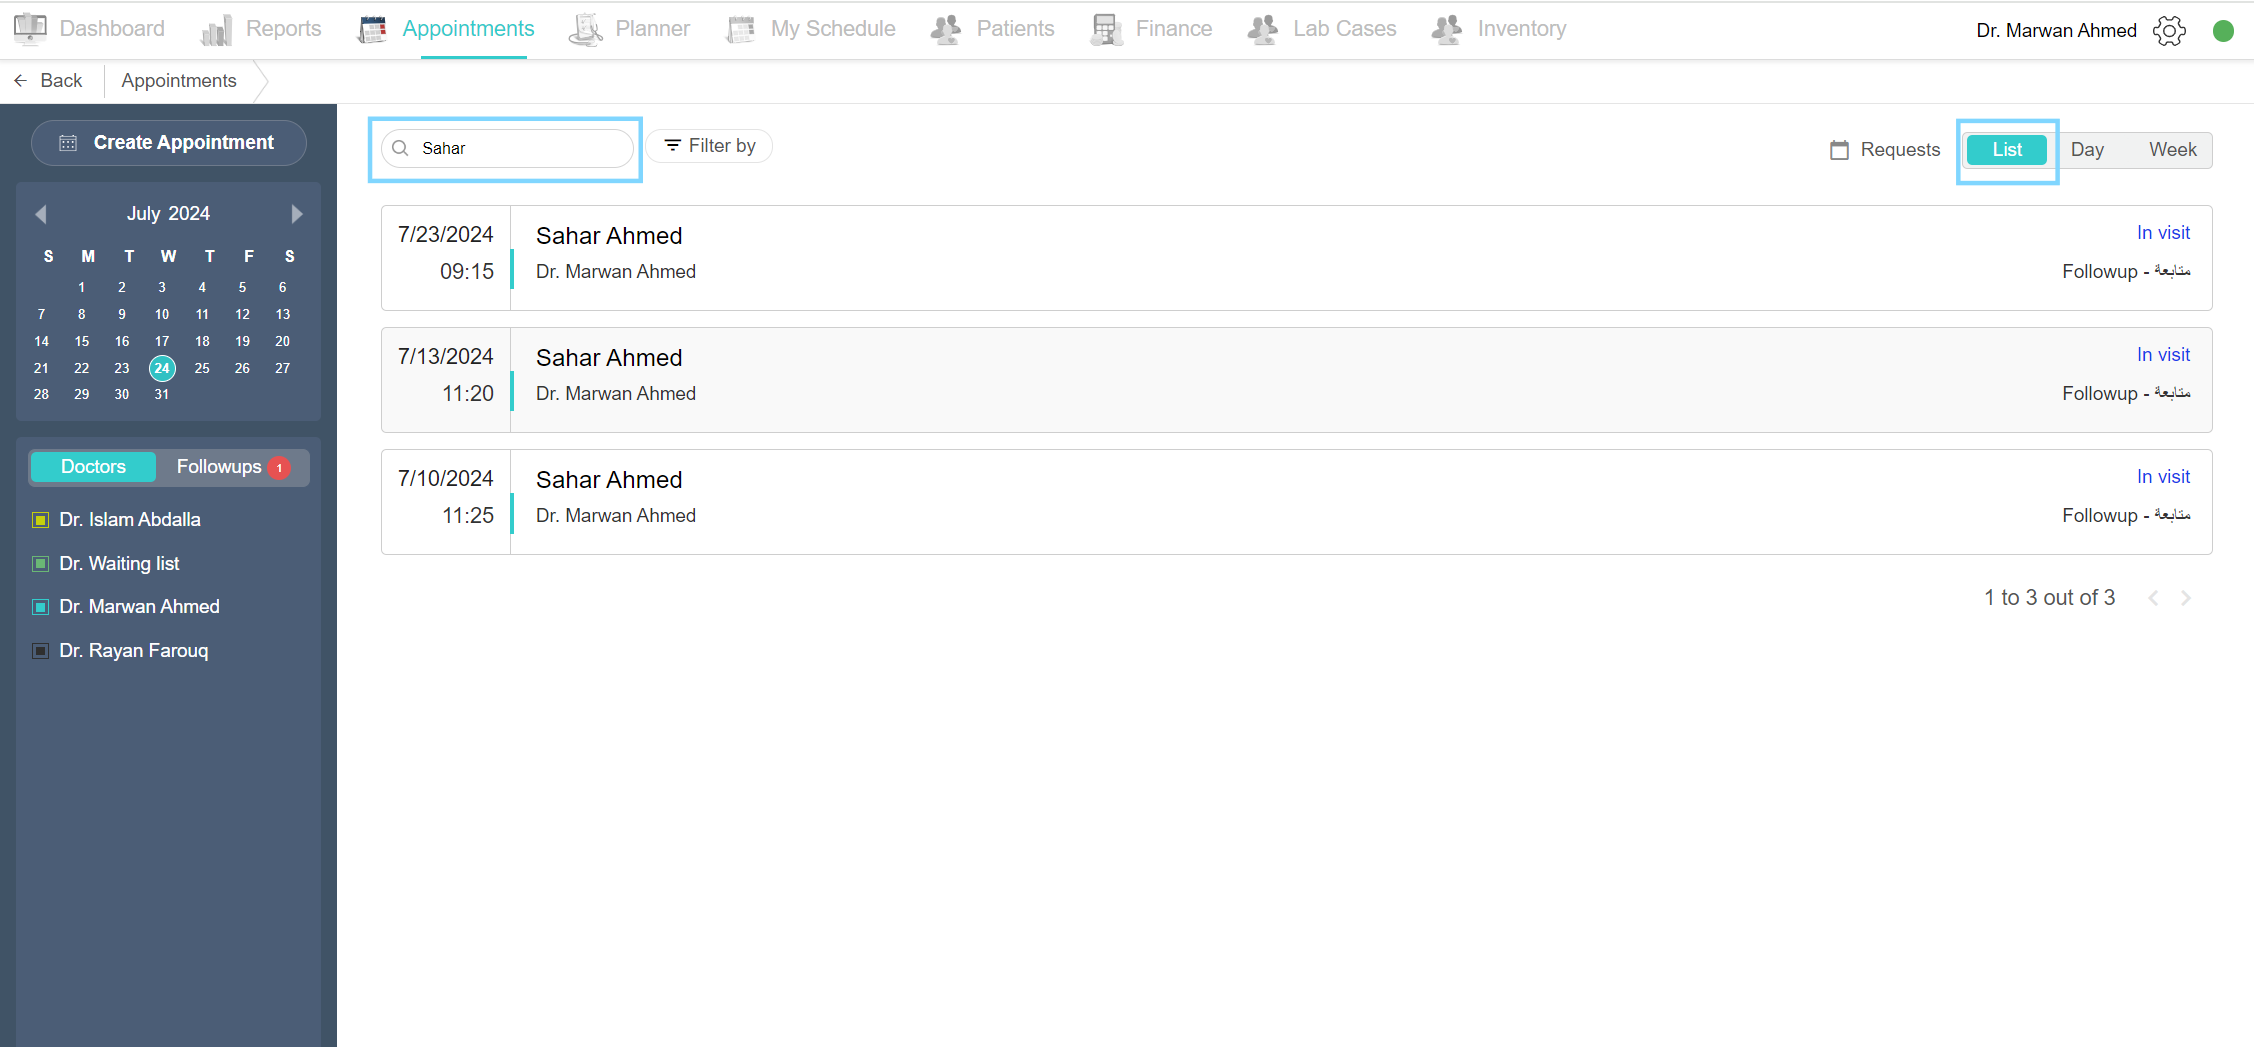
1. View patient appointments using search in the List view
To view all the appointments in a list view, open the appointments tab, and select the List option on the top right side. A complete list of all the appointments made by the clinic is shown. To search for a specific appointment, use the search field, you can search using the patient name, and phone number to view all the appointments under that patient's name.
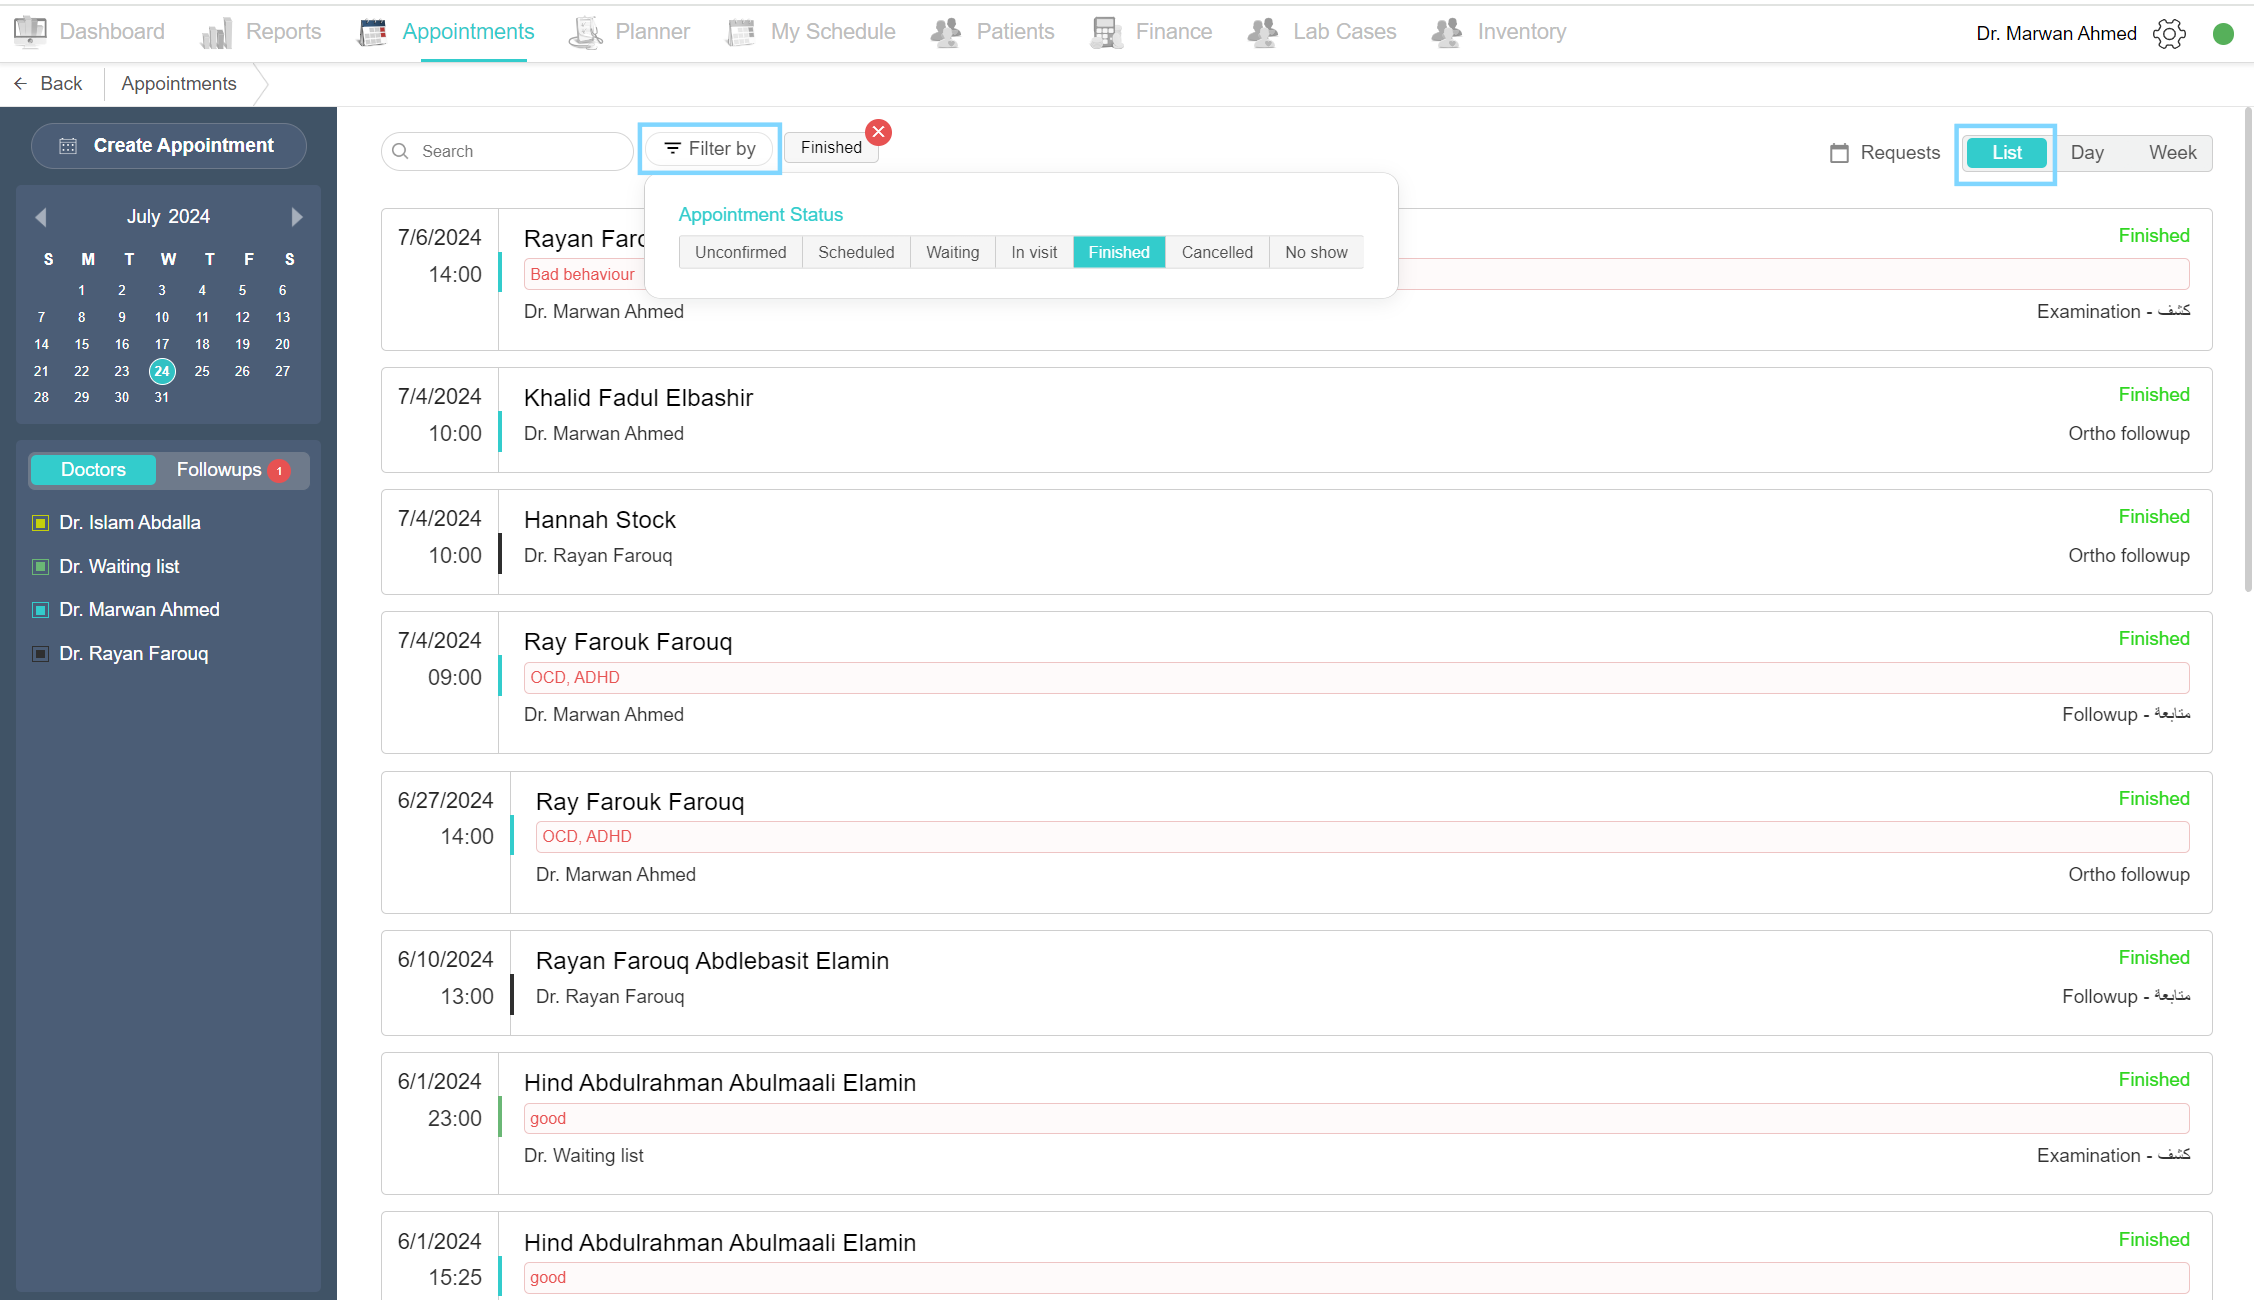
2. View filtered appointments in List view by appointment status
To view filtered appointments in the list view by appointment status, select the “Filter by” option next to the search field. There are several appointment statuses to choose from, “Unconfirmed”, “Scheduled”, “Waiting”, “In visit”, “Finished”, “Canceled”, or “No show”. Select one and now you can view all the appointments under that status.
View patients’ invoices from the appointment popup box
An easy access to patient invoices is to open it through the appointment pop up box. Choose the desired appointment, and click the appointment to open the appointment pop up box. On the bottom of the box, click the “Go to invoice” button. The patient invoices open up, the latest invoice is the default and appears upfront. You can edit, save drafts and generate invoices. On the right side, you can add a payment after generating the invoice. On the left side of the page are all the invoices of the patients, draft, generated and paid ones. You can move around the invoices and select the desired one.
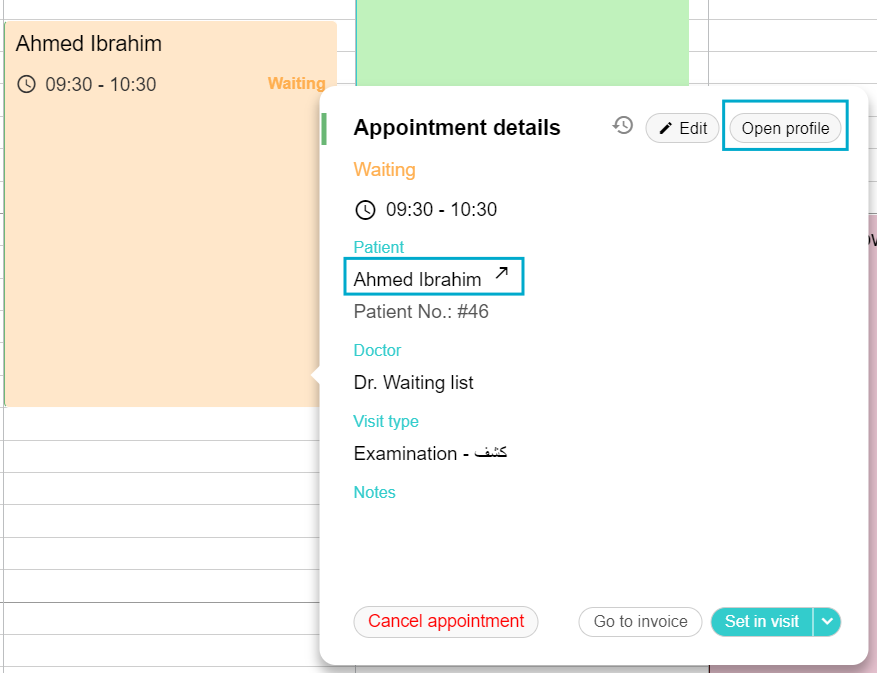
Open patient profile from appointment details
To open a patient profile, choose the appointment of the patient. Click on the appointment to view the appointment details popup box, at the top is the Open Profile button, this will take you to the patient’s profile. Additionally, next to the patient's name is an arrow pointing sideways. This arrow is a shortcut to open the patient profile. The patient profile will open up.
Notification of appointment status changes when made by a doctor
The moment the patient enters the clinic, the appointment statuses should be changed to keep up with the process. On the occasion that the doctor has changed the status, either by starting the visit or finishing it up, the reception will immediately get a notice. A notification on the bottom left of the page will appear along with a sound effect to alert you of the changes. Then you can check the appointment to view the changes made.
View Appointment Log
An appointment log serves to efficiently manage and help in communication and documentation, while also helping in improving planning and accountability in both personal and professional settings.
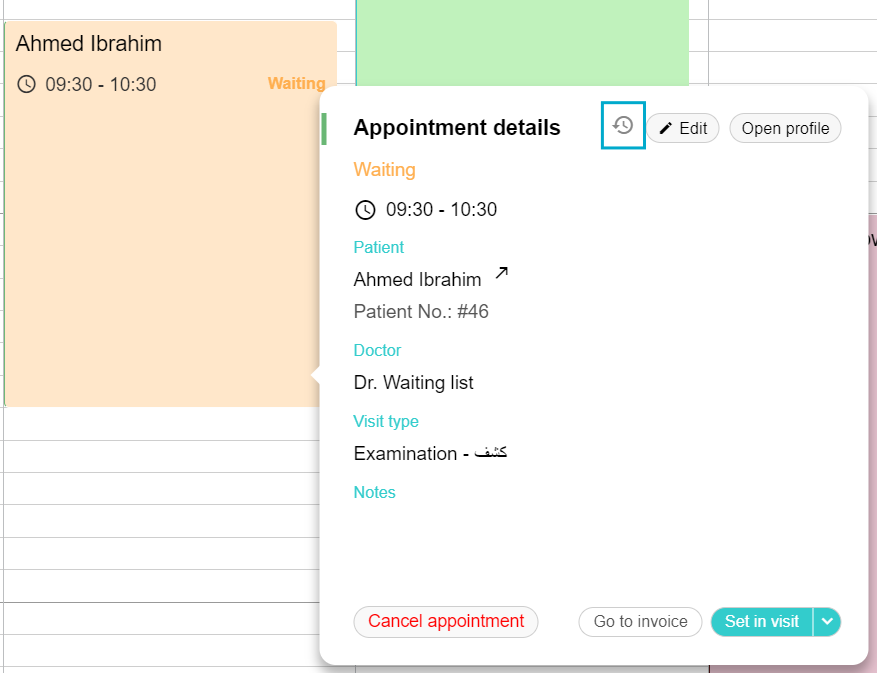
To view each appointment log, choose the desired appointment and click to open the appointment details popup box. On the top of the box, you’ll find a clock icon next to the edit button. Click on the icon and observe the appointment log.
To select a log entry to view, simply click on the log entries on the left side of the box. All the necessary information you need to know will be visible, starting with the date of the appointment log entry, the user who made the action, and many more. This will help the management in holding someone accountable when a mistake occurs.
Start patient visit
The doctor’s account can start the patient visit from the Planner tab and it can also be started from the appointment page.
Click on the appointment to show the details box, on the top is the Start visit in a coloured button. Once clicked, this will take you to the Current visit view for the patient. This option is only visible for the doctor’s account. Any other account will have the Open profile button instead.
Planner
This tab is for doctors and nurses to view all appointments for today and begin their visits as doctors.
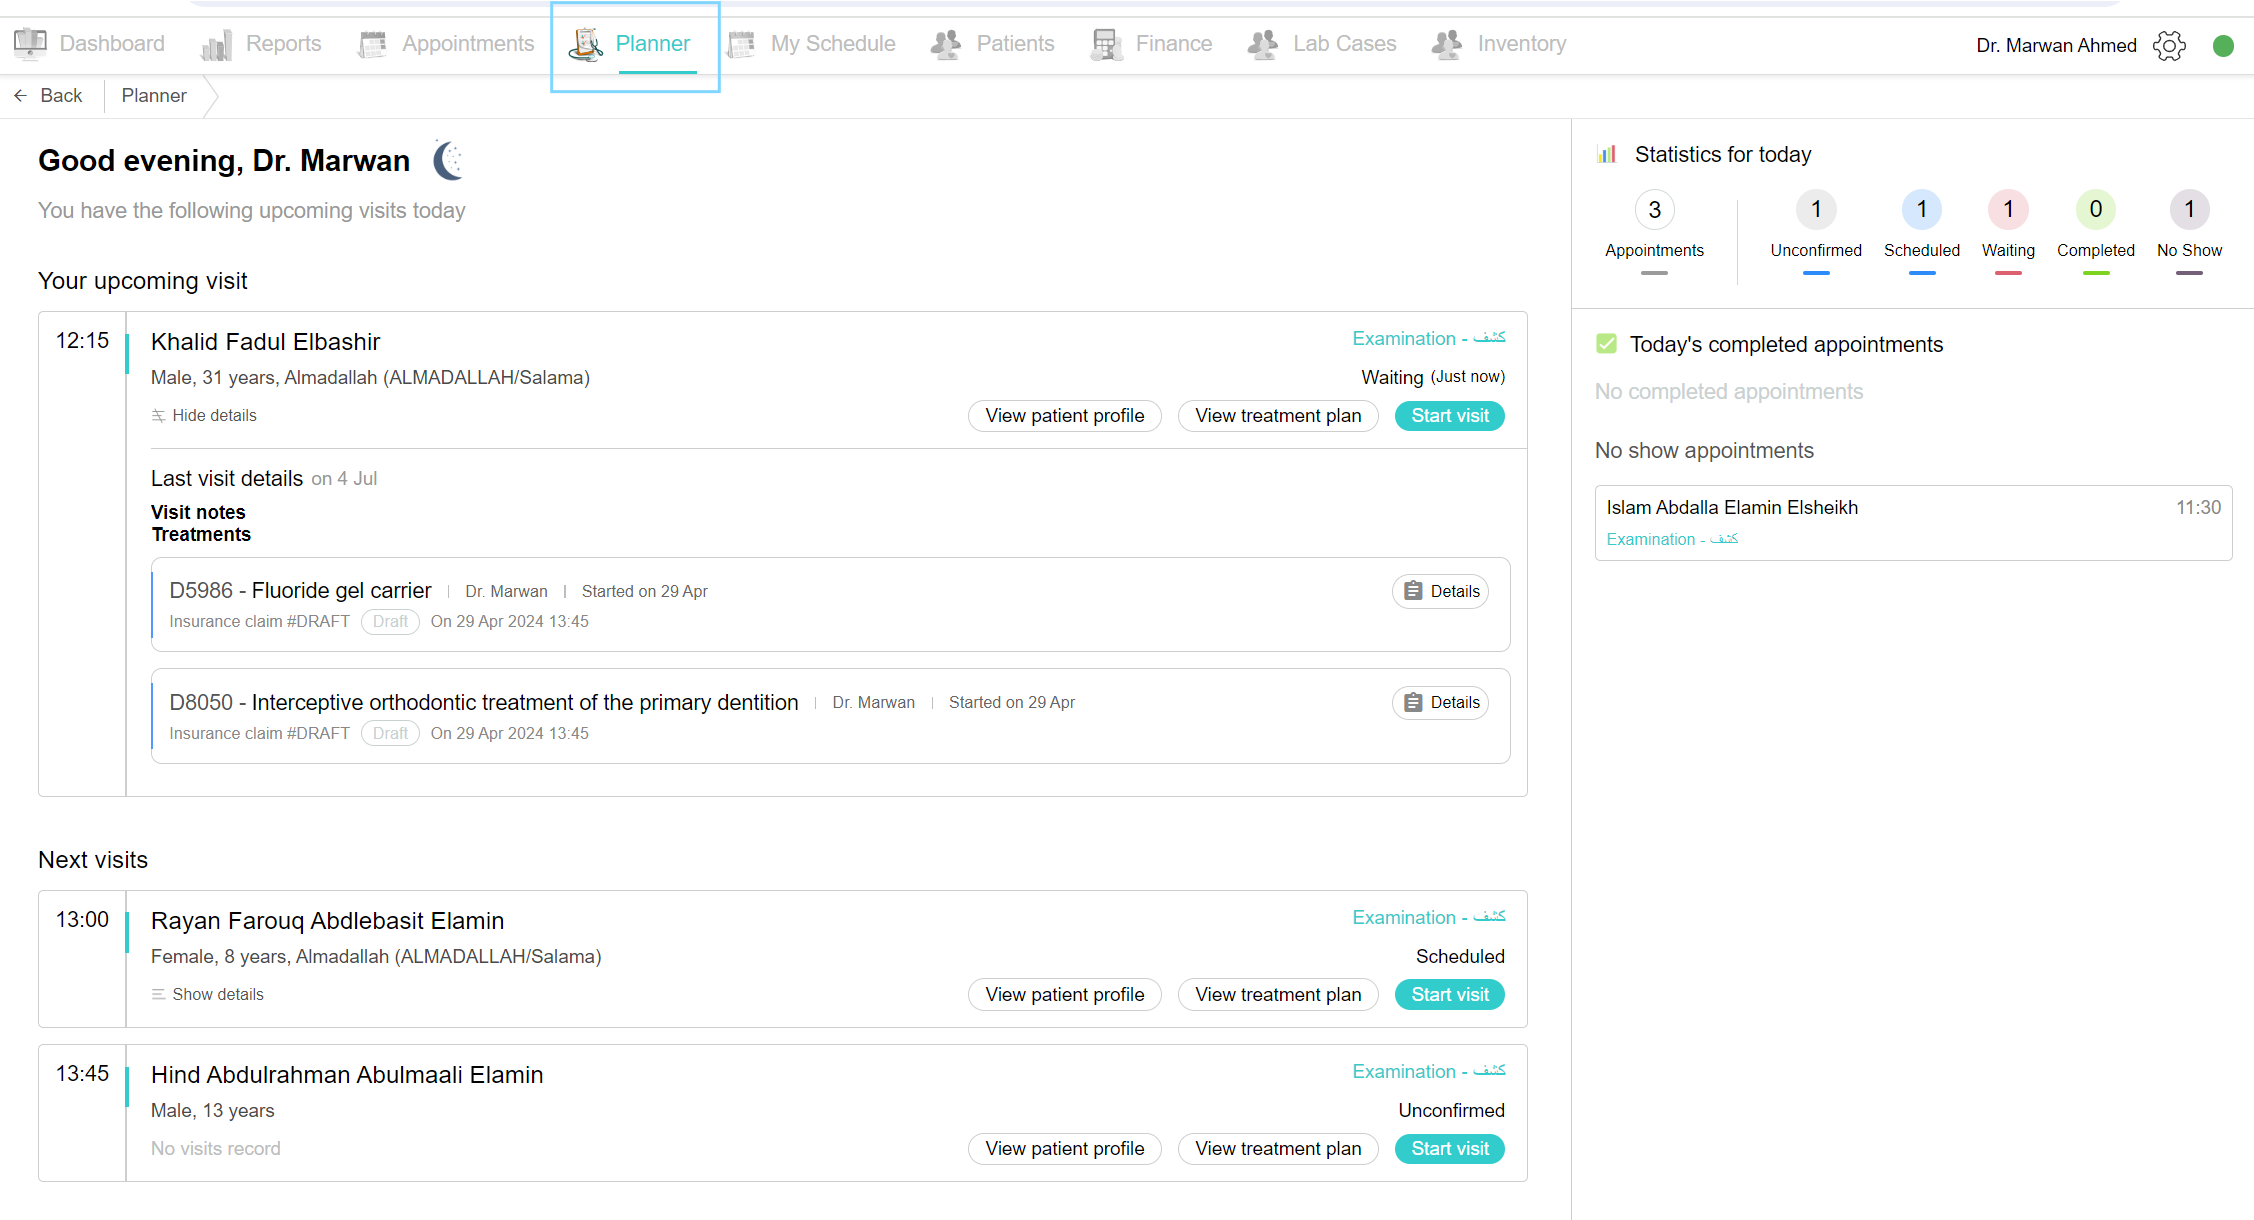
Planner tab
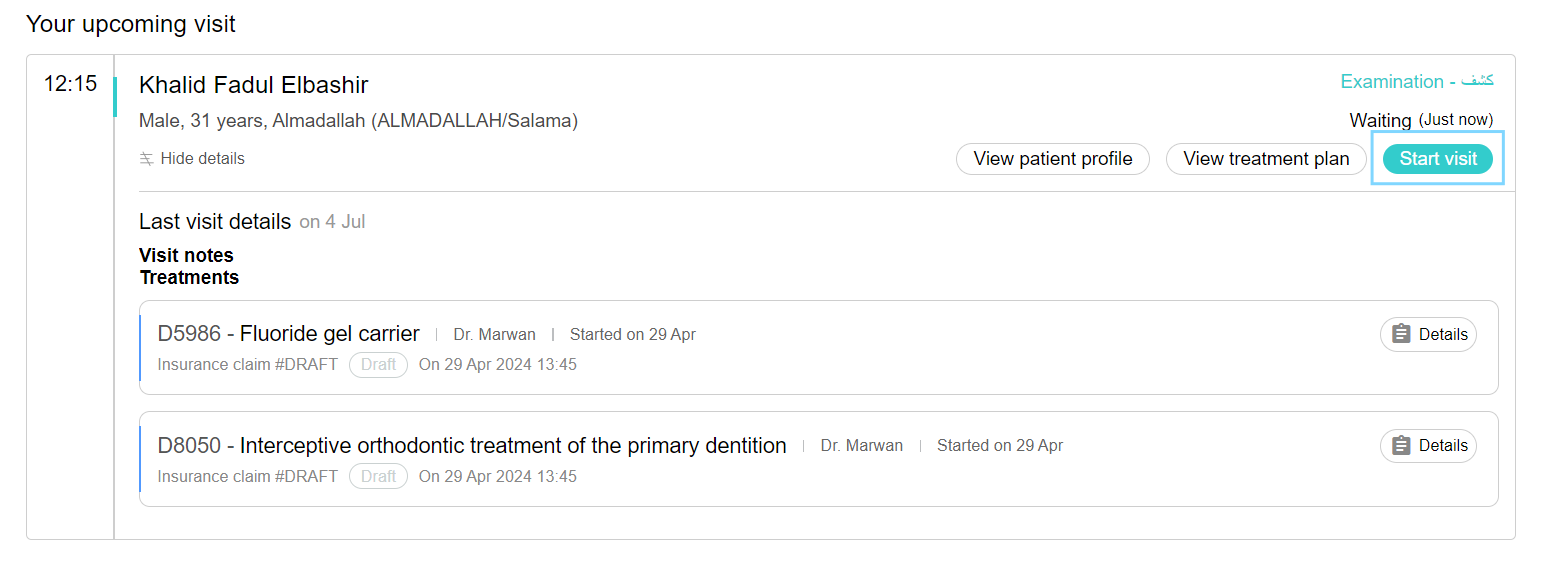
If you want to see all appointments for today and start your visits as a doctor, go to the planner tab. You will see on the left side your upcoming visit with the patient's name and details of your last visit and the subsequent visits. You can view the patient profile by clicking on the "View Patient Profile" button under the patient's name and start the visit by clicking the "Start Visit" button.
On the right side, you will see all of your appointments for today with their statuses.
What happens when you start the visit:
 The “Current Visit” page opens, it consists of everything needed for the doctor on one page.
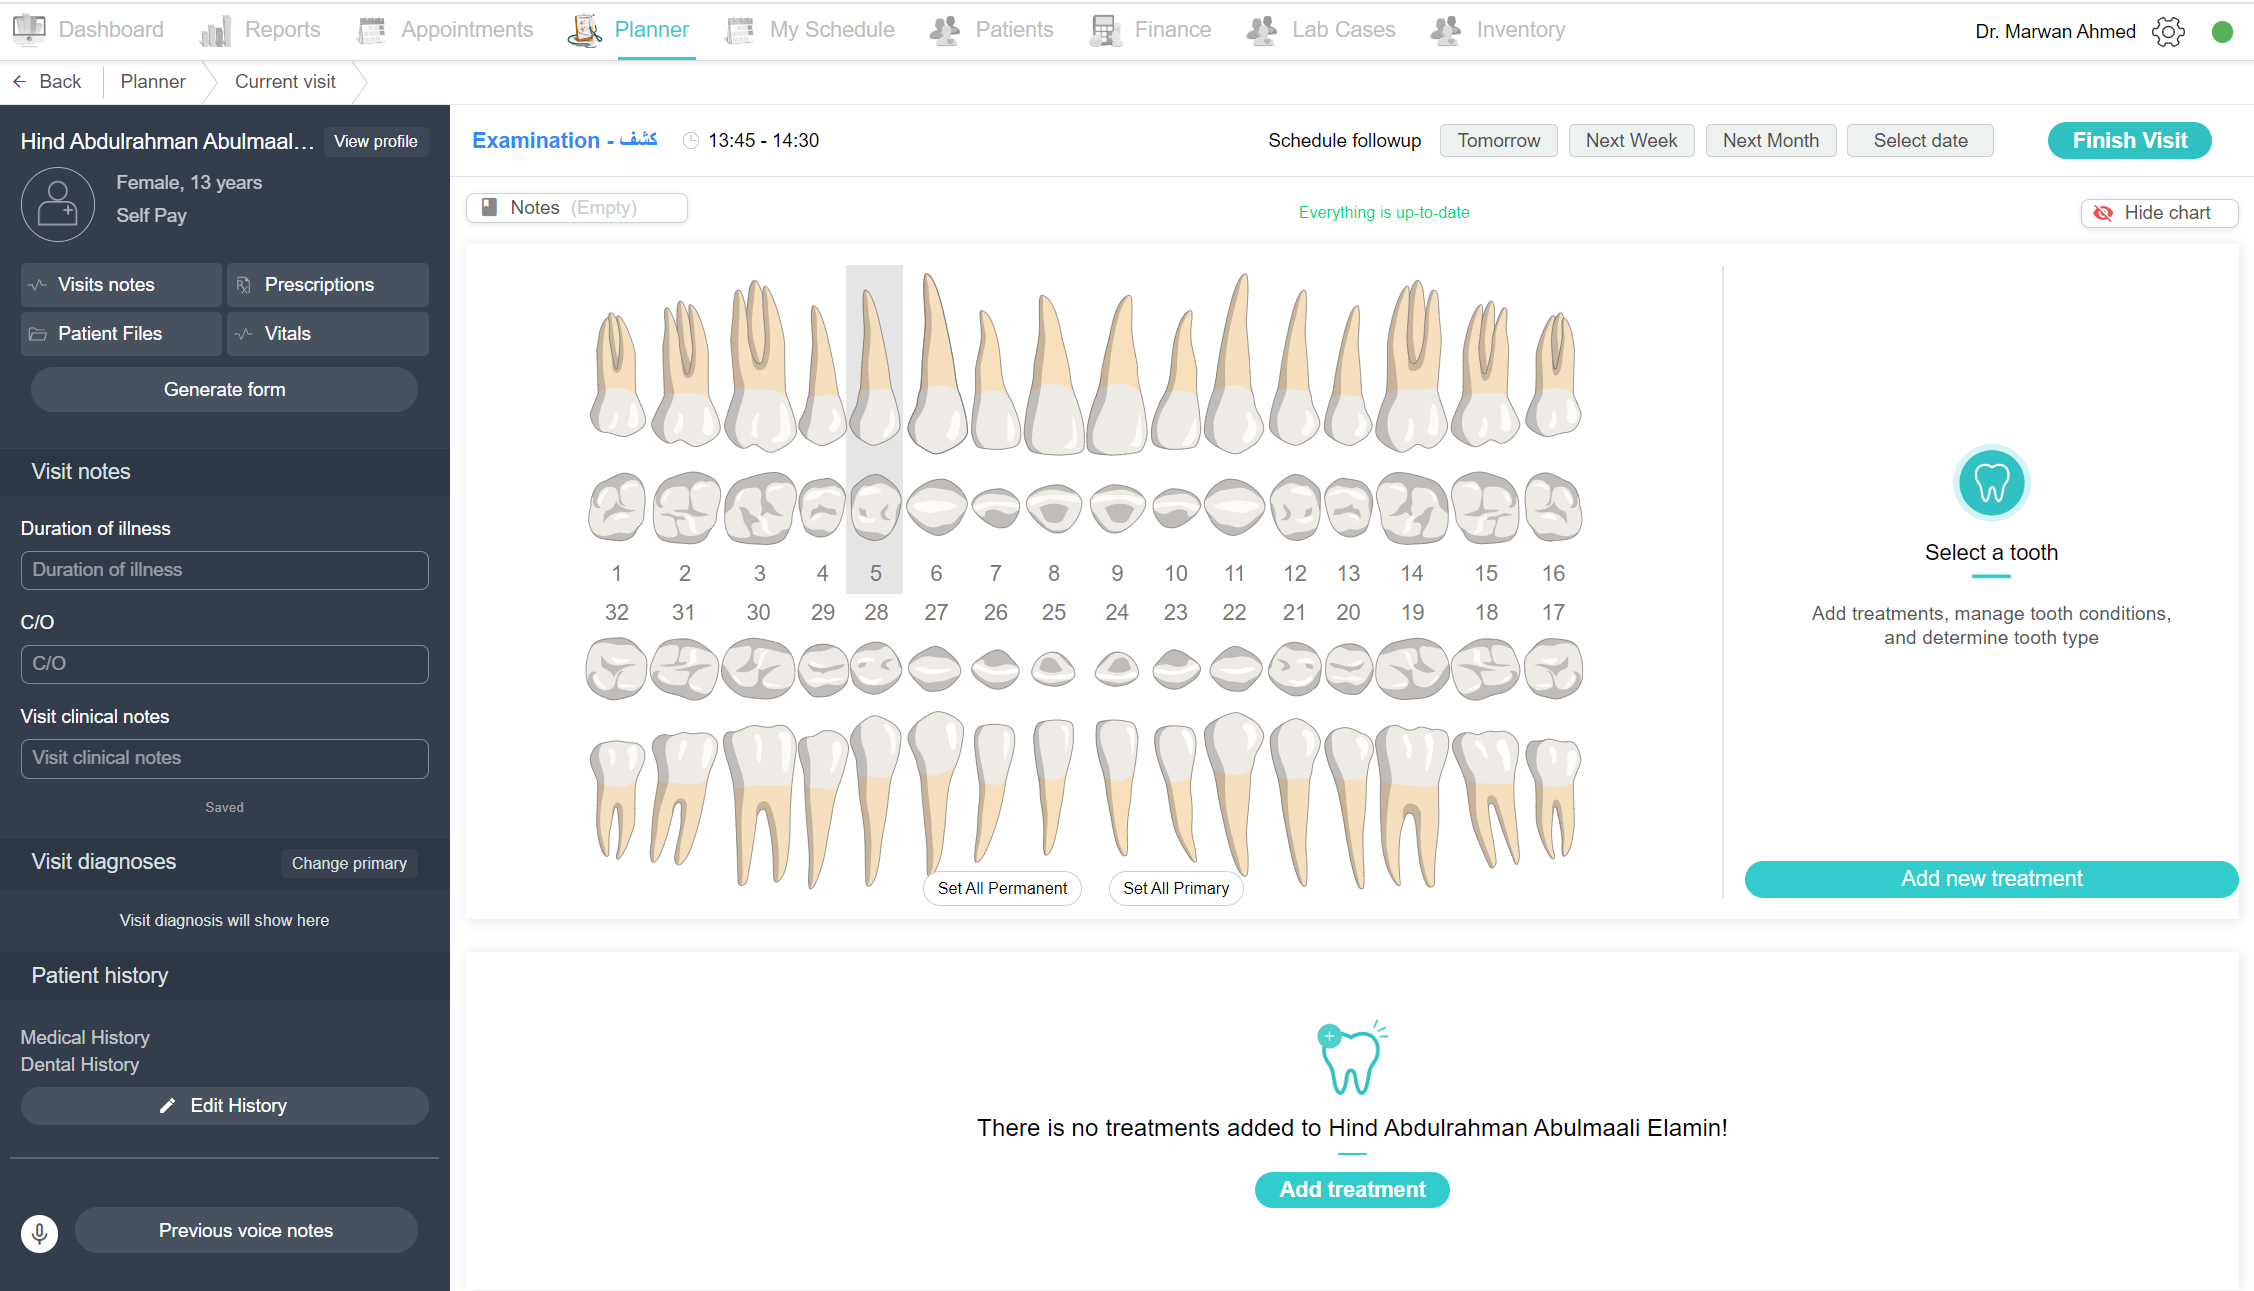
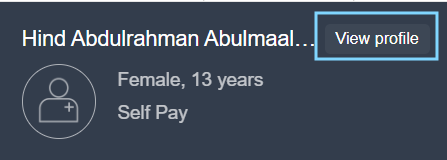
1. On the left side, you can see the patient information. If you want to see the patient profile, click on the "View Profile" button.
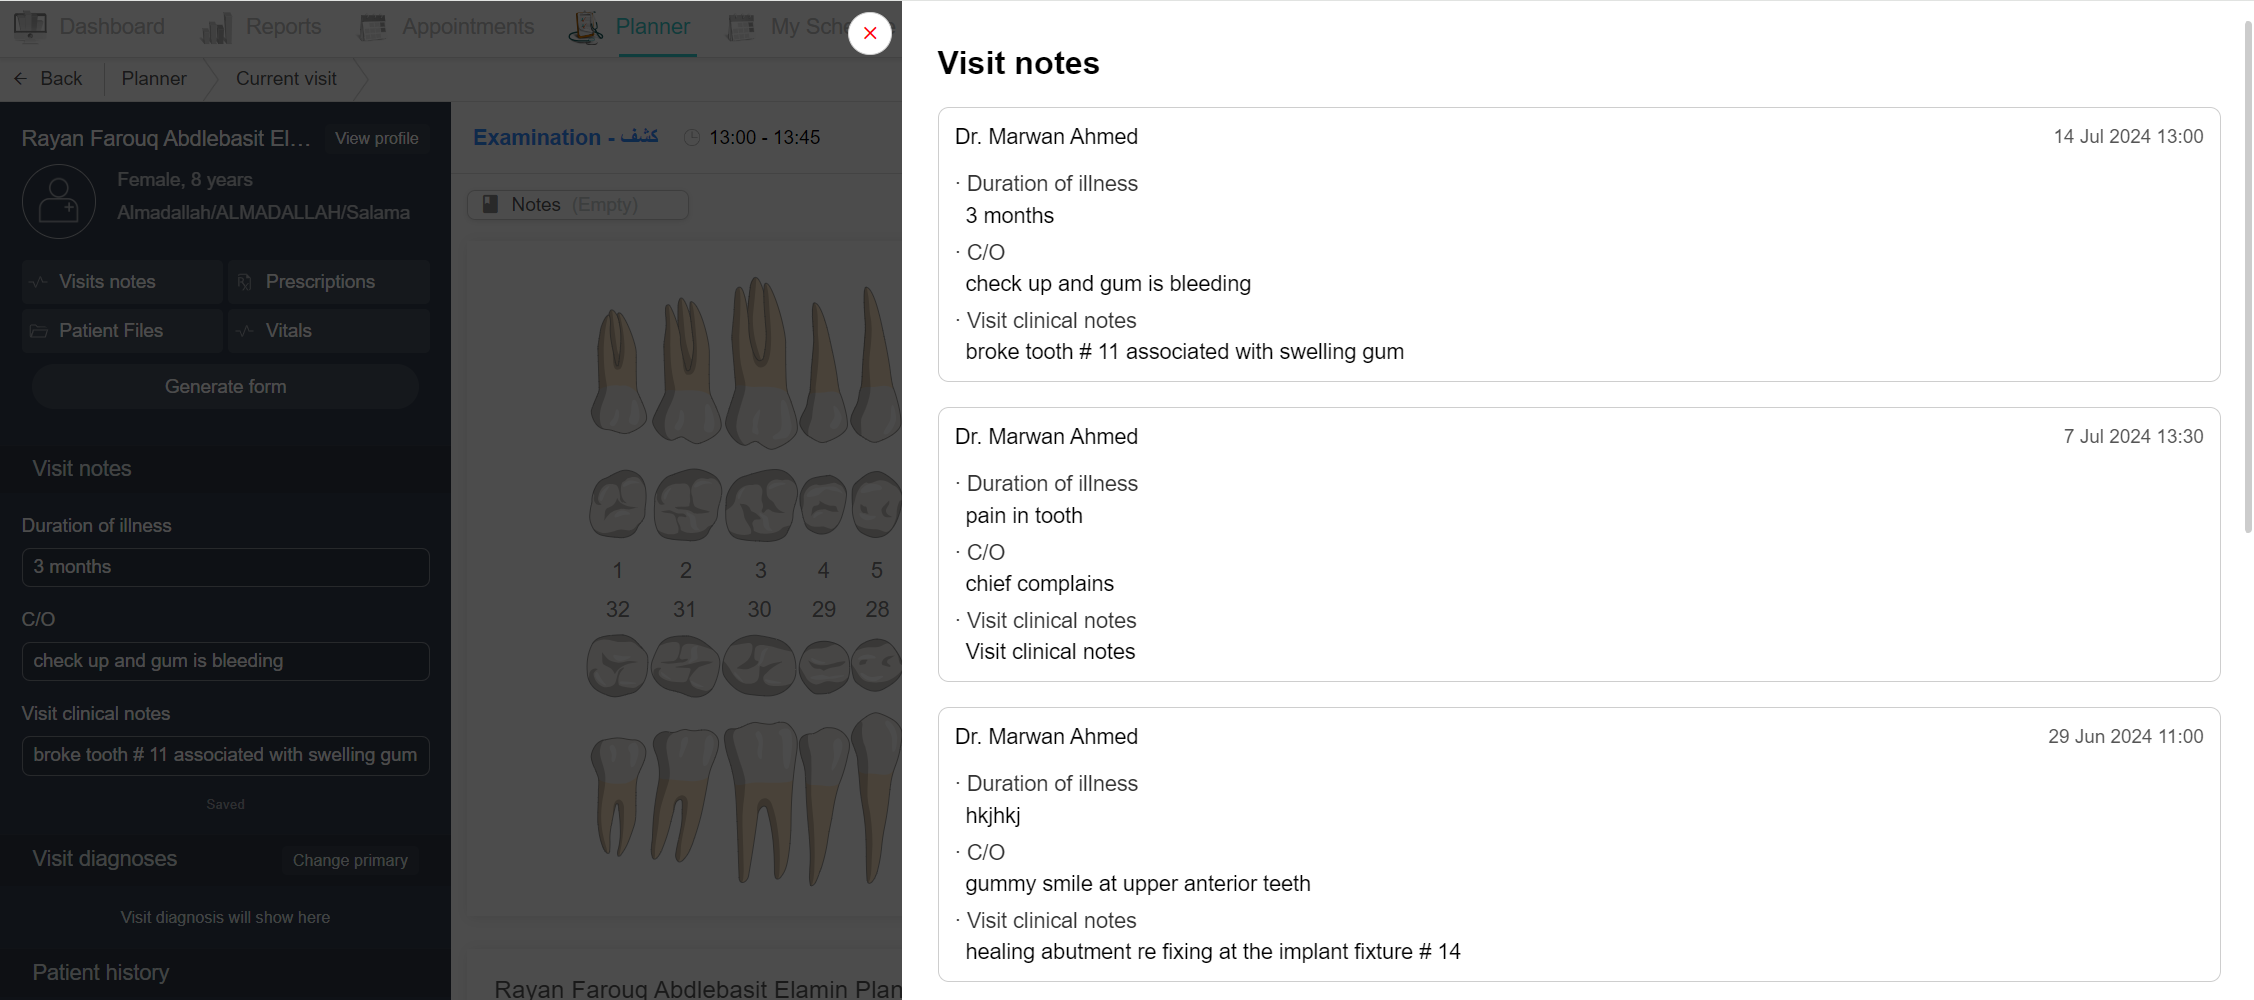
2. By clicking on "Visit Notes," you will see the record of the visit notes that have been added, including who added them and their dates.
3. For prescriptions, you can write drugs for your patient by clicking on "Prescriptions." Click on the "Add Prescriptions" button, select the drug from the drug list, and then you can change the instructions. After that, click on the "Print and Lock" button to save and print it. You can see all of the prescriptions for this patient in this view.
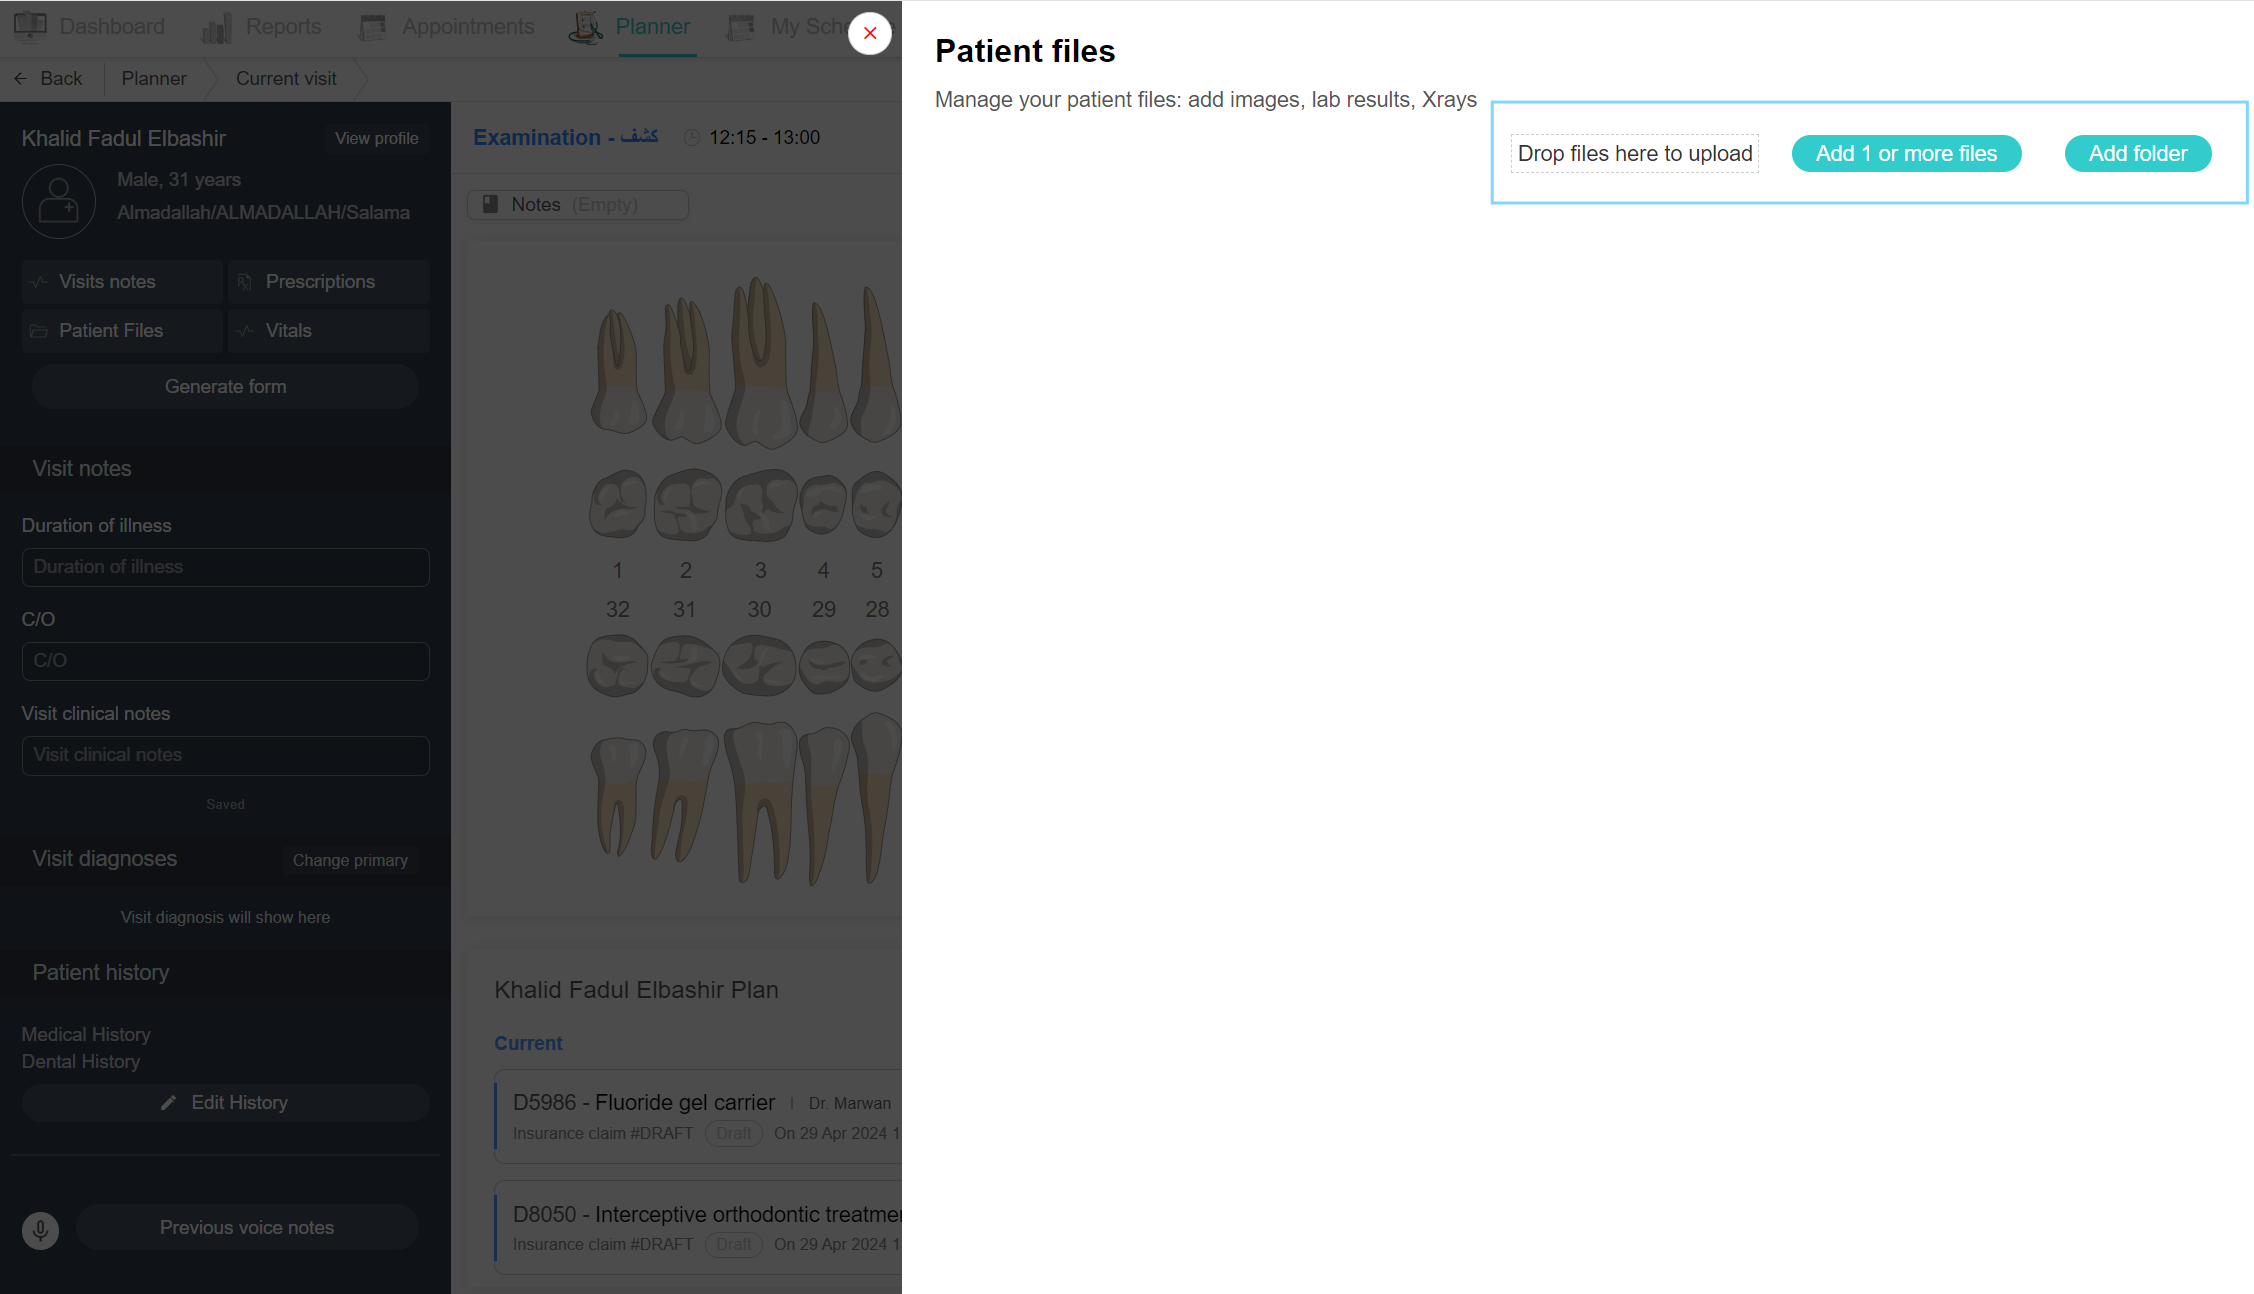
4. If you want to add a file to this patient, such as an x-ray or before and after images or lab results, click on "Patient Files". Click on "Add More Files" or "Add Folder" and select the file you want to add and upload it. You can see all of the files added to this patient at any time in this view.
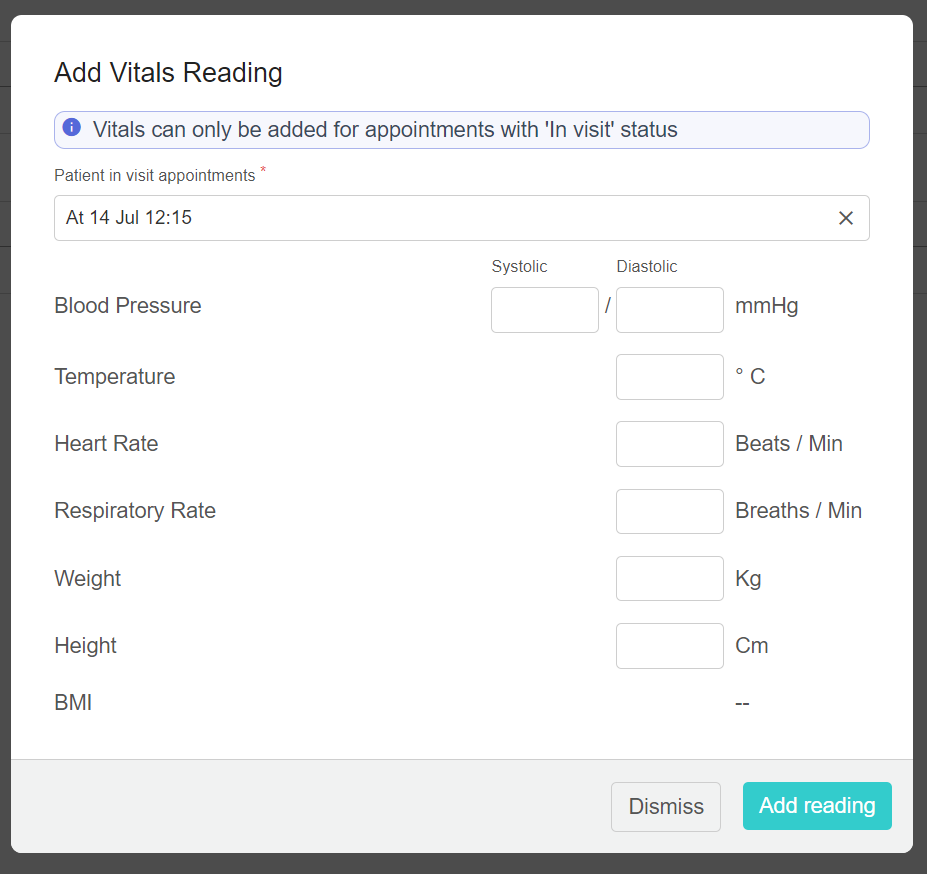
5. To add vitals to this patient, click on "Vitals" and then click on "Record Vital Readings." Fill it out and click on "Add Reading" after completing it. You can see all recorded vitals and dates in this view. Vitals can only be added for appointments with an “In Visit” status.

6. By clicking on "Generate Form," you can see all the forms in the system. Select the form you want to create and select the doctor's name from the doctor list. Click on "Generate Form" and then you will see a URL under the QR code to open the link in a new tab. The form automatically appears in the webform system on a tablet. Click on "Sign Form" to sign it if needed. You can see all forms generated for this patient in the patient reports on the patient profile.
7. In the visit notes, you must fill out medical data for every visit, including the duration of illness, chief complaint (C/O), and visit clinical notes.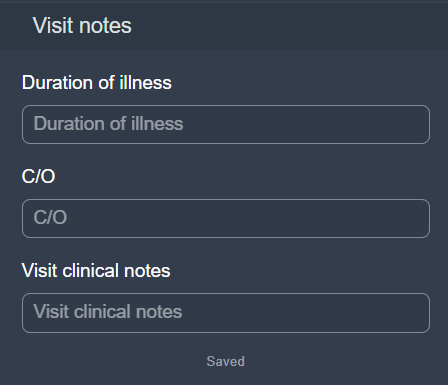
8. To add medical and dental history, click on the "Edit History" button. Once clicked, you can see the patient history with the latest edit. At the top are the medical alerts that are displayed as alerts - in red - above the dental chart. Then, add patient problems by clicking on the "Add Patient Problem" button, selecting patient problems and diagnoses from the diagnosis and problem list, and selecting the life cycle and onset date and resolution date. After completing it, click on the "Save" button to save it. You can add patient allergies by clicking on the "+ Patient Allergy" button, selecting allergy type from the allergy list and allergy from the allergy list, and then clicking on "Save." Fill out the medical history. You can see all previous patient problems and patient allergies that were added.
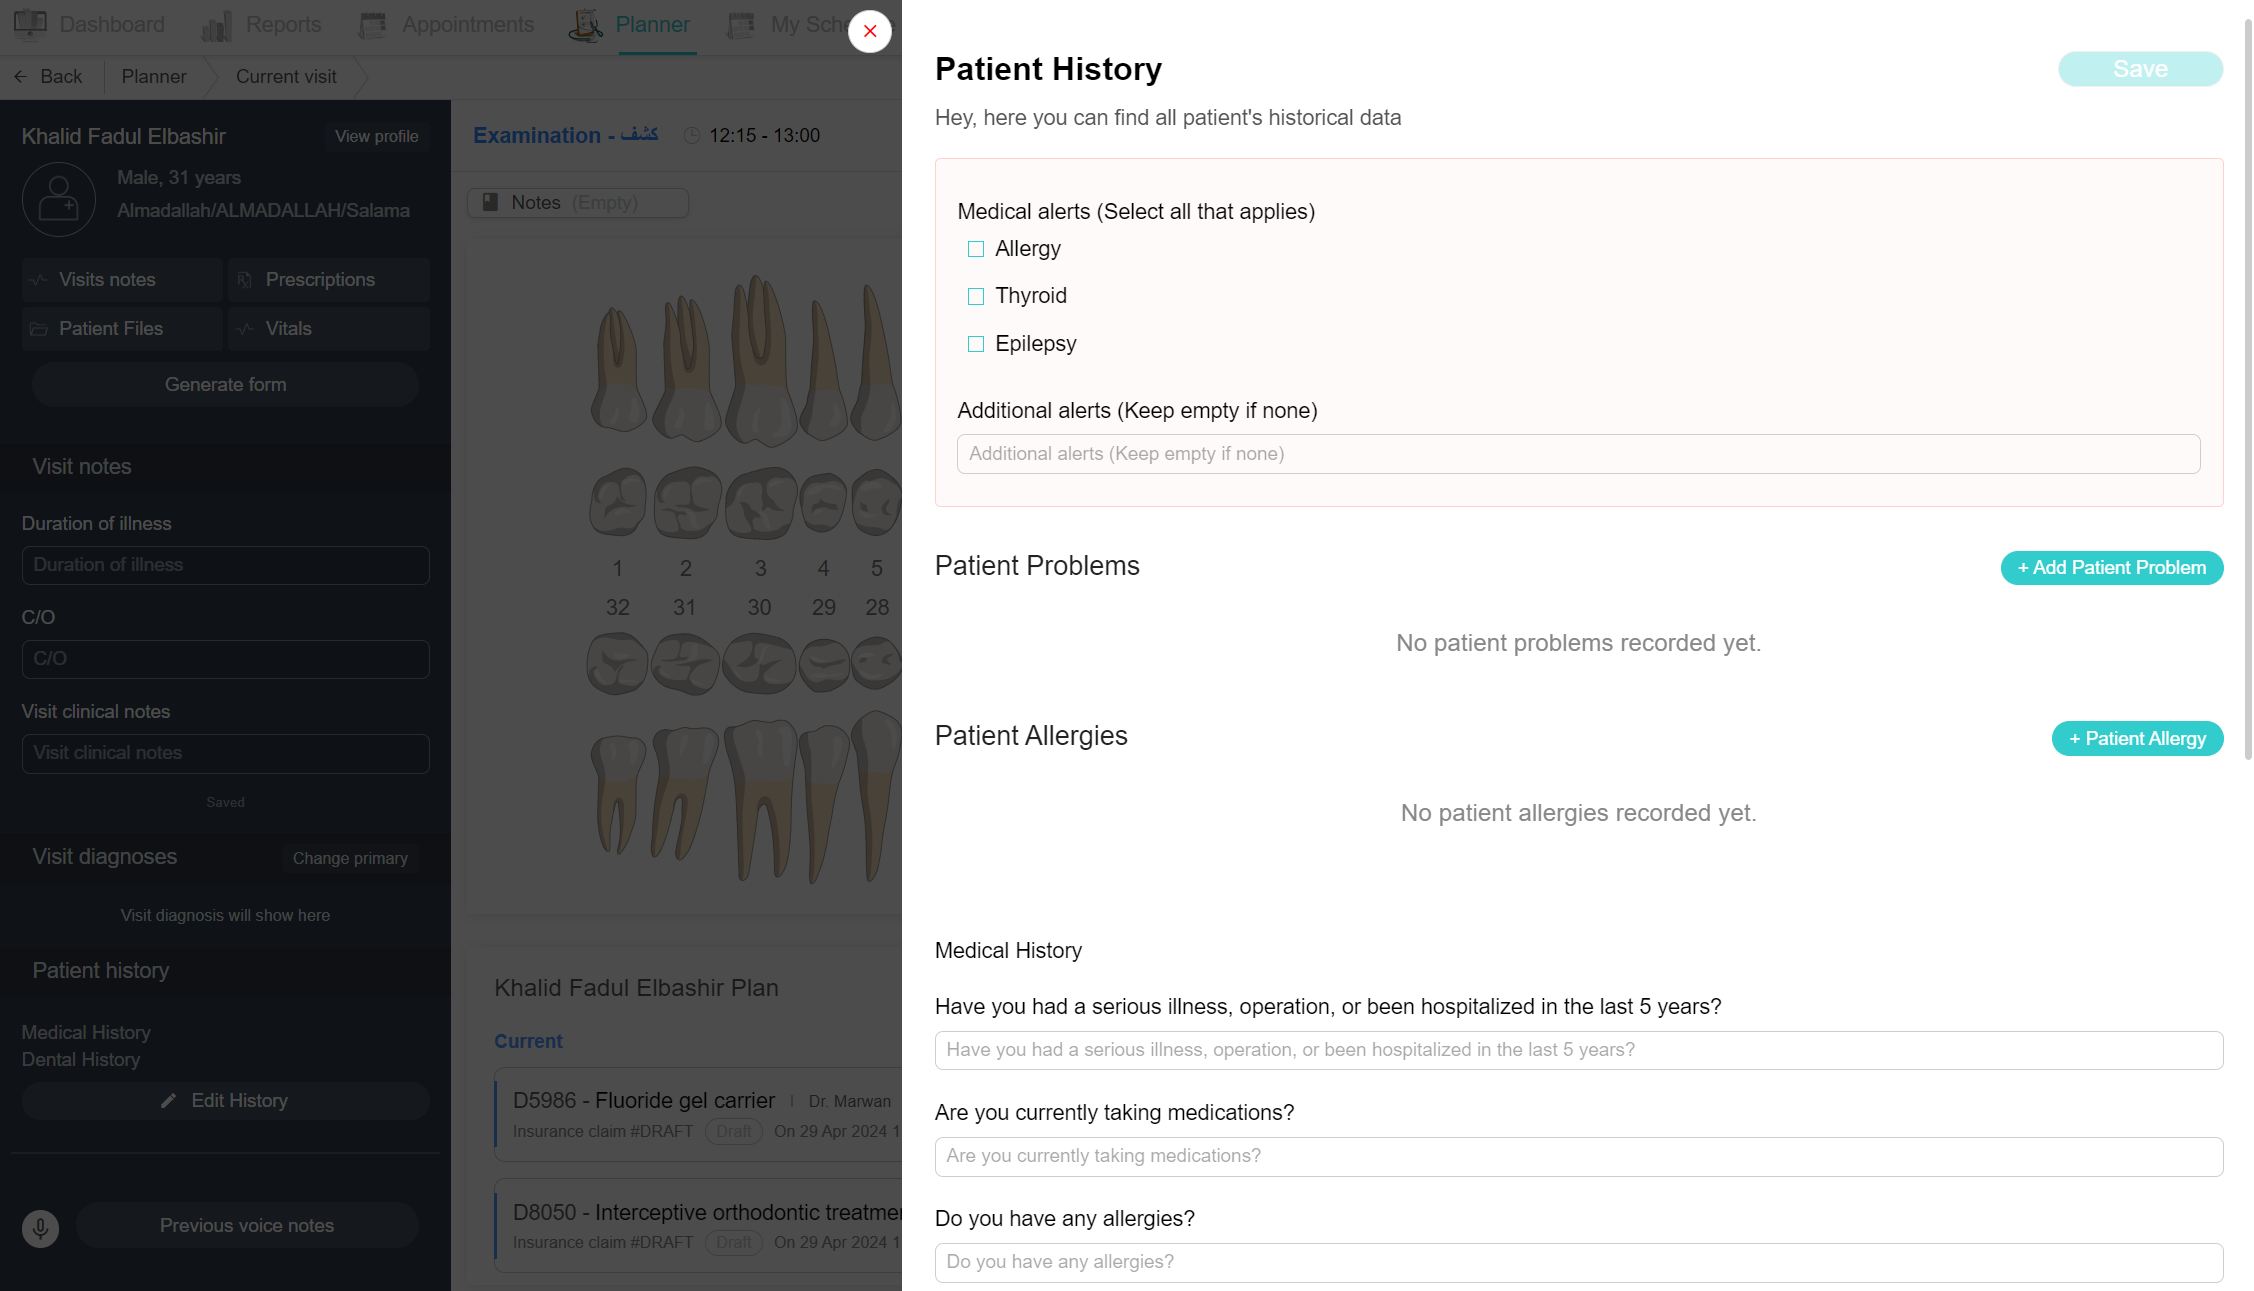
9. You can add voice notes by clicking on the "Previous Voice Notes" button and clicking on the "Record Voice Note" button to record your voice.
10. On the right side, you will see the dental chart. Once you click on a tooth, you can mark its status as missing, fractured, or carious. Then, select the treatment by clicking on the "Add New Treatment" button. Treatments are divided into groups and you can search for them by clicking on "All Items" and searching by treatment name and treatment CPT code. After clicking on the treatment you want to add, you must select a diagnosis from the diagnosis list and then click on the "Add and Start Treatment" button to start the treatment. Every treatment has two statuses: "current" (meaning the treatment is still active) and "completed" (meaning the treatment is finished). All treatments added are shown under the dental chart, first current treatments, then completed treatments, and then deleted treatments. Deleted treatments are still shown in this section. You must add progress notes to any treatment by clicking on the "Details" button next to the treatment name.
11. If you want to schedule the next visit, simply click on the "Select Date" button at the top of the page and choose a date. After completing the treatment, click on the "Finish Visit" button.
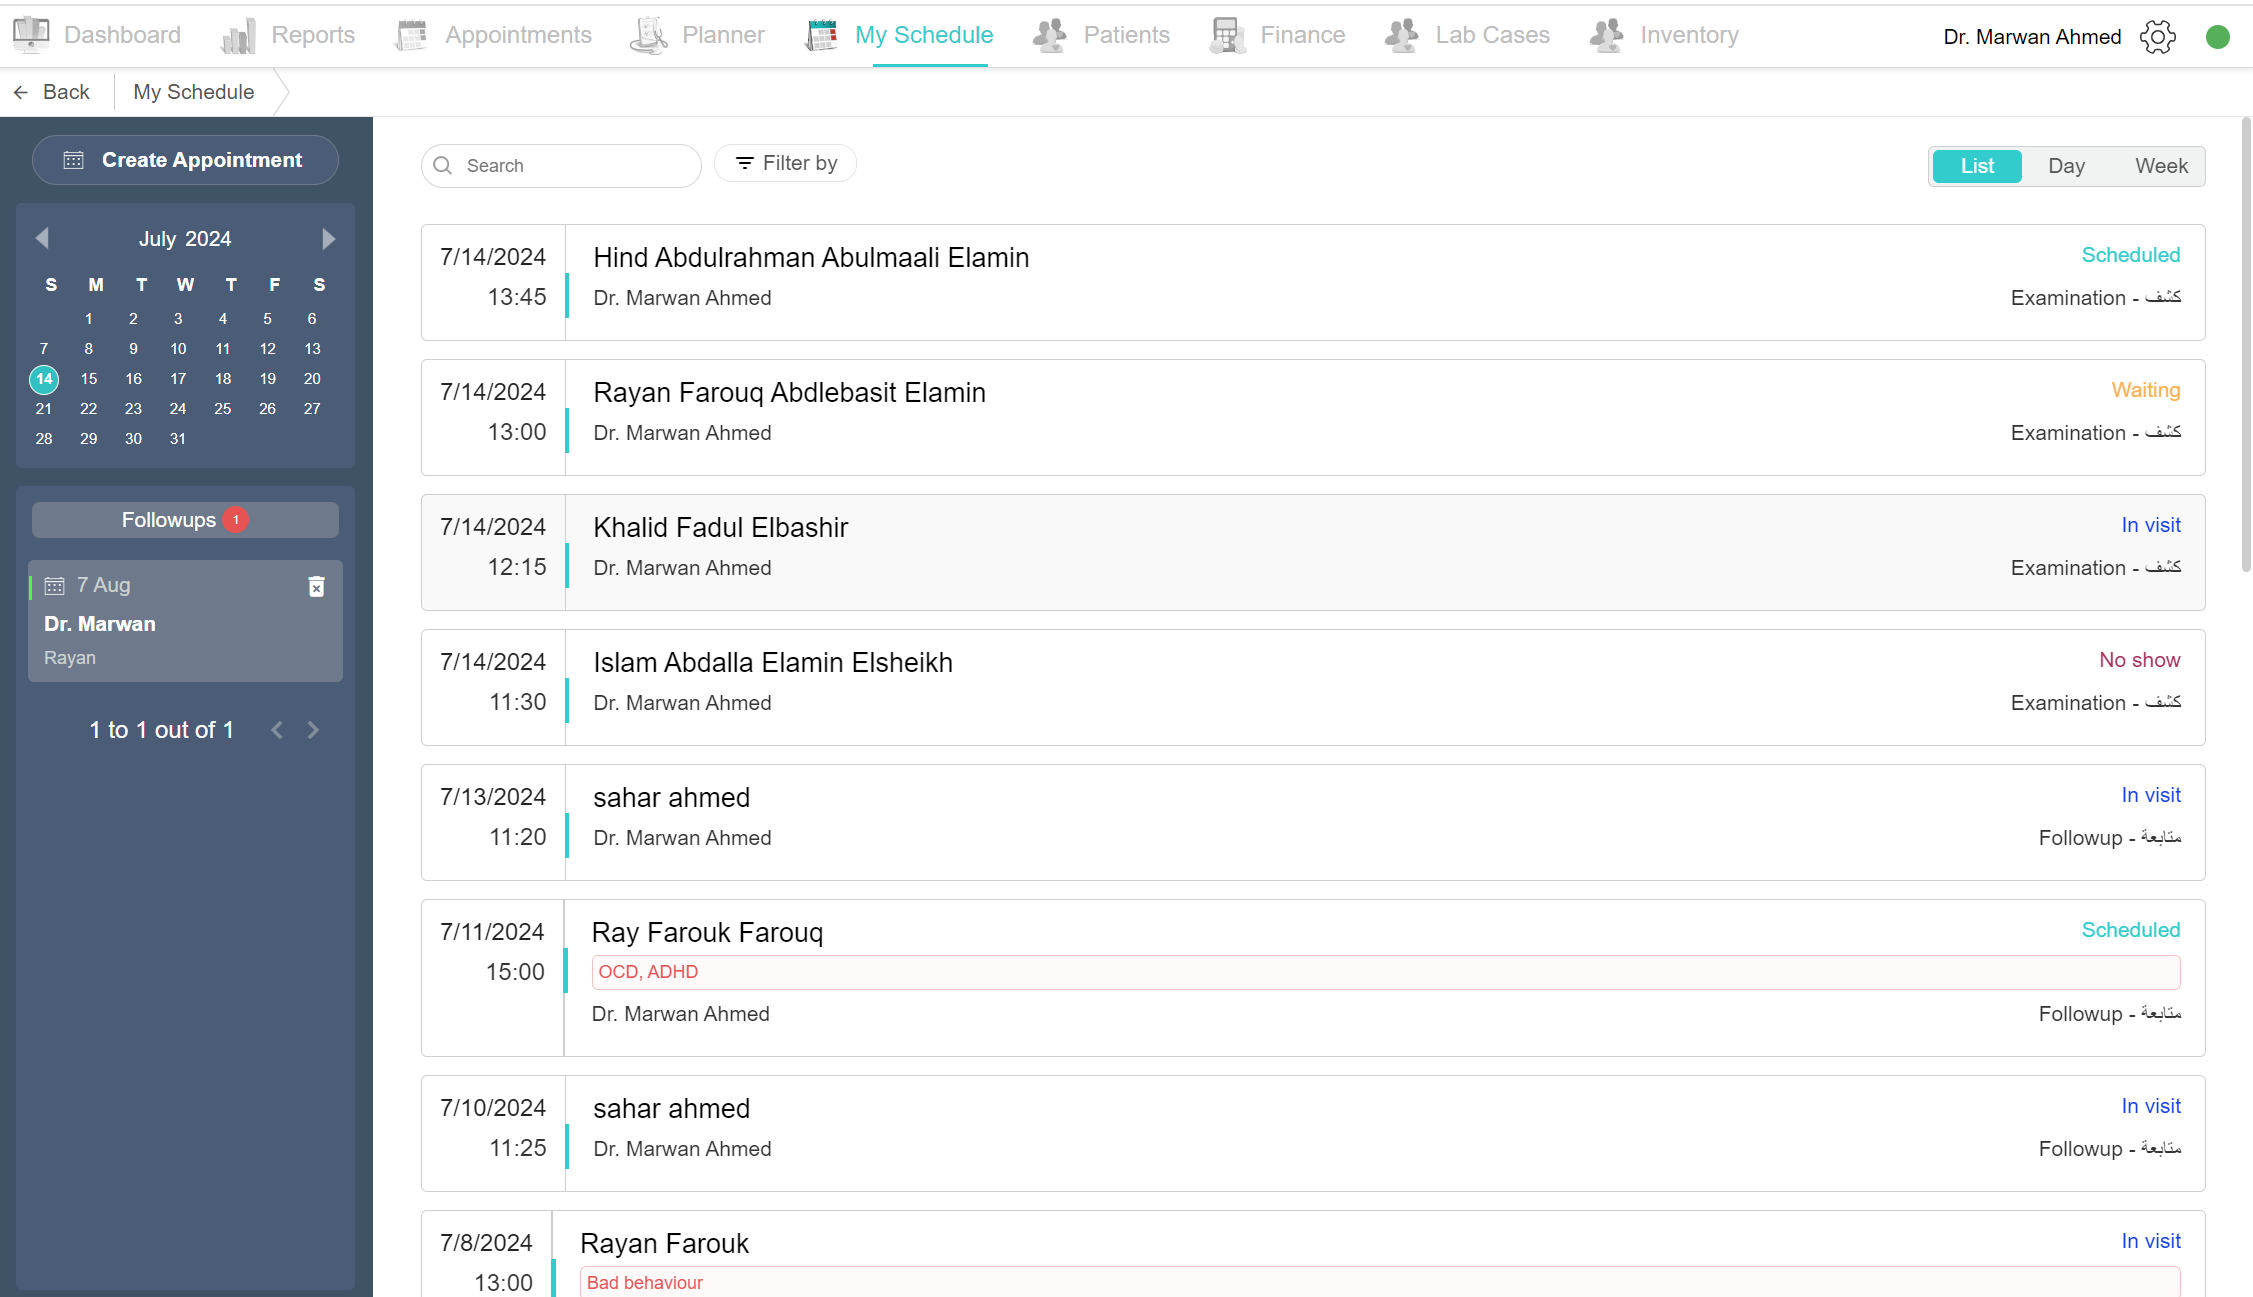
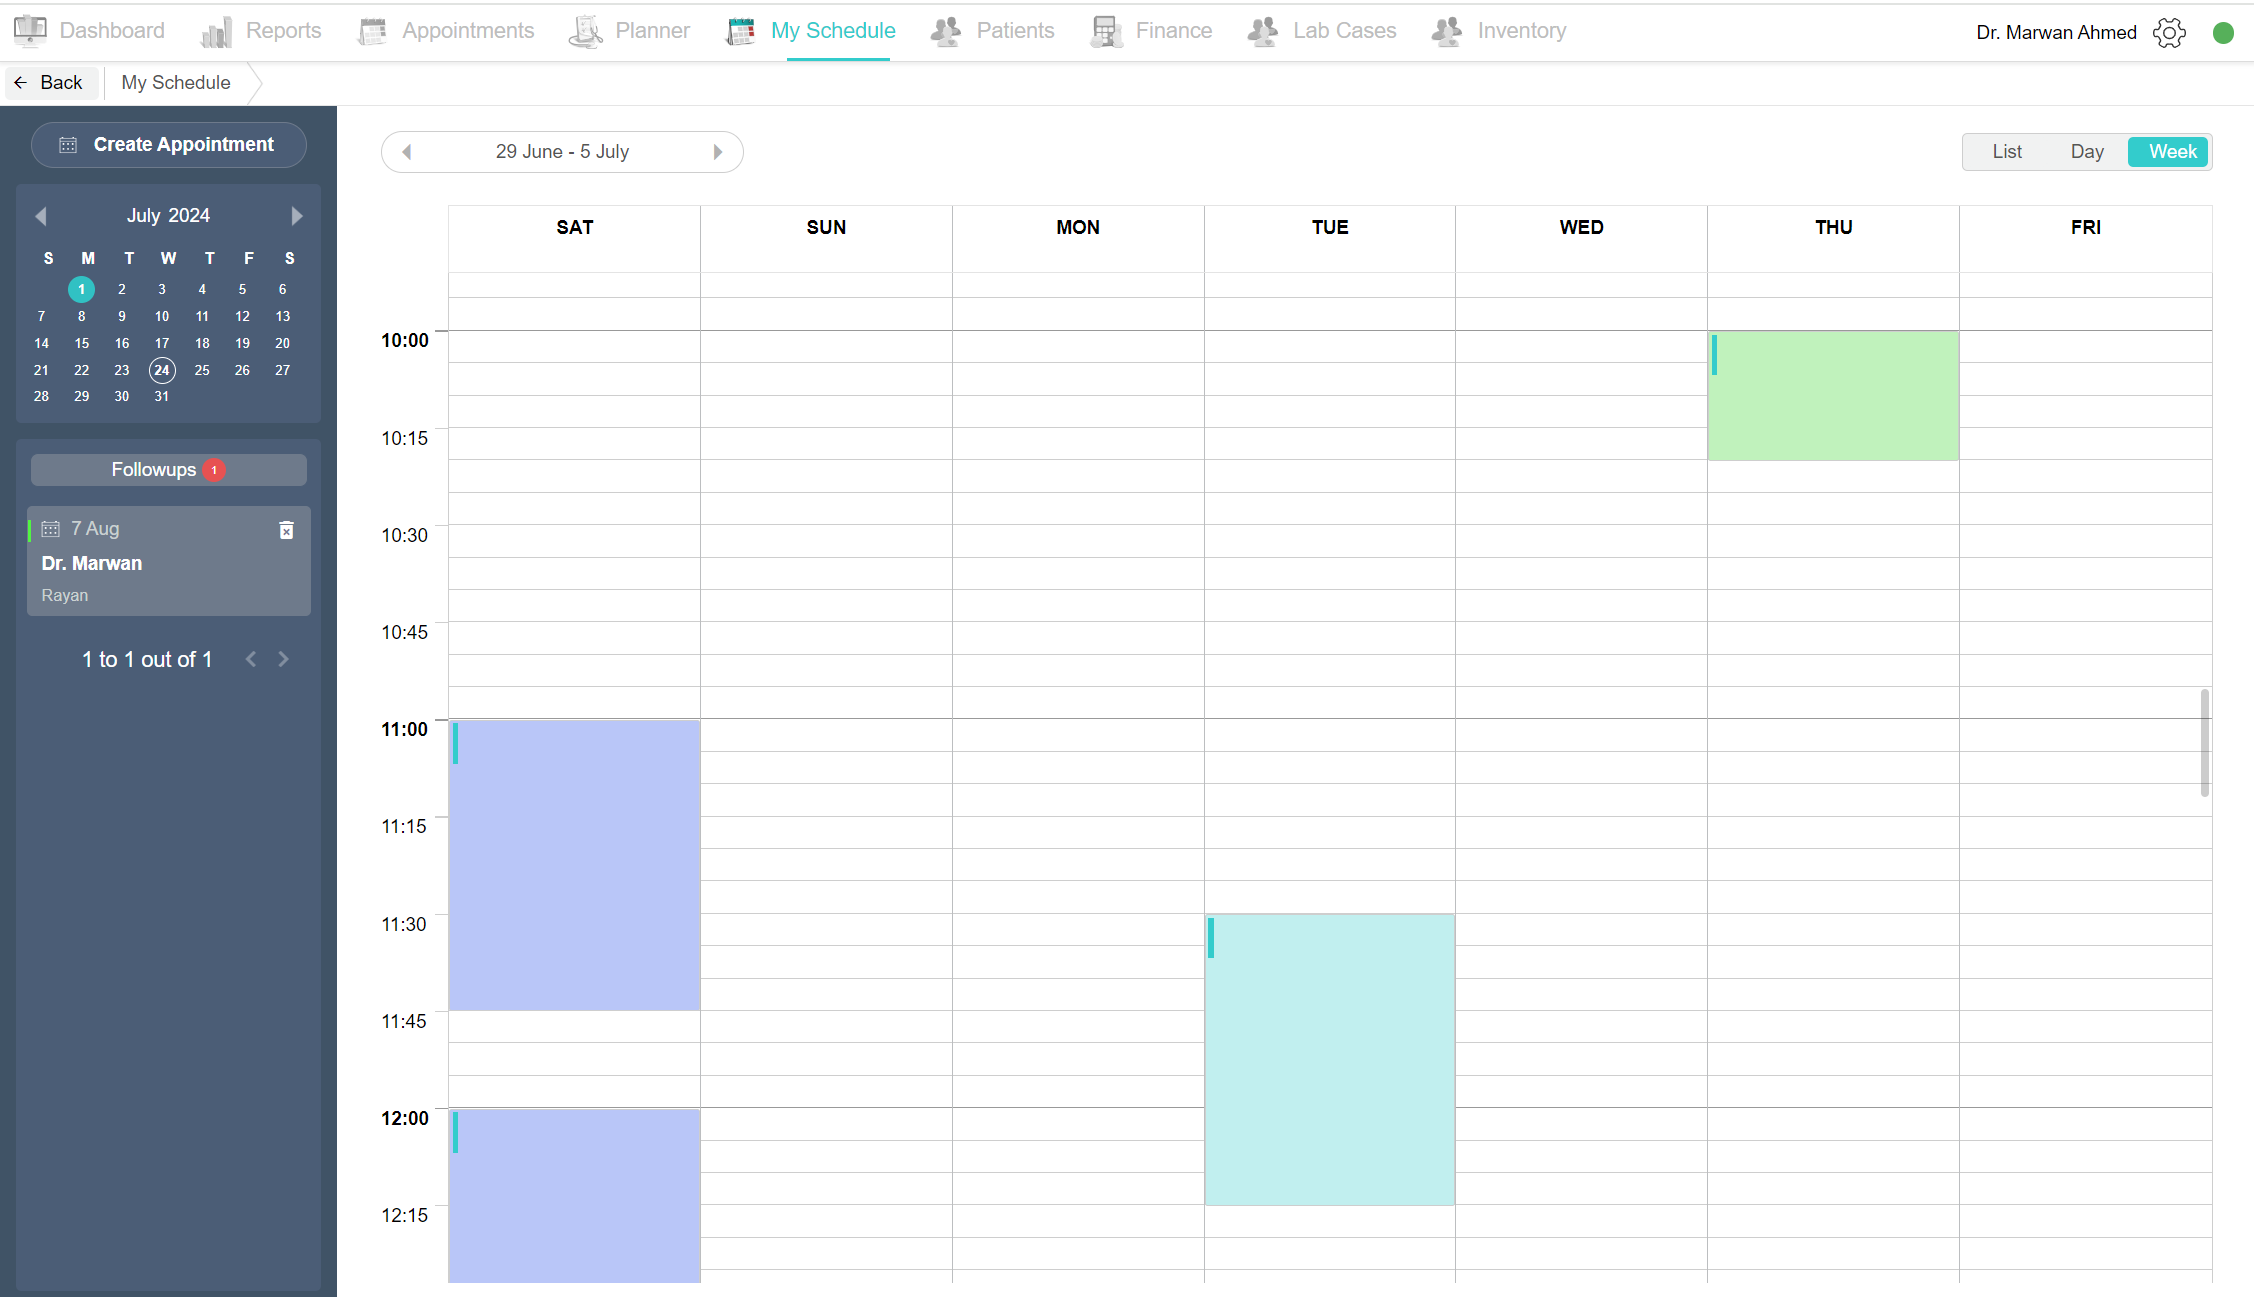
My schedule Tab
As a doctor, if you want to view your appointment schedule for a specific time, simply click on the 'My Schedule' tab. You can see all your appointments, which are displayed as follows:
Day: By clicking on the 'Day' button at the top left, you will see all the appointments for today or for a specific day you select from the calendar.
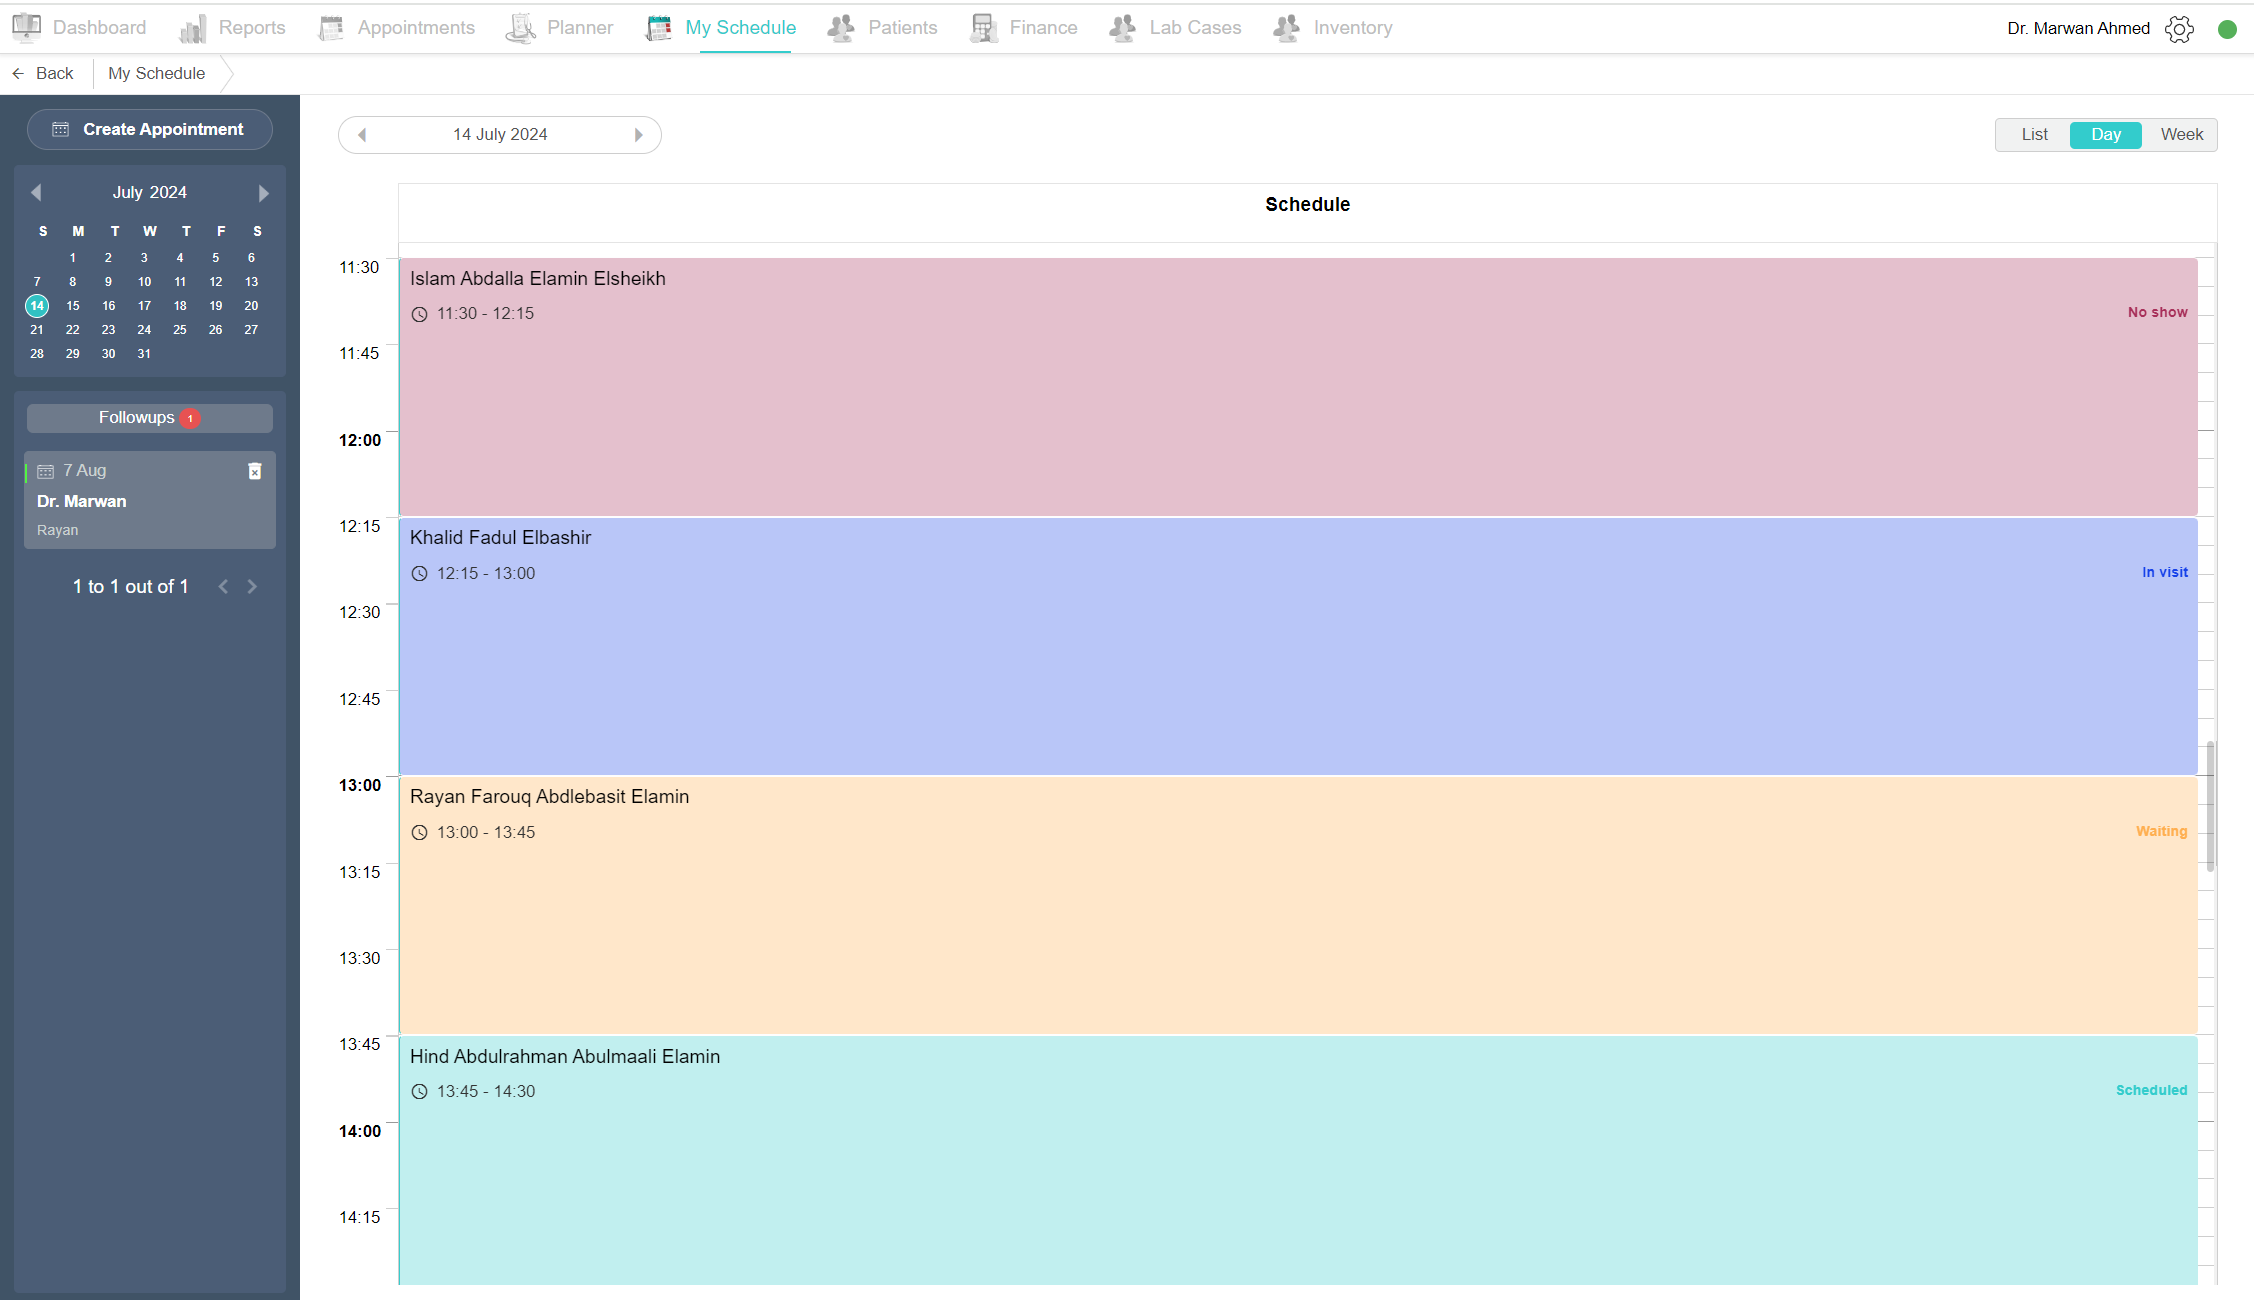
List: If you want to see all appointments from your start date until now, just click on the 'List' button at the top left. You can filter appointments by status or search by patient name.
Week: By clicking on the 'Week' button, you can view appointments scheduled for the selected week period.
E-medical record (EMR)
Patient management is one of the most important features in Electronic Medical Records (EMR) systems.
E-medical record tab
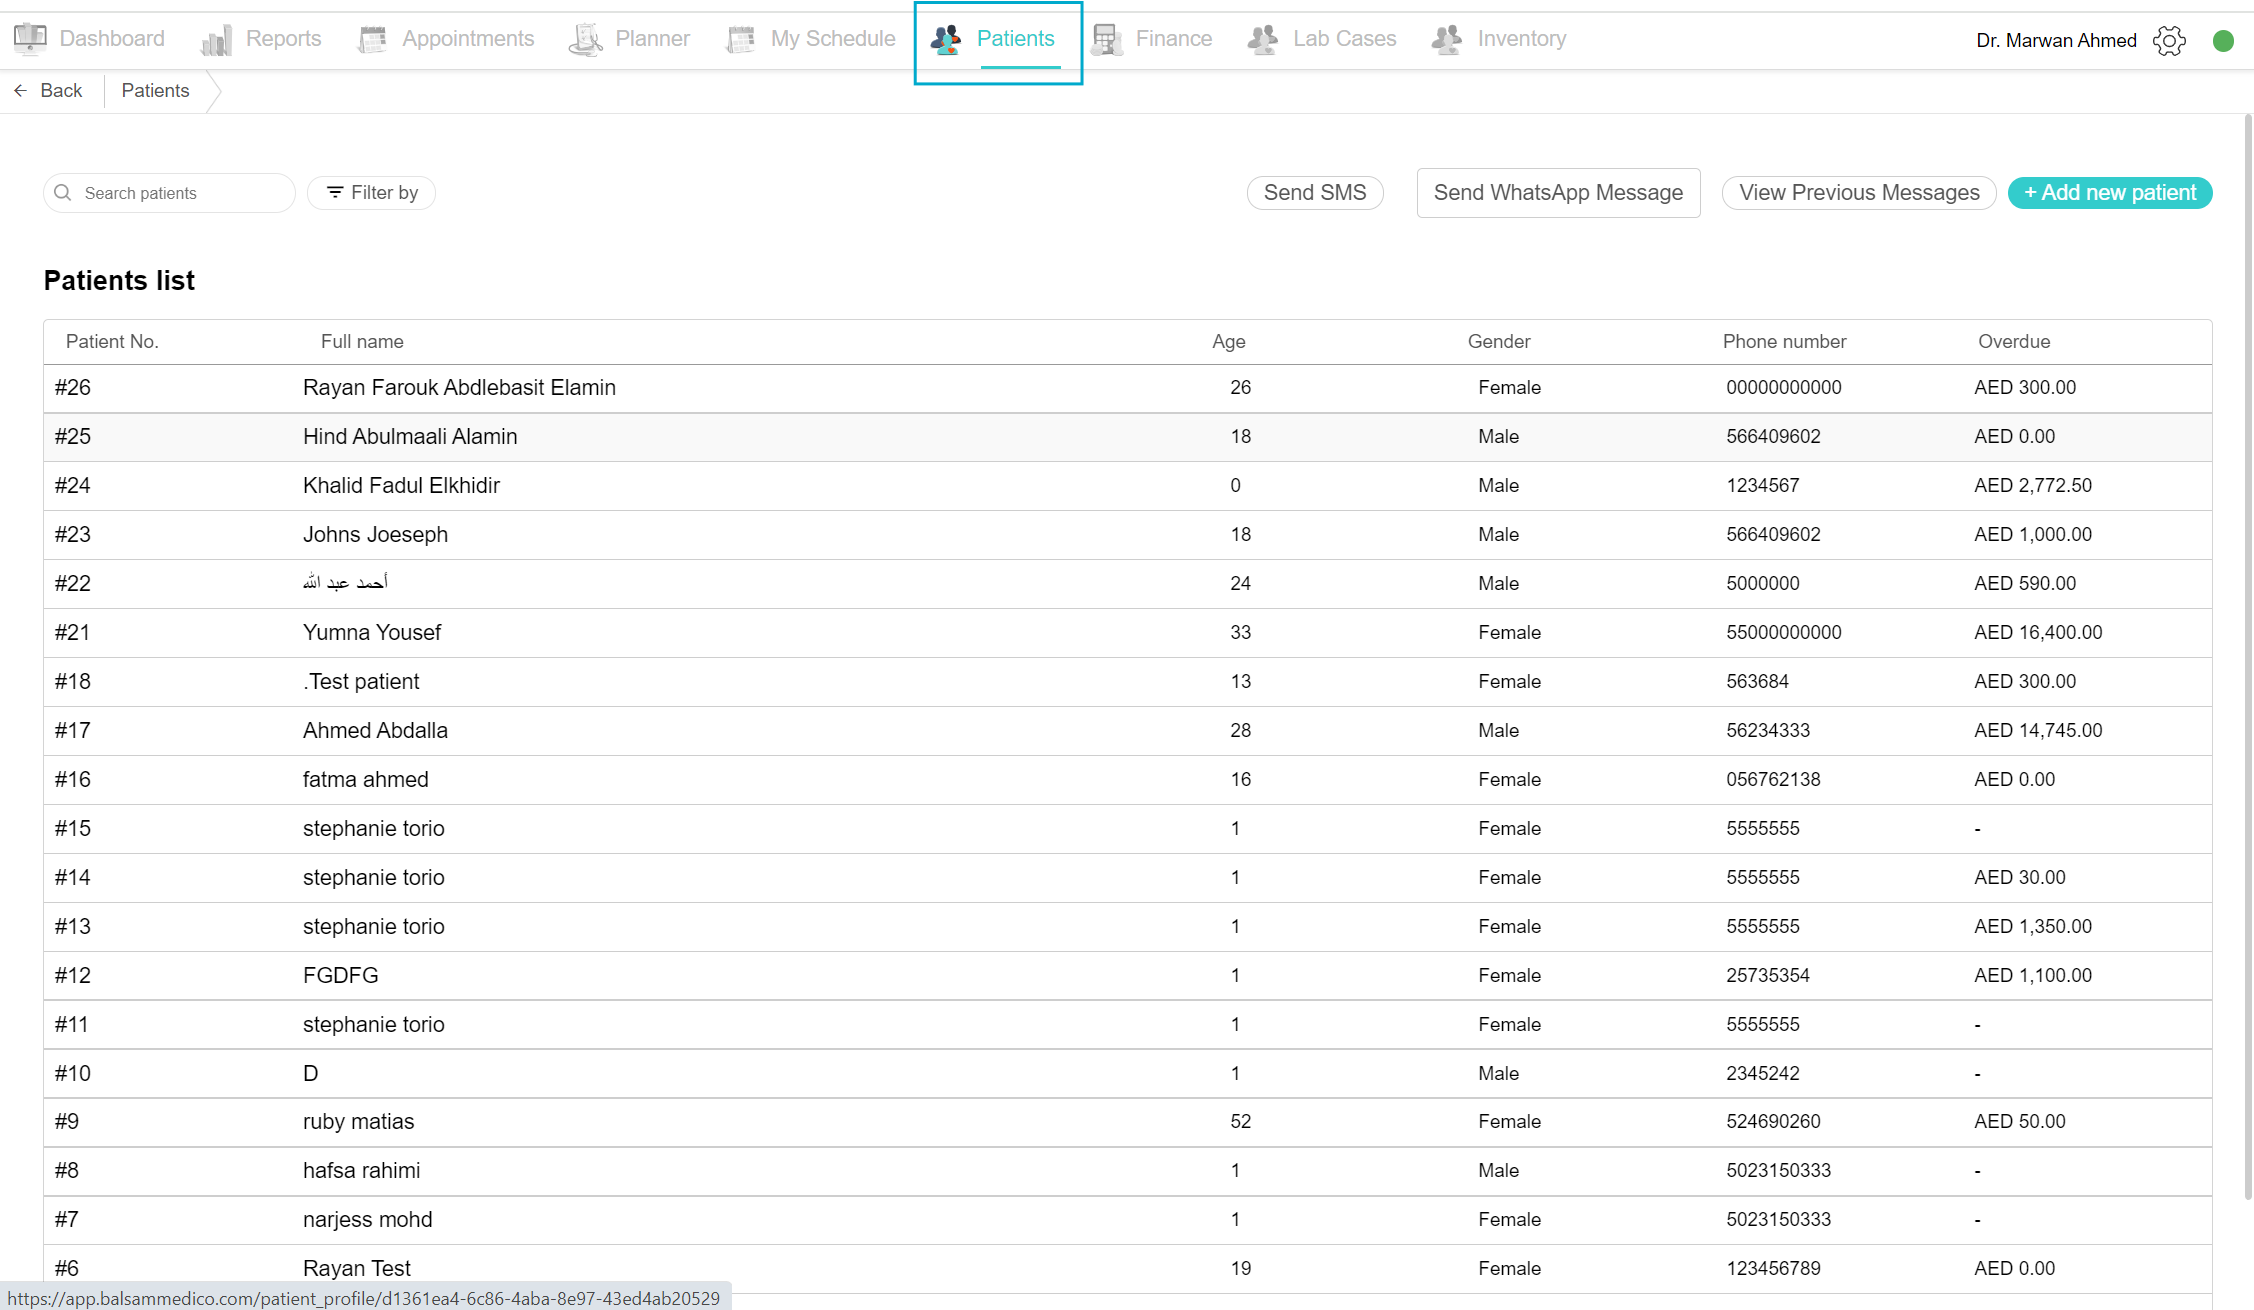
To see all patients in the clinic, click on the "Patients" tab.
Receptionists and doctors usually need to review data about patients. Patient management is one of the most important features in Electronic Medical Records (EMR) systems. Usually, the receptionist is responsible for managing the patients. The page includes the patients' list, a search field, a filter option, an “add new patient” button, and SMS management. The patient list shows the patient number, the patient name, age, gender, phone number and the patient overdue. Here, we will explain the various use cases for doing so.
Search Existing Patient
To search for an existing patient, go to the "Patients" tab. You have a list of all patients. You can search by patient name, file number, phone number, or ID.
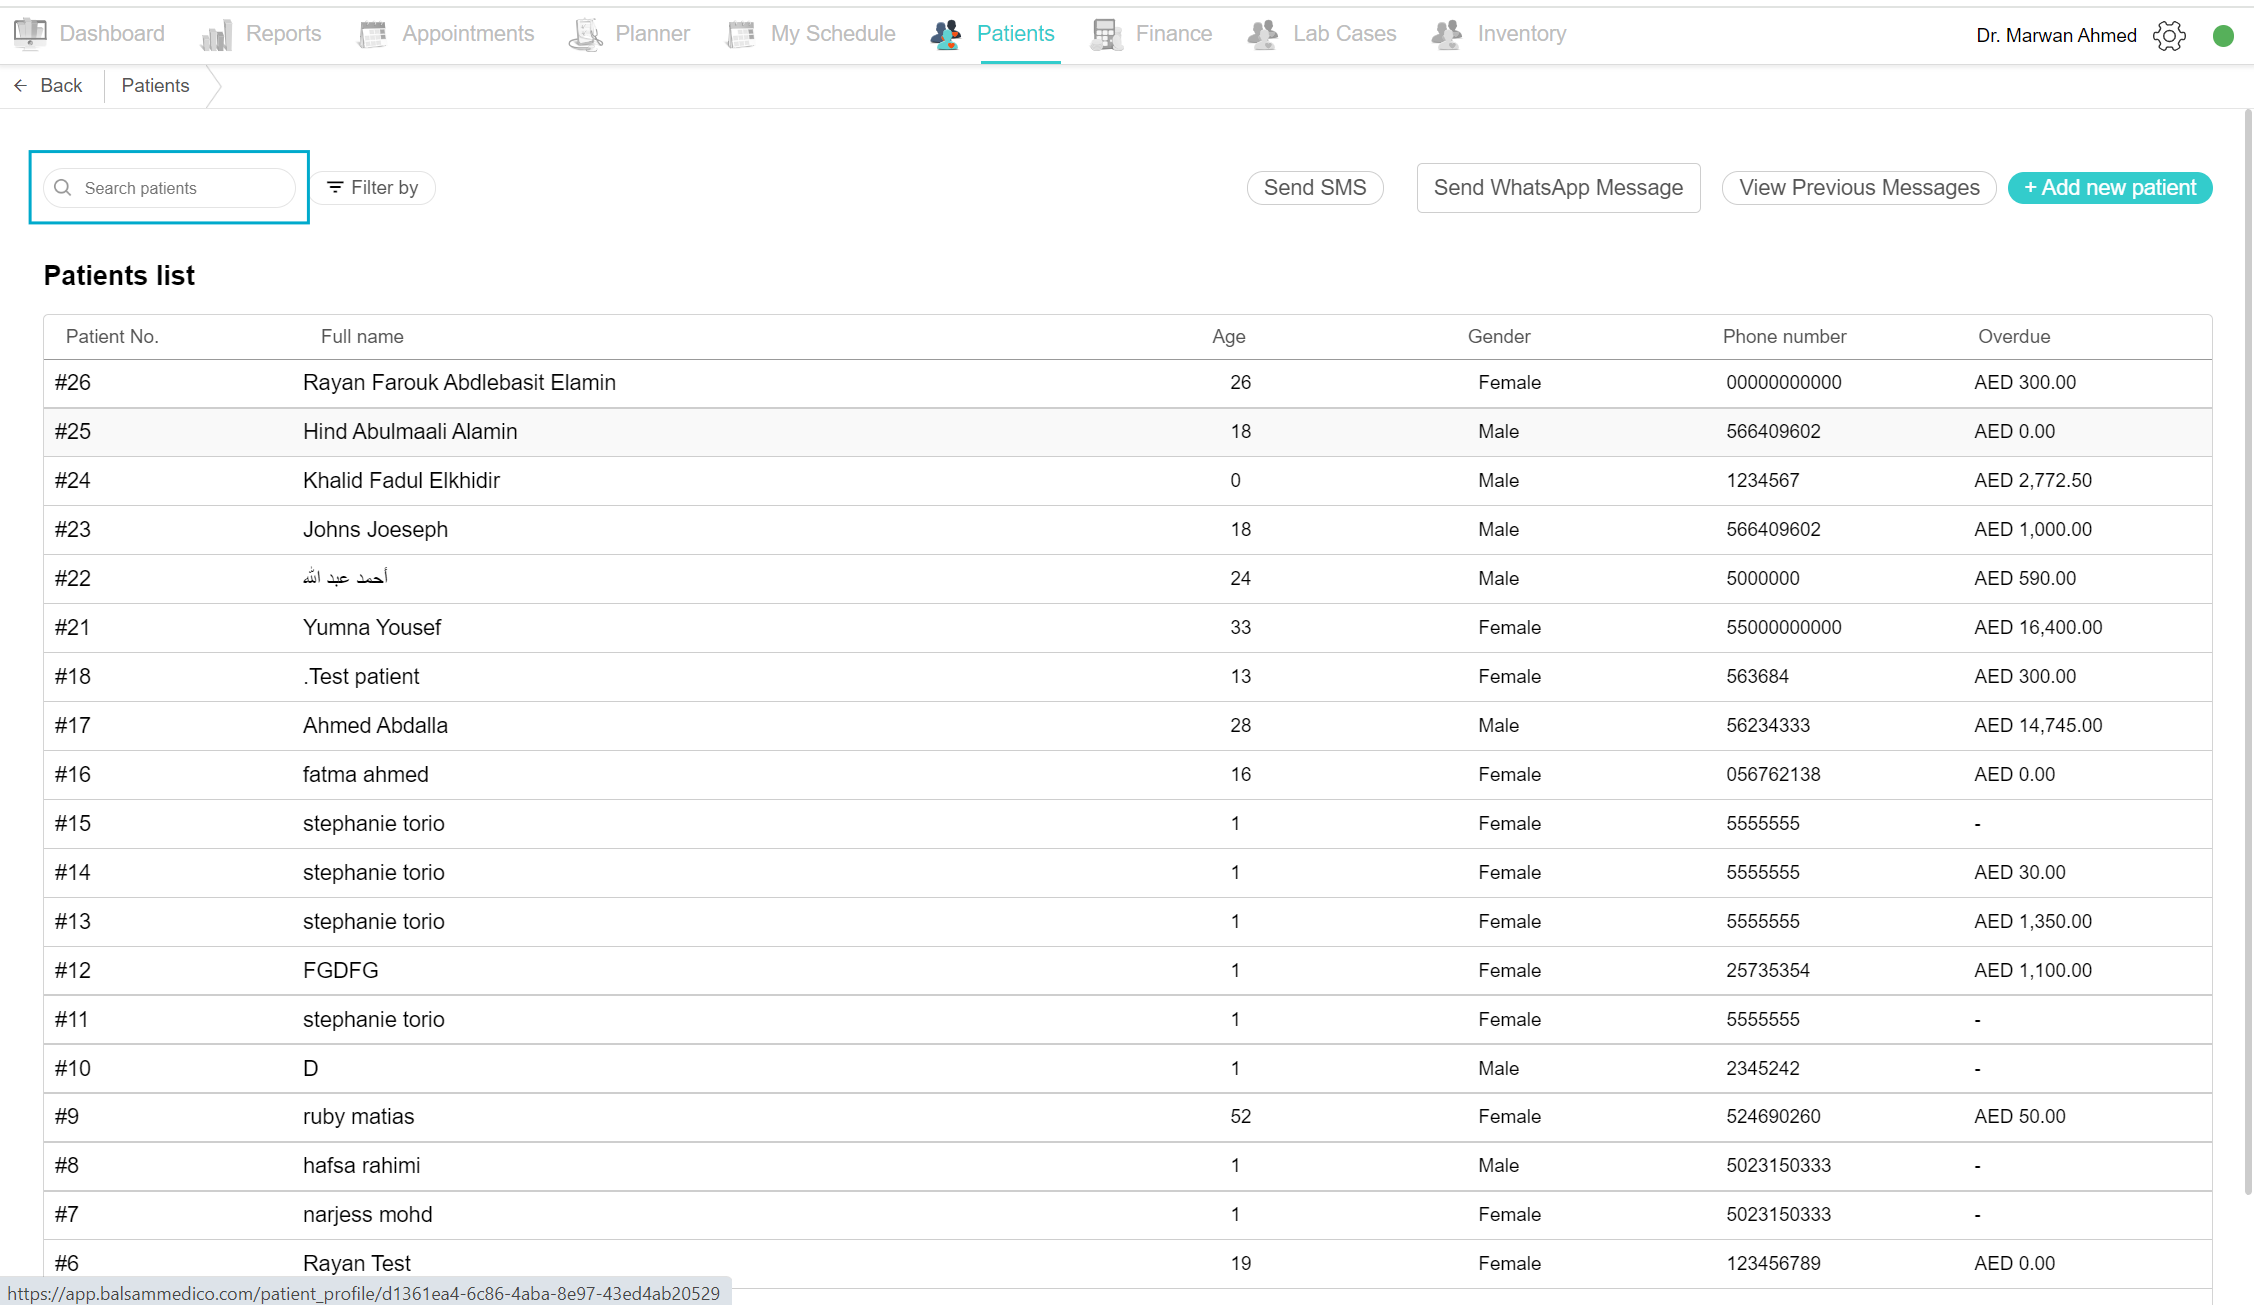
Filter Patients
Go to the “Patients” tab, and view the patient list. Click on the “Filter by” option. You can filter the search by gender, overdue status, or age.

Add New Patient
There are two ways to add a new patient.
In the "Patients" tab, click on the "Add New Patient" button. This will open the "Add New Patient" view. Fill out all the required information, such as full name, ID, date of birth, etc. You can also add additional optional information. After filling out the data, click on the "Add Patient" button. The new patient will appear in the patient list on the "Patients" tab.

The other way is through the Appointments tab when creating a new appointment. Click the Create New Appointment button and click on the Add New Patient button.

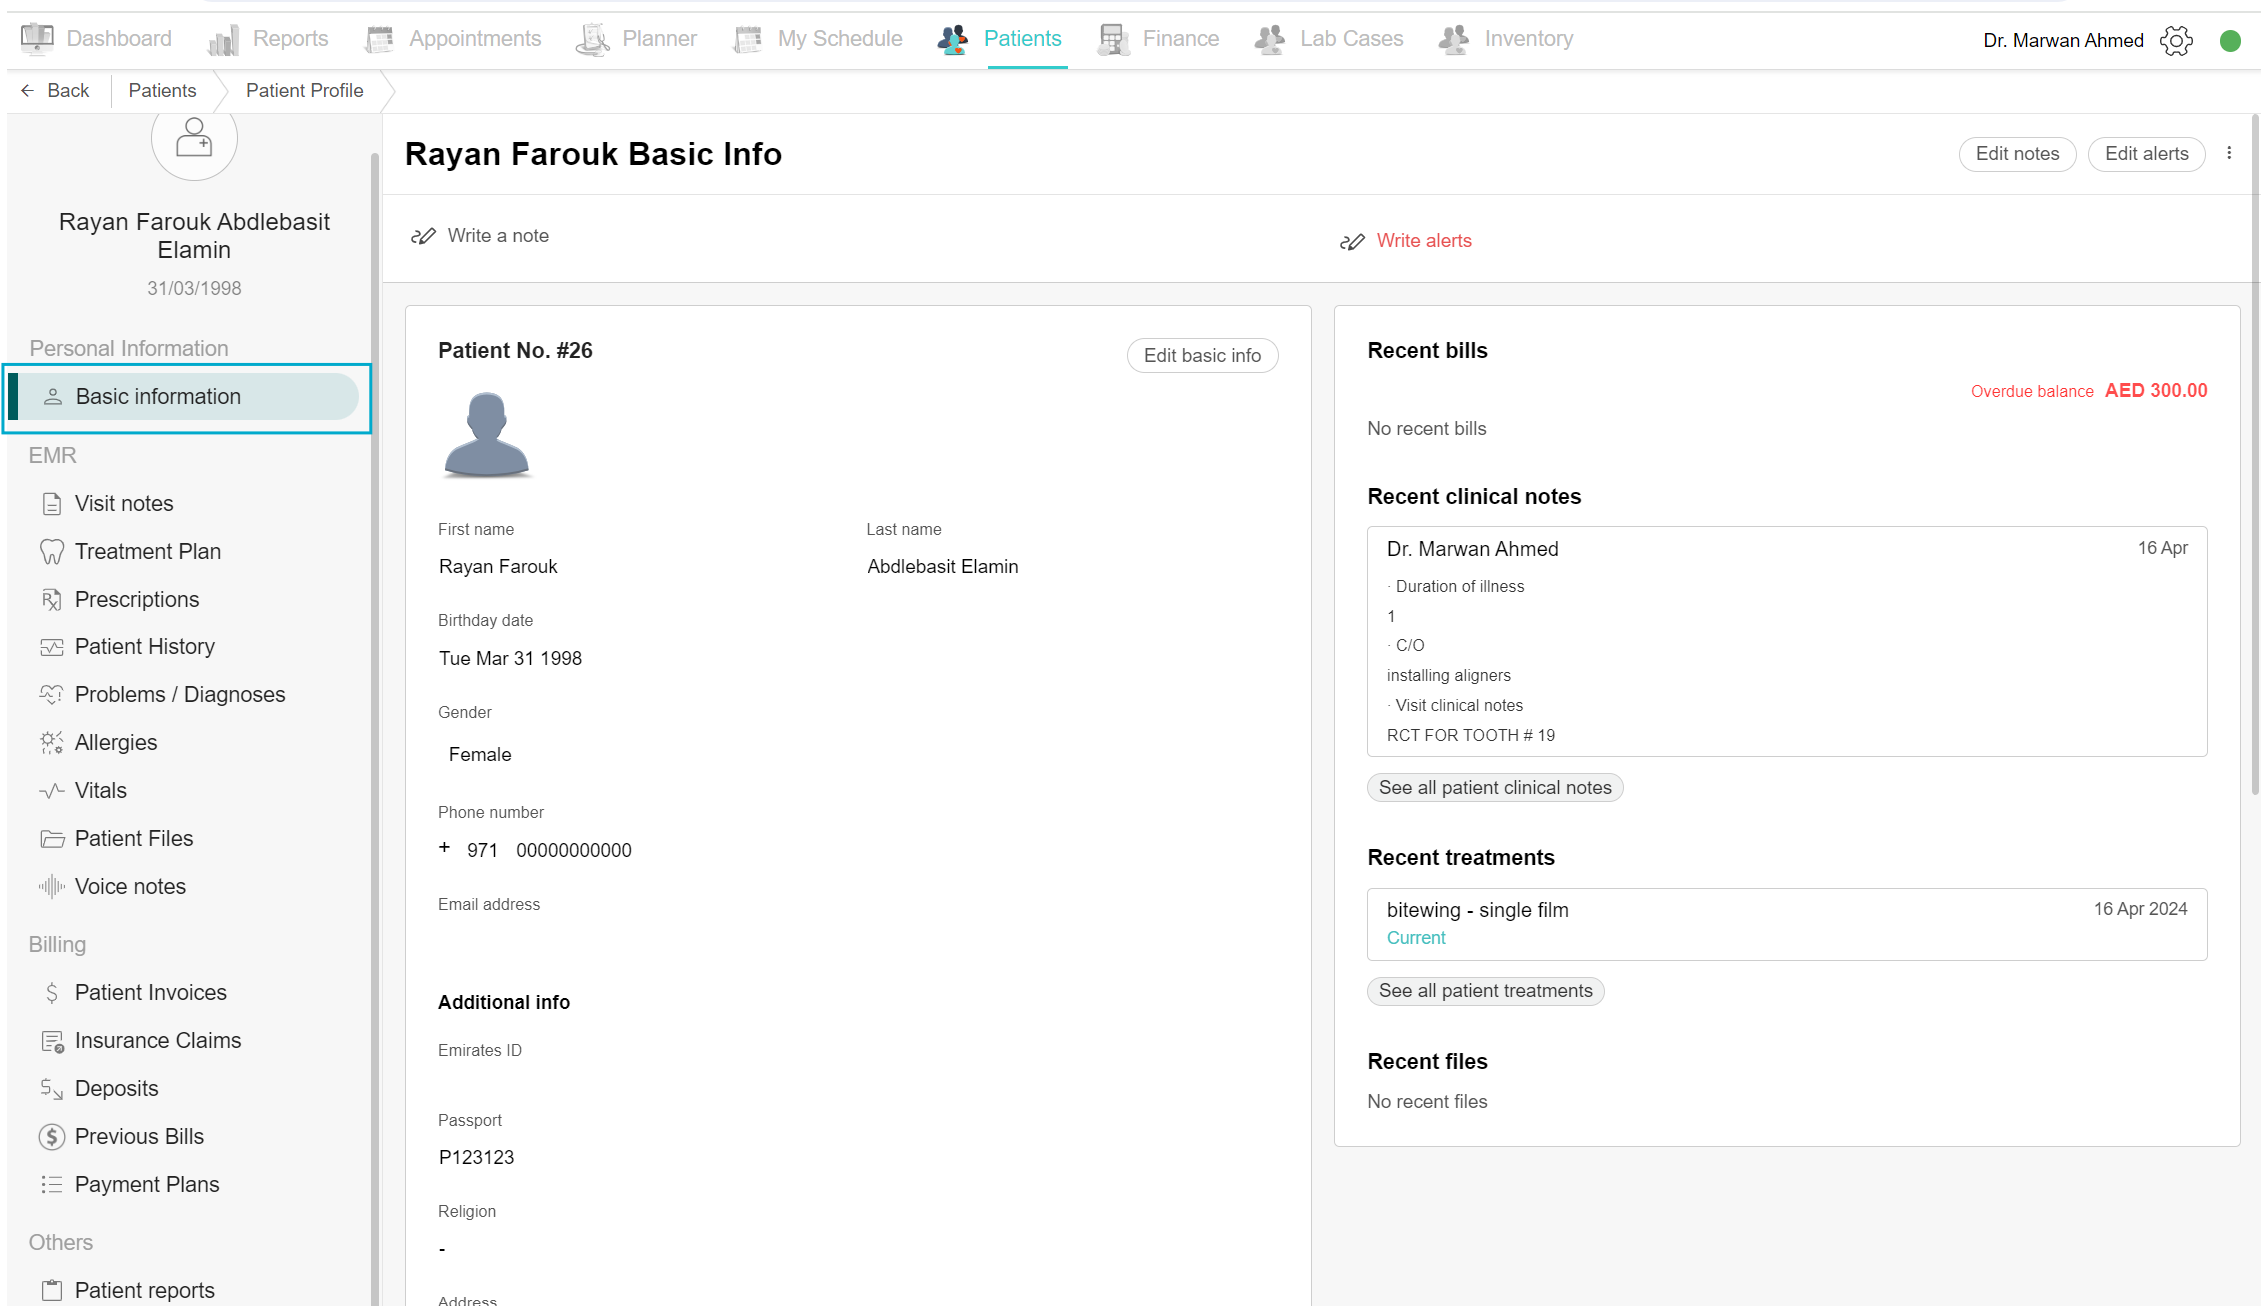
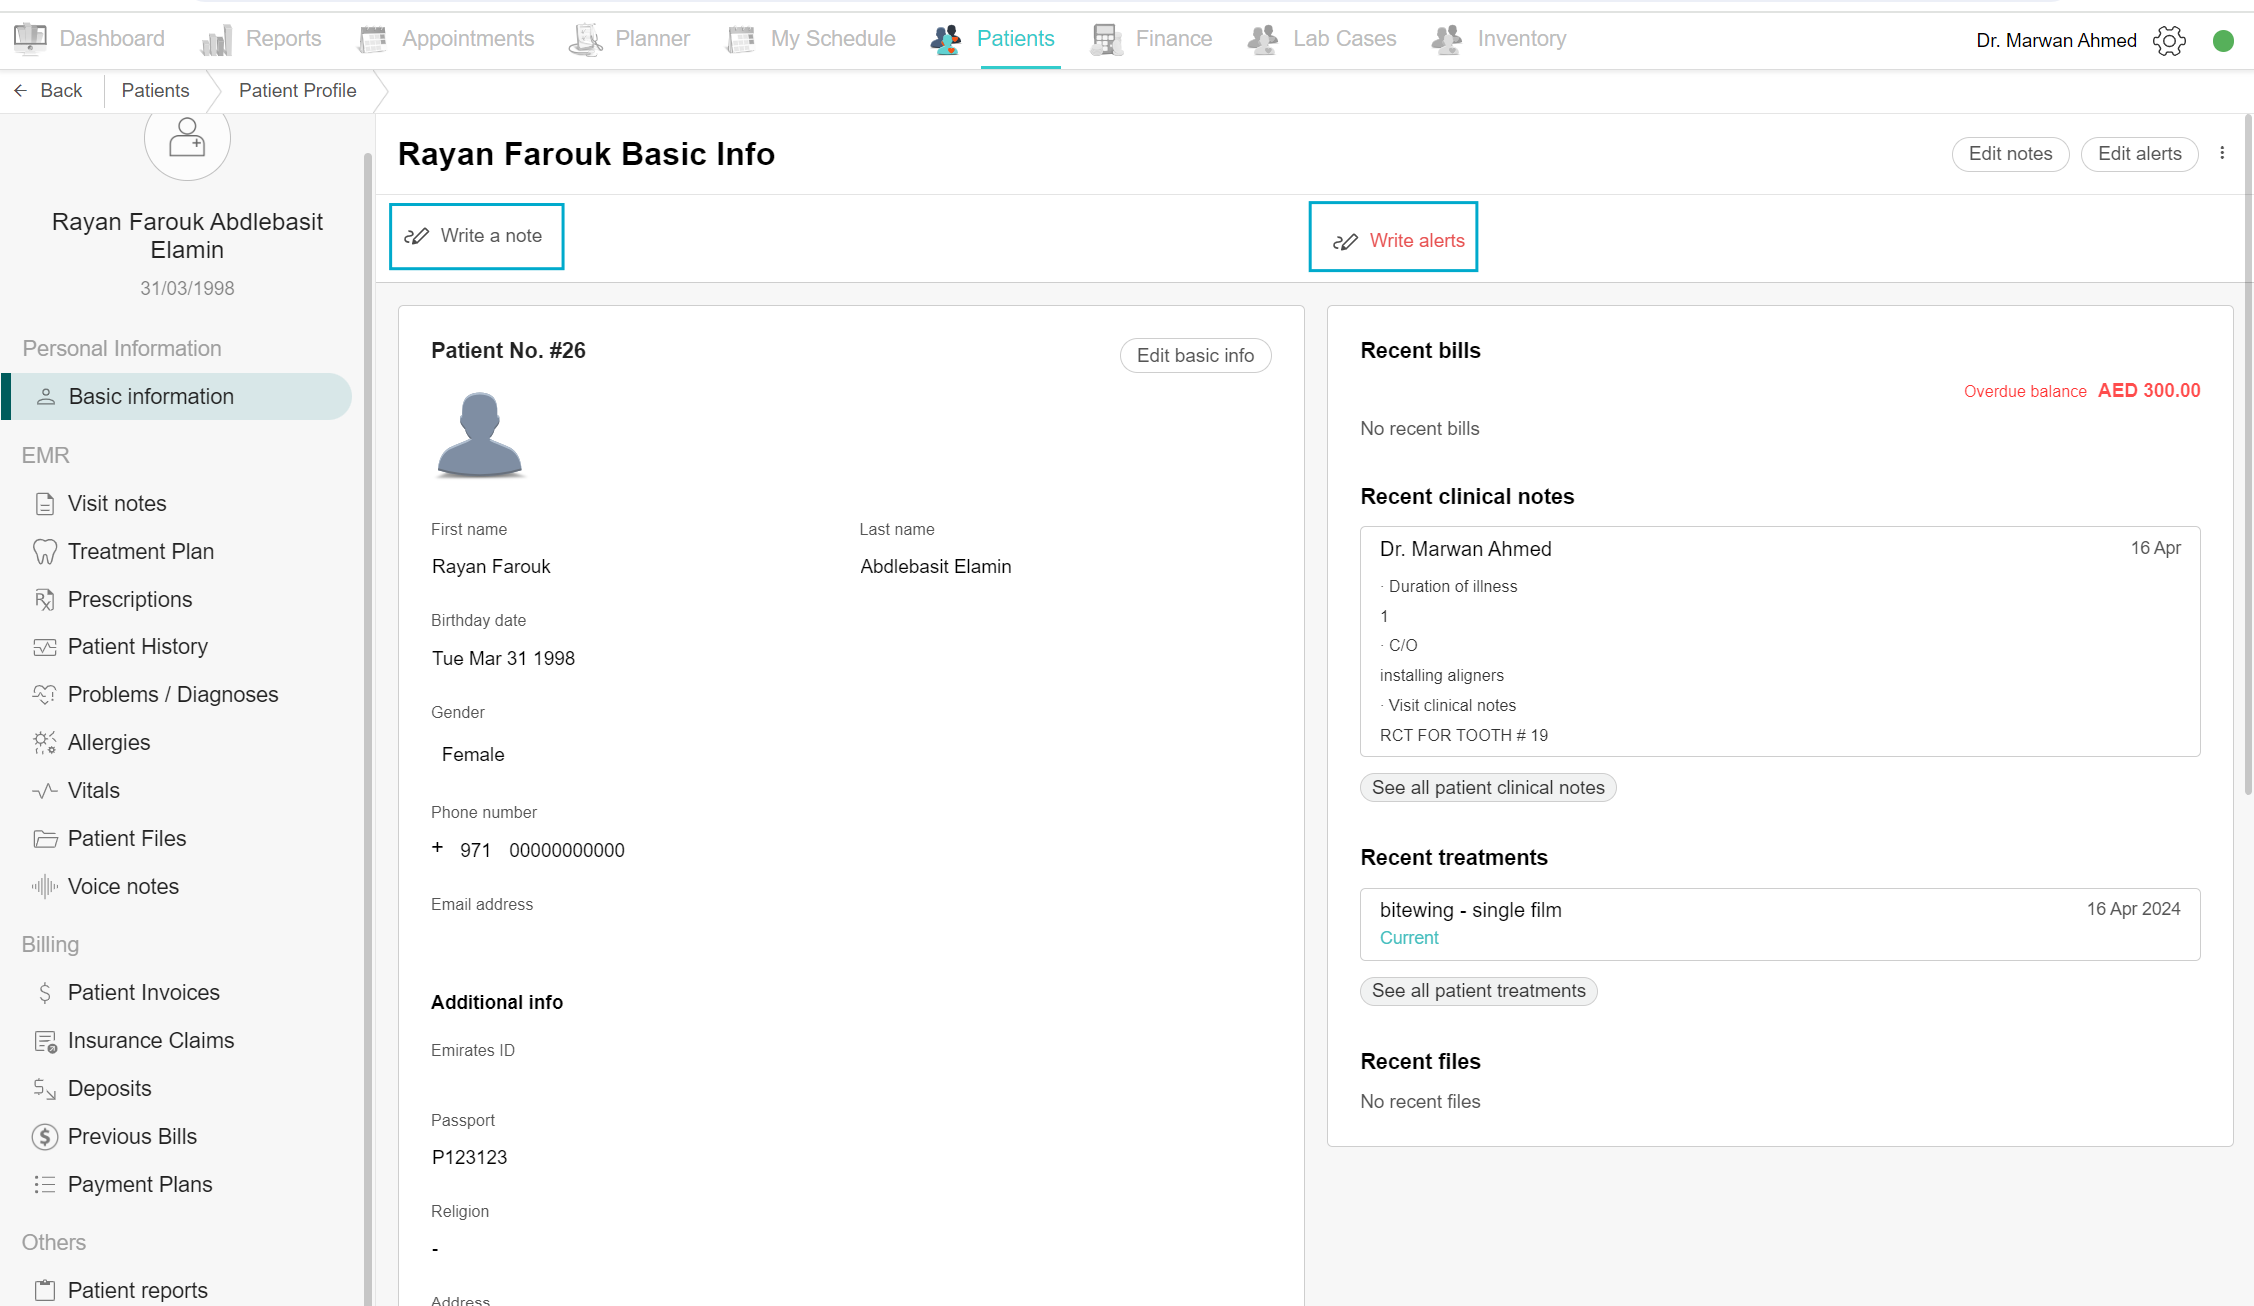
View Personal Information
Open the Patients tab, choose the desired patient and click on it. The patient profile opens up. In the Basic Information, you will find the patient’s information including notes, alerts if found, their personal information, their signatures if found and the insurance information. On the right side of the page, the recent bills, clinical notes, treatments and files are shown. To view more of the clinical notes, click the “See all patient clinical notes” button under the recent clinical notes box and to view more of the patient treatments, click the “See all patient treatments” button under the recent treatments box. On the left side of the page, you can check the personal information, EMR, Billing and Others. Under Personal Information you can check basic information and under EMR, you can check everything medical about the patient. Under Billing, you can check patient invoices, insurance claims, deposits and payment plans. Finally, under Others, you can check patient reports where you can fill out a consent form and patient report.
Write Notes or Add Impressions
To add a note or impression about a patient, go to the "Patients" tab, click on the patient's name, and the Basic information, then click on the "Add Note" button. Write your notes and you can see them at the top of the patient profile tab. And, if needed, add an alert by clicking the "Add Alert" button, the alert is viewed at the top of the patient profile next to the notes and can also be seen in the appointment details box in the Appointments tab.
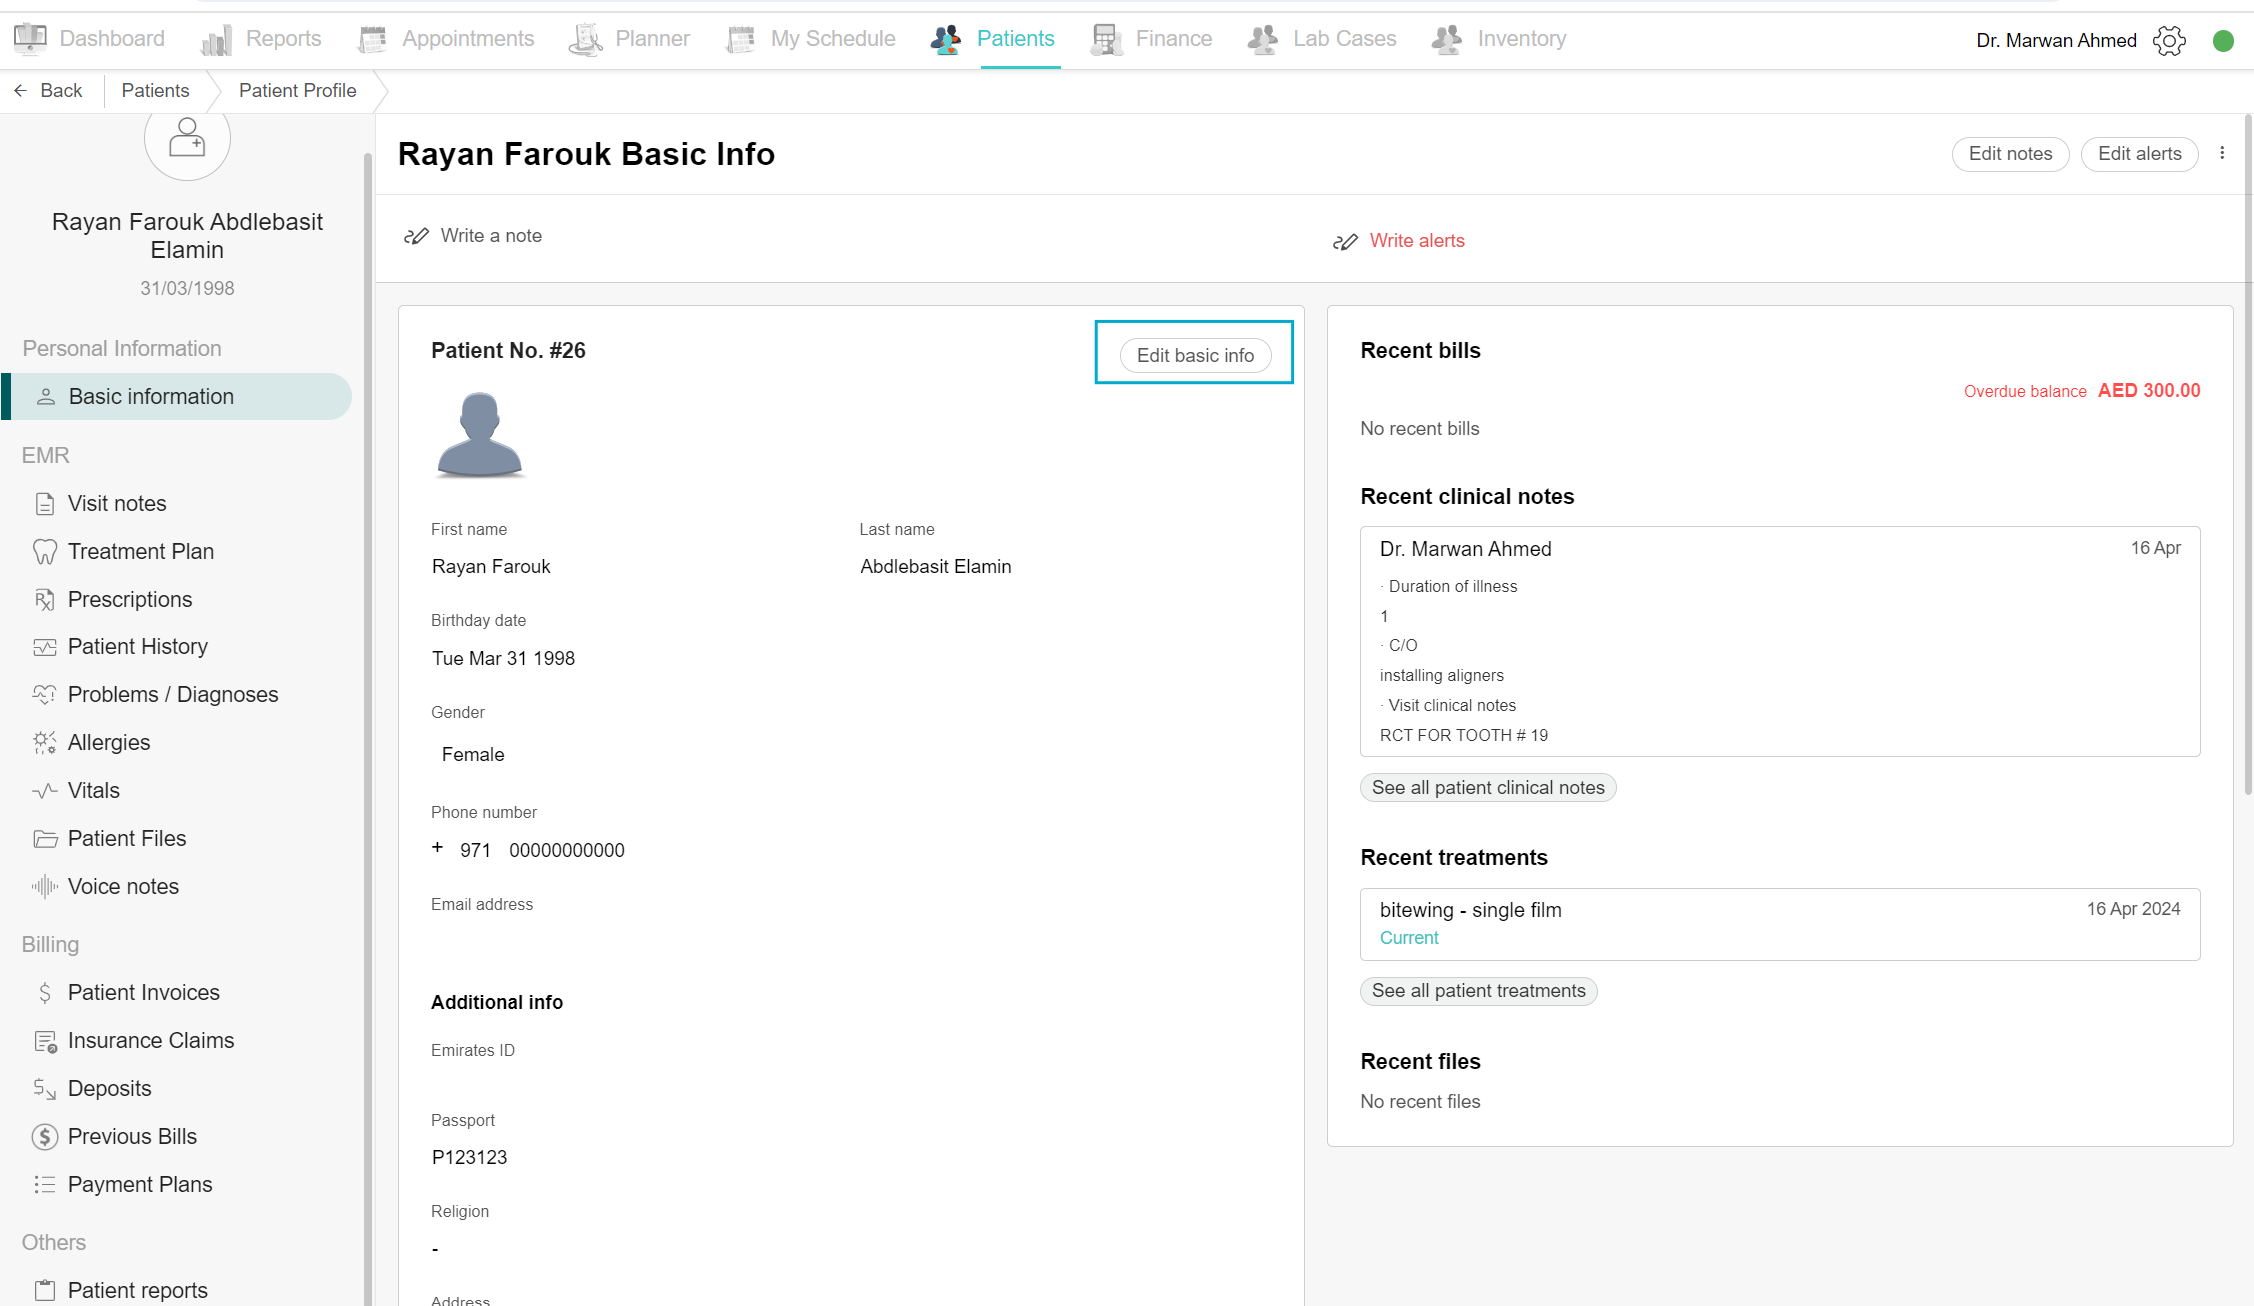
Edit Patient Information
To change existing patient information, such as a phone number, go to the "Patients" tab and select the patient. Once you click on the patient's name, you will go to the patient profile view. Click the "Edit Basic Info" button, make your changes, and click the "Save" button. The new information will be displayed in the patient profile.
Delete patient
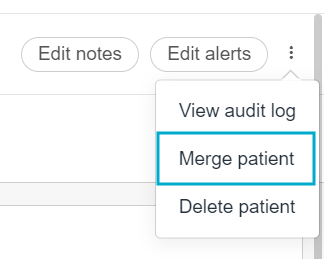
Deleting a patient will remove all records of them, removing the file number as well. So the privilege of deleting a patient is given to certain accounts. To delete a patient, open the patient profile. In basic information, at the top-right of the screen, click the three dots to view the list of options. Click on Delete patient. A confirmation box appears, click “Delete” to confirm and complete the process. Now the complete patient profile and file number are permanently deleted.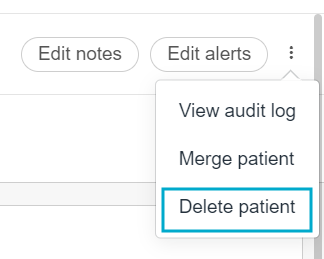
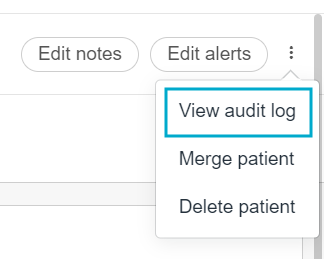
View Audit Log
In basic information, at the top-right of the screen, click the three dots to view the list of options. Click on View audit log. This will show who added or updated the patient info and when. Click View Details for specifics. This feature can be accessed by an admin account.
Merge Patients
When a patient is made by mistake or is duplicated, we need to combine both these patient profiles. For that, we created the merge patients features. Open the Patients tab, and click the desired patient. On the basic information page, click the three dot menu icon. Choose the “Merge patient” option, and a pop-up box appears. Notice the writing in the box, it says “All treatments, prescriptions, vitals, appointments, invoices, claims and reports will be moved to 1 patient.”. The biggest warning is “Patient basic details and history won’t be merged. Make sure to manually save the data you want to retain”. Select the other patient you want to merge with from the drop down menu. Two options appear making you choose which patient number you want to retain and which patient file will be deleted. Select the desired option and click confirm. Refresh the page and the patient file is now deleted.
Visit Notes
All visit notes are automatically saved with the author's name and date. To review them, go to the "Patients" tab, click on the patient's name, and select "Visit Notes".
Treatment Plan
To see previous treatments, go to the "Patients" tab, select the patient's name, go to the patient profile, and in the EMR section, select "Treatment Plan". You will see all treatments with their status and date.
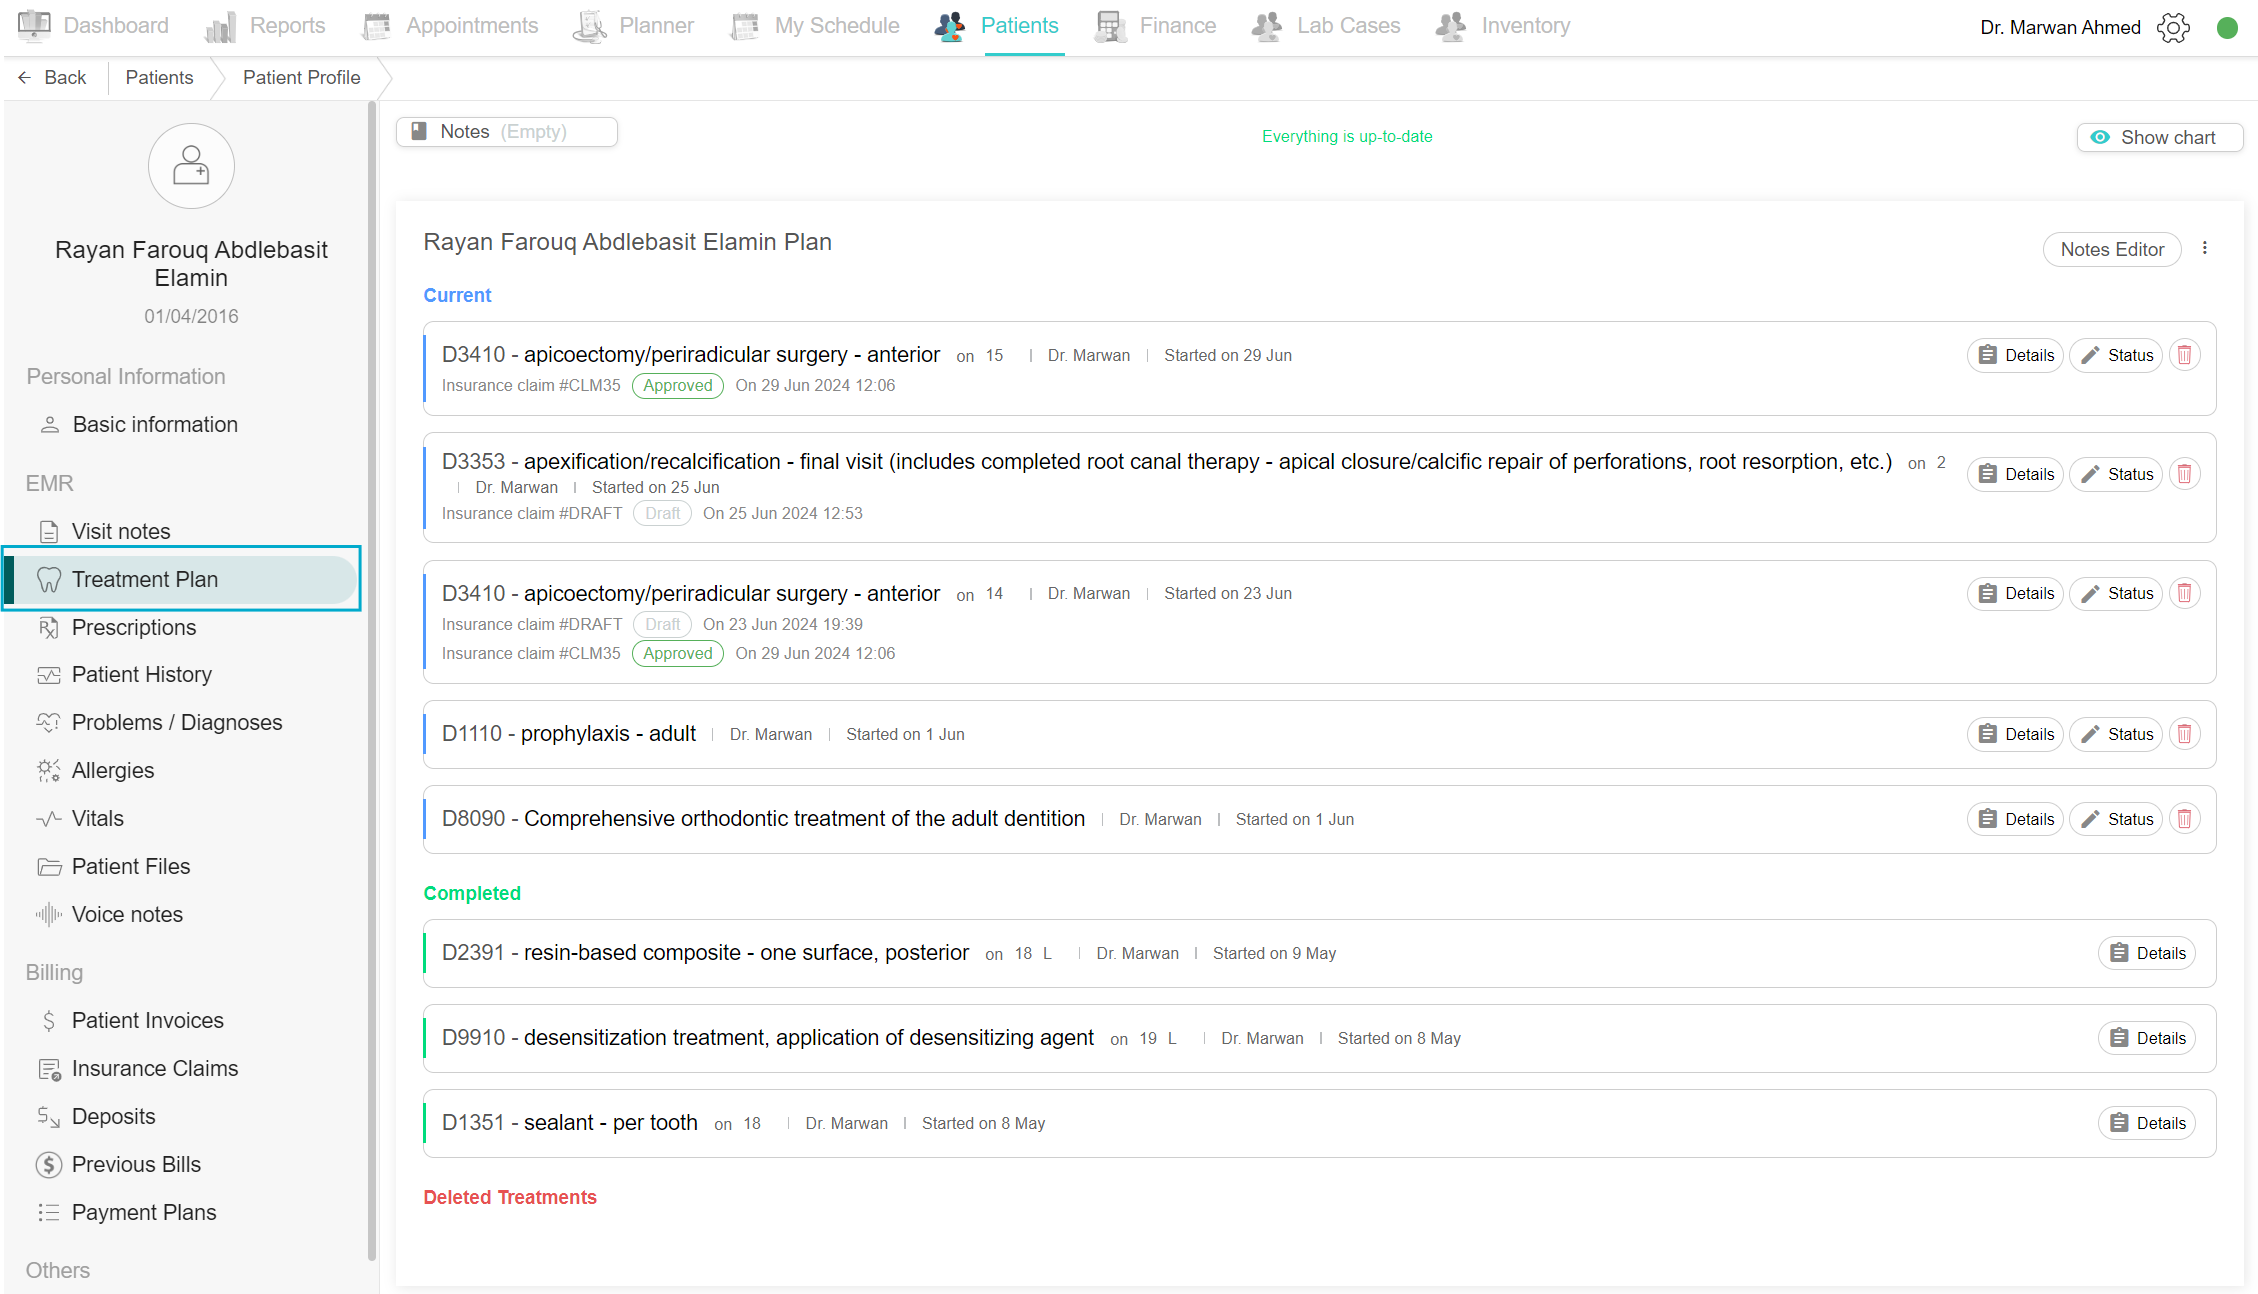
Prescriptions
Add prescription:
Writing prescriptions is easy. Click on the patient's name, select "Prescription" in the EMR section, click on the "Add Prescription" button, select the drug from the list, and save it. Click Print and Lock to disable editing the prescription and print it for the patient.
Revoke prescription:
If the doctor wishes to cancel the prescription, that is to revoke the prescription. To revoke a prescription, choose the desired prescription, and click the “Revoke” button next to the drug name. A confirmation box appears, click “Revoke prescription” to continue the cancellation process. Now the prescription is given the status “Revoked”.
View Patient History
To view patient history or make changes, go to the "Patients" tab, click on the patient's name, and select "Patient History" in the EMR section. Review the patient history. Edit as needed and click the "Save" button.

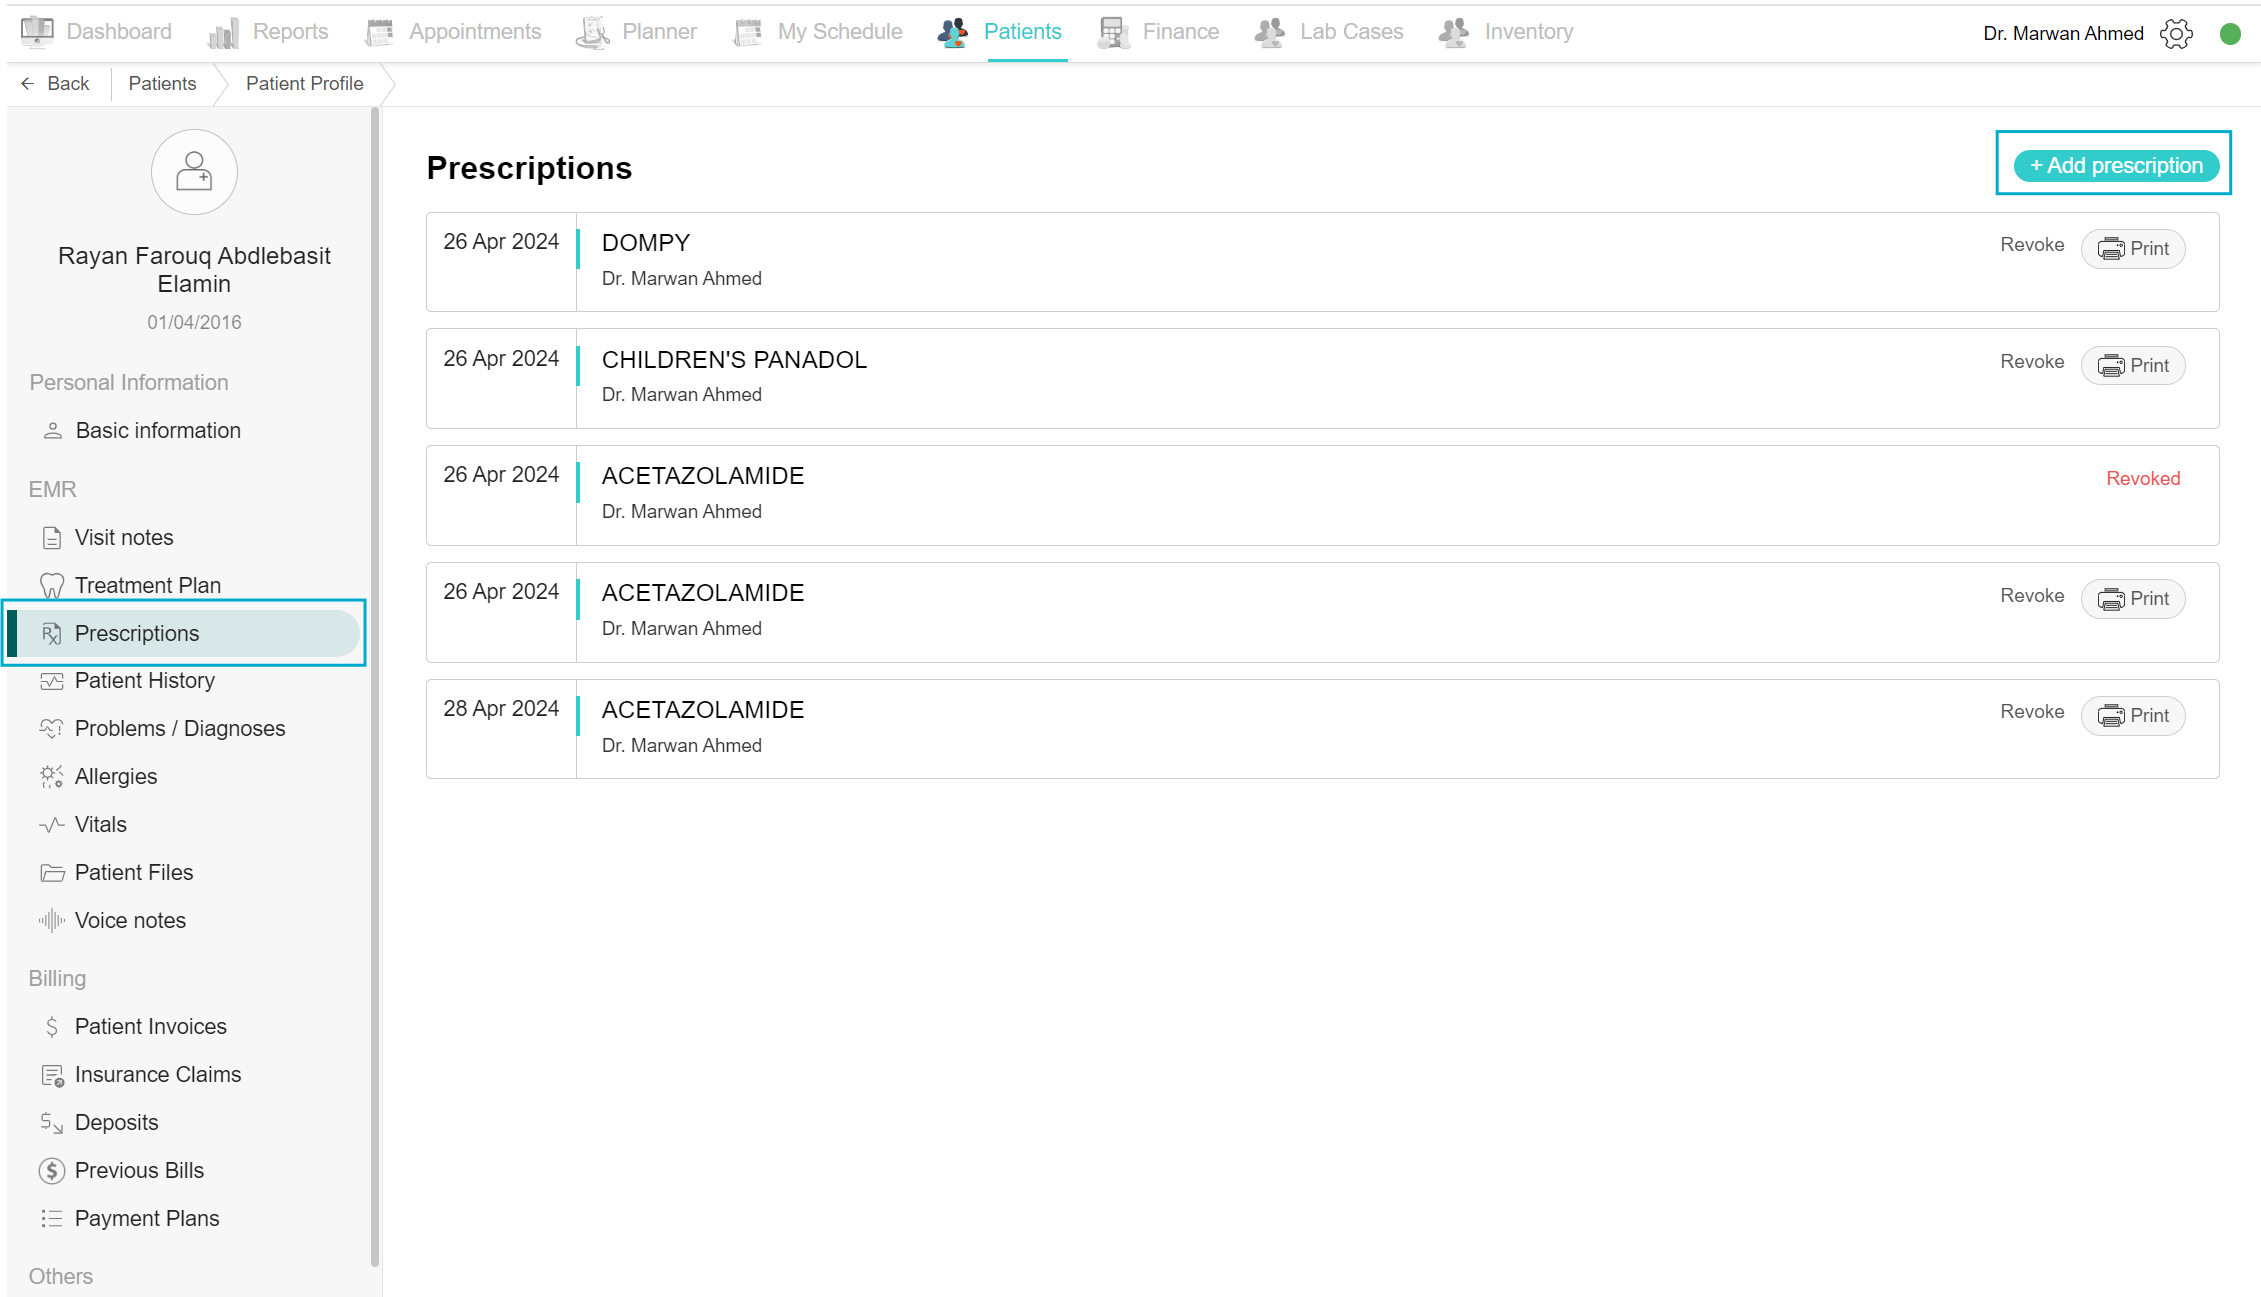
View Problems and Diagnoses
To add a new problem, go to the "Patients" tab, select the patient's name, and select "Problems and Diagnoses". You will see all previous problems and can add new ones by clicking on the "Add Patient Problem" button. Use ICD codes according to DHA.
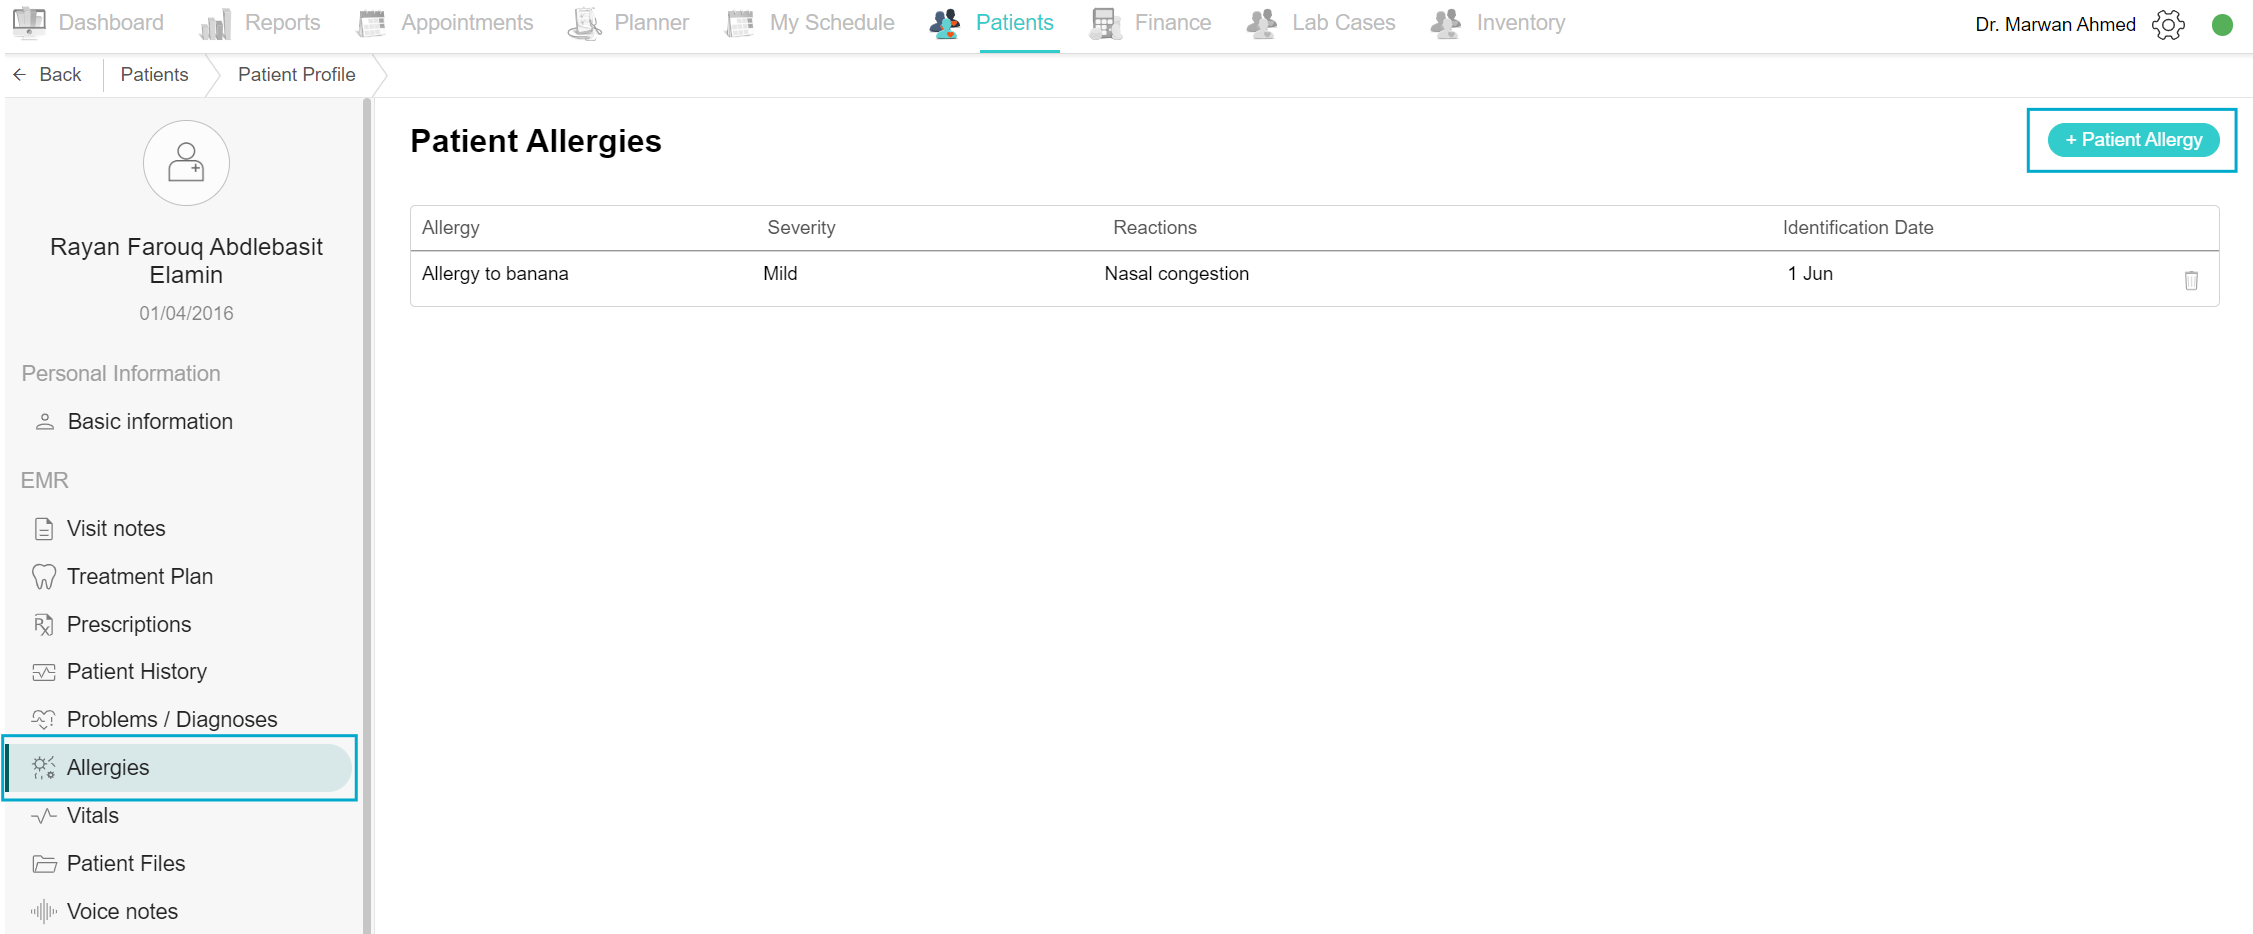
View Allergies
To check the previously added allergies, you can find the list when clicking “Allergies” in the EMR section. To add a new allergy, go to the "Patients" tab, click on the patient's name, and select "Allergies" in the EMR section. Click on the "Add Patient Allergy" button, select the allergy type and sensitivity, and click Save.
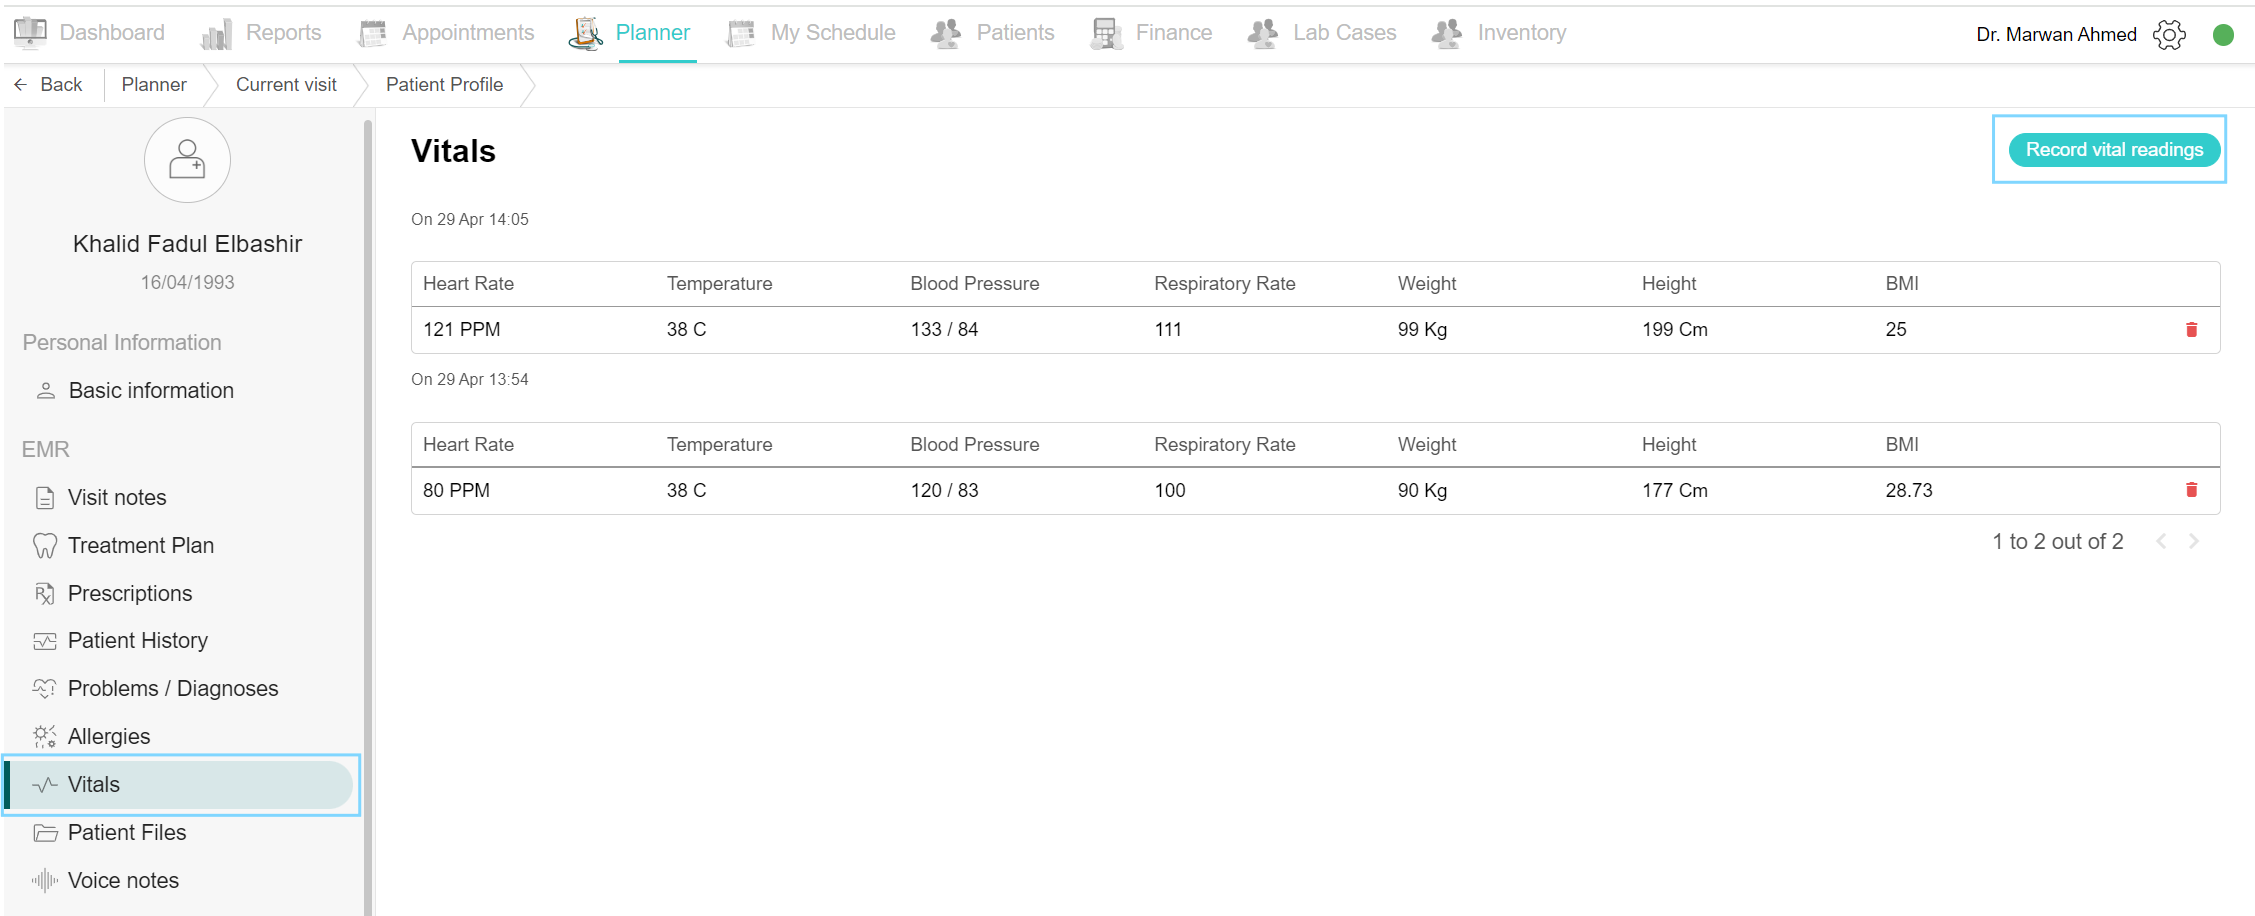
View Patient Vitals
All recorded vitals are saved in the system and can be accessed at any time. To see vitals recorded three months ago, for example, go to the "Patients" tab, click on the patient's name, go to the patient profile, and select "Vitals". You can also add new vitals by clicking on the "Record Vital Reading" button.
View Patient Files
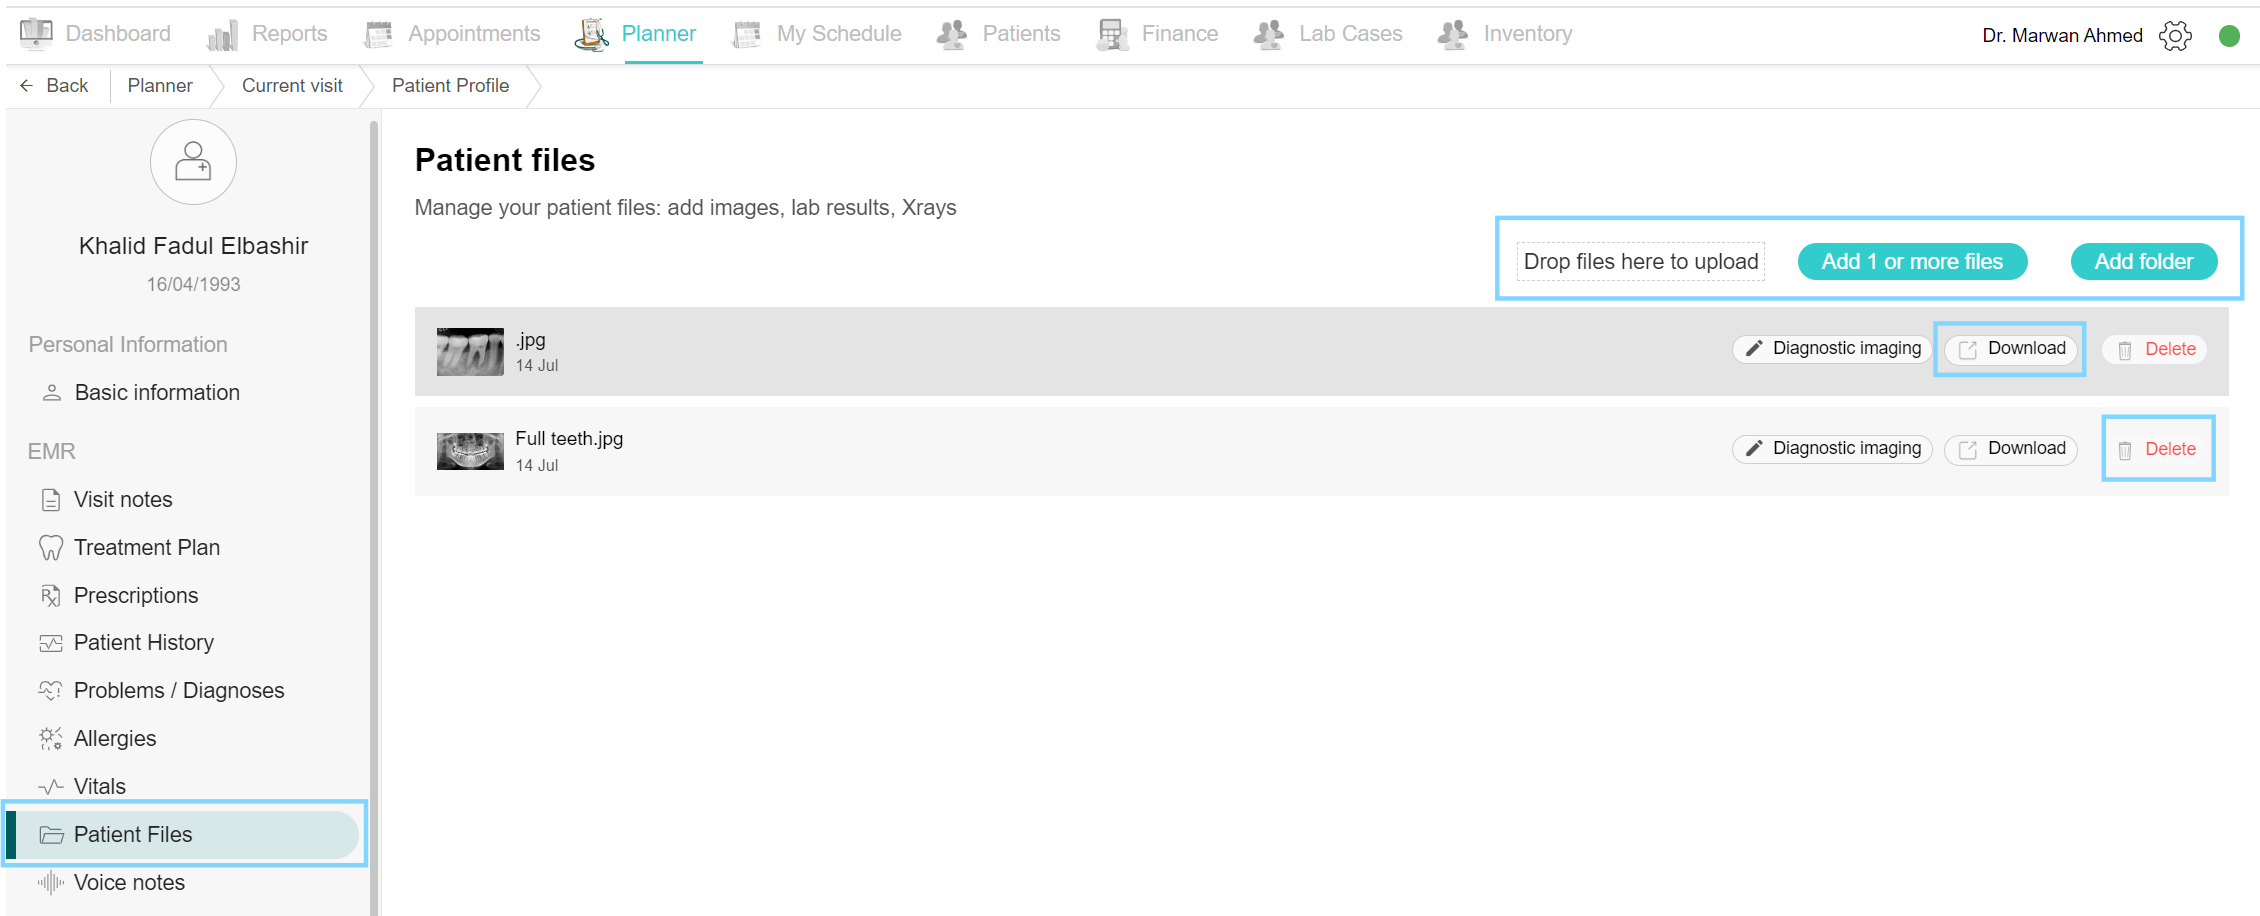
To add files to a patient's record, such as an x-ray, go to the "Patients" tab, click on the patient's name, and select "Patient Files" from the EMR section. Click on the "Add 1 or More File" button. You can also add a folder by clicking on the "Add Folder" button. To add files from a computer desktop, you can either drop files to upload or upload files. All added files will remain accessible at any time.
When the file is added and shown in the system, there are two options next to it, a download button and a delete button.
To delete a patient file, select the desired file and click the “Delete” button. A confirmation box appears, click the “Yes, delete this file” button to delete the file.
To download a file, select the desired file and click the “Download” button, select the download location and click Save.
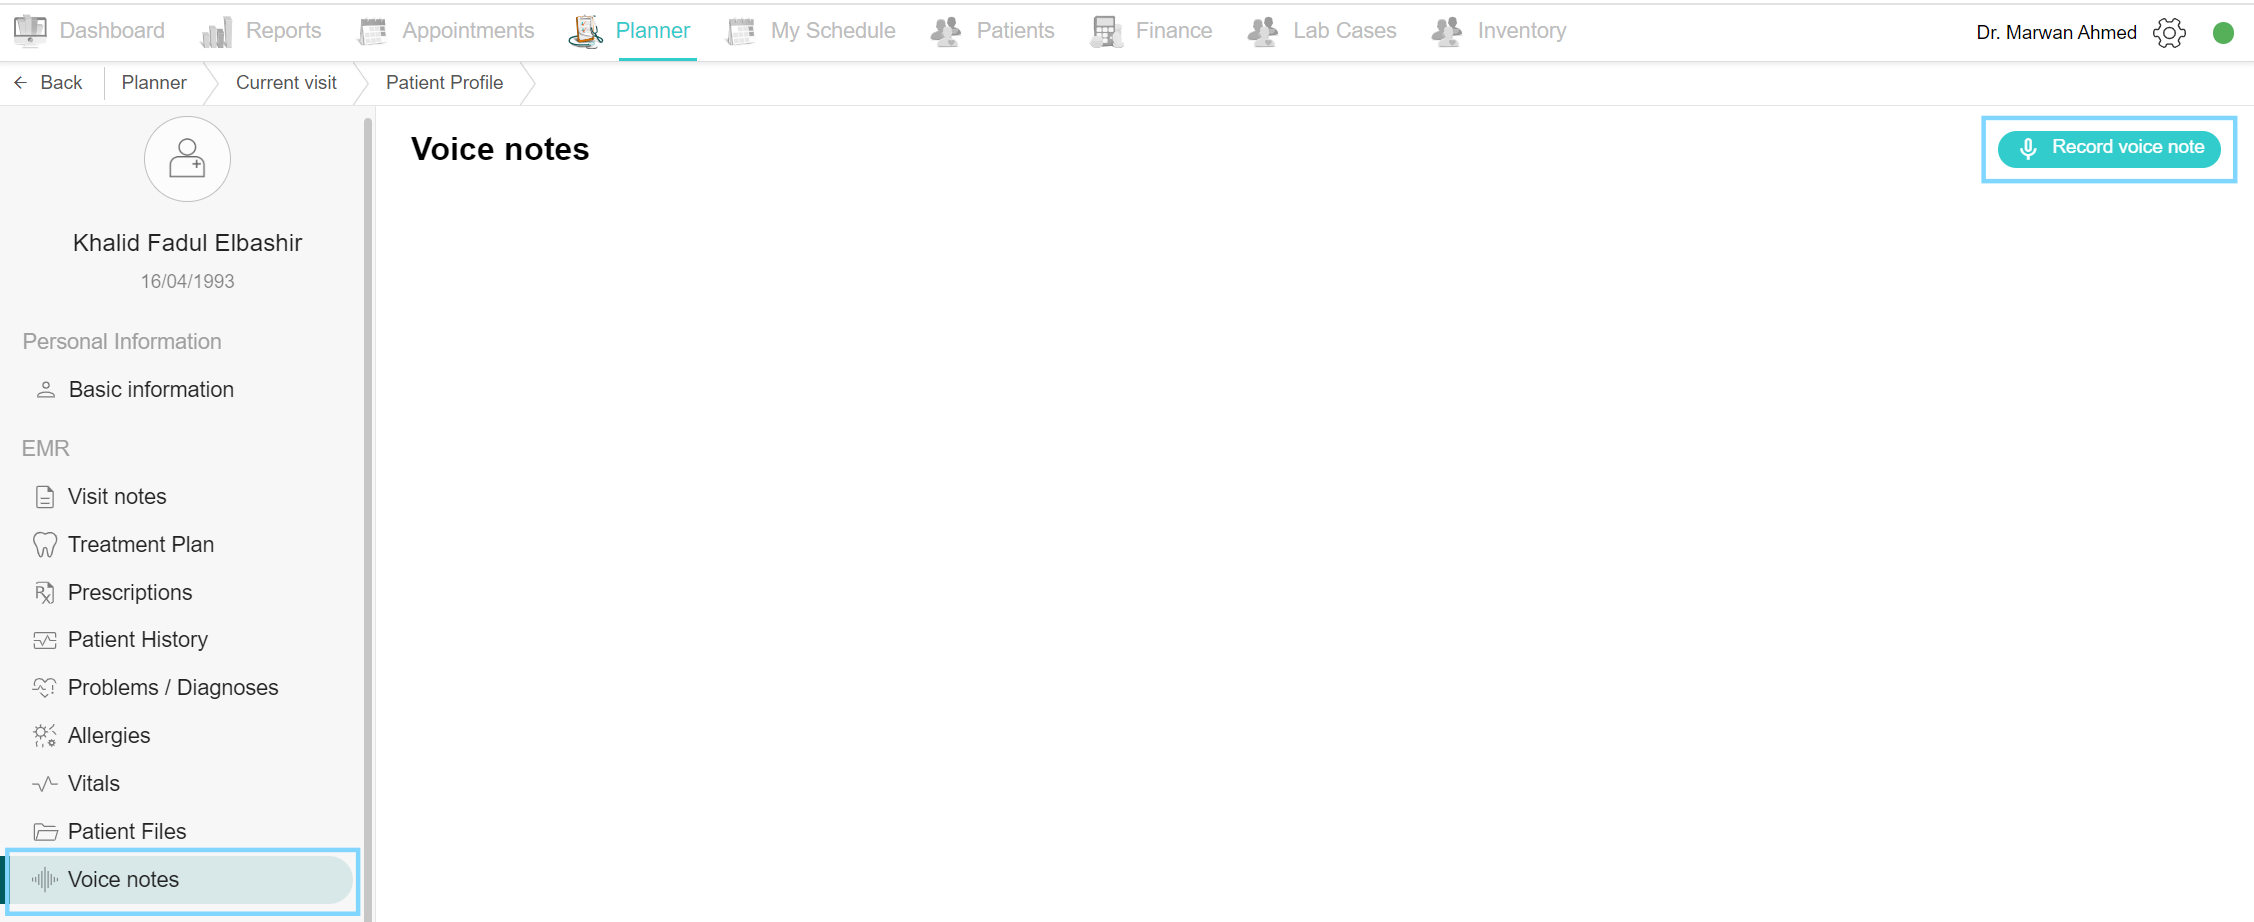
View and Record Voice Notes
To record a voice note, navigate to the Patients tab, select the patient, and then click Voice Notes. On the top is the Record Voice Note button, click it and start recording. After completing the note, click Save to save it or Cancel to discard it. You can also listen to all notes for this patient through this tab.
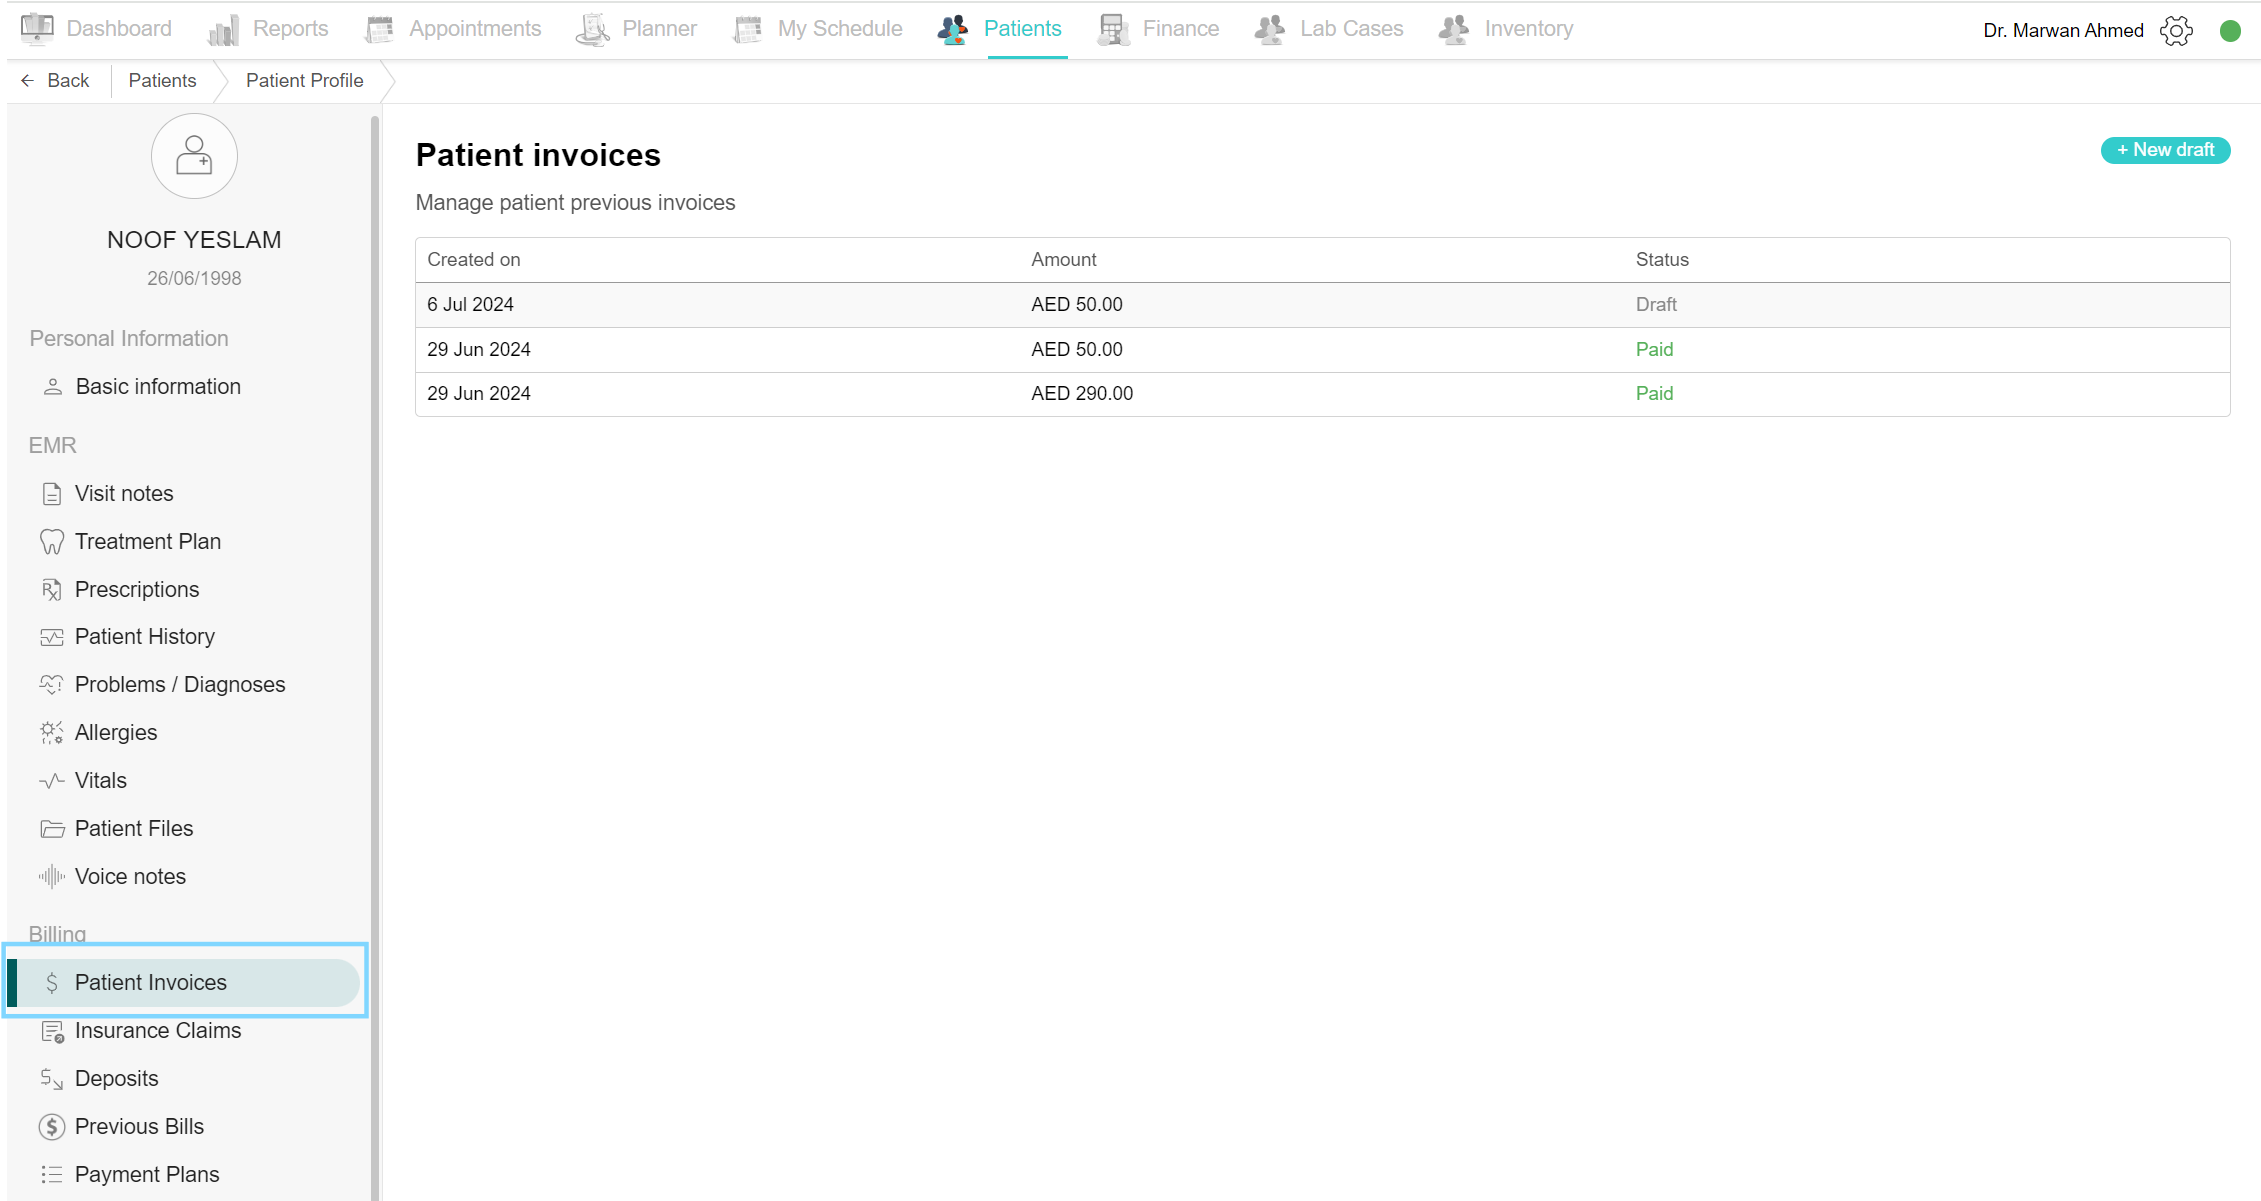
View Patient Invoice
As a receptionist, to check invoices, go to the "Patients" tab, click on the patient's name, and select "Patient Invoices" from the billing section. You will see all previous invoices with their status. Clicking on any invoice will show the invoice details, and you can generate a new invoice or review previous invoices from this section.
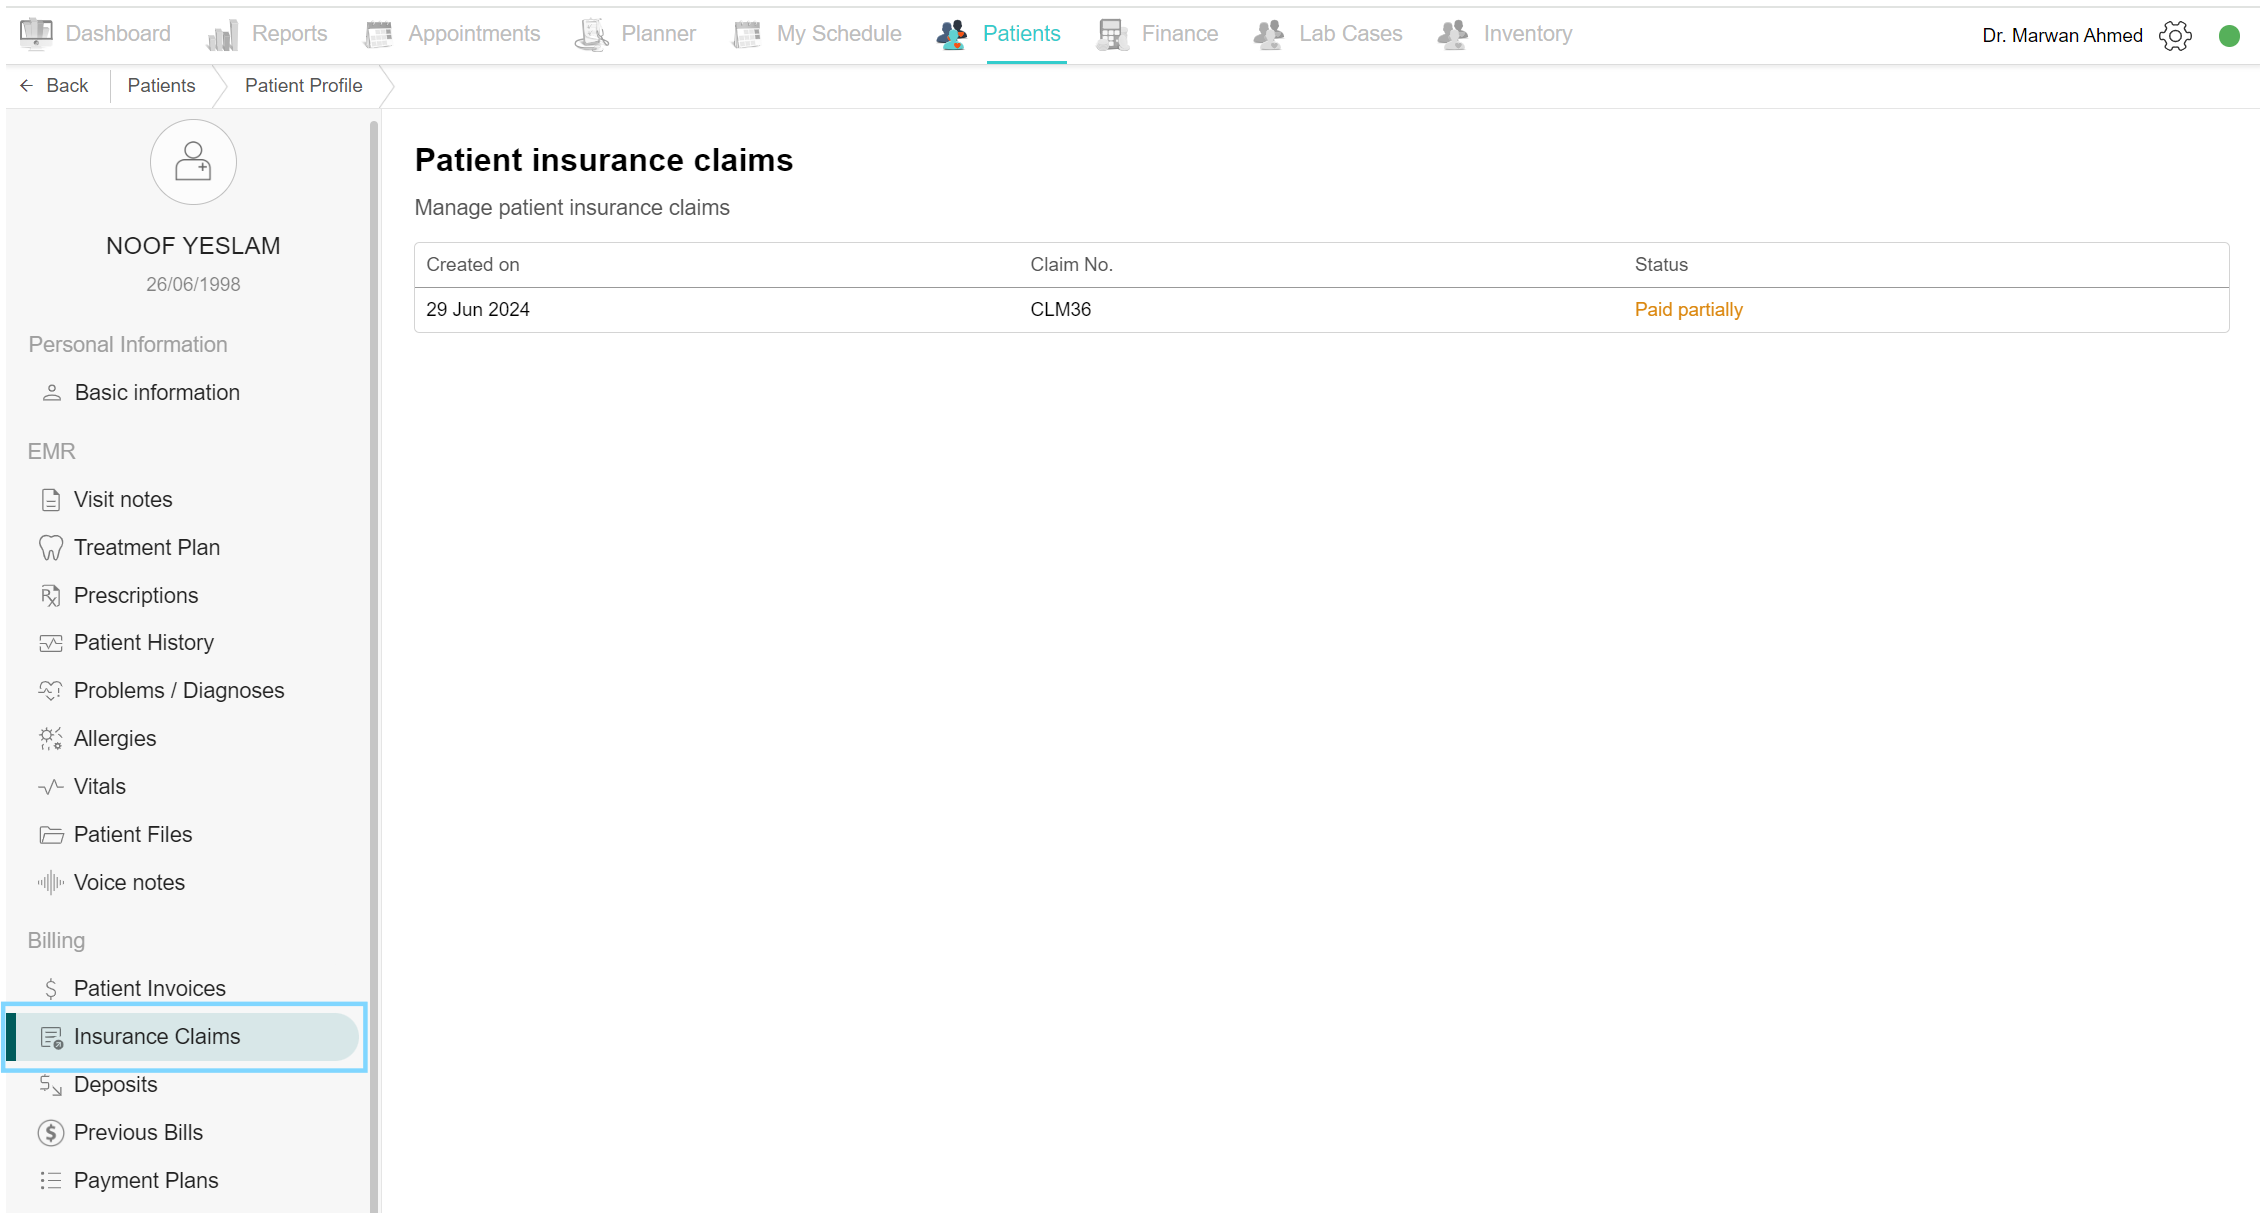
Patient Insurance claims
To view the patient insurance claims and status, go to the Patients tab and open the Insurance Claims under the Billing section. A list of the patient insurance claims is shown, it shows the claim number and the status. To view a specific claims, select the desired claim. On the left are the claim and patient information with the status, in the middle are the insured items and on the right are the insurance provider’s payments.
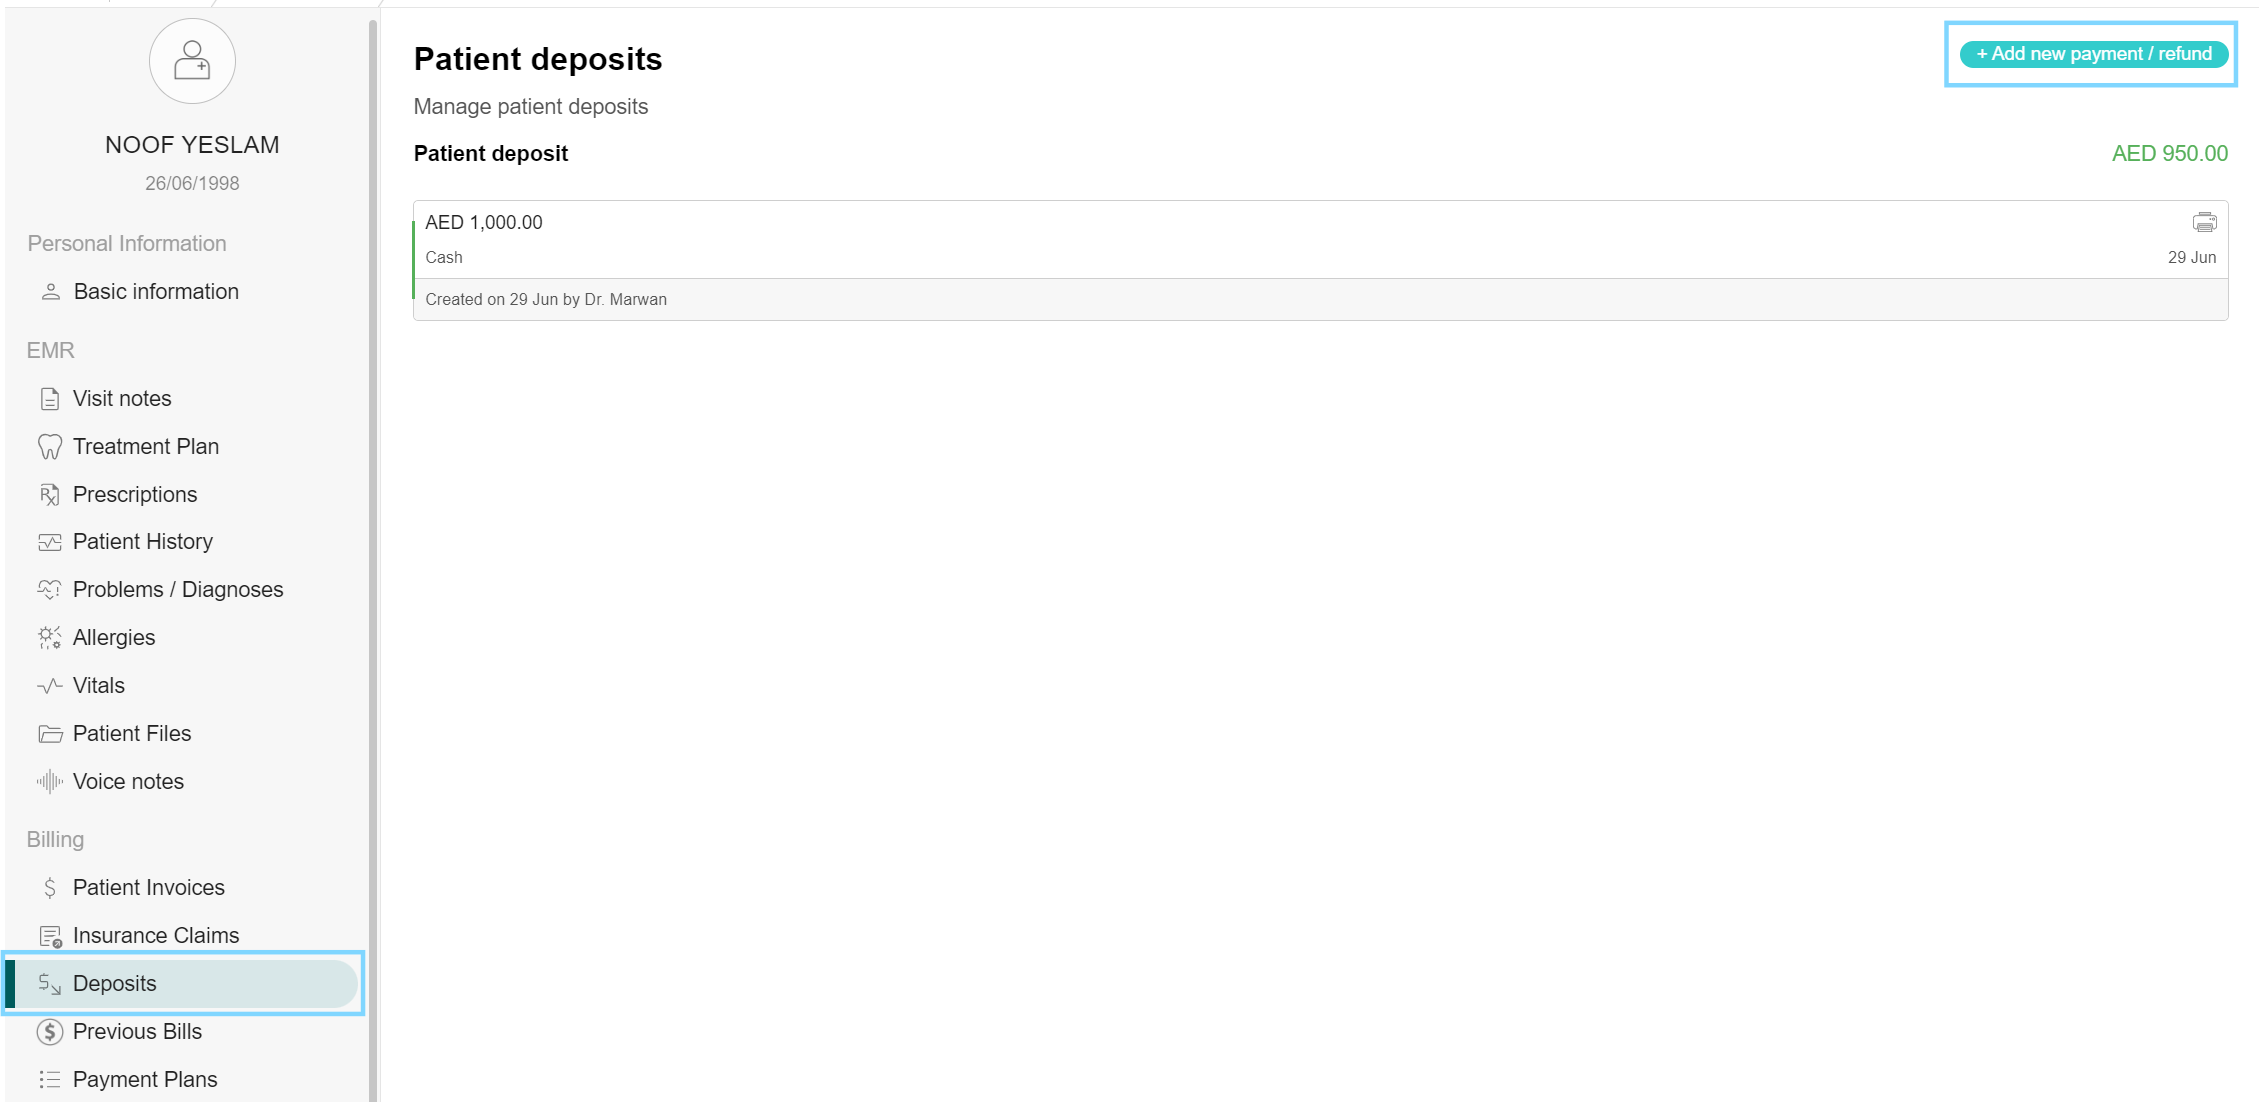
View and Add Deposits
Sometimes, a patient may deposit a certain amount with the clinic to cover treatment costs for a specific period, avoiding payment at each visit. To process this, go to the Patients tab, select the patient, click Deposit, then Add New Payment. This opens the Add Payment or Refund window. To deposit, click the Payment button, and choose the date, payment method, and amount. Confirm to save or Dismiss to cancel. For refunds of the deposits, click the Refund button, enter the date, amount, and method, and then Confirm. This window displays all deposits and refunds for the patient. You can print the deposit in case the patient requests it.
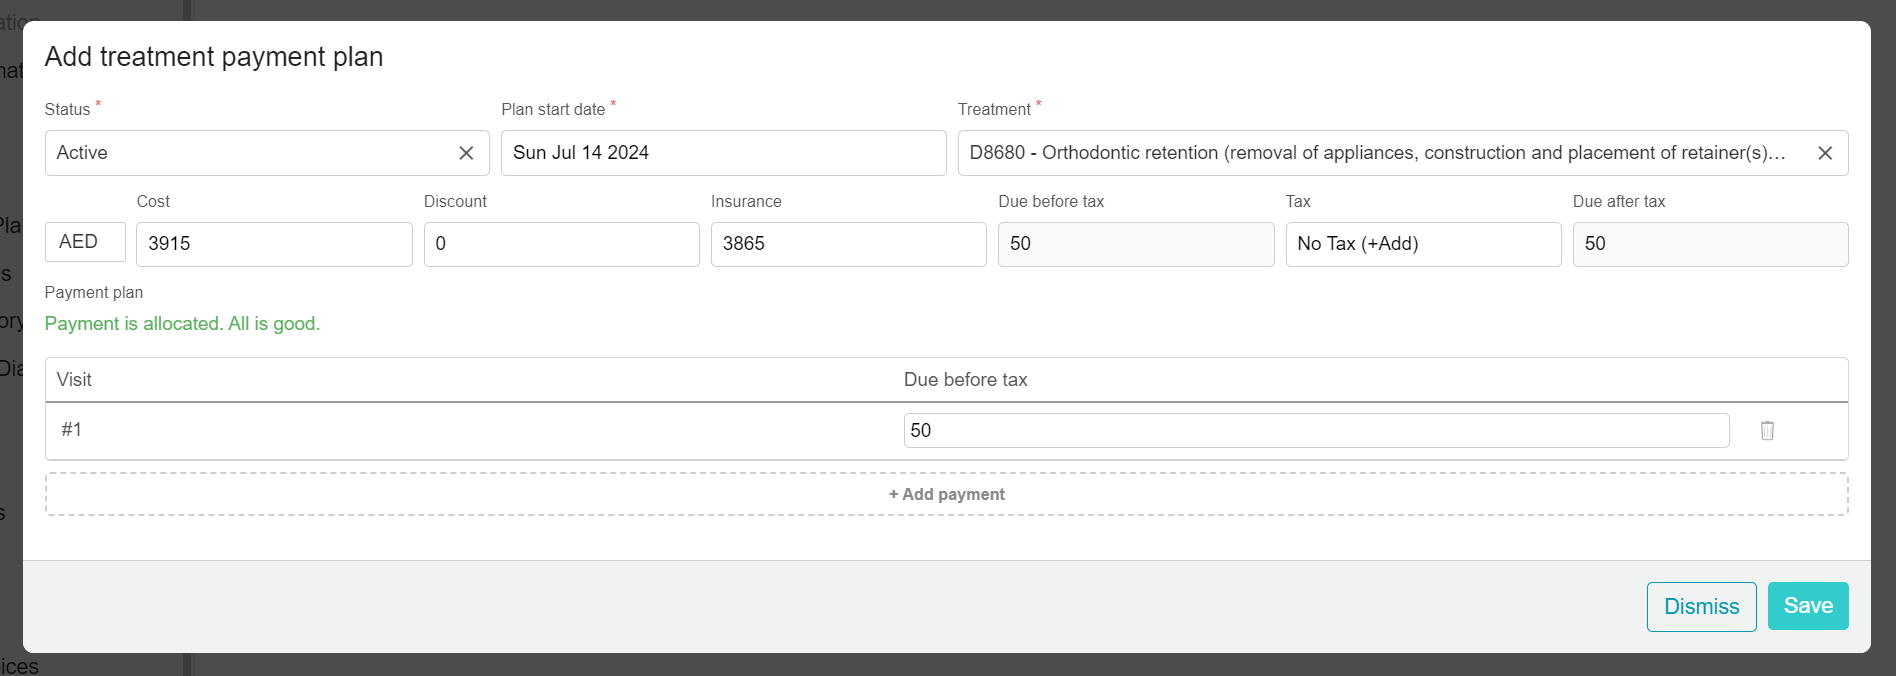
View and Add Payment Plans
If a patient wants to pay in instalments per visit, for example, orthodontic treatment, go to the Patients tab, select the patient, and click Payment Plans in the billing section. View existing plans, or click Add New Payment Plan to begin.
Plan status (Draft, Active, and Completed):
- Draft: Payment plan is scheduled but not started.
- Active: Ongoing payment plan.
- Completed: The payment plan is finished and is paid in full.
Select the start date, choose treatment from the patient list (cost, discount, remaining calculated automatically), add per-visit payments with Add Payment, and then Save to finalize. You can print the payment plan by clicking the print button.
Note that the payment plans do not affect the patient invoices and are found for documentation purposes.
View Patient Report
To create a report, such as a medical report or consent form, go to the "Patients" tab, click on the patient's name, and select "Patient Report" from the other section. Click on the "Create New Report" button to add and write the report. You can also create a new form by clicking on the "Create Form" button and selecting the desired form. This feature is customizable, allowing you to create any report or form you need.
Finance Tab
Balsam Medico has a complete finance system impeded in it including invoicing, expenses and many more. Click on the Finance tab on the top menu. On the main page, you will find the Finance section and Settings section. Under the Finance section are the following pages:
1. Invoices
2. Liabilities
3. Expenses
4. Income
5. Insurance claims
6. eClaim Management (if the clinic has an eClaim account)
In Settings, you can find:
1. Expenses categories
2. Income categories
3. Payment options
4. VAT Taxes
5. Payable entities
Invoices:
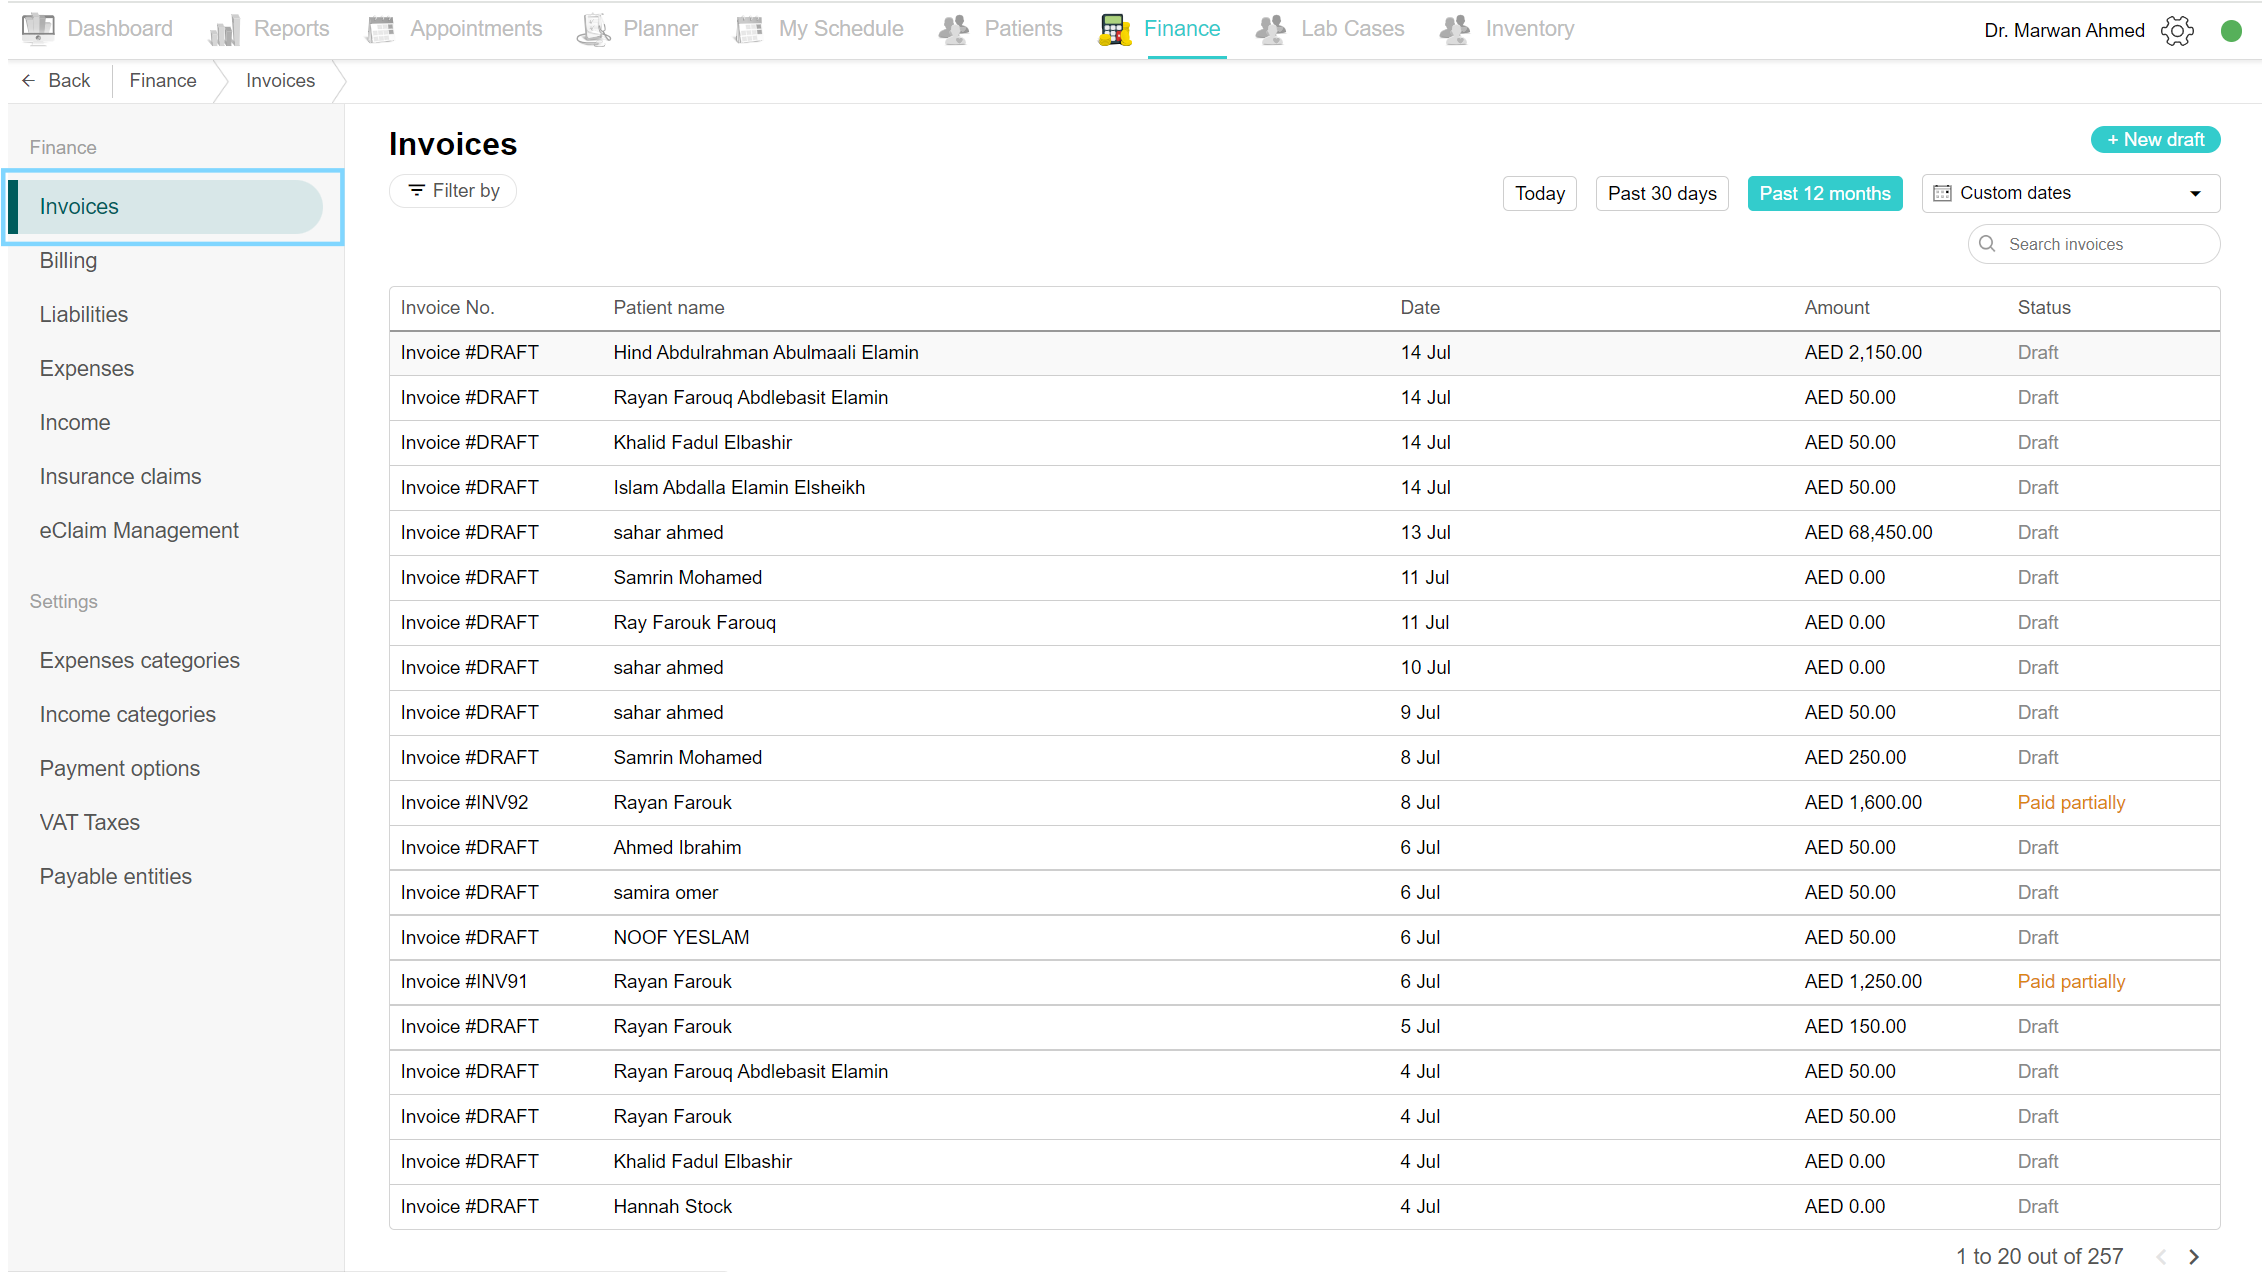
View invoice list
To view the full list of invoices and start creating, editing and cancelling invoices, go to the Finance tab and click on Invoices on the side. The invoices page includes all the invoices created in the system, you can filter the invoices by invoice status or by date, you can search for an invoice using the search field found above the list. The button “New draft” is to add a new invoice draft to the system. All these features will be explained below.
Create a new draft invoice
a. Invoice is created automatically with appointments
Creating a new invoice draft can be done in multiple ways. With every appointment made and treatment added, an invoice draft is automatically created. You can find the invoice by either opening the finance tab or going to the invoice page through the patient profile. Additionally, in the appointment details box, click on “Go to invoice” to view the invoice draft created with the appointment.
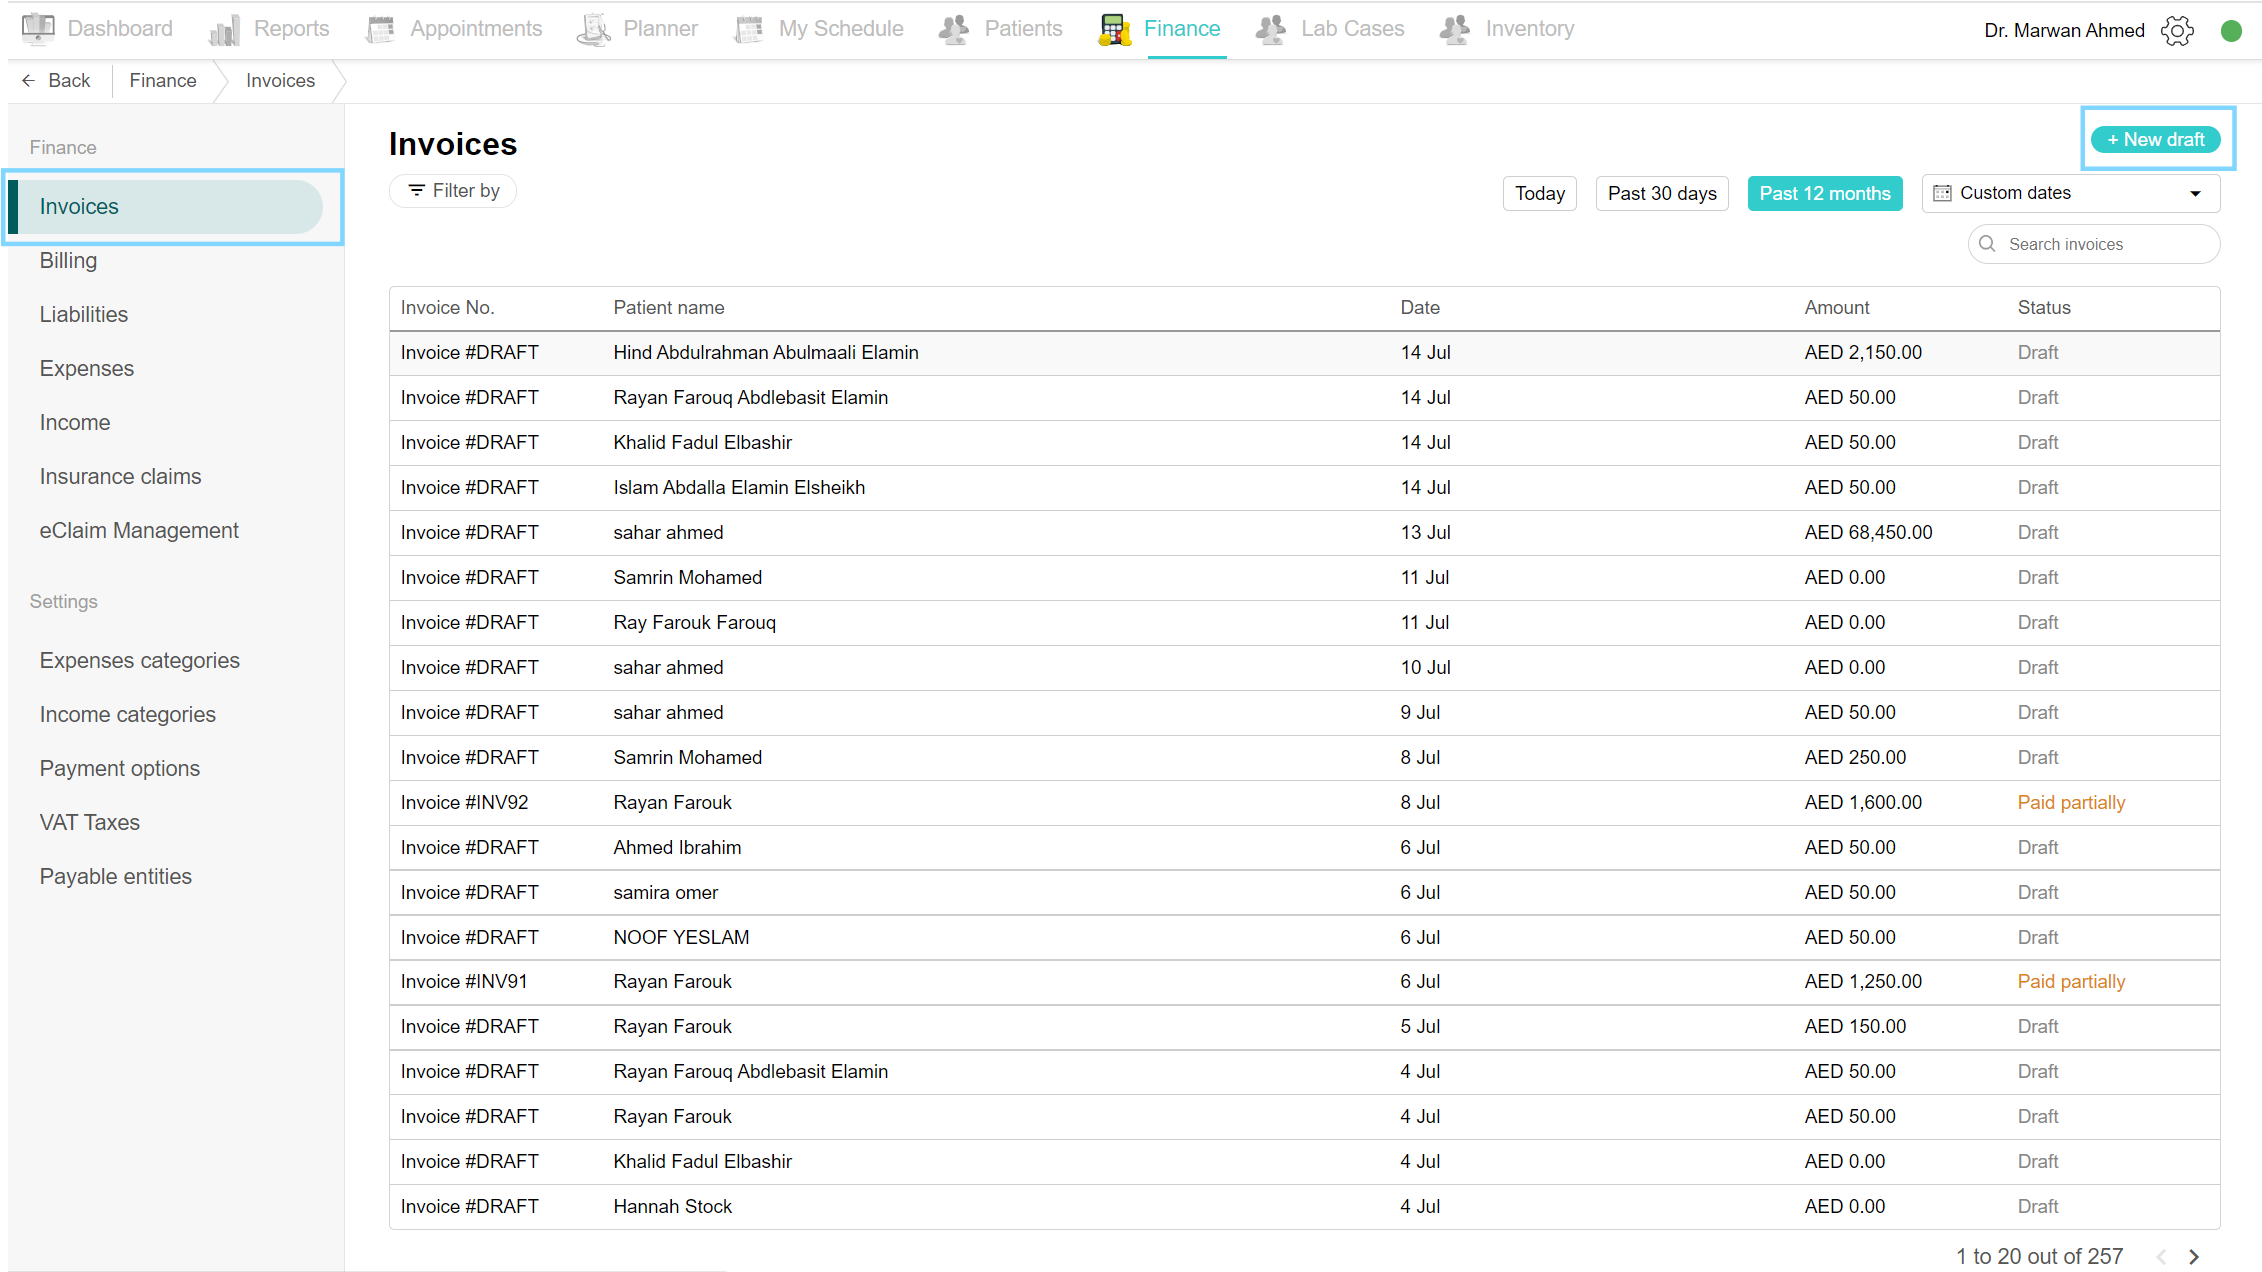
b. From the invoices page
To create a new invoice from the invoice page, go to the invoice page and click on the “New draft” button found at the top of the page. Select the patient from the list, you can search for the patient's name or file number. A new draft opens and a list of all the previous invoices is found on the left.
c. From the patient invoices page
The final way to create an invoice is through the patient profile. Simply go to the patient desired and open their profile. Scroll to the Patient Invoices and click to open the page. At the top of the page is the “New draft” button, click the button and a new draft opens with a list of the previous invoices found on the left side
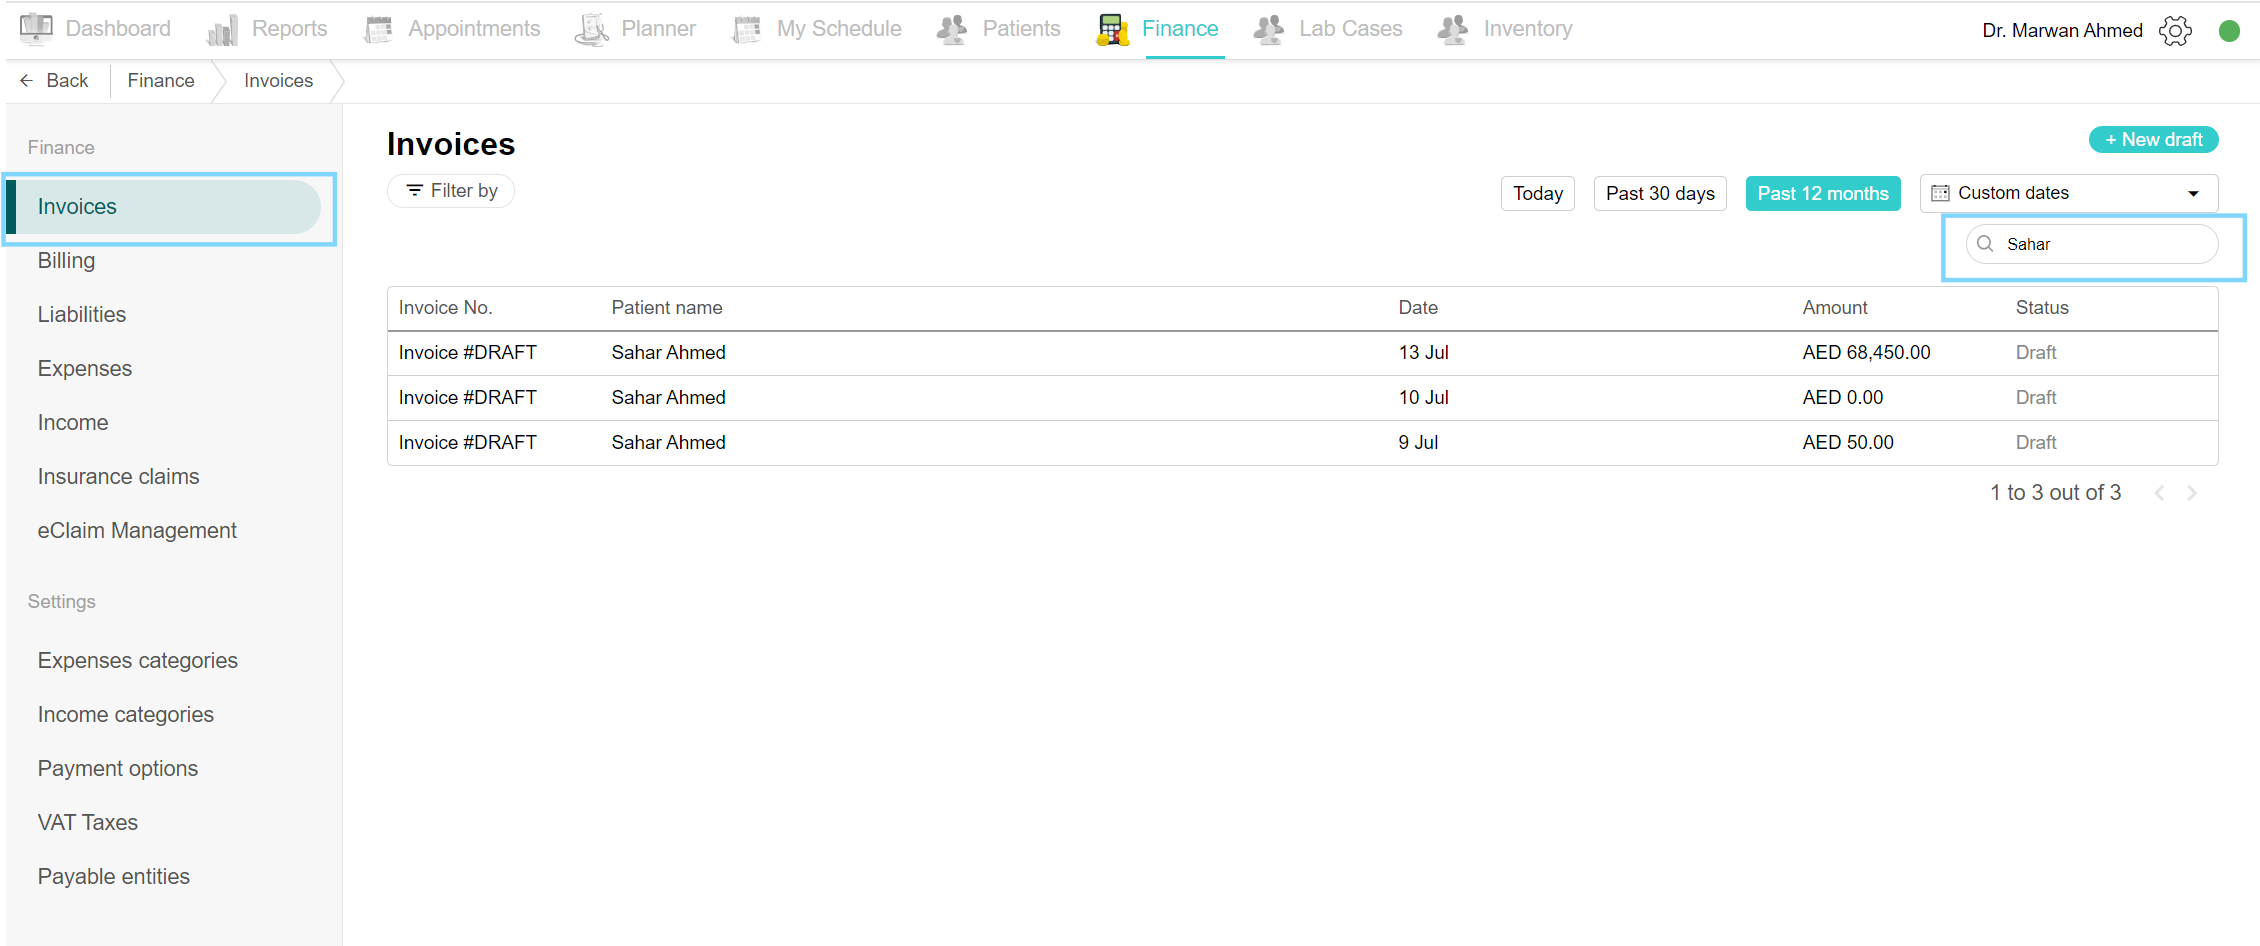
Search invoices
To search for a specific invoice, go to the Finance page and click on Invoices. In the search field found above the invoice list, start typing to find your desired invoice.
You can search by:
-
patient name,
-
phone number and,
-
Invoice number
Finally, choose the requested invoice from the search.
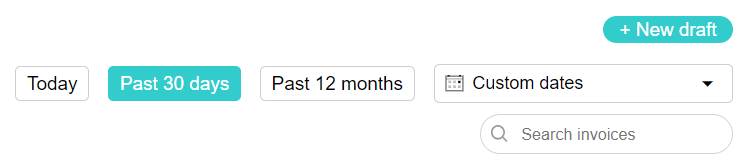
View filtered patient invoices by date
You can filter the patient invoices by several filters. The first is by date. Go to the Finance page and click on Invoices to open. On the top of the page is the date filter. You can filter the invoice list by Today, Past 30 days or Past 12 months. To filter for a specific date period, simply click on the “Custom dates” and choose the time period you wish. To choose one day, just tap on the date twice.
Now all your invoices are listed below.
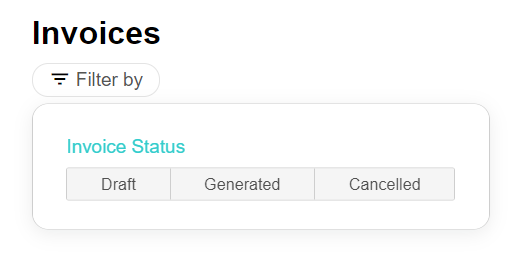
View filtered patient invoices by invoice status
You can filter the patient invoices by several filters. The next is by invoice status. Go to the Finance page and click on Invoices. On the top of the page is a filter by button, when clicked you get to choose between the invoice statuses. Now all the invoices under that status are listed below.
View patient invoice
To view each invoice specific to a patient, go to the Finance tab and open Invoices. Either choose an invoice from the list or by searching it, and the patient invoice page is shown. On the left are all the previous invoices of the patient with their status and amount. The right side is the main invoice part, the billable items and the payments on its side. You can print the invoice by clicking the print button at the top.
Edit patient invoice
To edit the invoice, open the desired invoice. An invoice can not be edited if there is a payment added to the invoice. There are 2 scenarios for editing the invoice.
Scenario 1 Draft Invoice:
If the claim status is Draft, you can immediately start editing the invoice. Click on the date calendar to change the date. In the billable items table, you can change the cost and discount by clicking the column and changing the pricing. If the item is under the insurance price, you cannot change the cost, only the insurance price. Click on the delete icon on the item row to delete the item.
To add a new item, click on the “Add new bill item” button. A list of billable items appears, choose the items you wish to add by clicking on the “Add to invoice” button. Finally, click the save draft button.
Scenario 2 Generated Invoice:
If the invoice is generated, make sure there isn’t any payment that has been added to the invoice.
If there is any payment, the invoice can’t be edited unless you provide a refund of the payment and click on the edit button. If there isn’t any payment, proceed with the editing. Click on the “Edit invoice” button found on the top of the invoice. Continue with the same steps mentioned above. Click on the date calendar to change the date. In the billable items table, you can change the cost and discount by clicking the column and changing the pricing. If the item is under the insurance price, you cannot change the cost, only the insurance price. Click on the delete icon on the item row to delete the item.
To add a new item, click on the “Add new bill item” button. A list of billable items appears, choose the items you wish to add by clicking on the “Add to invoice” button. Finally, click the save draft button and generate the invoice again.
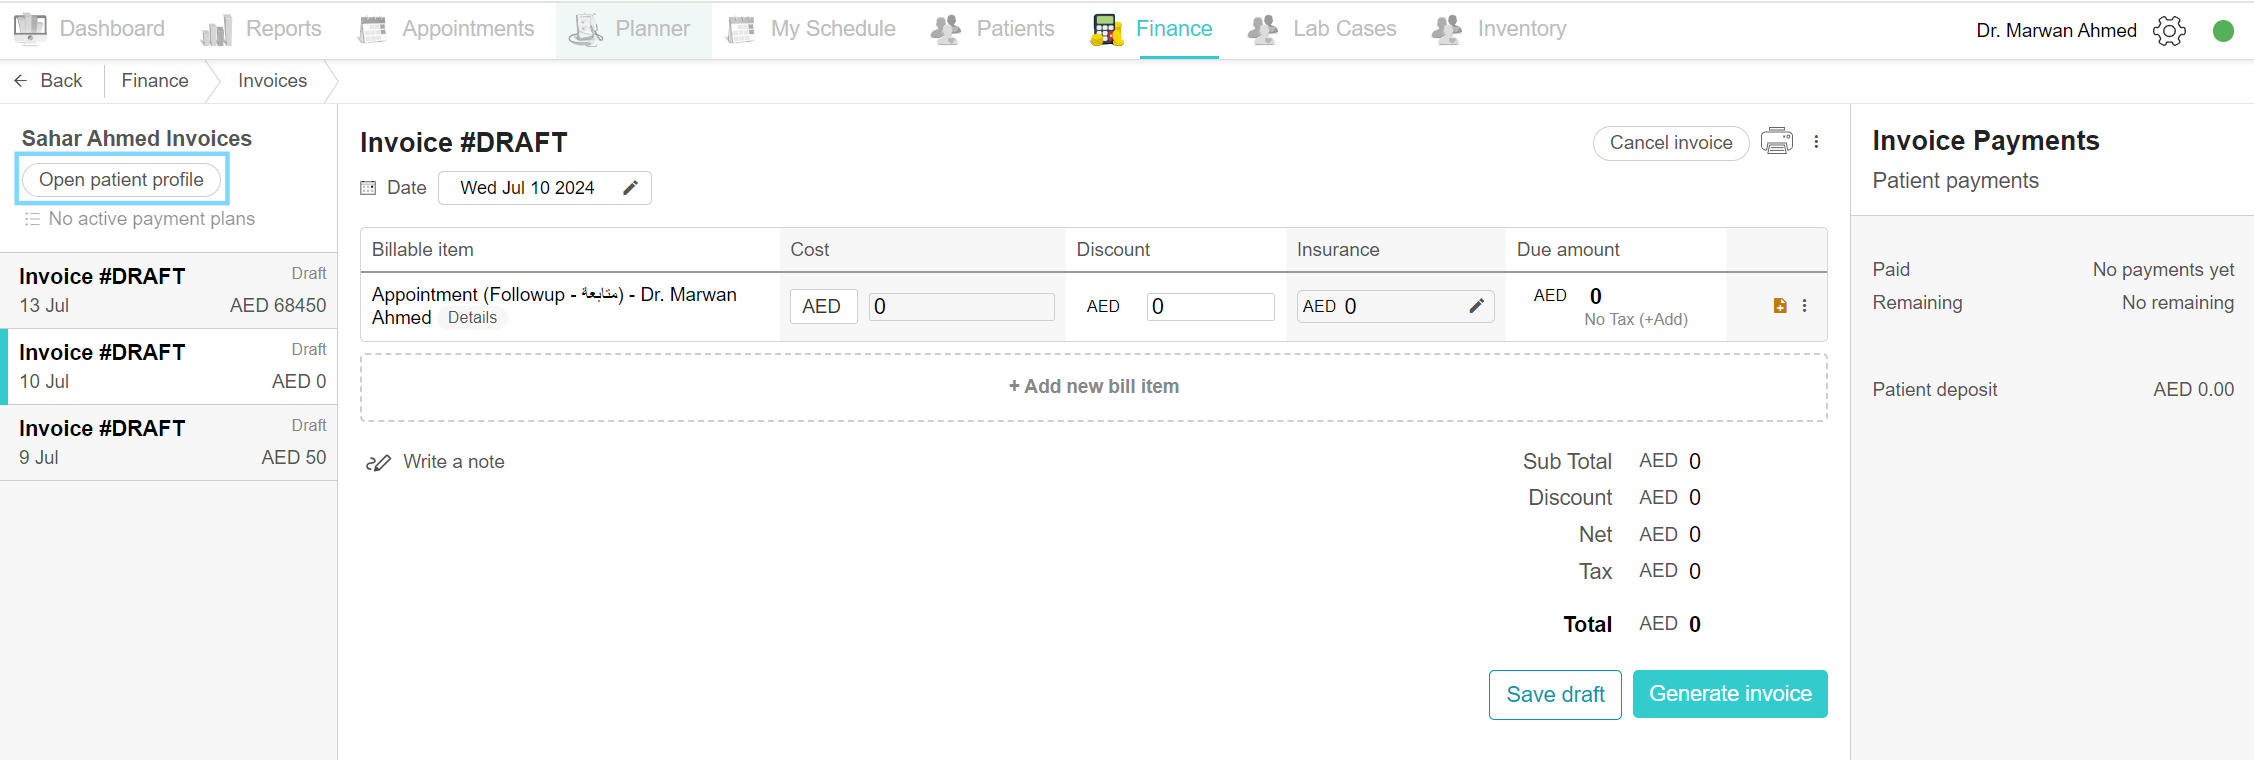
View patient profile from invoice
Click on Finance, and click on the Invoice page. From the list, choose the desired invoice and click it. On the left side of the invoice is the patient’s name for whom this invoice belongs. Underneath the name, you can find the “Open patient profile” button. Click the button and it will take you to the patient profile, from there you can view the patient information and view their invoices.
Select an invoice from the patient’s invoice list
After opening the patient profile, scroll down to the Billing section, and click on Patient Invoices. A list of invoices is shown, the list includes the invoice creation date, the amount and the status of the invoice. Select the desired invoice from the list and make the necessary changes.

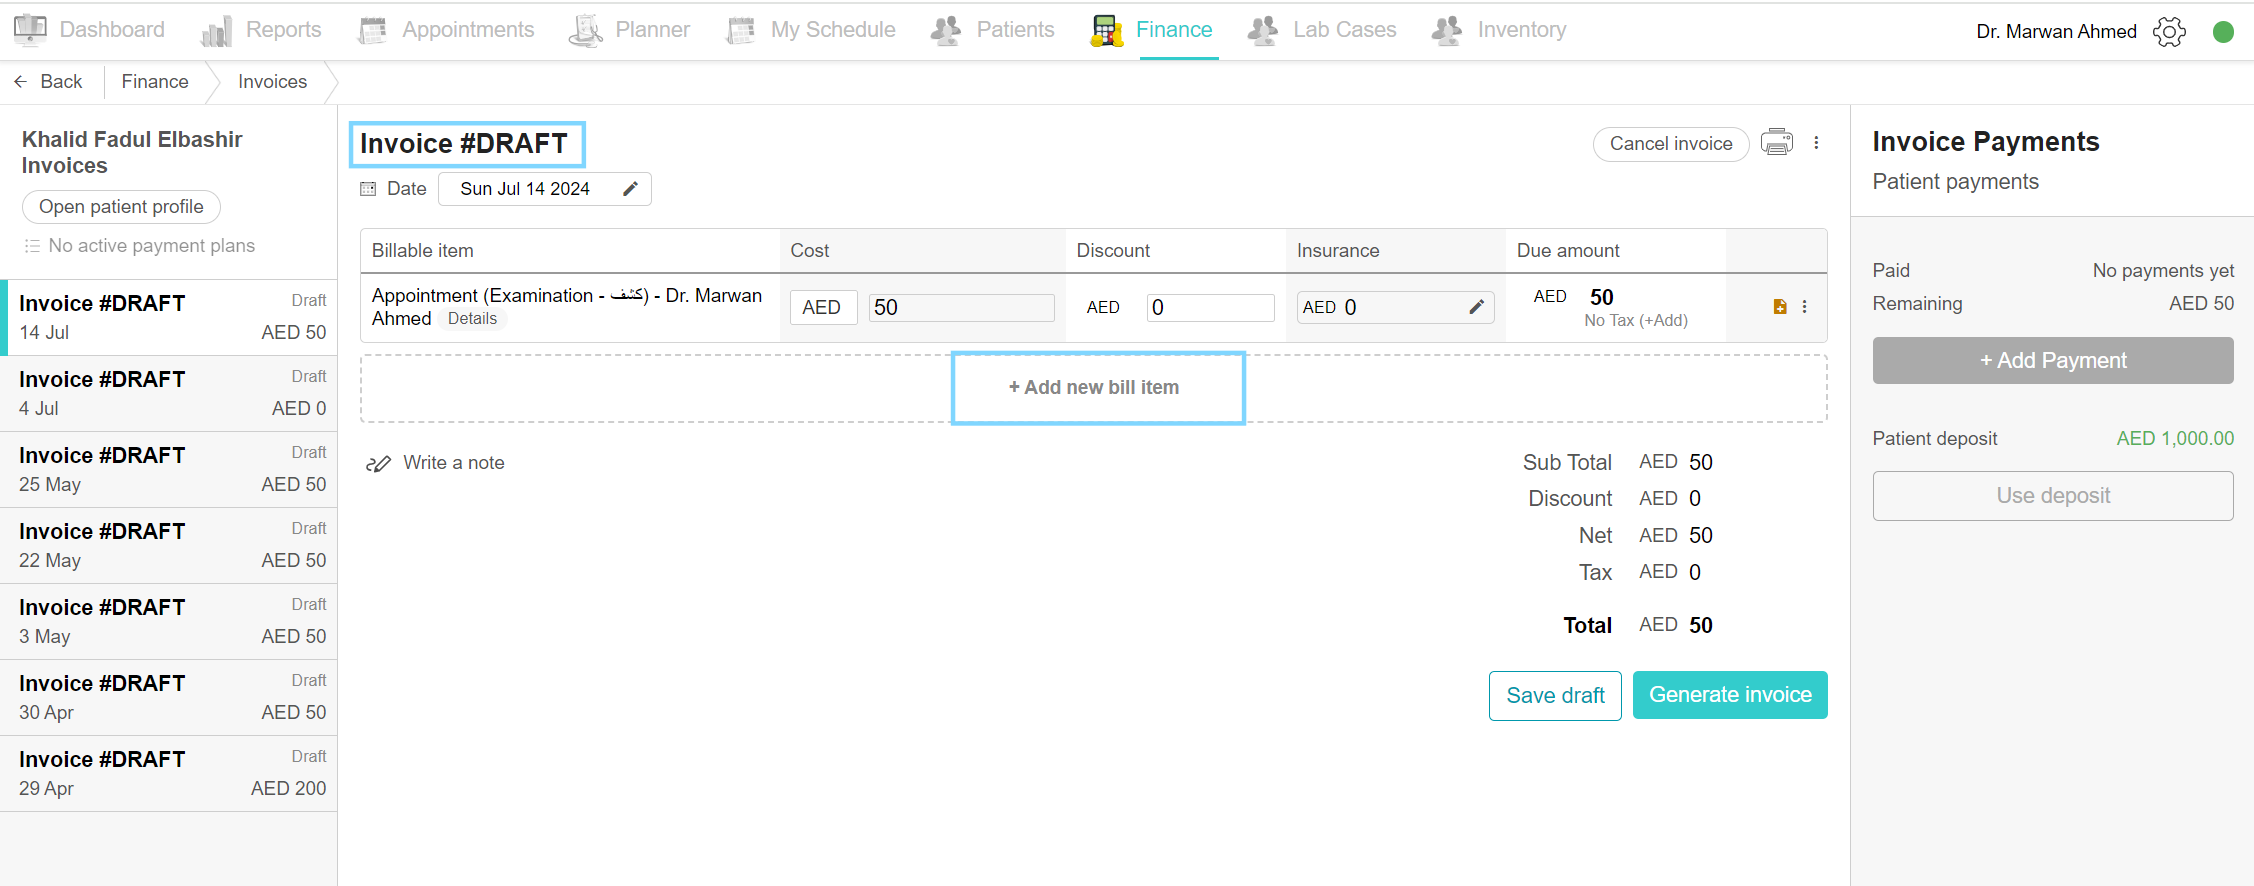
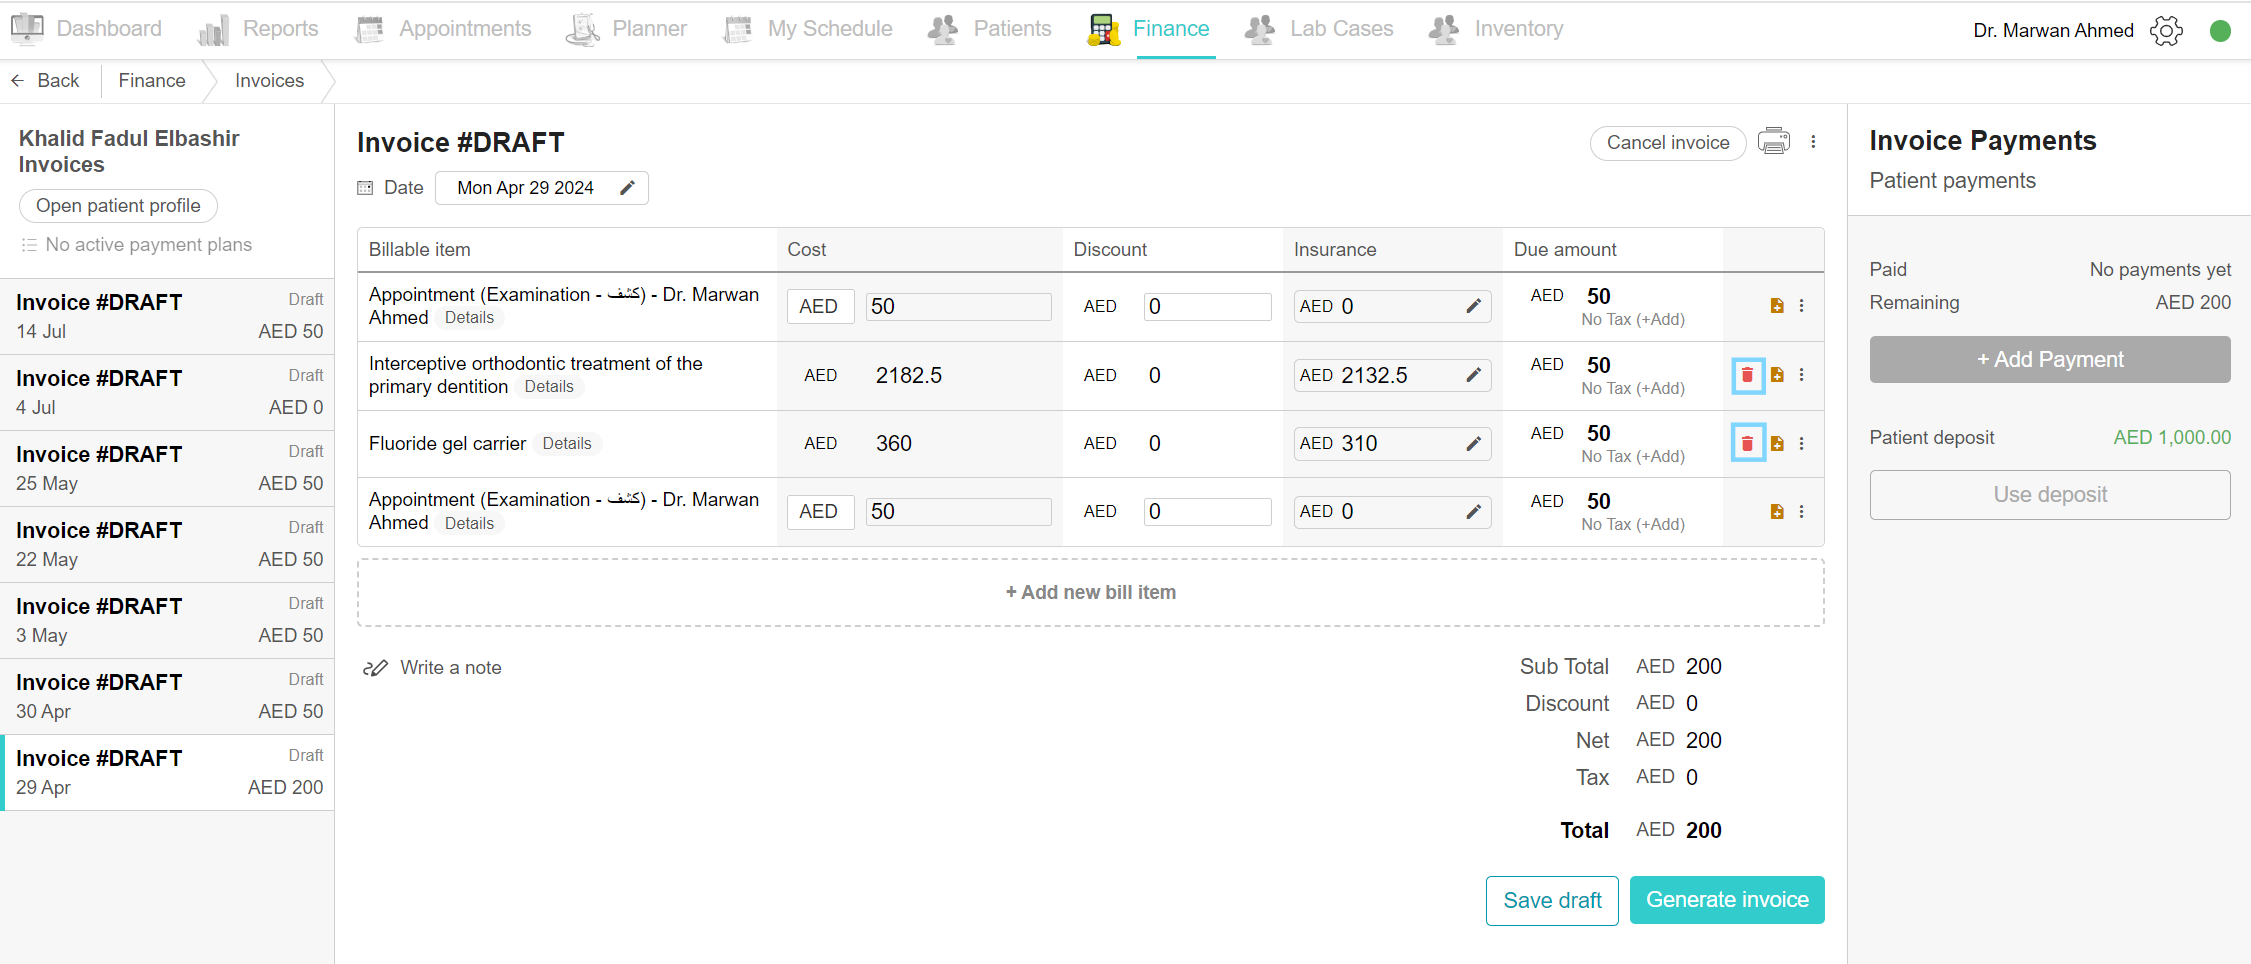
Add new bill item to invoice
To add a new bill item, open the Finance tab and click on the Invoice page. Click on the desired invoice. Click on the “Add new bill item” button, and a list of billable items appear, choose the items you wish to add by clicking on the “Add to invoice” button. If there is a bill item such as toothpaste, gel or anything else, click on the bill item drop-down list and choose one. Once it is clicked, it gets added to the invoice, now you can edit the item as you wish.
Add a note to bill item
To add a note, you can add it to the bill item or the whole invoice.
To add a note to the bill item, open the Finance tab and open the desired invoice. Move to the bill item and click on the “Add note” button on the item row. Write the note and click on the “Save draft” button.
To add a note to the invoice, open the desired invoice. At the bottom of the billable items, click on Write a note, write your necessary information to the notebook and click Save. Now click on the “Save draft” button.

Delete bill item
To delete an item, open the Finance tab and open the desired invoice. On the billable item, find the delete icon. Visit types such as Examination, Followups and any other visit types can’t be deleted from invoices, only treatments and bill items can be deleted. In the item row, you can find the delete icon and click on it. A confirmation box appears and click the “Delete” button. After deleting it, you can find it in the “Add new bill item” underneath the bill items.
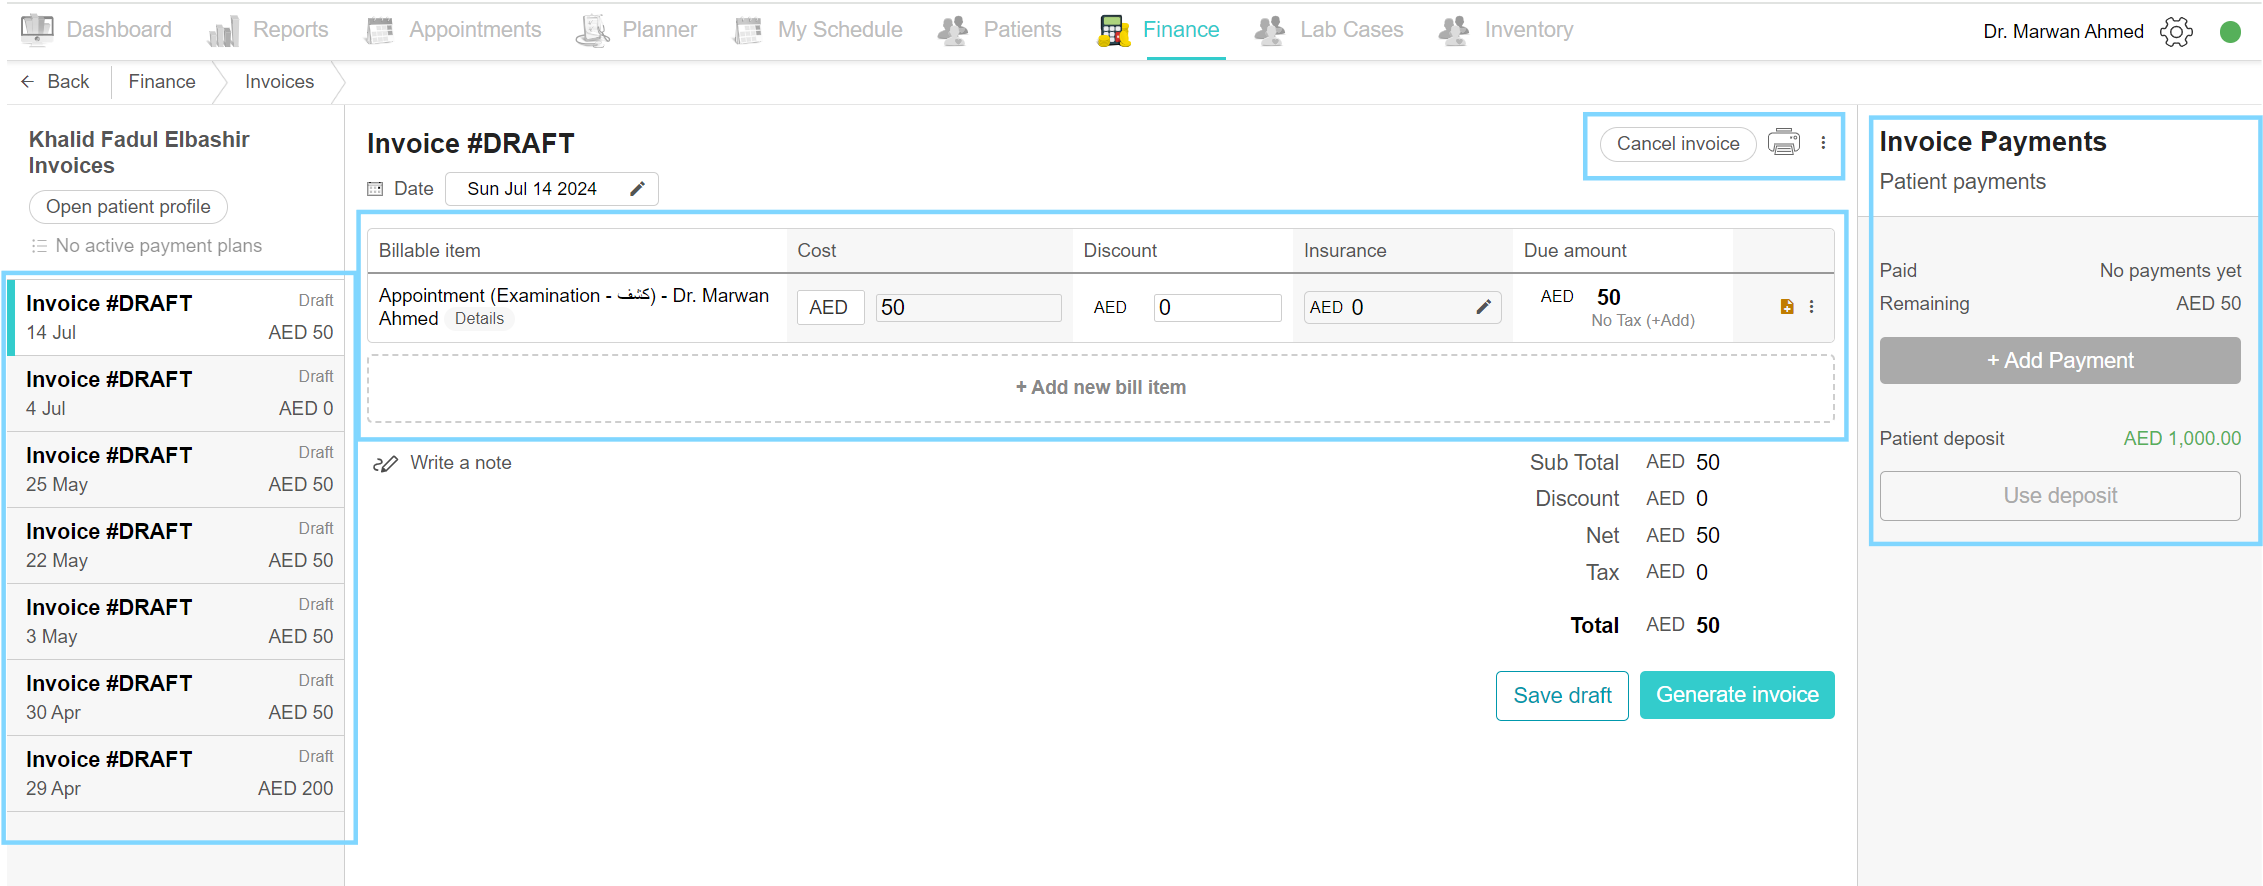
Cancel Invoice
To cancel any invoice, open the Finance tab, click the invoice page and open the desired invoice. Generated invoices can’t be cancelled. On invoices with the draft status, at the top of the invoice is a “Cancel invoice” button. A confirmation box appears and click on cancel invoice. The cancelled invoice is removed from the list but it can be found by filtering the invoice list by status. Click to filter by cancelled status, and you can find the recent cancelled invoice.

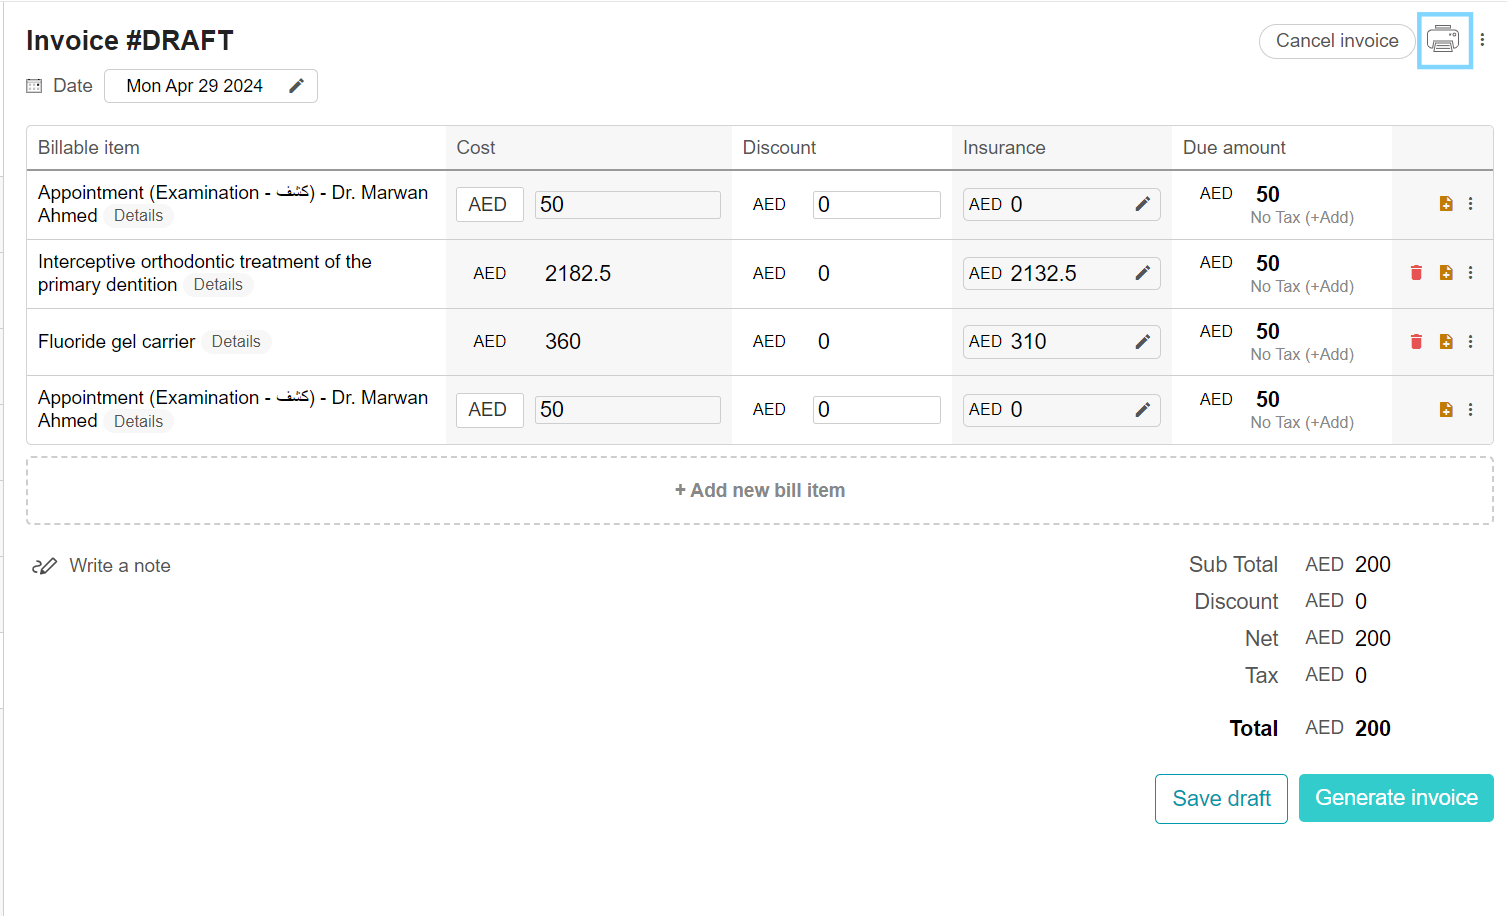
Print invoice
When a patient requests a copy of the invoice, click the desired invoice. You can either open the invoice from the appointment details box, the patient profile or from the invoice page. Open the invoice and at the top is the print icon. When you print the invoice, the template includes a header. The invoice header includes the clinic’s data, such as the clinic’s name, and logo and the patient’s data such as patient name and file number. The body of the invoice includes the Tax Registration Number – TRN- and the invoice details with the payment records. You can now print the invoice and hand it to the patient.
You can set the invoice layout to your liking. In the admin area, under invoice settings, you can set the invoice header, footer and even the prefix.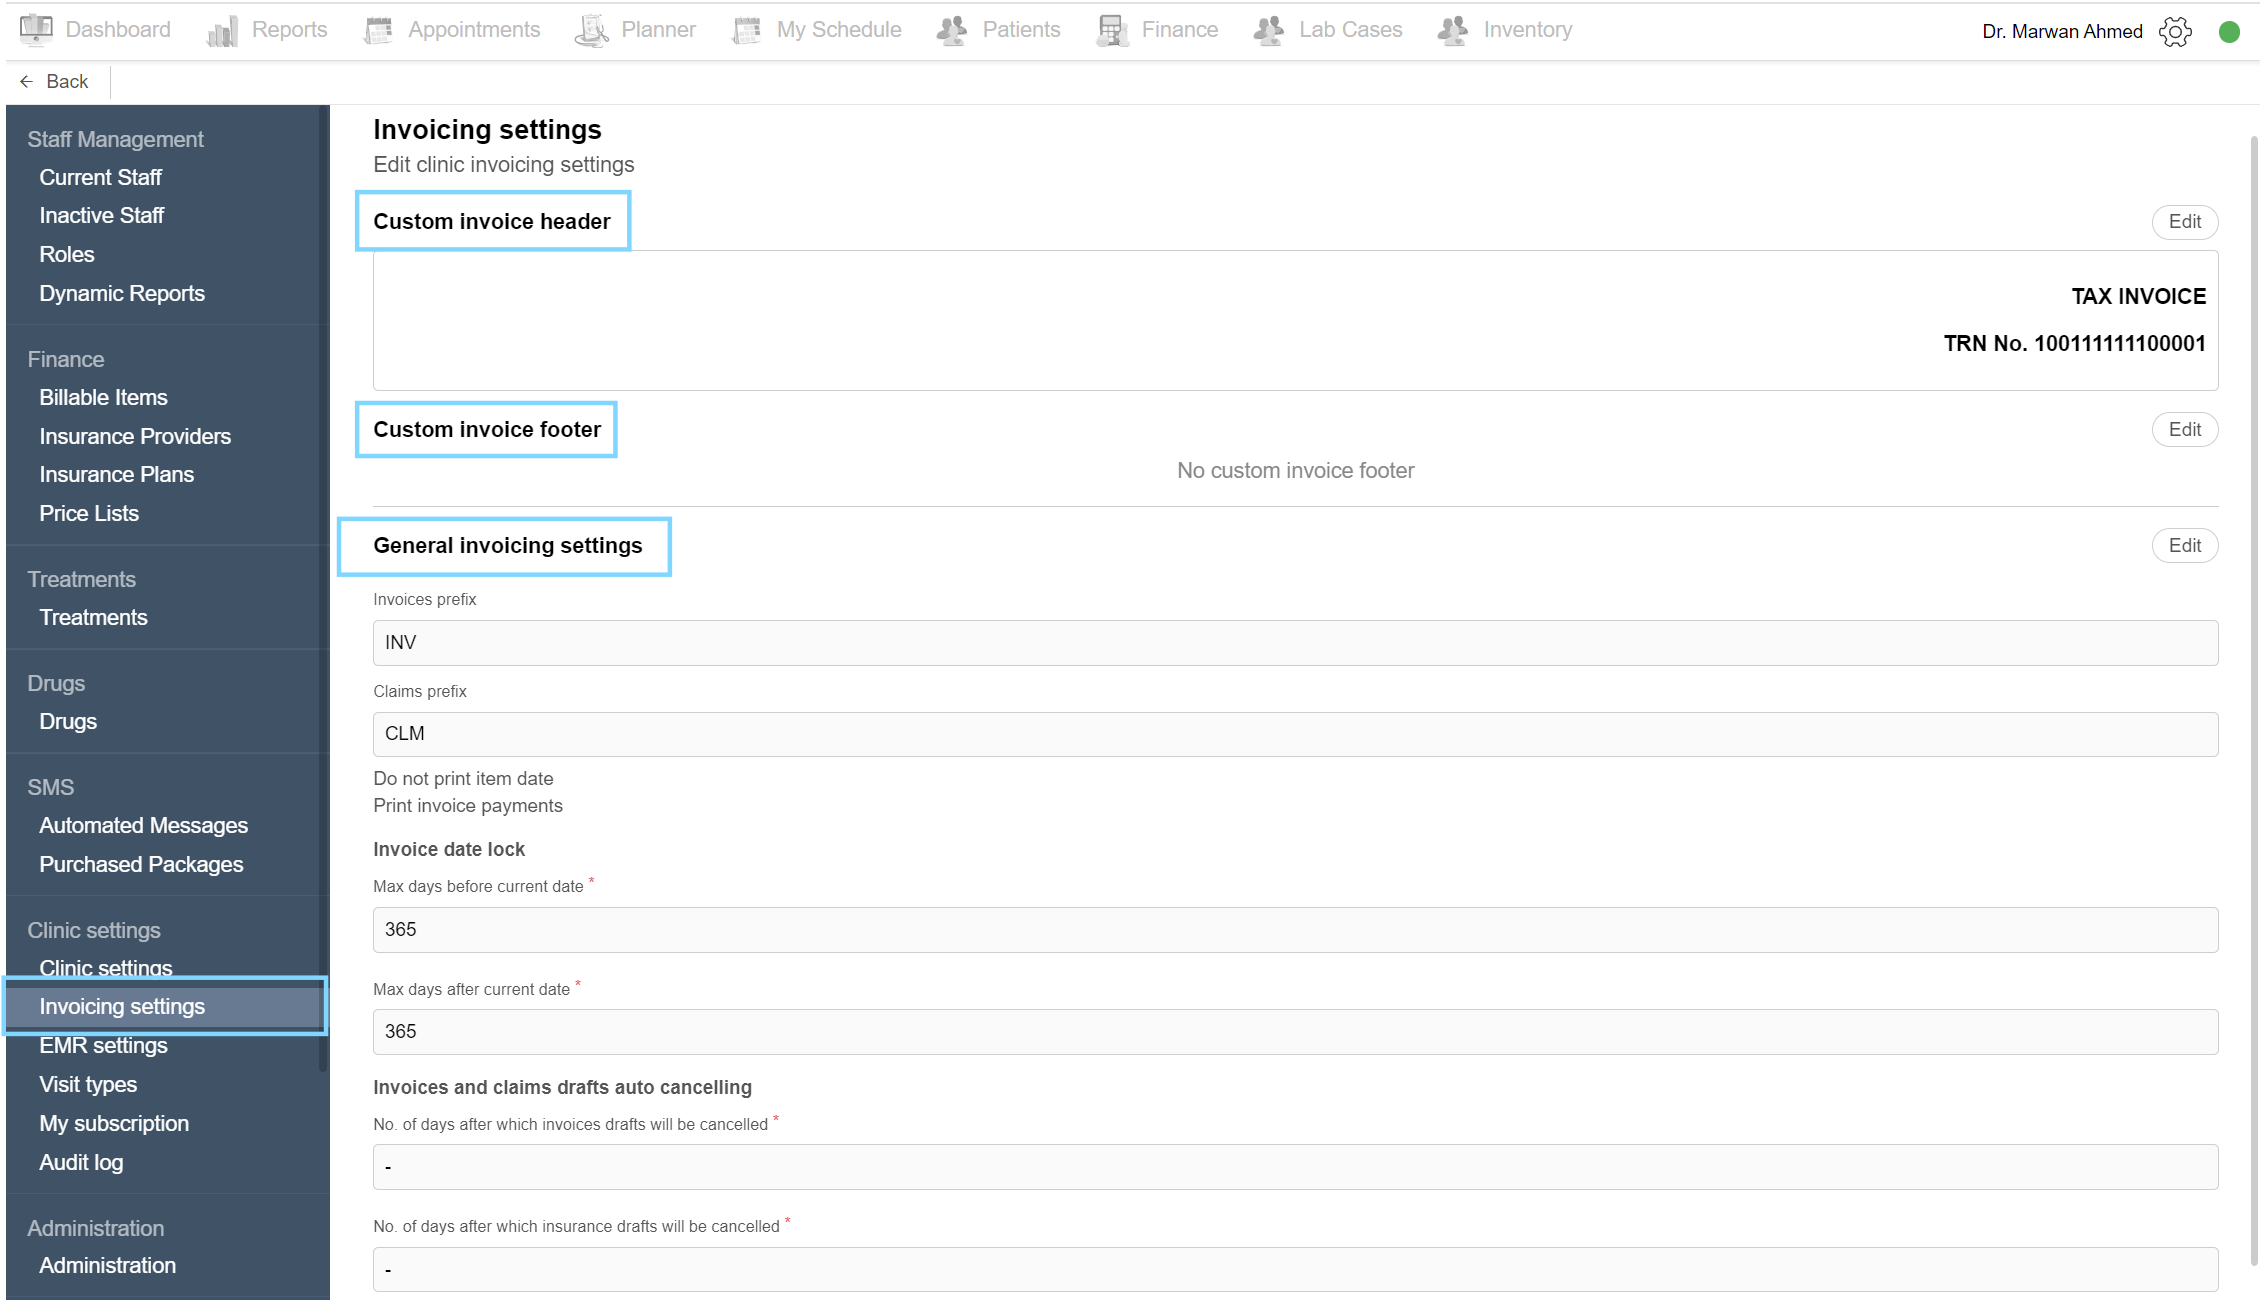
Generate invoice
Open the Finance tab and click on the Invoice page. Choose the desired draft invoice from the list. You can also open the invoice from the appointment details box or the patient profit. When you wish to add the payment from the patient, click on the “Generate invoice” button. When the invoice is generated it gets assigned an invoice number, you can search the invoice with the invoice number. Now the status is generated, and the payment can be made.
Add patient deposit
In the case, that the patient wants to add a deposit to their file for future payments, and not have to pay in every visit, we have designed the patient deposit feature. You can add the deposit in 2 ways.
Way 1: Add patient deposit through the patient profile.
Open the patient profile through various ways, either from the invoice page, the Patients tab or the appointment details box. On the patient tab, scroll down to Deposits to view the patient deposits. Click on the “Add new payment/refund” button to add a new deposit. In the new payment box, choose the payment method from the drop-down list and write the amount the patient paid you and any notes you wish. Click confirm and you can use the deposit in the invoices.
Way 2: Add patient deposit through the invoices.
To add a deposit through the invoice, just open the Finance tab and click on the desired invoice. When you open the invoice, click on the three-doted icon, and choose “Add patient deposit” from the options. In the new payment box, choose the payment method from the drop-down list and write the amount the patient paid you and any notes you wish. Click confirm and you can use the deposit in the invoices.
View audit log
The audit log shows a list of all the events made for the invoice. Open the invoice, click on the three-doted icon, and choose “View audit log” from the options. An audit log page opens and it includes the timestamp of the action made, the staff member or account responsible for this action, the event type and description and the Subject. Click on View Details to view more information on the event.
Note: Only Admins can view the audit log.

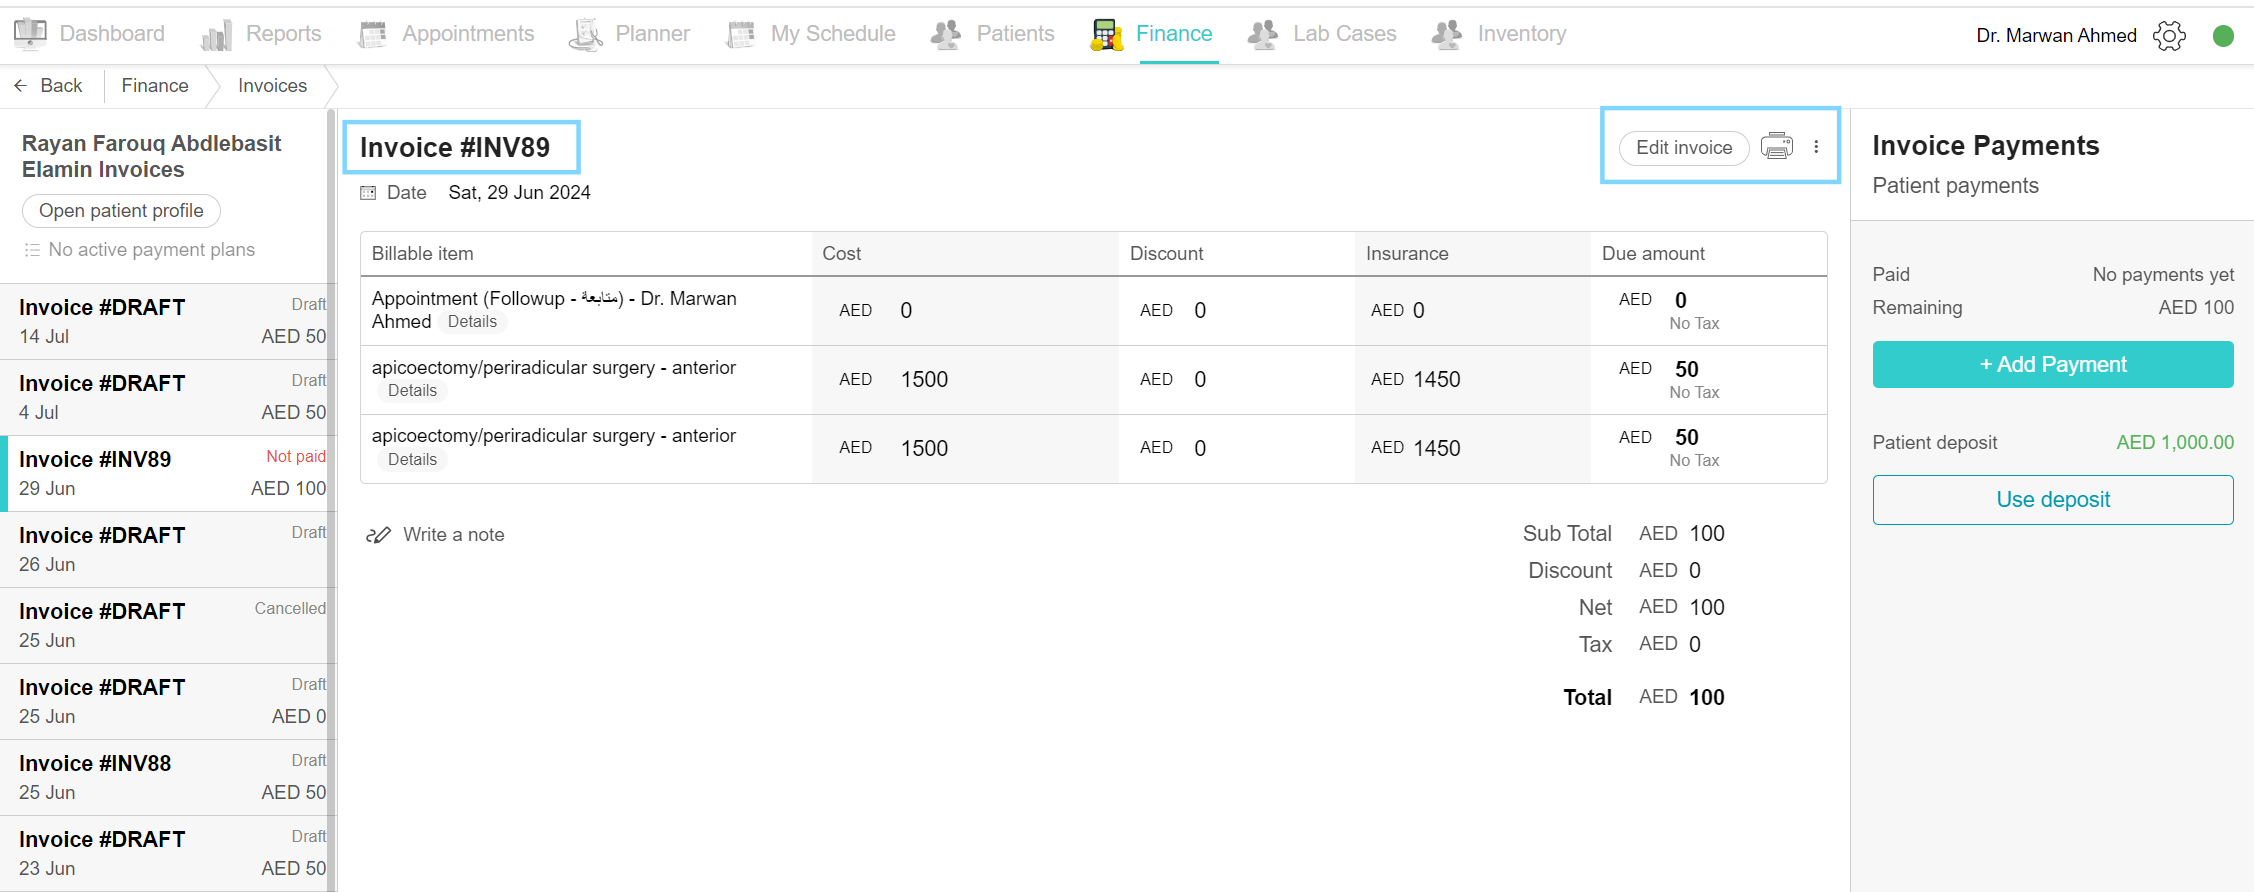
Edit generated invoice
Important note to remember is any invoice with non-zero payment cannot be edited.
If the invoice has no payments, you can now edit the invoice. Open the invoice, and click on the “Edit invoice” button. A confirmation box appears. You can edit the invoice by changing the date, altering the billable item table, and adding a new bill item. Click on the delete icon on the item row to delete the item.
To add a new item, click on the “Add new bill item” button. A list of billable items appears, choose the items you wish to add by clicking on the “Add to invoice” button. Finally, click the save draft button.
Copy billable item to another invoice
In some cases, a bill item is needed to be copied to another invoice.
Use Case: When a patient regularly purchases the same services or products, copying bill items saves time and ensures consistency in invoicing.
To do so, click on the Finance tab, click on the Invoice page and choose the desired invoice. In the bill item row, click on the three-dot option and choose “Copy to another invoice” from the options. A list of the patient’s invoices shows up, select the target invoice to send to the bill item. The target invoice opens and the copied bill item is added to the invoice.
Move billable item to another invoice
In some cases, a bill item is needed to be moved to another invoice.
Use case: When a patient decides to have a service or product be paid with another bill item that is in another invoice.
To do so, click on the Finance tab, click on the Invoice page and choose the desired invoice. In the bill item row, click on the three-dot option and choose “Move to another invoice” from the options. A list of the patient’s invoices shows up, select the target invoice to send to the bill item. The target invoice opens and the item is moved to the new invoice.
Add payment or refund to the invoice
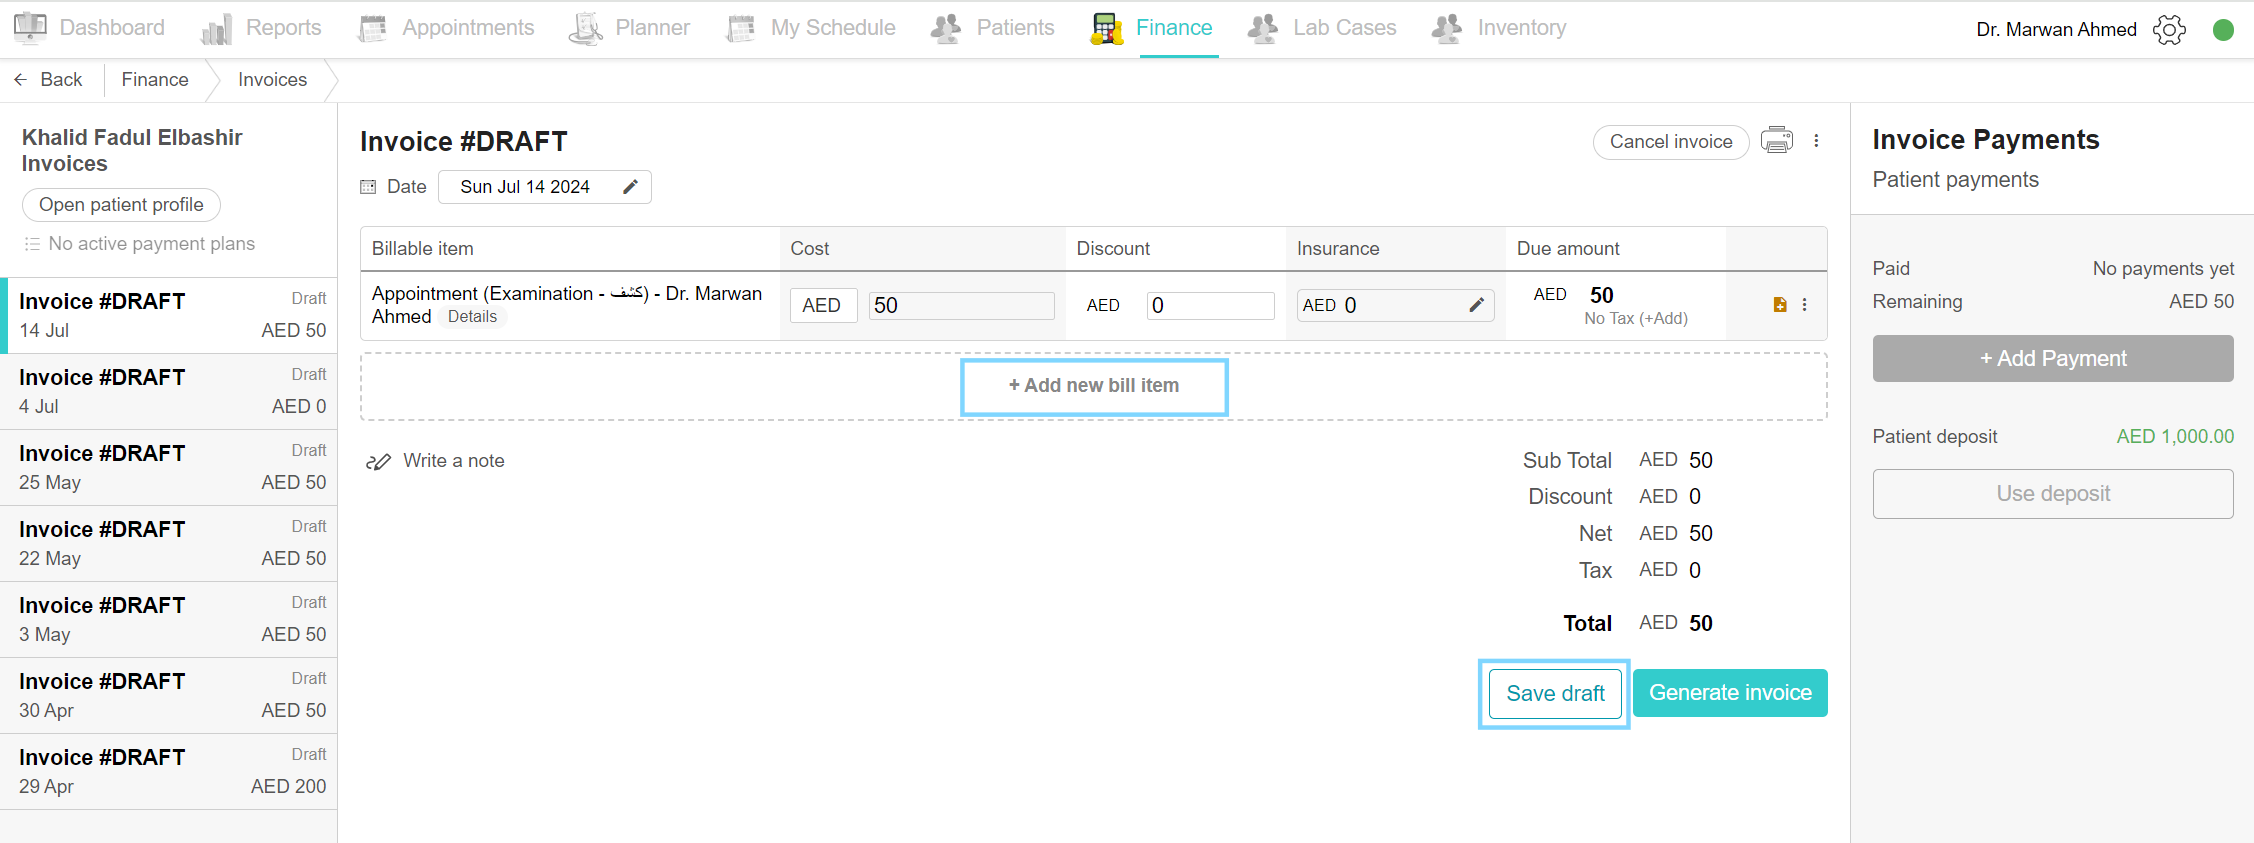
After generating the invoice you are now ready to collect the payment from the patient. Open the desired invoice, on the right side of the invoice is the title “Invoice Payments”. This shows a record of the patient’s payments to the invoice. Check the Paid and Remaining amounts displayed. Check the patient deposit under the payment section.
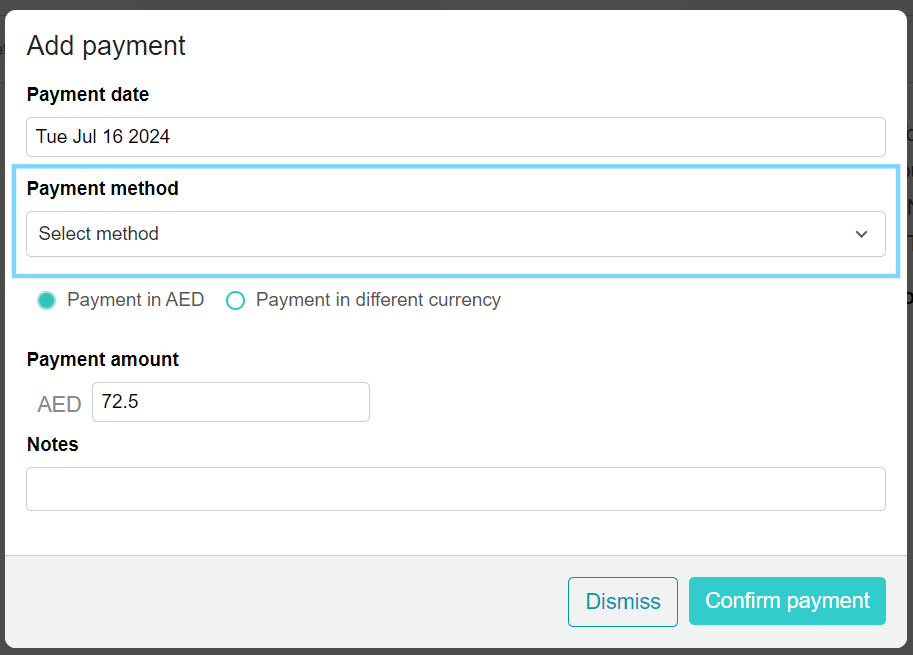
Click on “Add Payment” to add any new payments made to the clinic. A payment box opens up, choose the date, and payment method from the list and write the amount and notes (if any). Finally, click “Confirm payment”.
If the patient has any deposits in their account and wishes to pay using the deposit, simply click the “Use deposit” button found under the patient deposit amount. Enter the payment amount and click to confirm payment.
For refunding a patient, such as accidentally overcharging the treatment, click on the “Add Refund” in orange found underneath the “Add Payment” button. Select the refund method and the amount and confirm the direct refund.
Once you make the changes, a record of all the invoice payments and refunds appears with the payment method, amount and date of action.
Create payment with multiple payment methods
When the amount is being paid in multiple payment methods, simply click on “Add payment” and choose the first payment method with the amount. You can write a note explaining the multiple payment methods. Then confirm the payment. Repeat the same process and this time choose the second payment method and amount and confirm the payment. Repeat for the other methods. The payment record will display all the various methods you added.
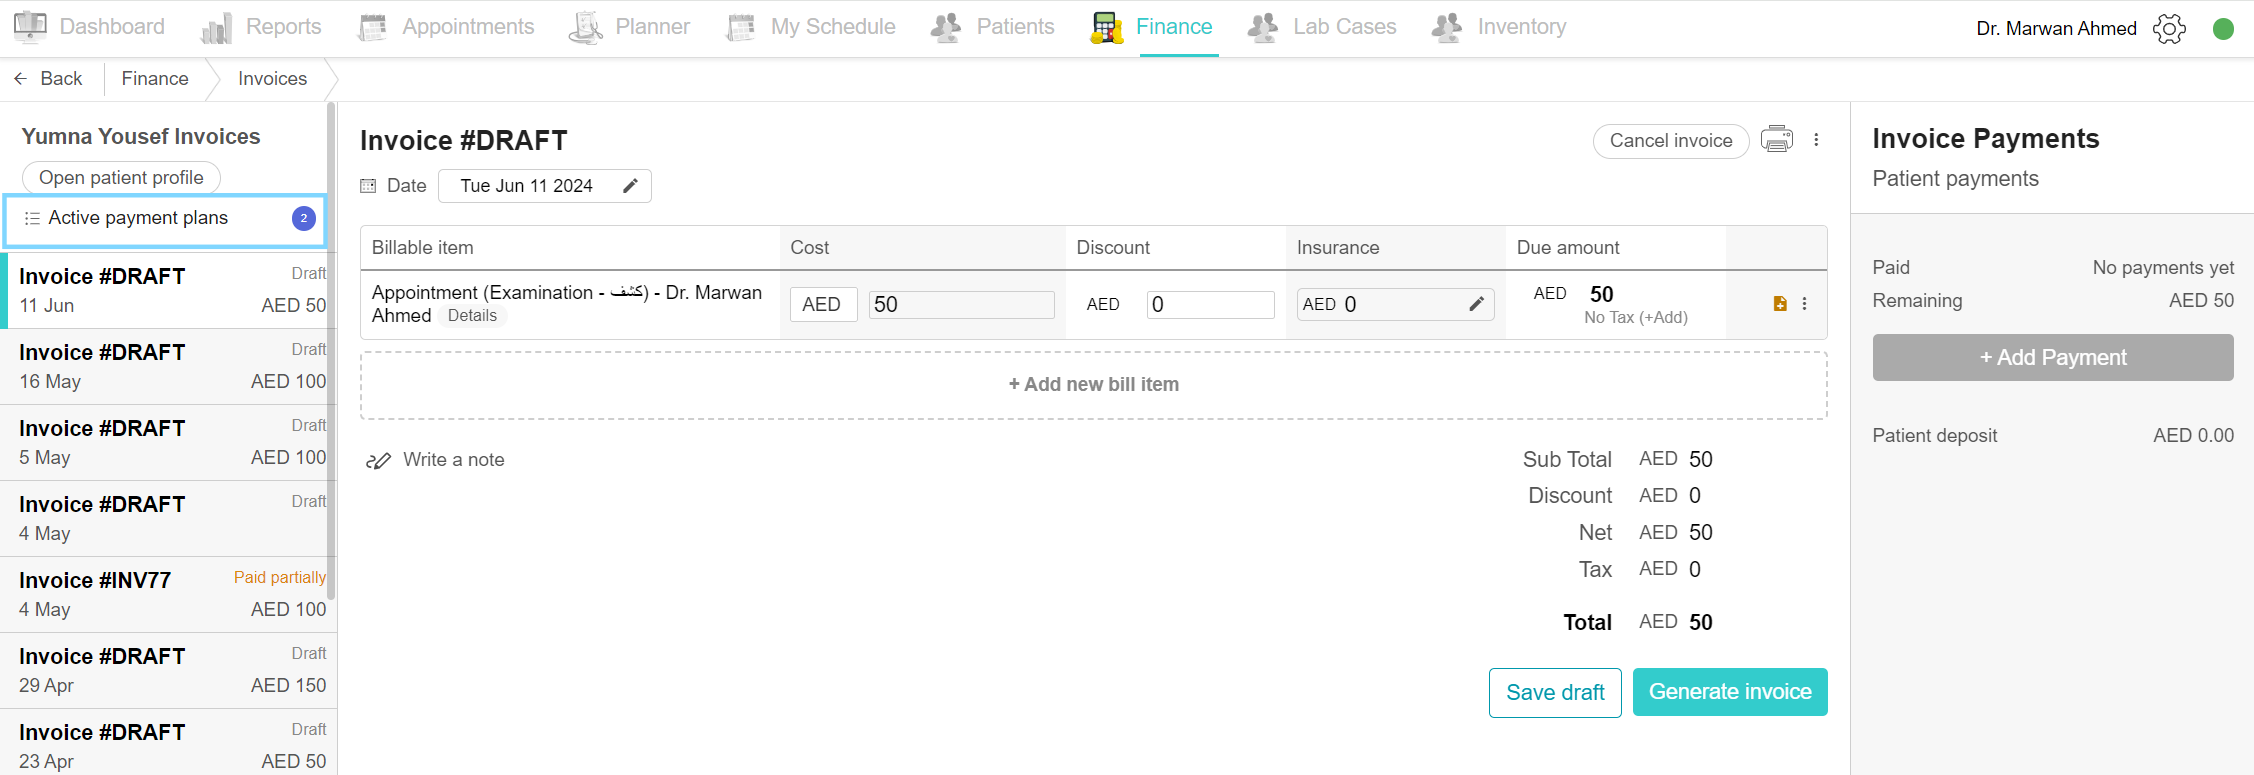
View active payment plans
To view any payment plans added to the patient, either check the patient profile or the invoices. In the case of invoices, click on the Finance tab and choose the Invoice page. Select the desired invoice. On the left side of the invoice underneath the patient name, you can find the “Open patient profile” button and the active payment plans option. “No active payment plan” explains that no payment plan is added to this patient, while “Active payment plans” with a number balloon next to it indicate a plan added to the patient and is active. Click on the text to view the payment plans. Note that these plans are for record only and do not affect the invoices.
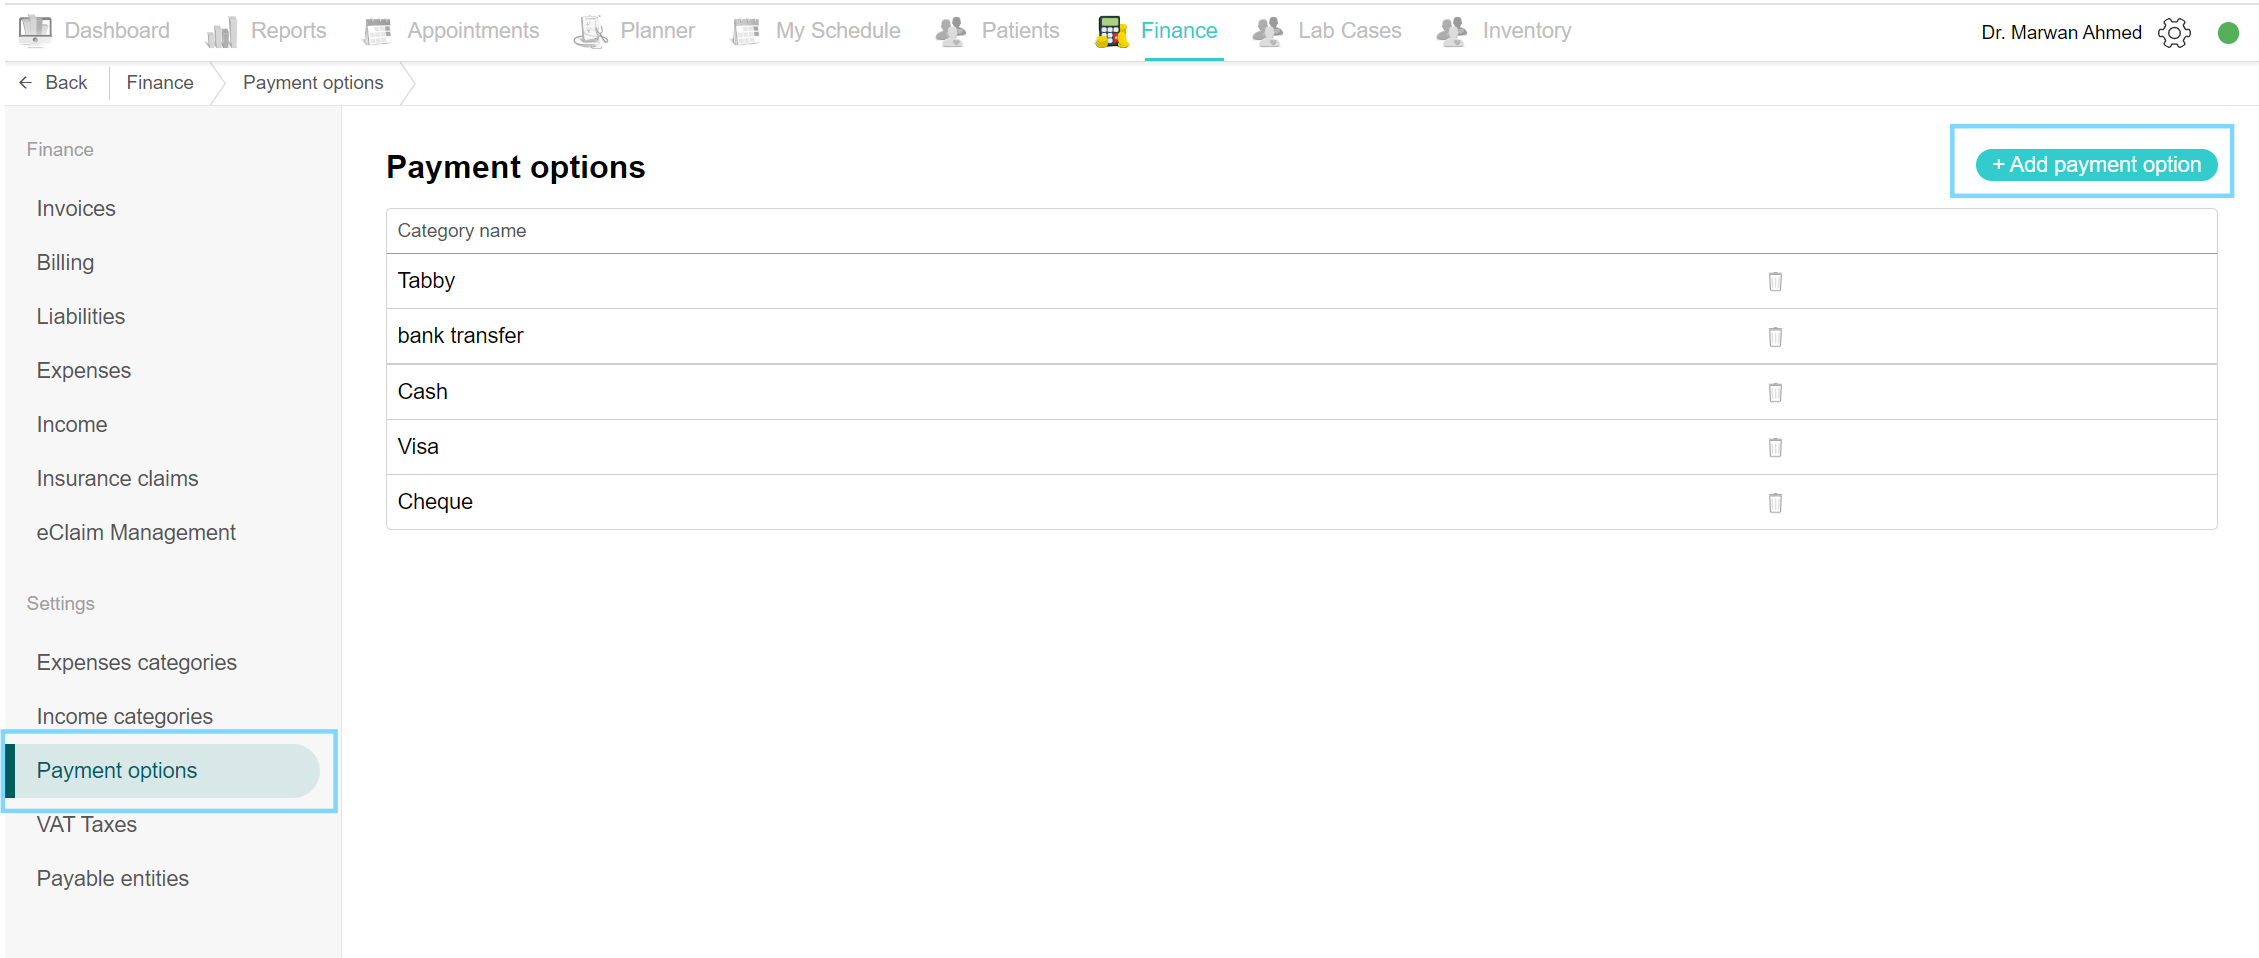
Payment Option:
These are the different methods through which patients and clients can pay for their invoices for services or products. Some common ones are Cash, Credit/Debit card, Bank Transfer and many more.
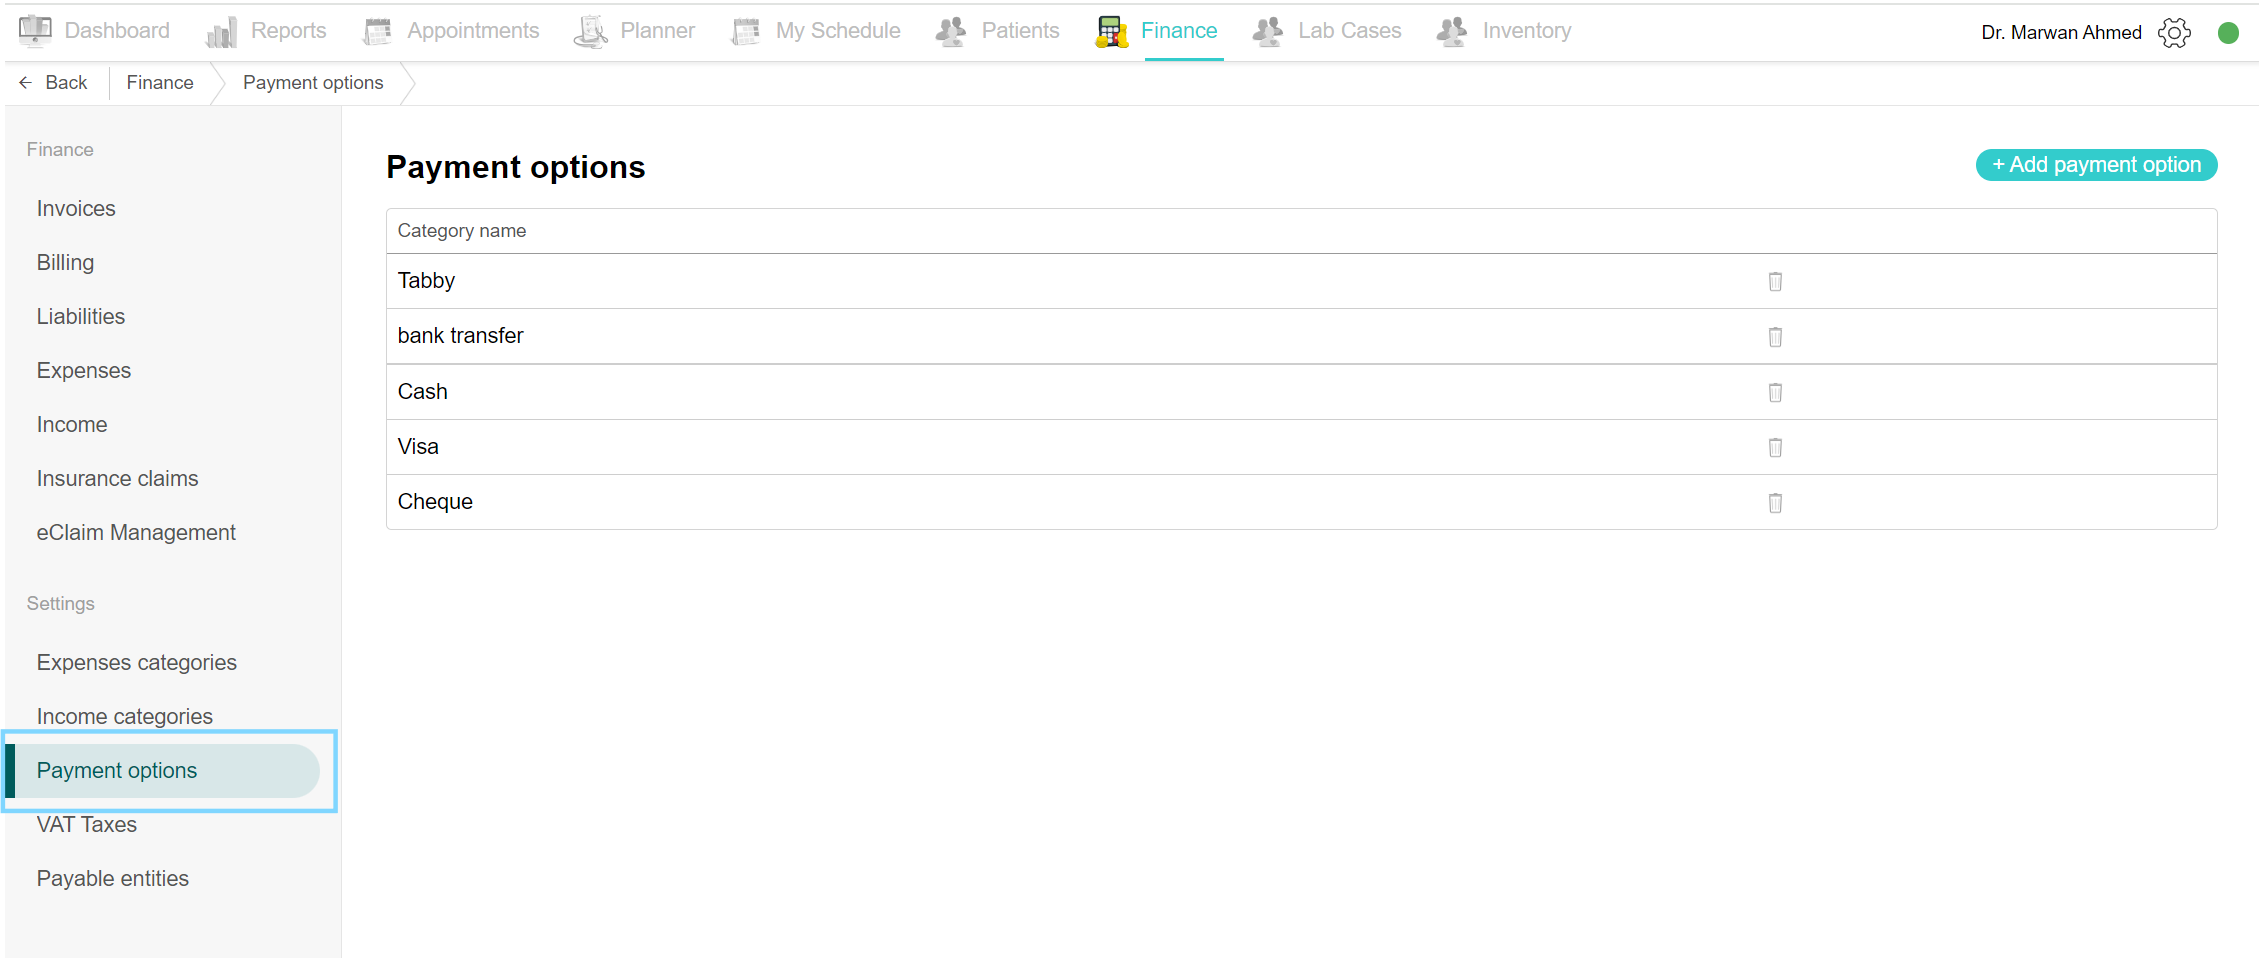
Add a new payment option
Go to the Finance tab, under the Settings section, and click on Payment options. A list of payment methods is shown. To add a new method, click on the “Add payment option” button. Write the new method and save it. From now on, all invoices will contain this new payment option.
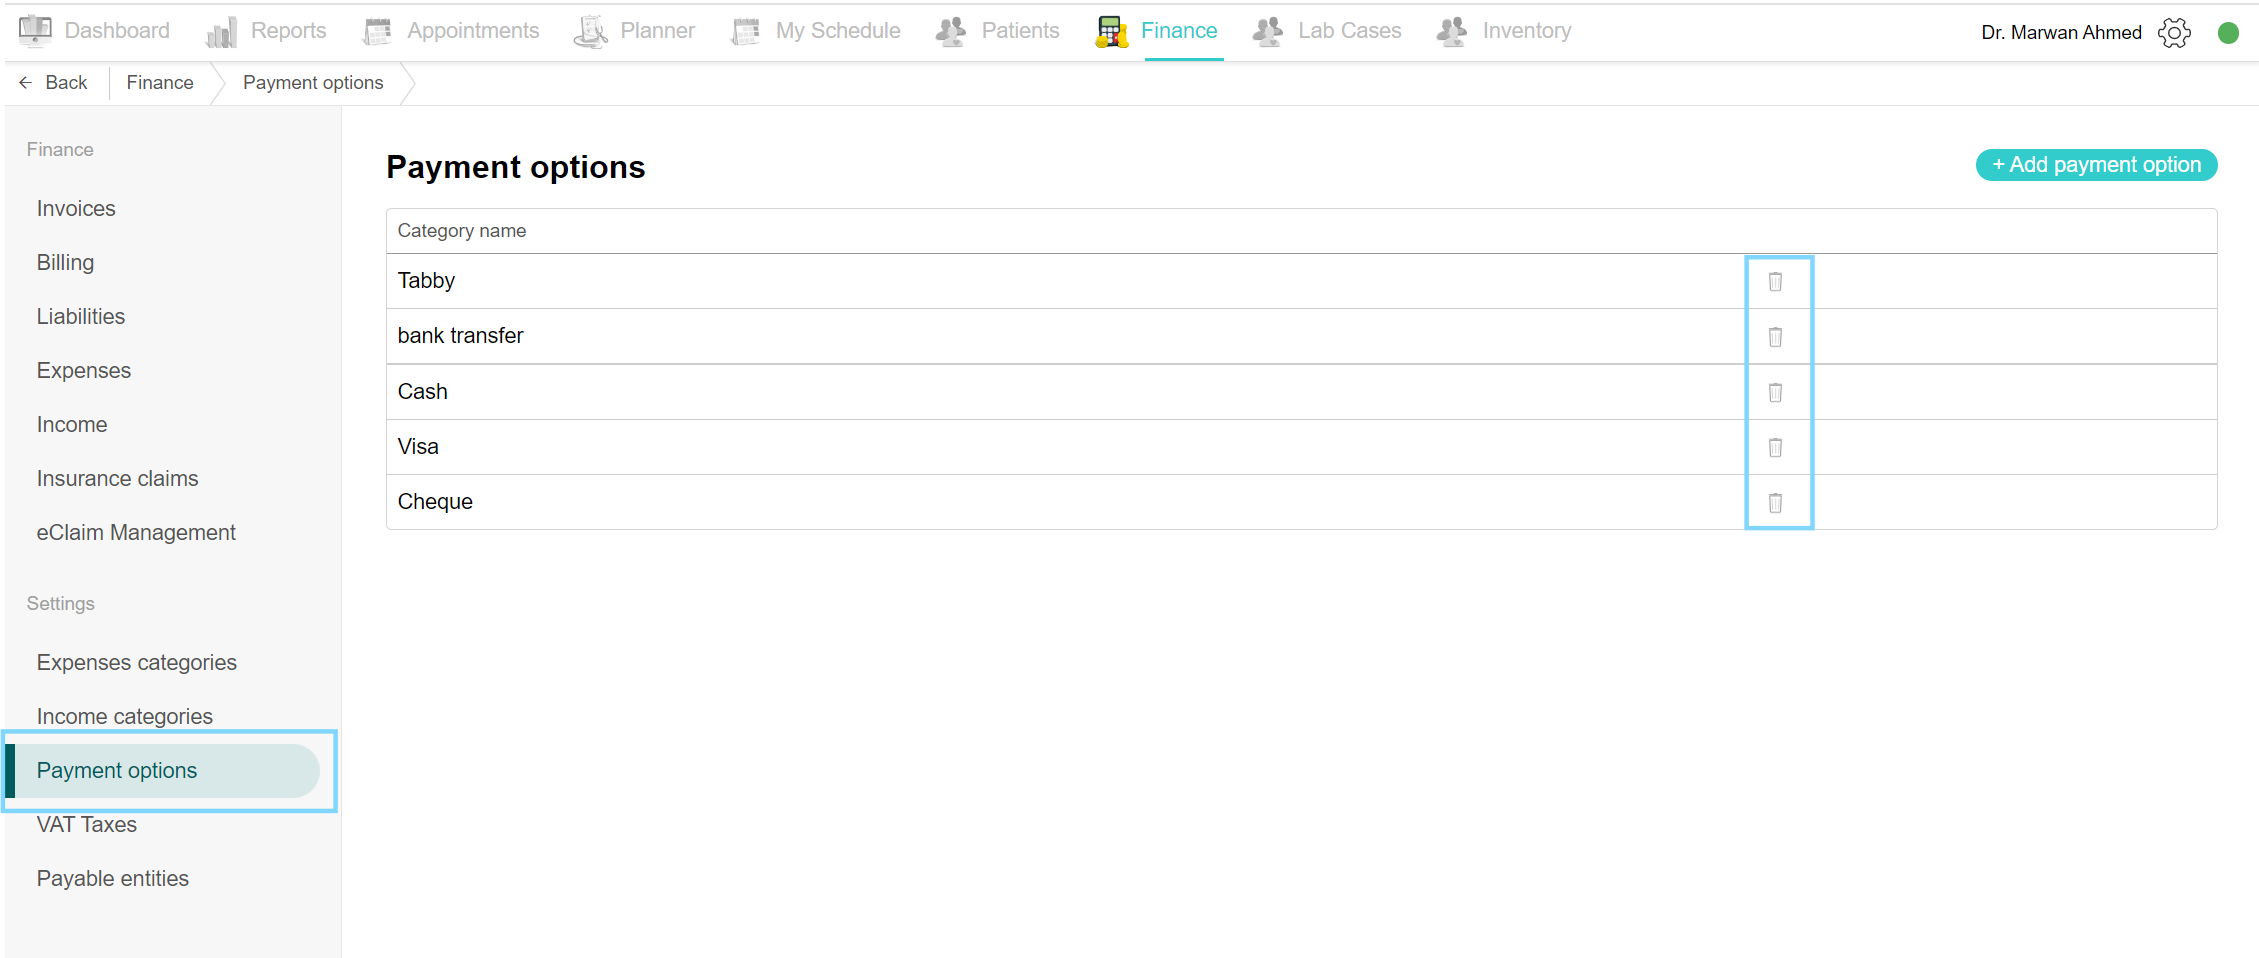
Delete payment option
To remove an option from the list, go to the Finance tab and choose Payment Options. From the list, find the payment method you wish to remove and click on the delete icon located next to the name. Confirm the step by clicking “Delete”. Now the method is no longer found in the list or any invoice.
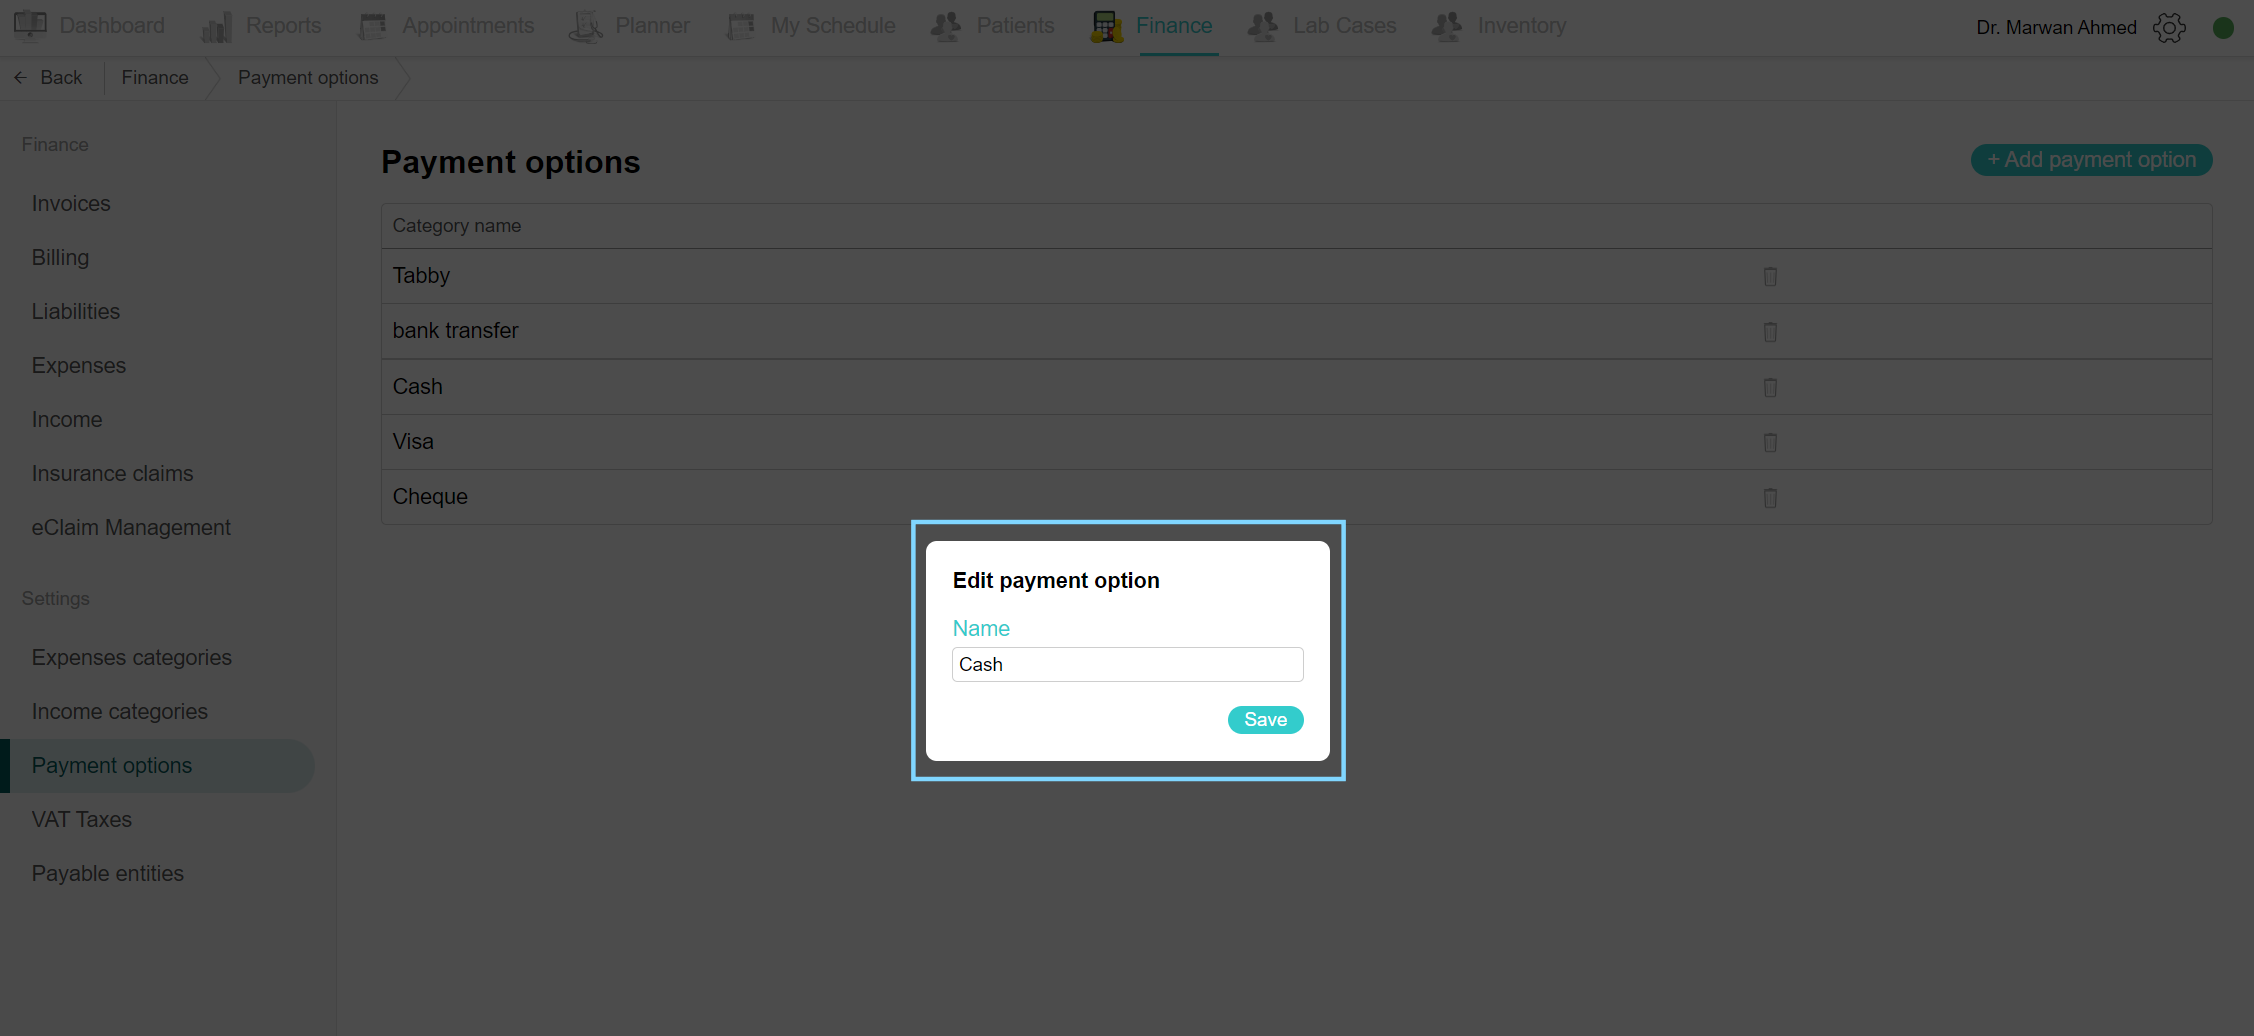
Edit payment option
To edit the name of the payment option, go to the Finance tab and choose Payment Options. From the list, find the payment method you wish to edit and click on the method name. An edit payment option box appears, now make the changes and save it. Now the method is edited to the new name.
Vat Taxes:
This is the Value-Added Tax added to cosmetic procedures created by FTA. You can add and configure the tax to Balsam Medico and have it automatically calculated on the necessary invoices.
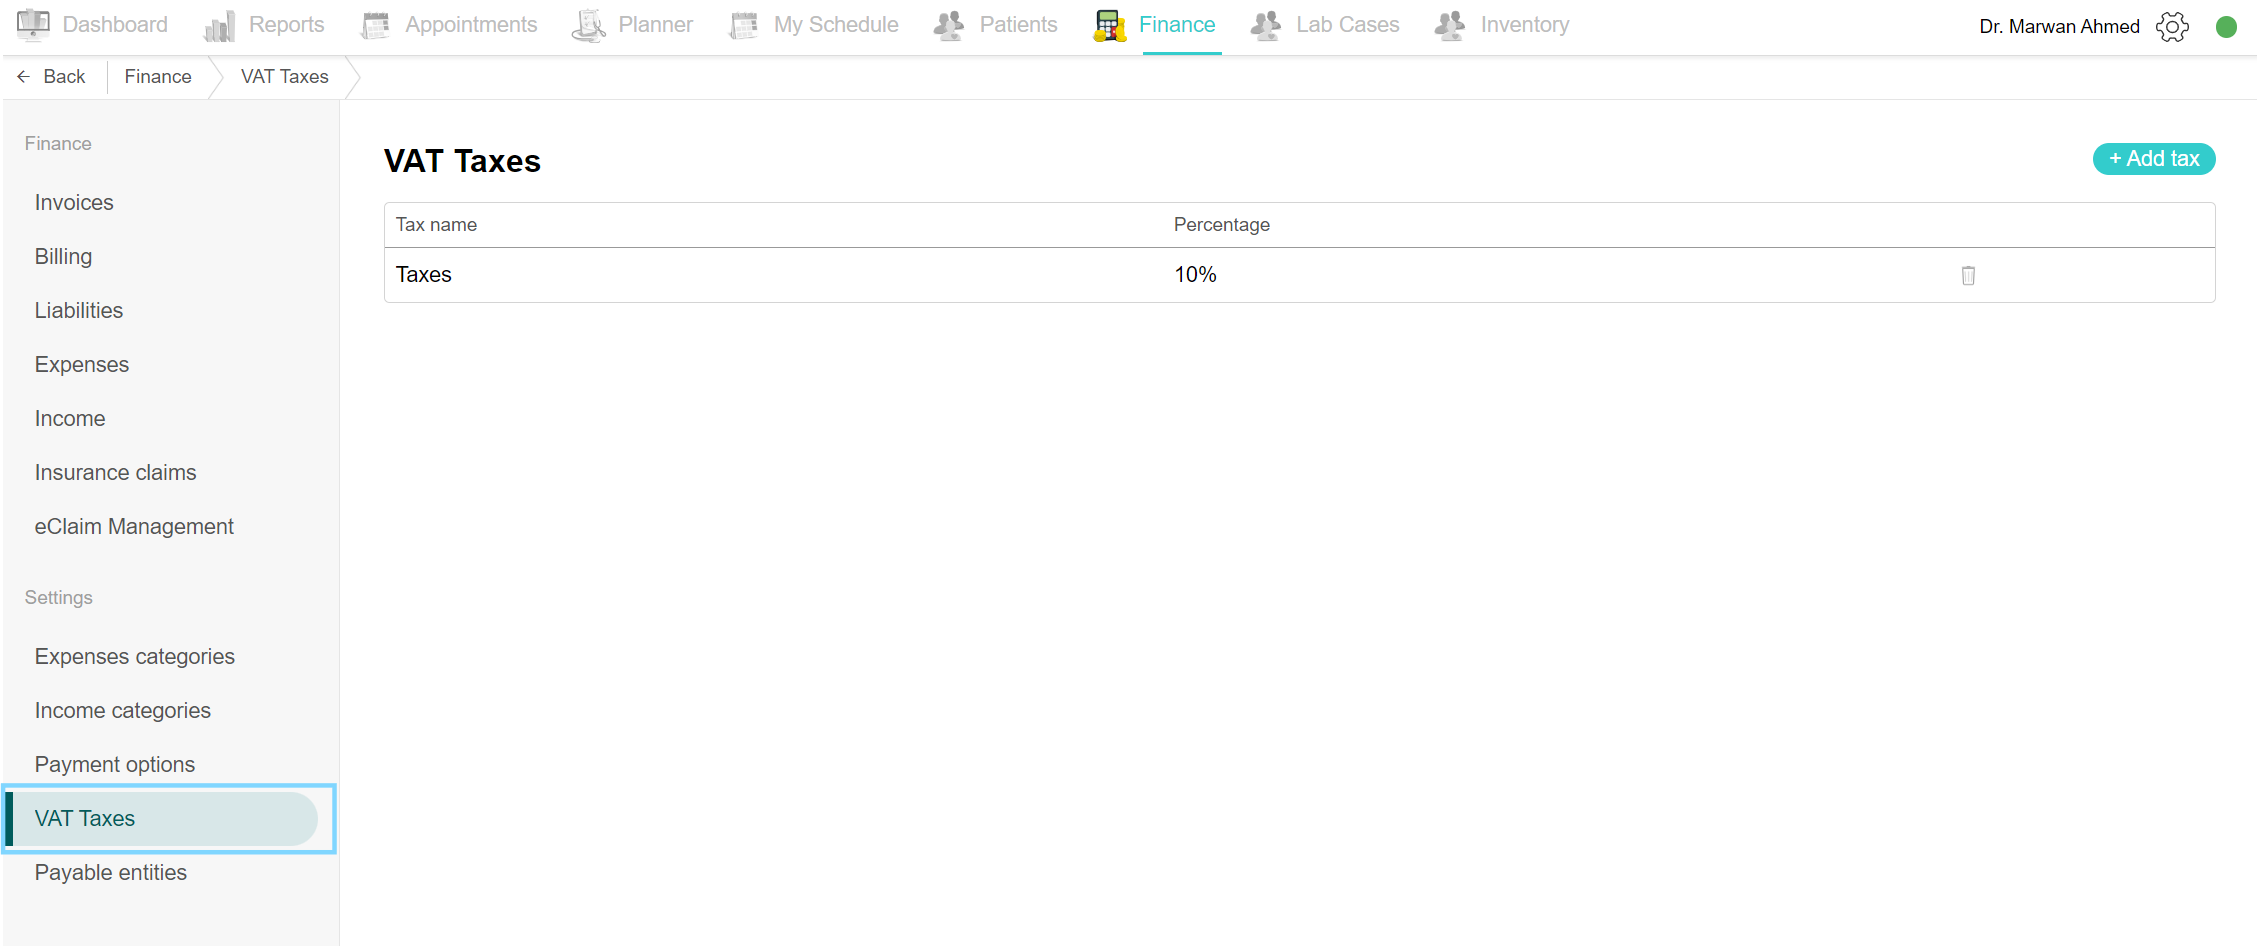
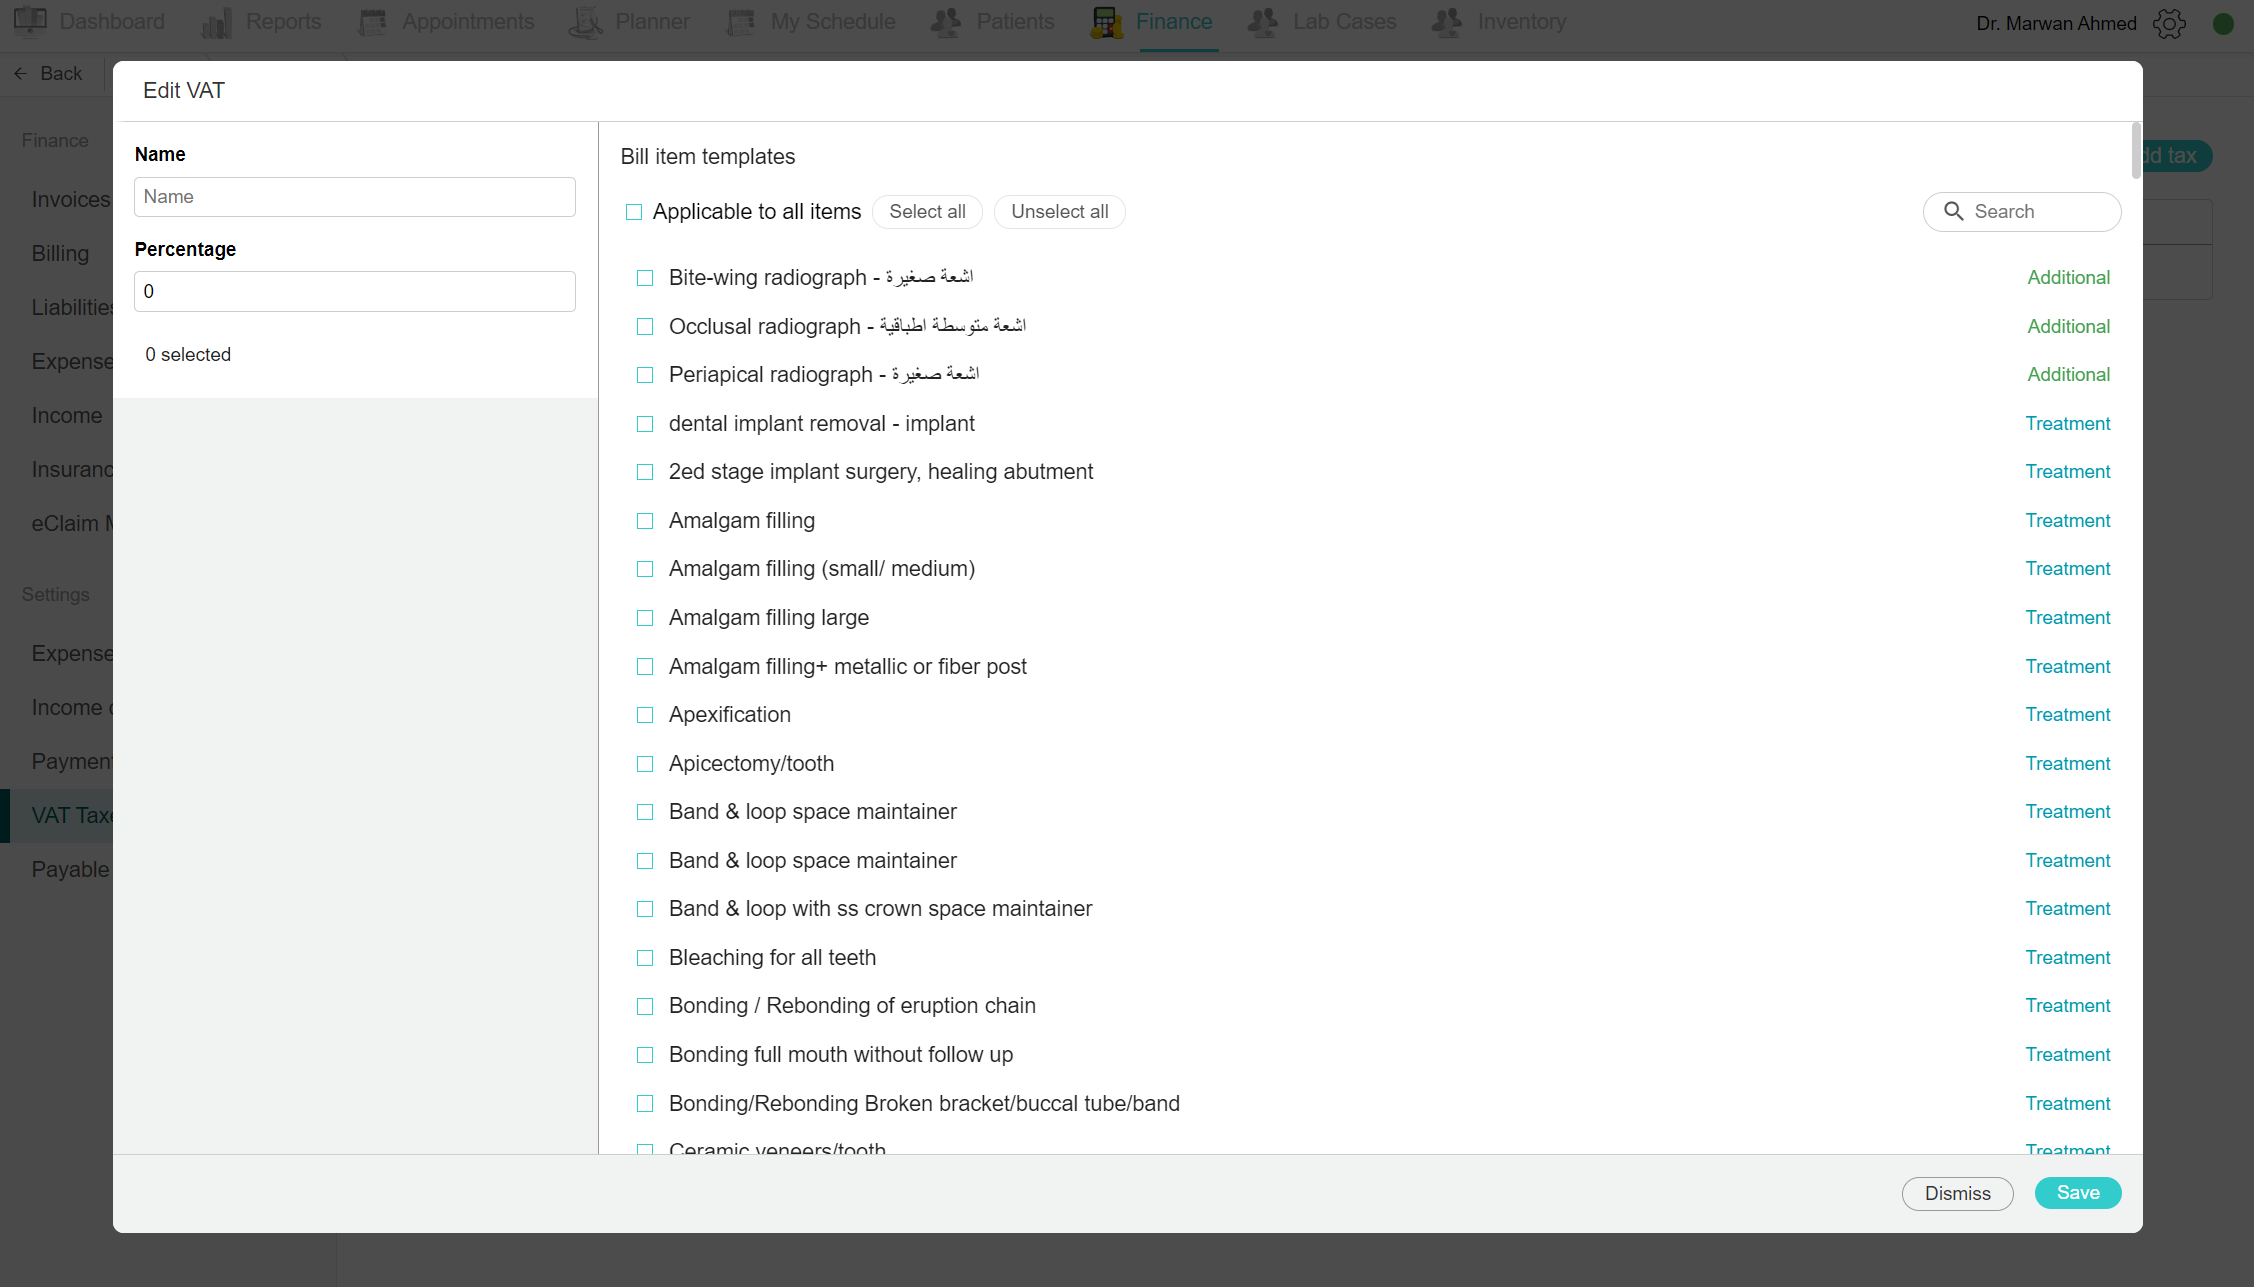
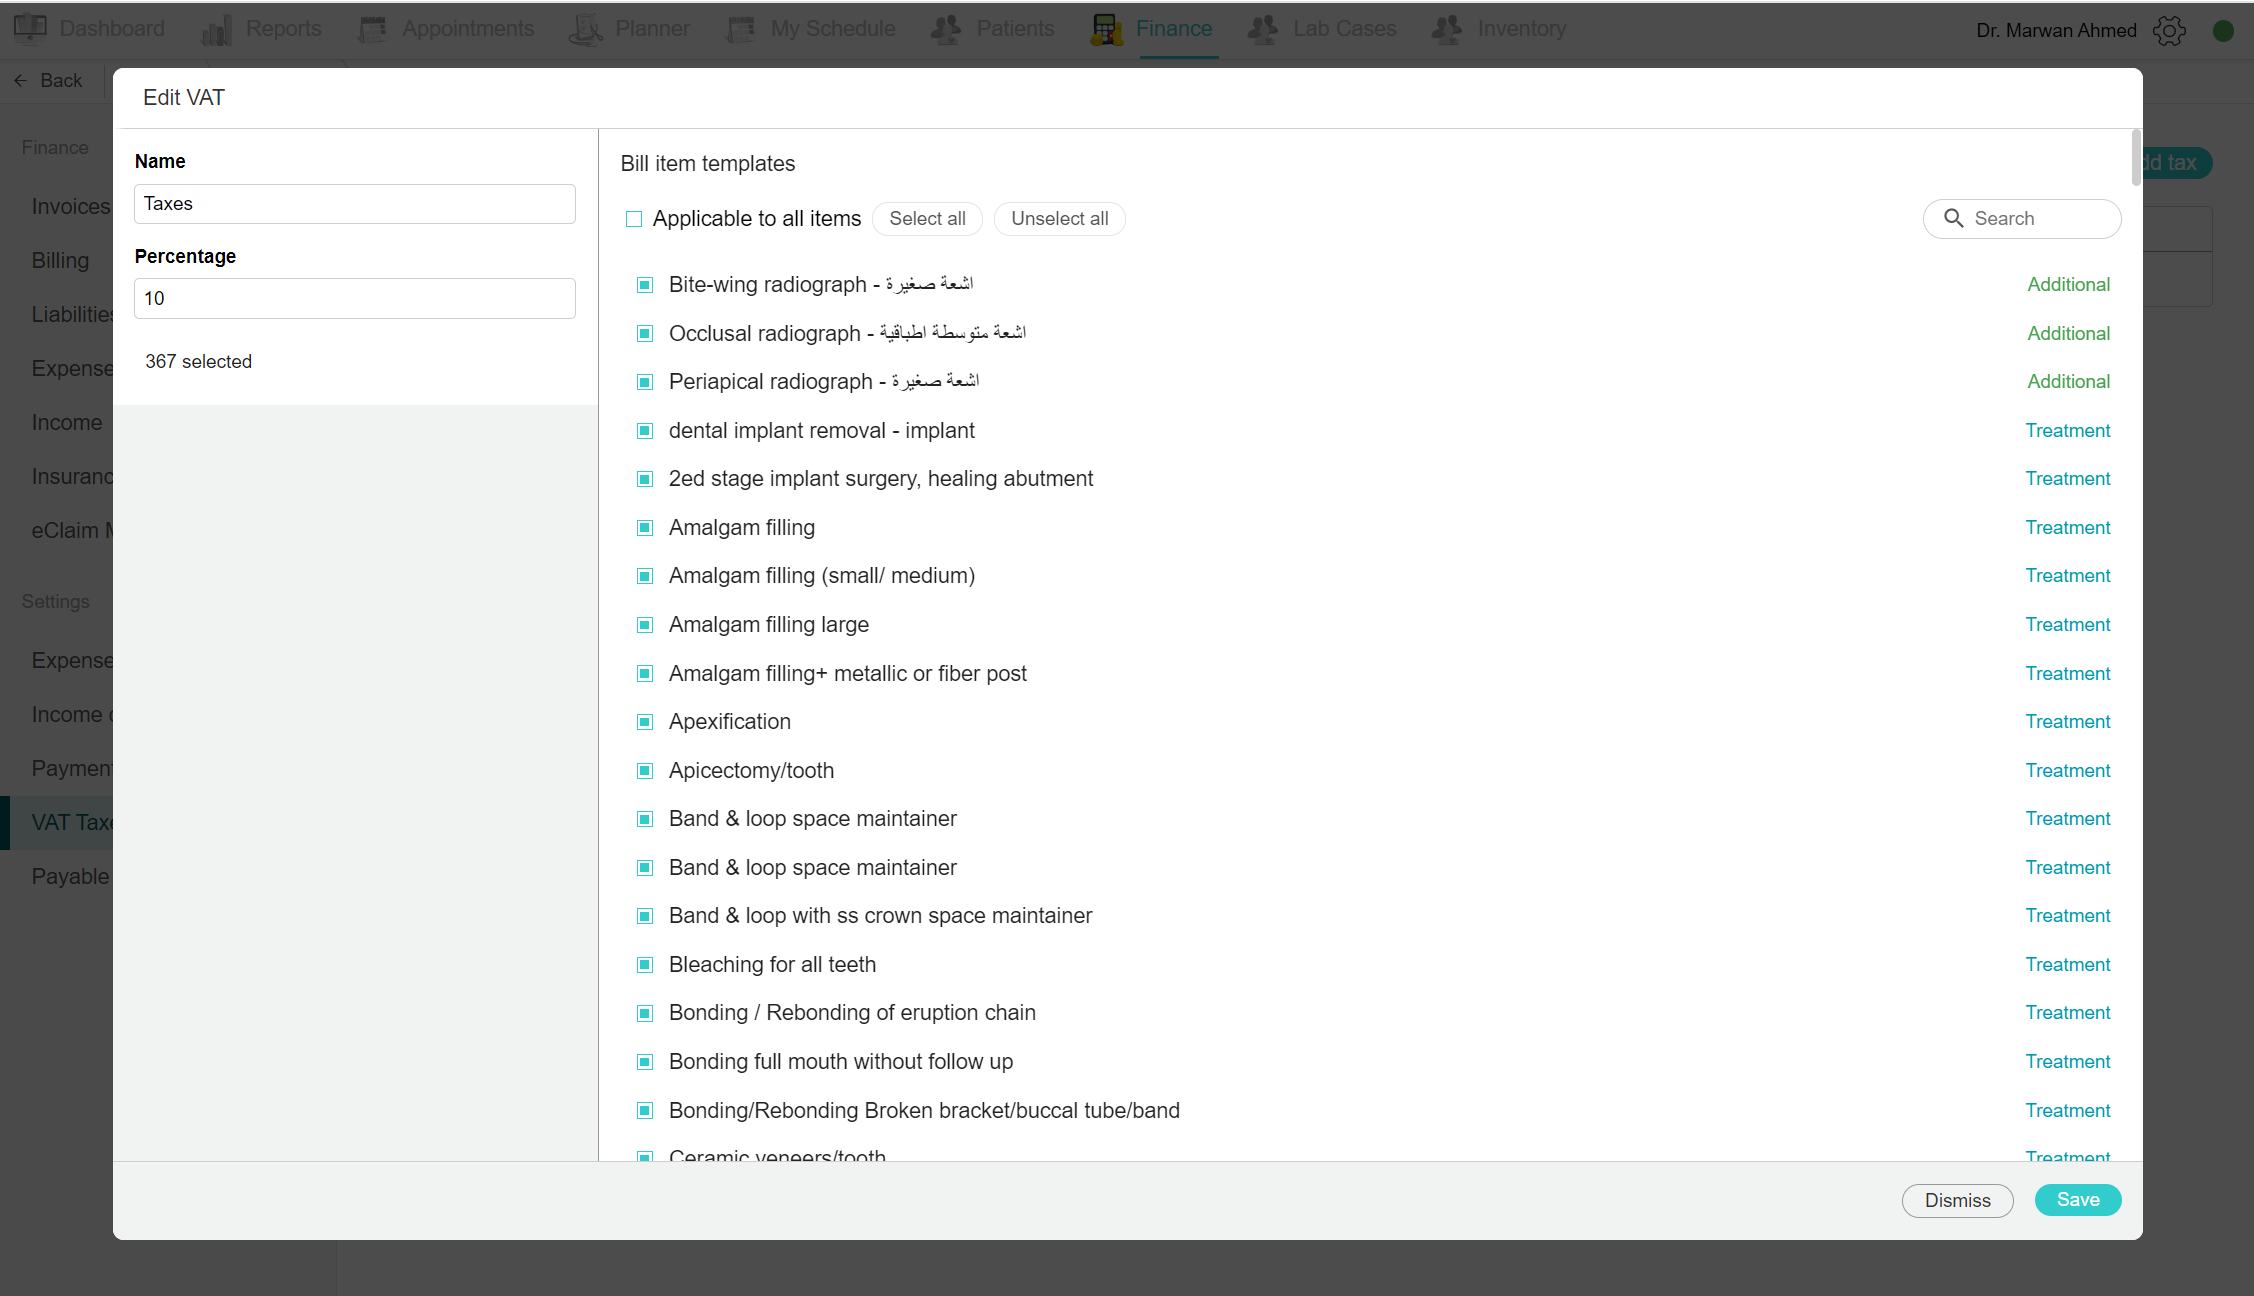
Add new VAT tax
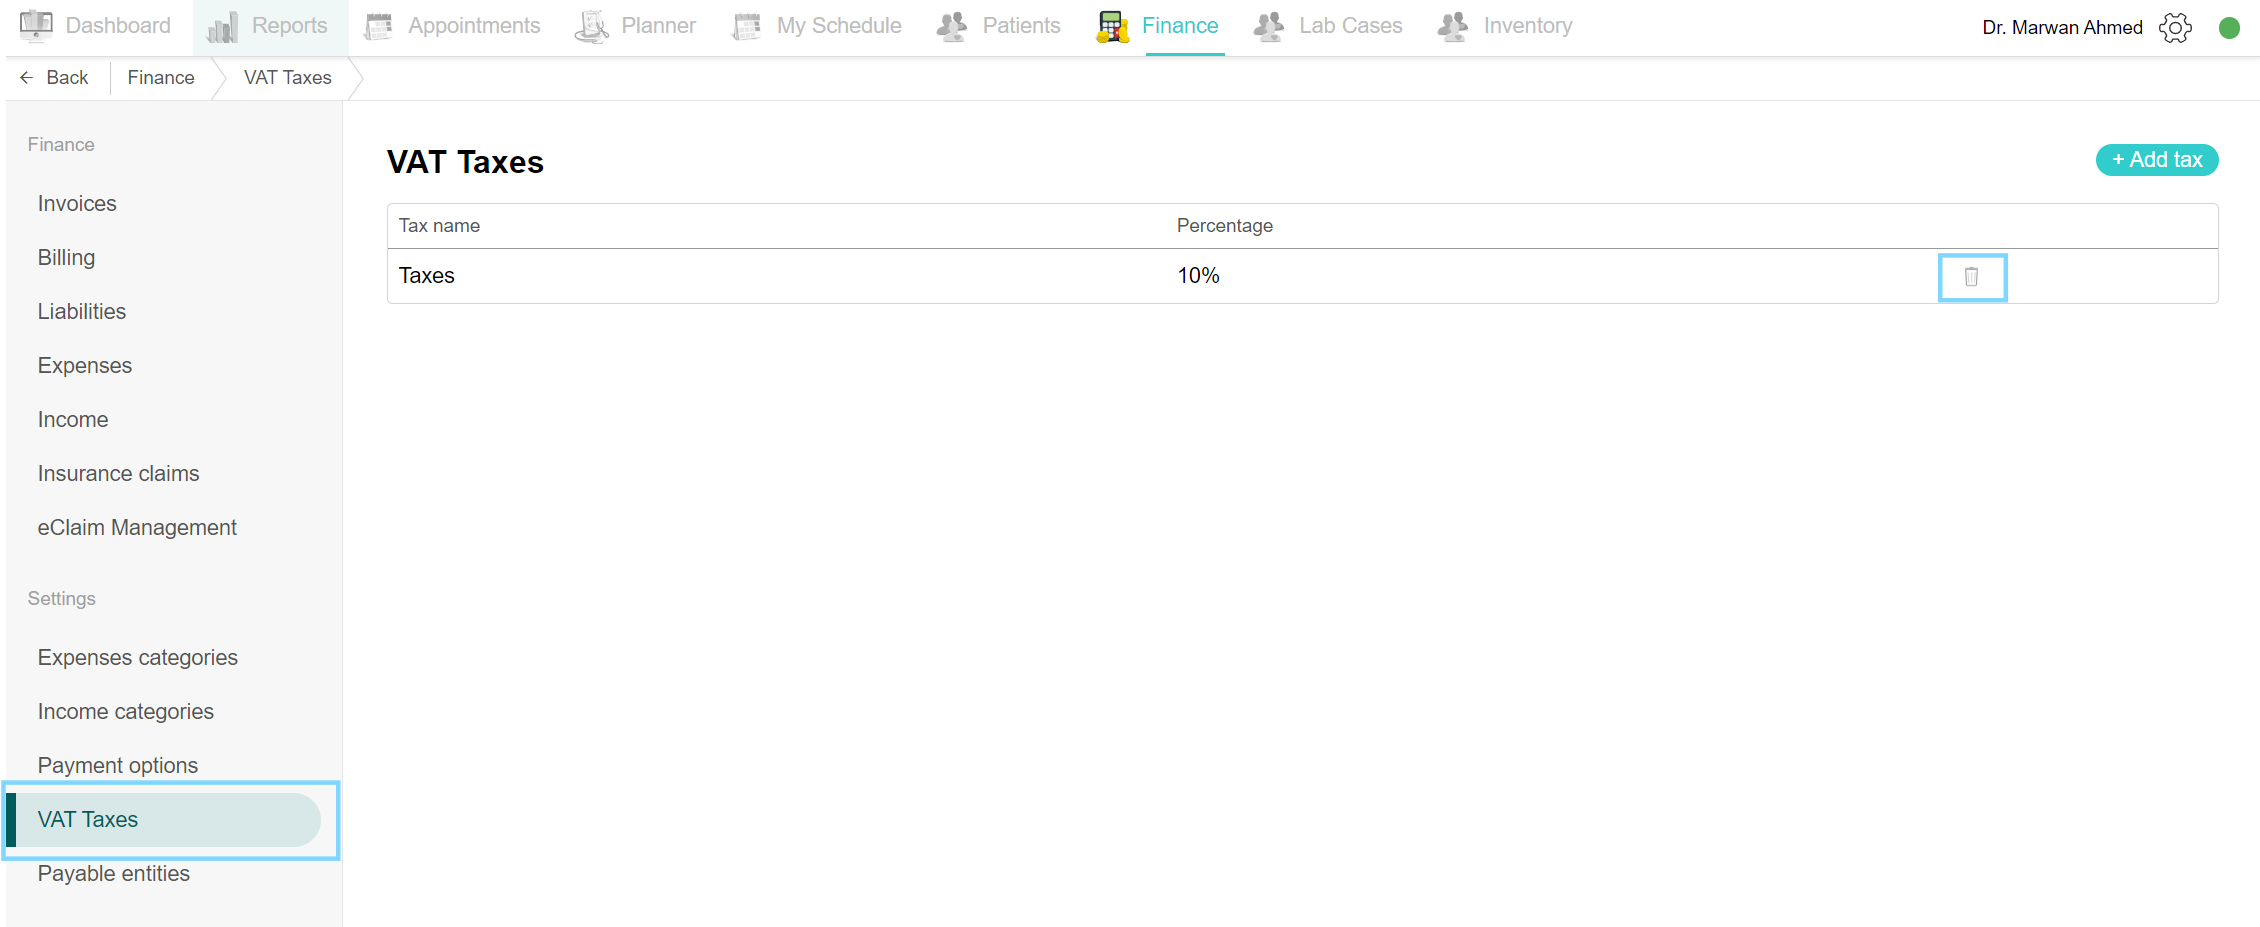
Go to the Finance tab, under the Settings section, and click on VAT Taxes. A list of all the taxes is shown. To add a new tax, click on the “Add Tax” button. An Edit VAT page appears, on the left add the name of the tax and the percentage. Example: Name: VAT Tax and the Percentage: 5%. Now move to the right side and select the items to which this tax applies. If the tax is for all treatments and services, either click on the box next to “Applicable to all items” or click on “Select all”. After selecting the desired bill items, click save. Now every invoice that contains the selected bill items will have the tax auto-calculated and added to the invoice.
Edit VAT tax
To edit any VAT, go to the Finance tab and click on VAT Taxes under the Settings section. Click on the desired tax from the list. An edit VAT page opens, on the left side, edt the name and/or percentage. On the right side of the page, you can edit the list of bill items applicable to the tax. You can select or unselect the items from the tick box next to their name. Finally, click save.
Delete VAT tax
Go to the Finance tab and click on VAT Taxes under the Settings section. Locate the desired tax you wish to remove from the list. Click on the delete icon on the same row of the VAT Tax name. Confirm by clicking the “Delete” button. Now it is no longer found on the list.
Insurance claims
View insurance claims
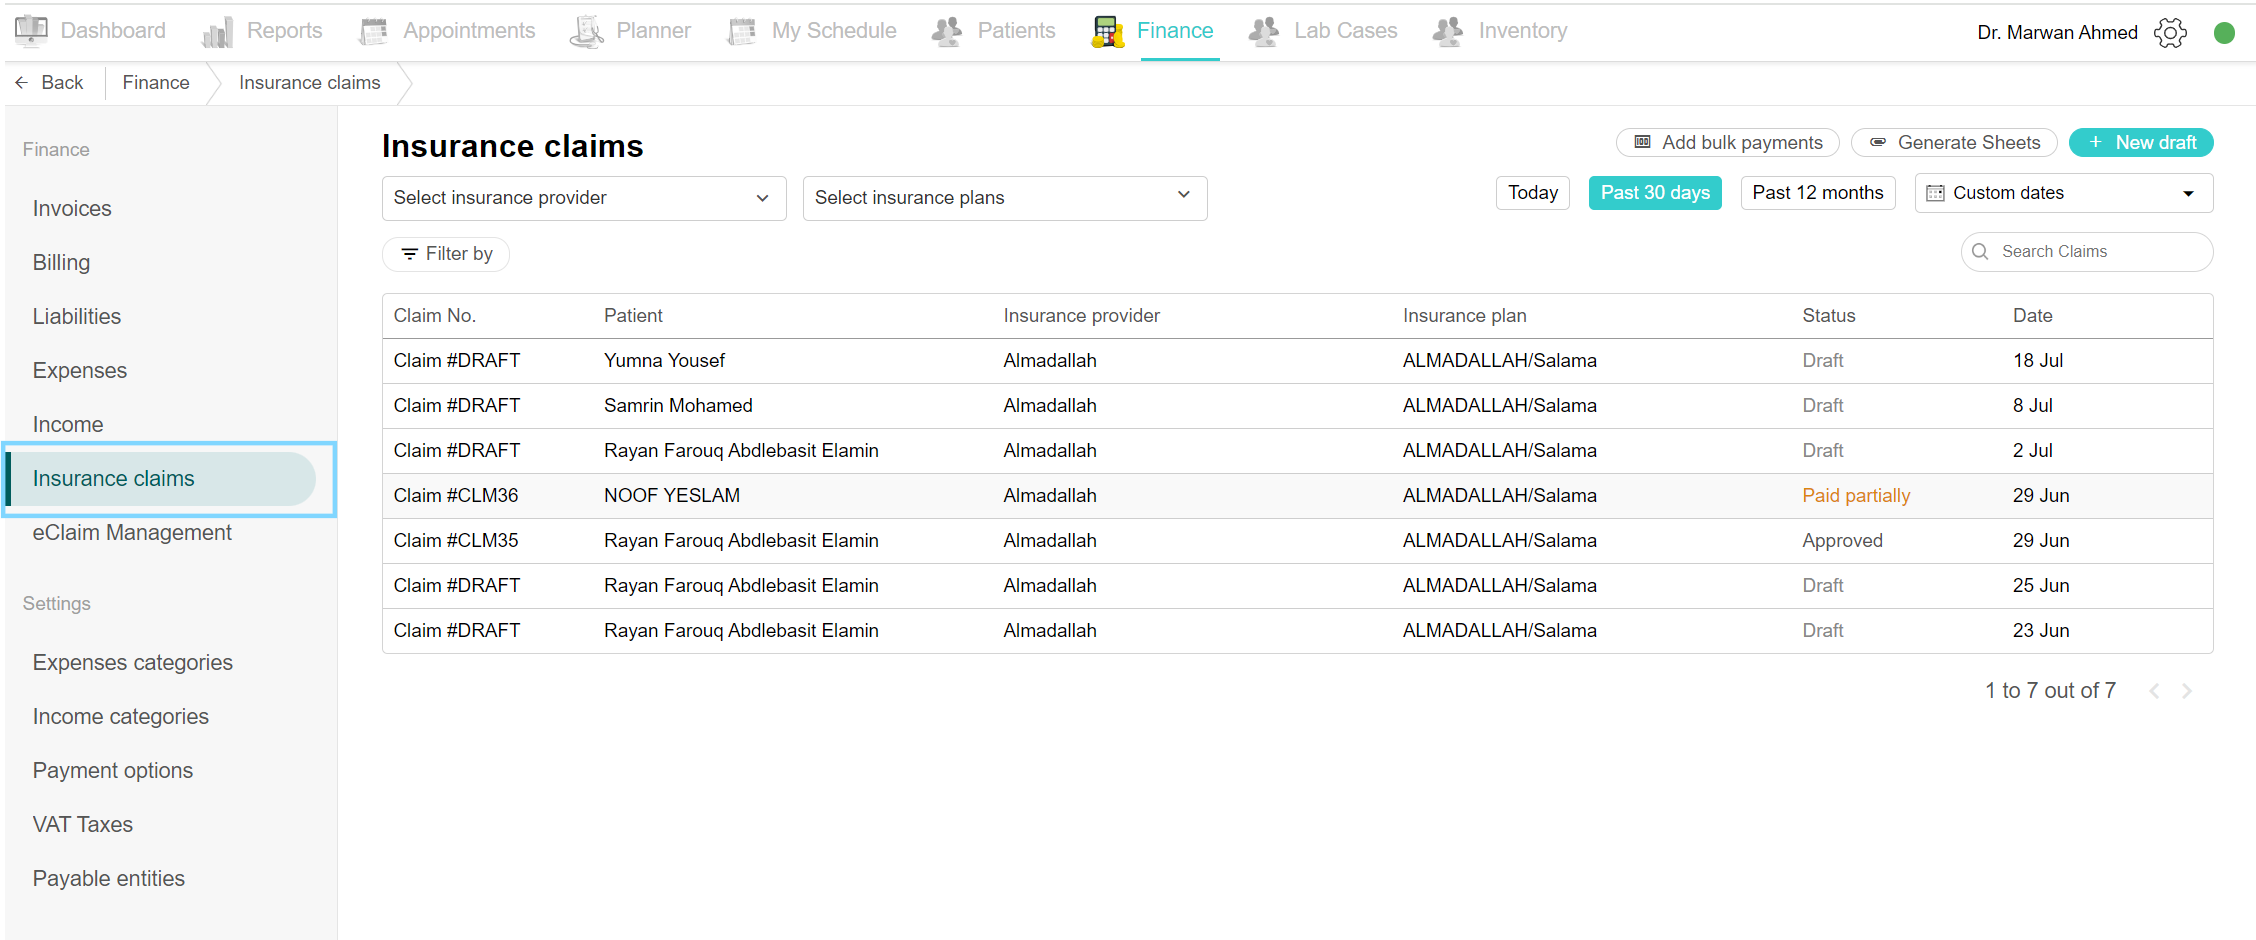
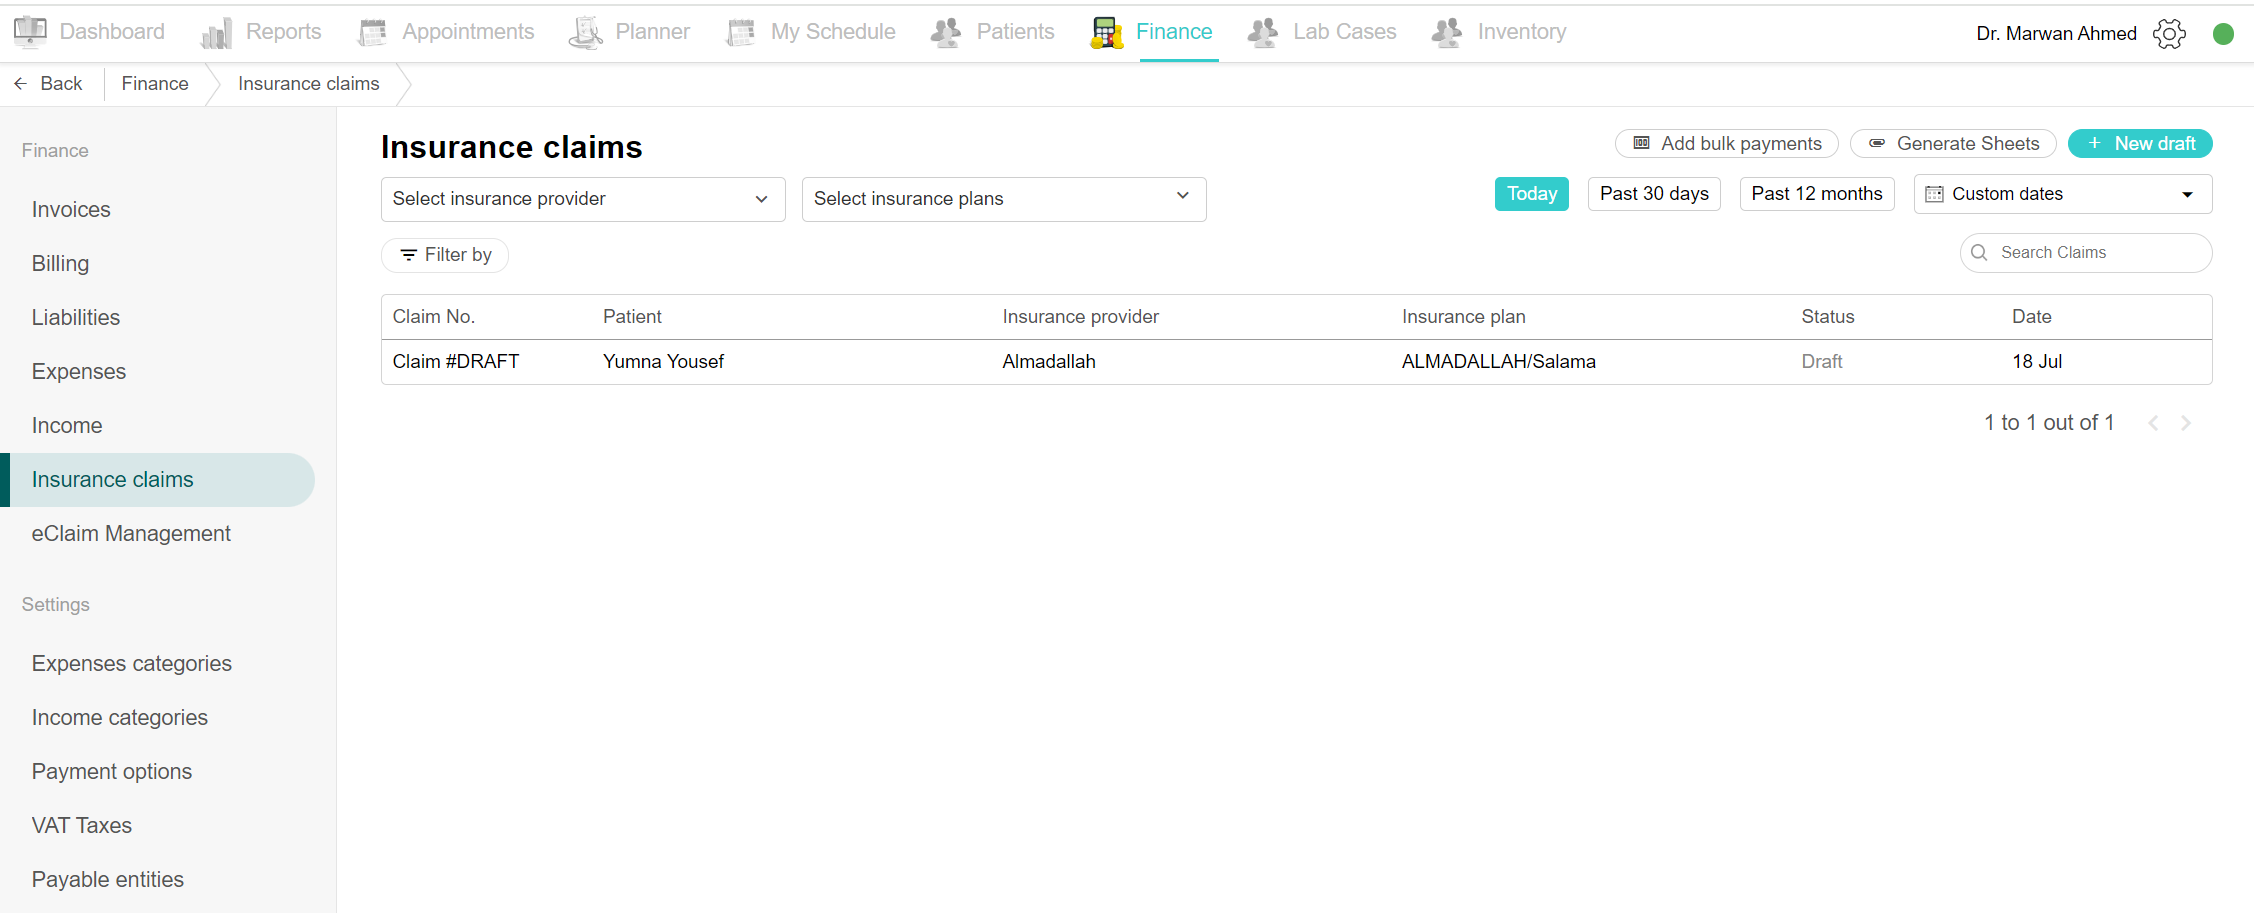
When a treatment being performed on a patient is covered by an insurance company, the clinic has to generate a claim to the insurance provider. To view all insurance claims drafted, generated and submitted, navigate to the Finance tab and click on Insurance claims. A list of all insurance claims is shown. Click on a claim to edit, update or submit.
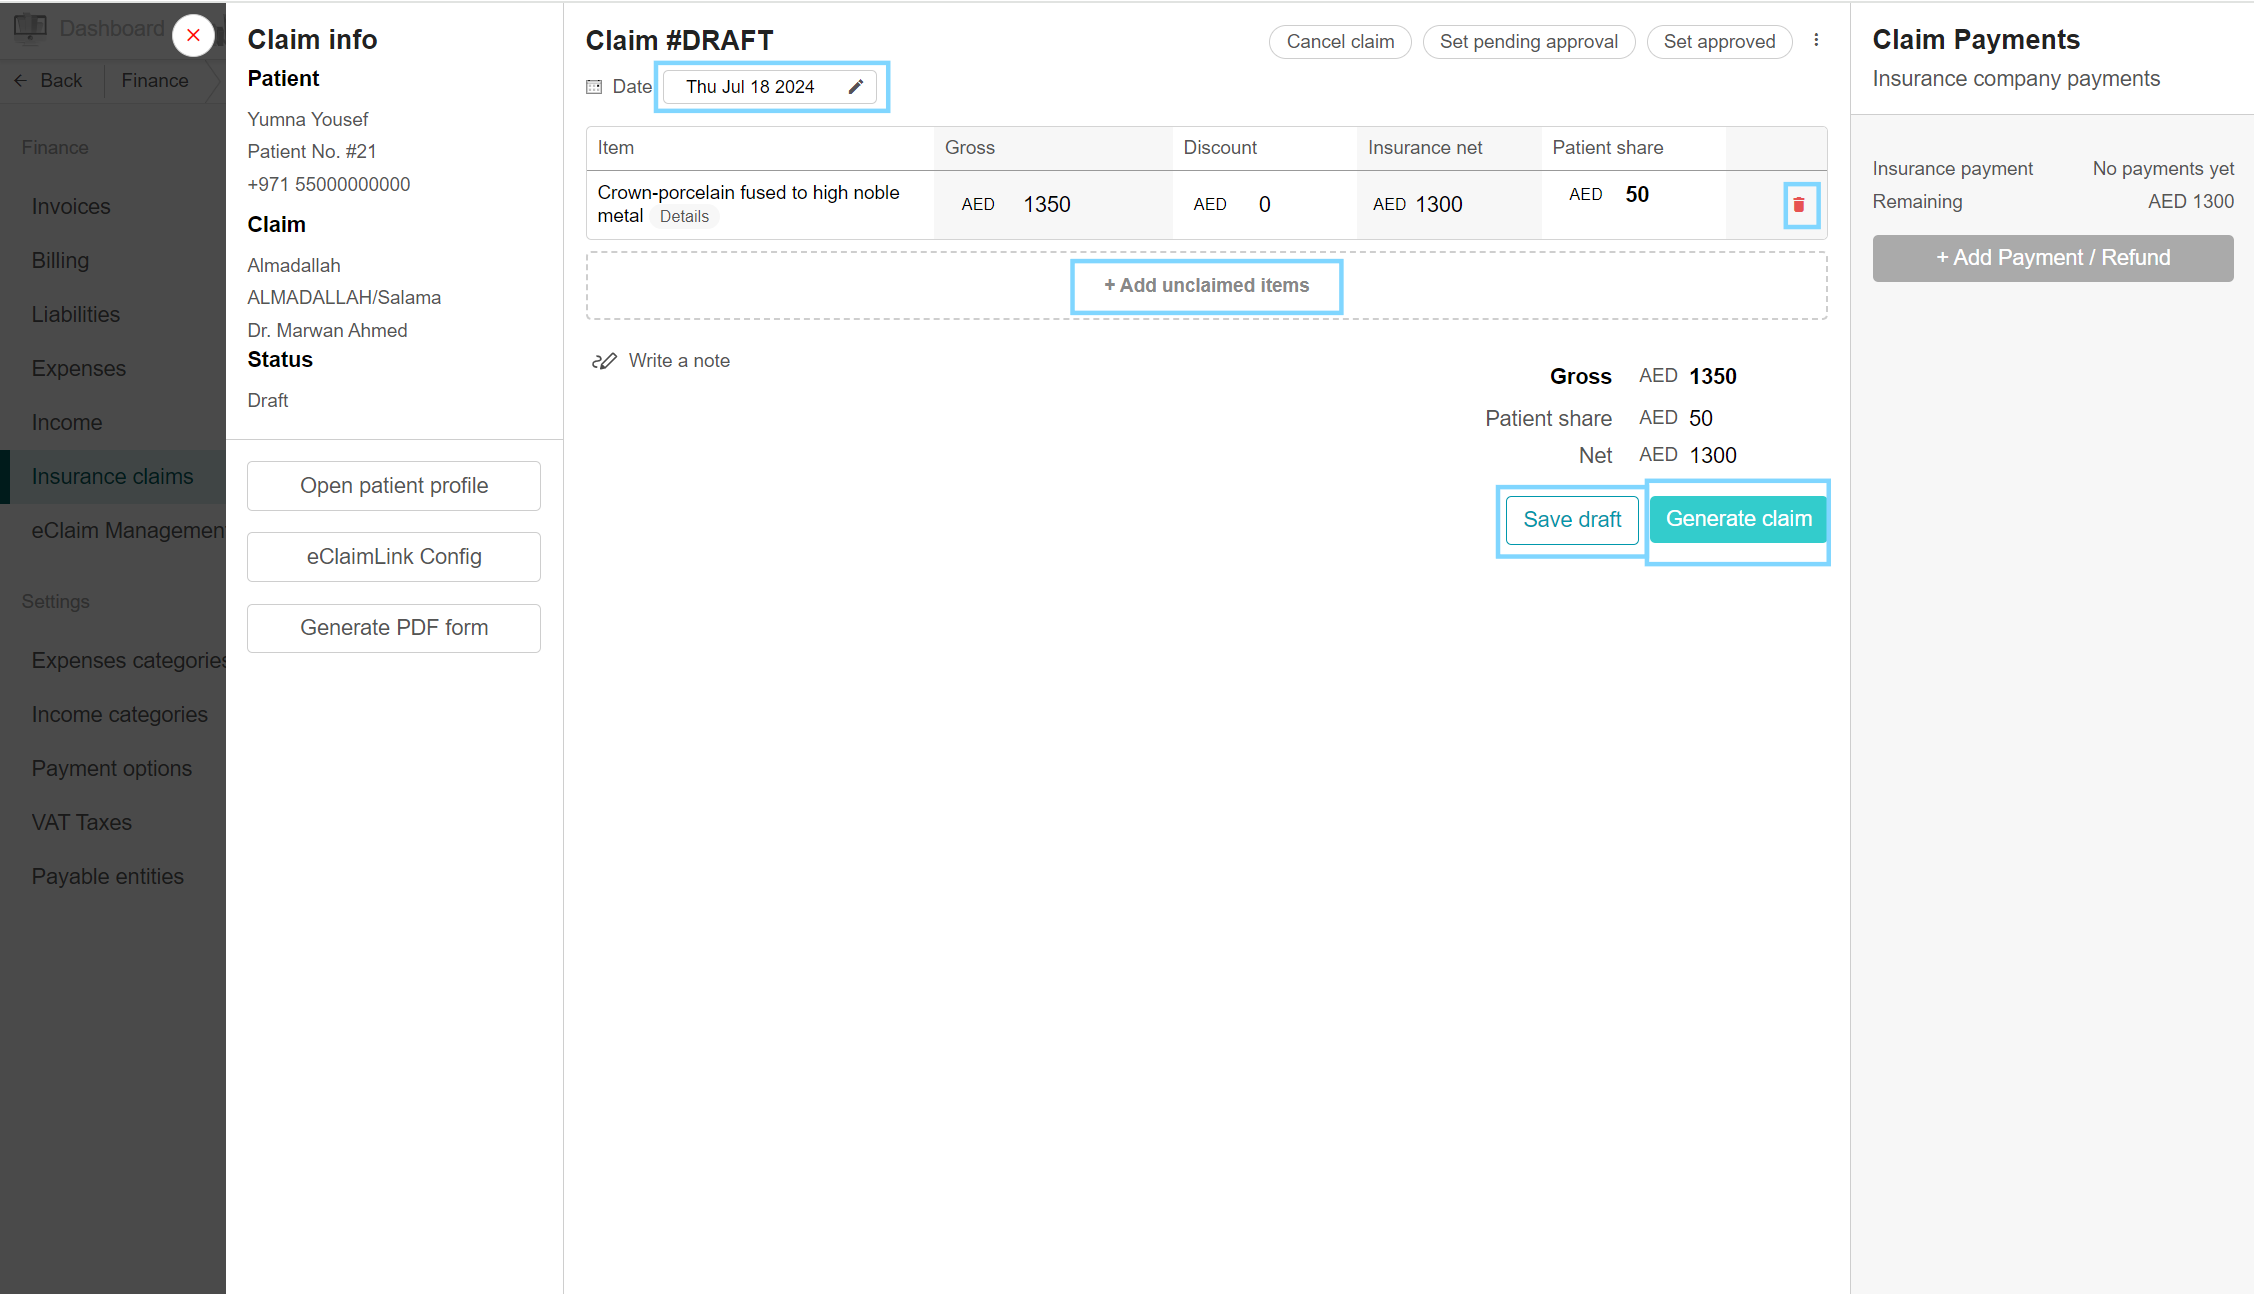
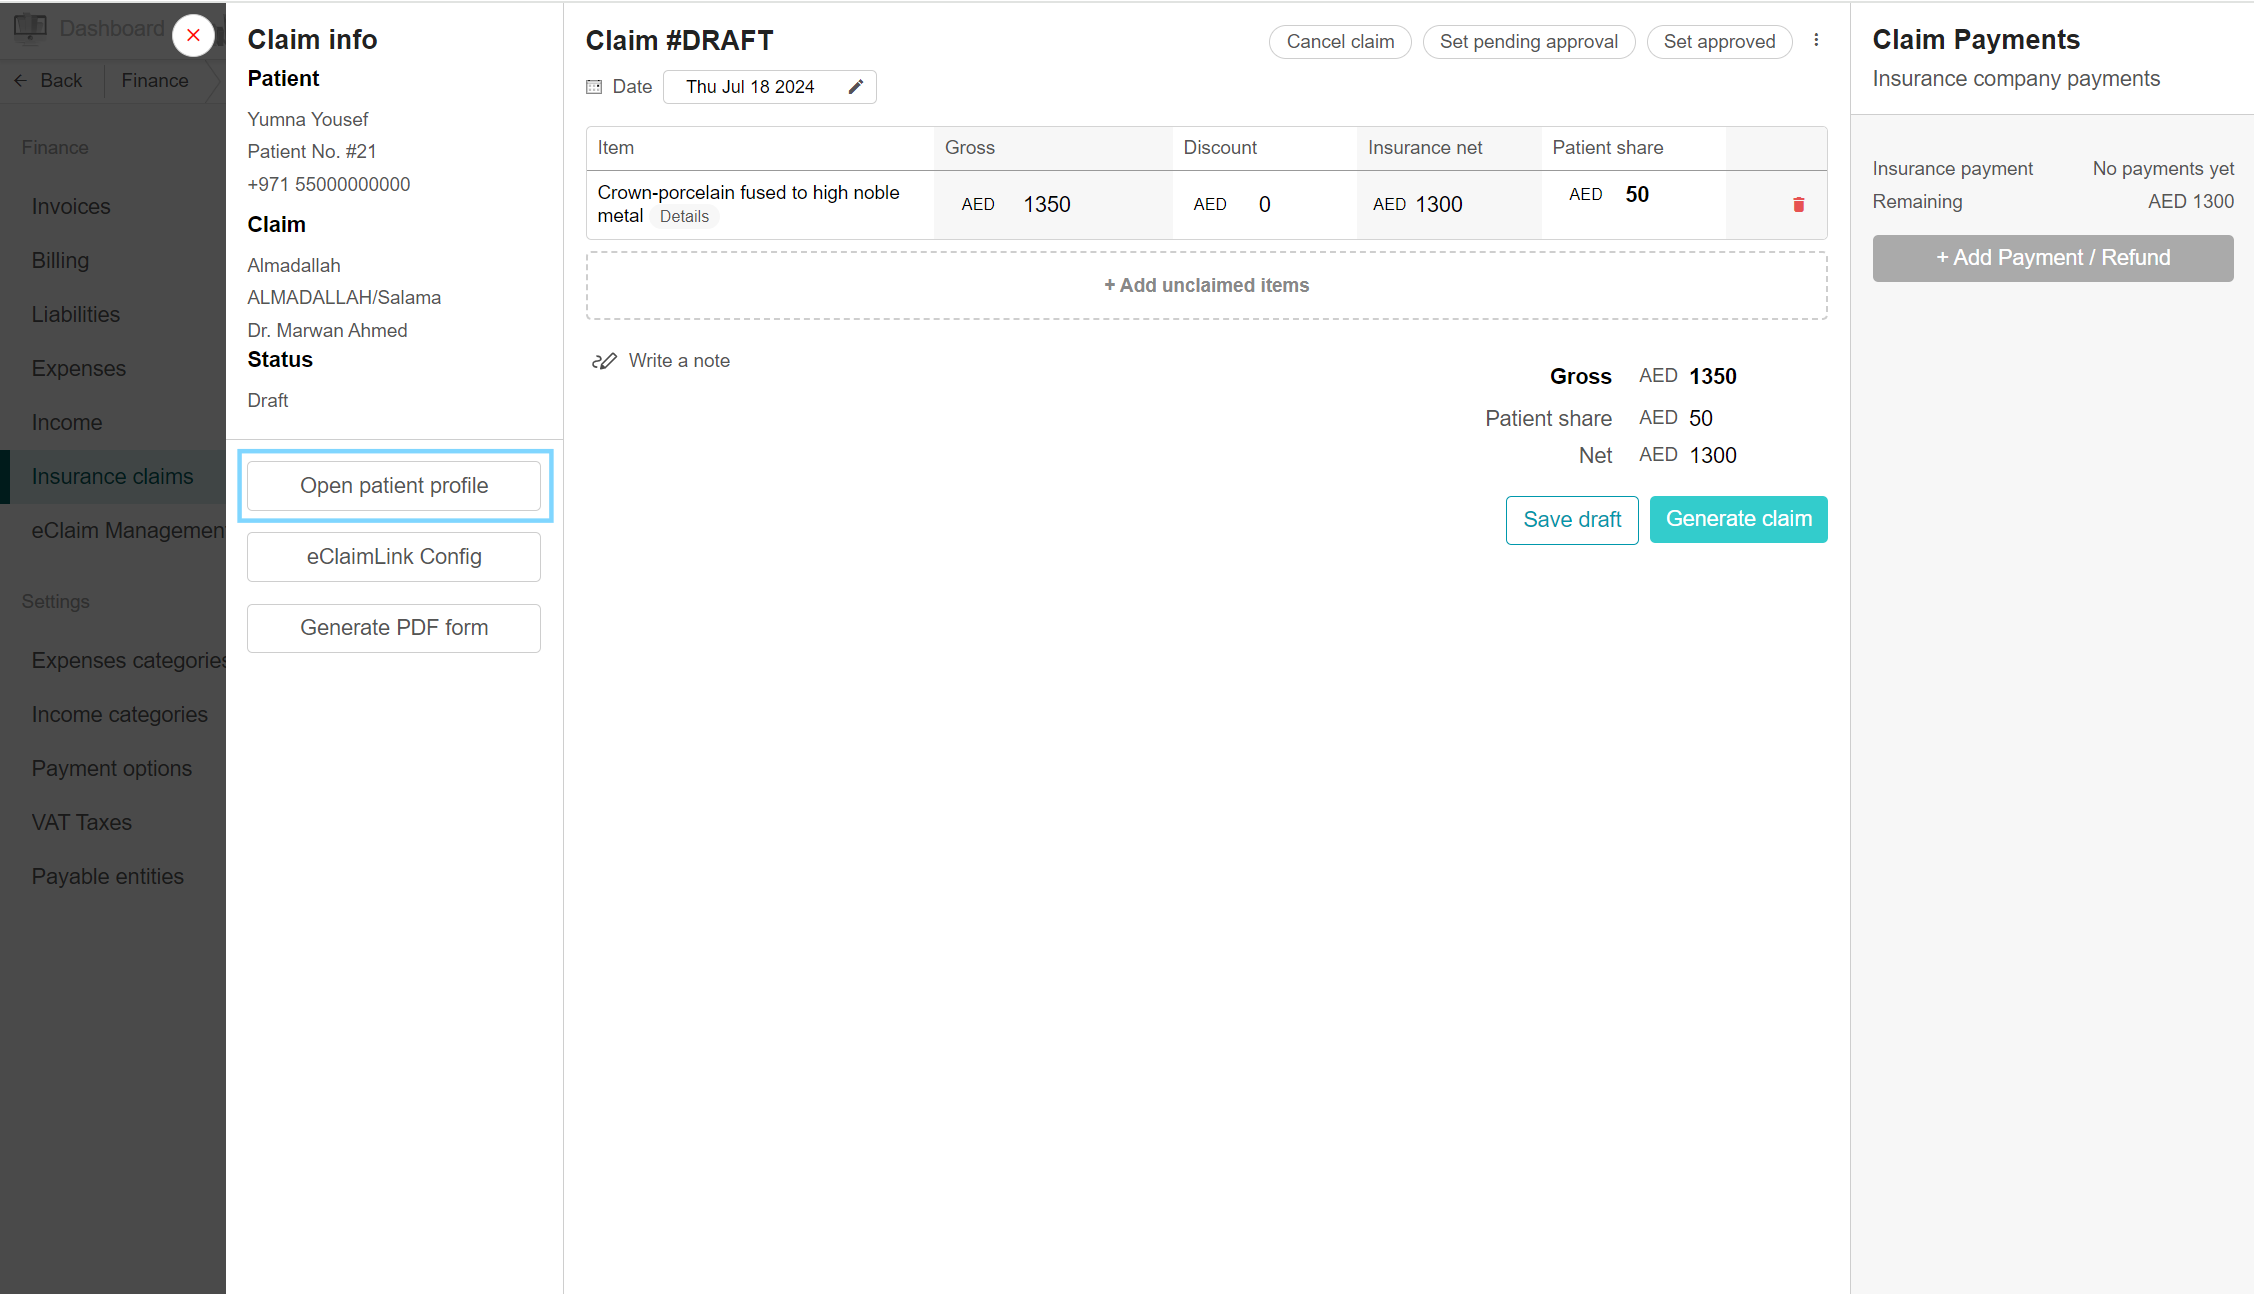
Automatic Claim Generation after Adding Treatments
The doctor adds the patient's treatments, insured by the insurance company. After adding them, the claim is automatically generated and found in the Insurance Claims section under the Finance menu. Select the desired claim, and you will notice its status is "Draft". Treatments are listed under Items, showing insurance net and patient share. Click "Add unclaimed items" to include any missing treatments. Choose status changes. Finally, click "Generate claim", and now the claim is generated with the status visible to the doctor.
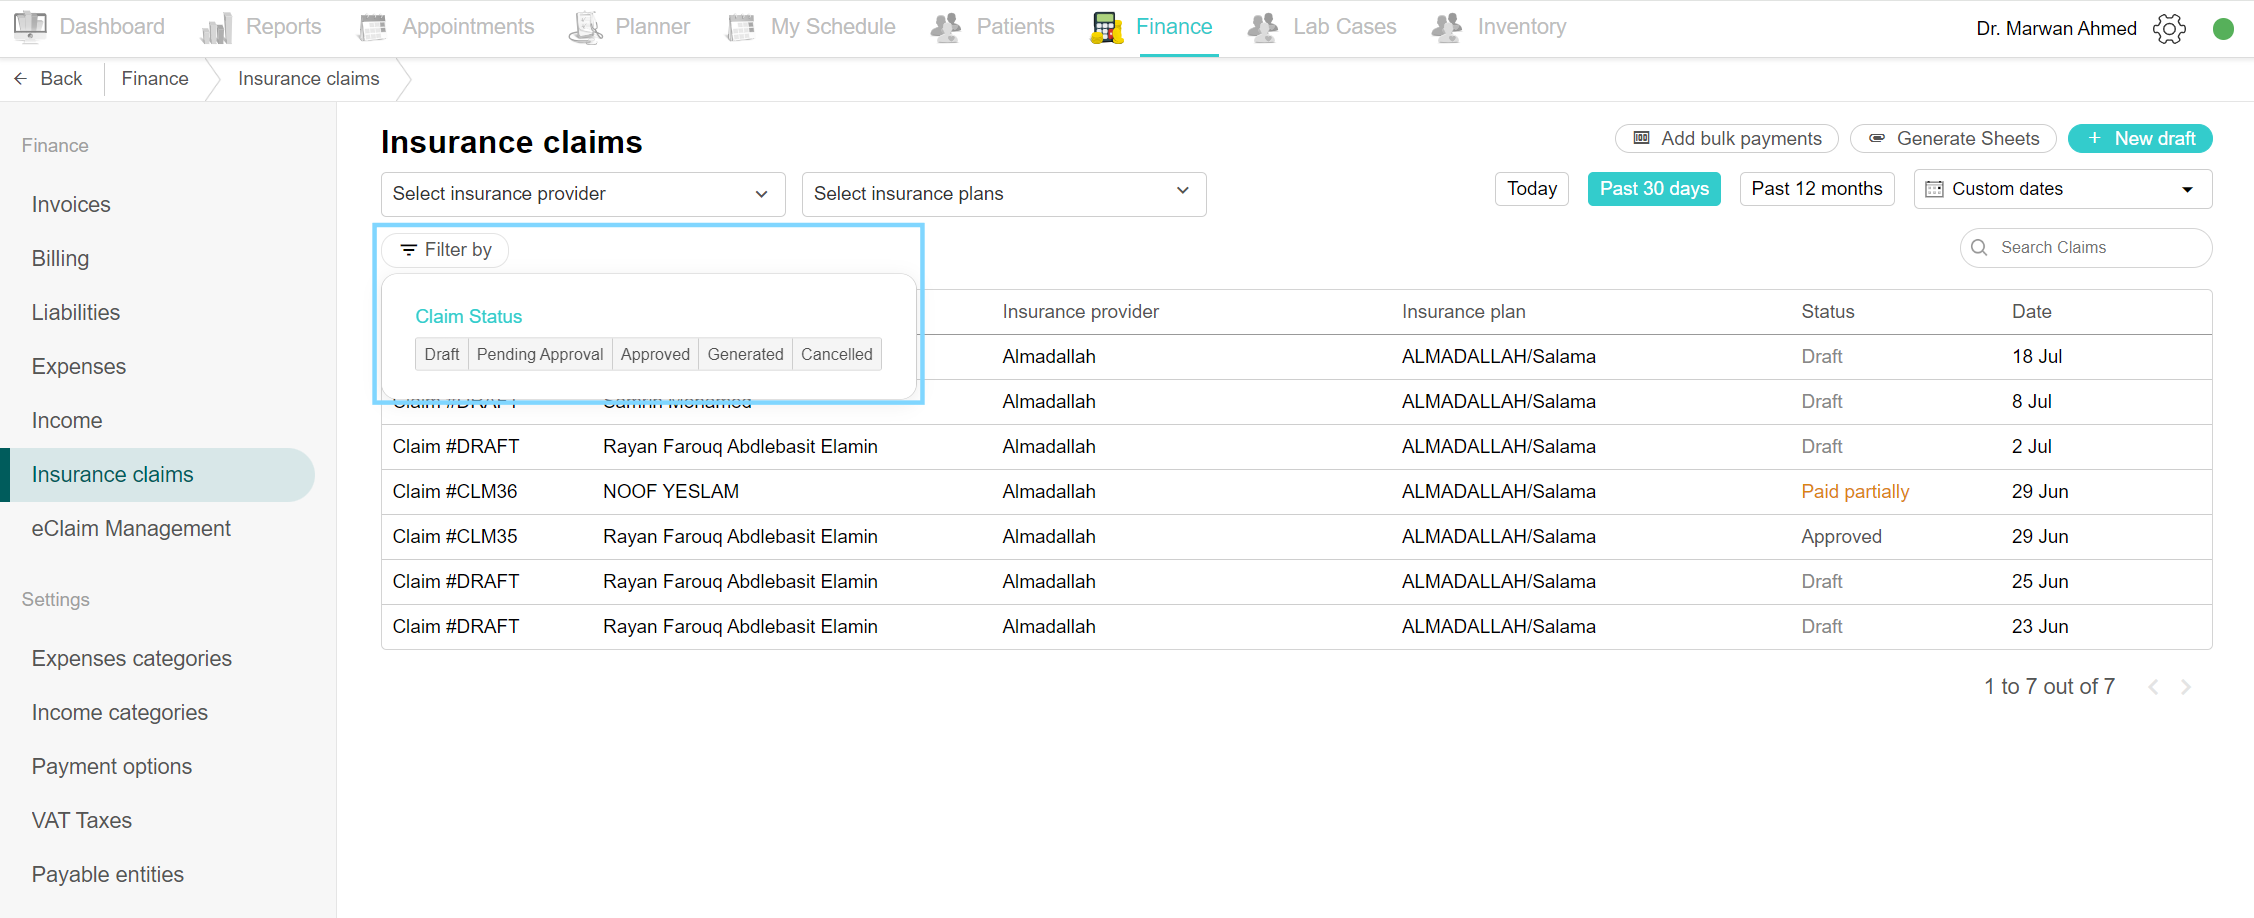
Filtering Claim Status
1. Draft: The claim is in progress but has not been submitted or finalized yet. It's still being worked on or prepared.
2. Generated: This indicates the initial stage of a claim where it is officially logged or created in the insurer's system.
3. Cancelled: The claim has been terminated or withdrawn before a decision was made.
4. Pending Approval: The claim has been submitted and is awaiting a decision from the insurance company or relevant authority.
5. Approved: The claim has been reviewed and accepted by the insurance company. Compensation or benefits will be provided according to the policy terms.
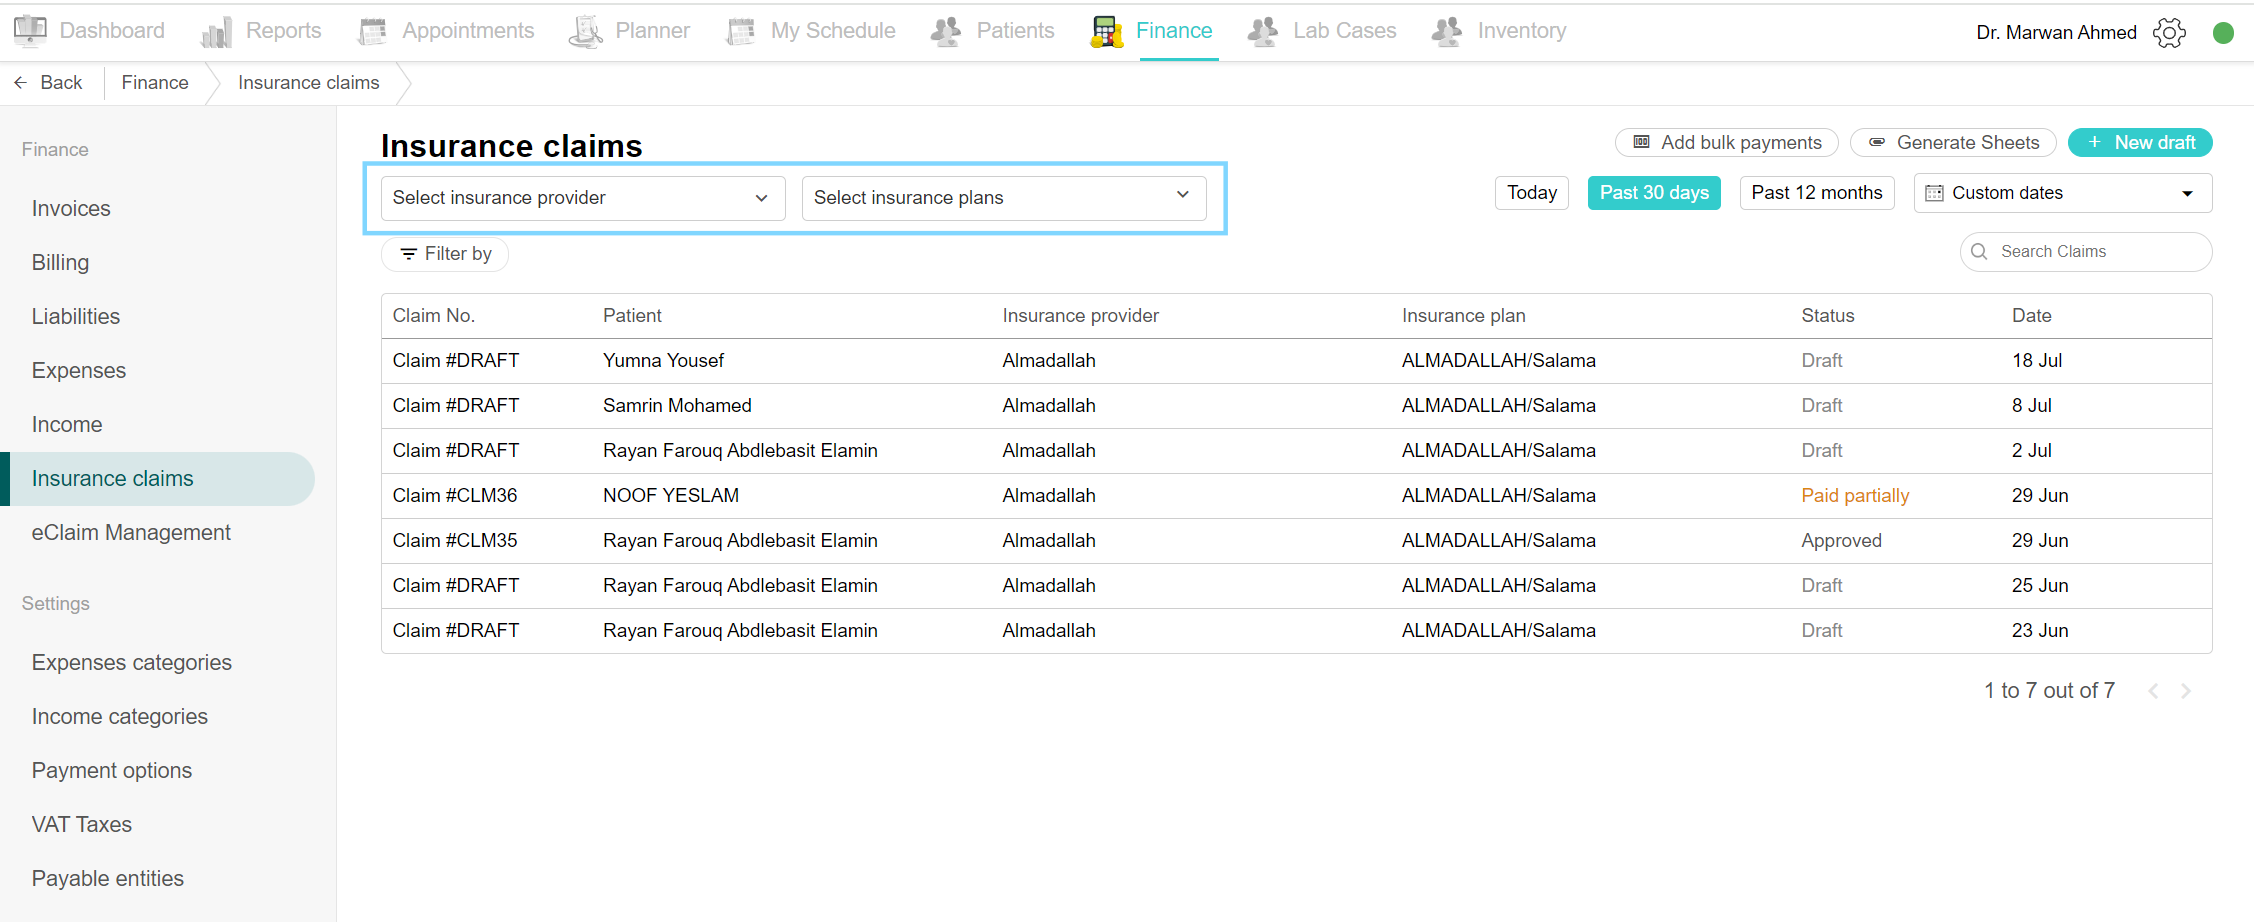
Filter by Insurance providers and plans
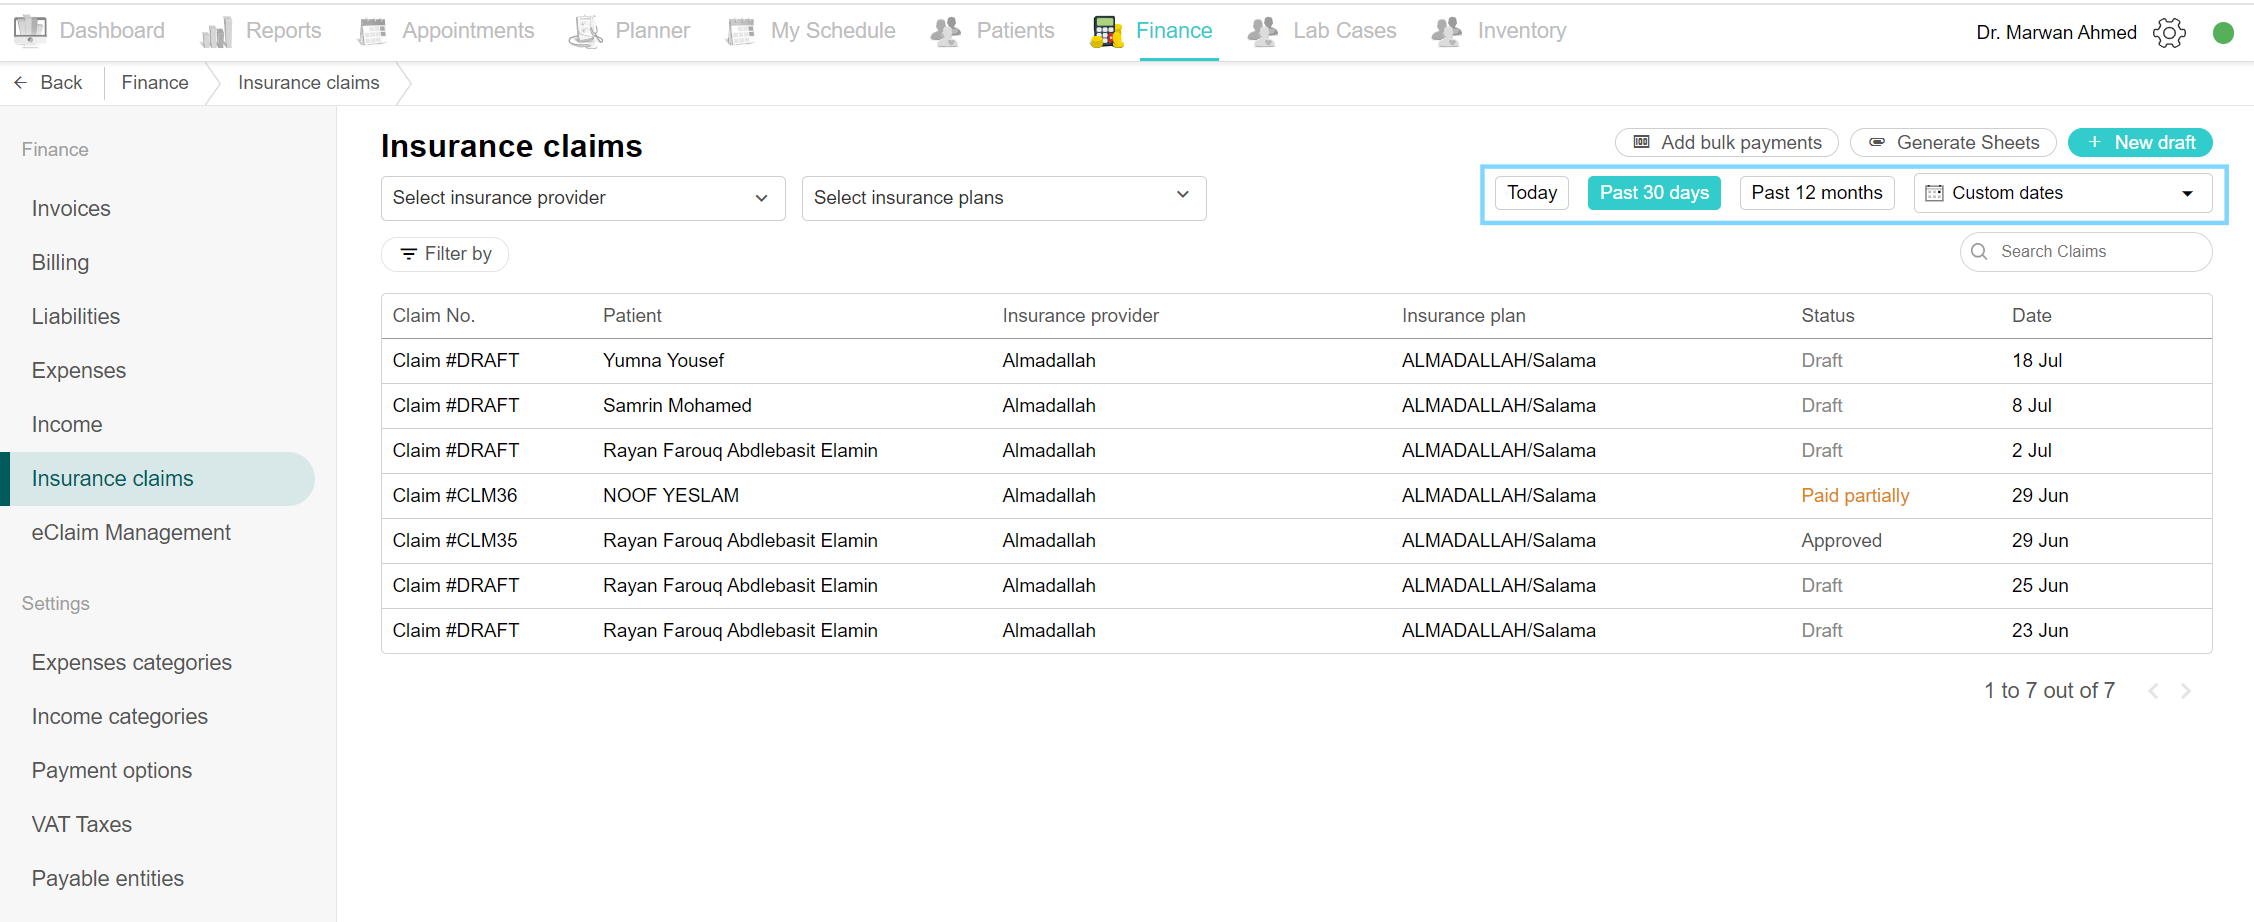
View Claims by Custom Dates
Open Insurance Claims from the Finance side menu. By default, today's claims are visible. You can view claims by selecting filters like "Past 30 days", or "Past 12 months", or by choosing custom dates. Click on "Custom Dates", select the desired period, and view the claims during that period.
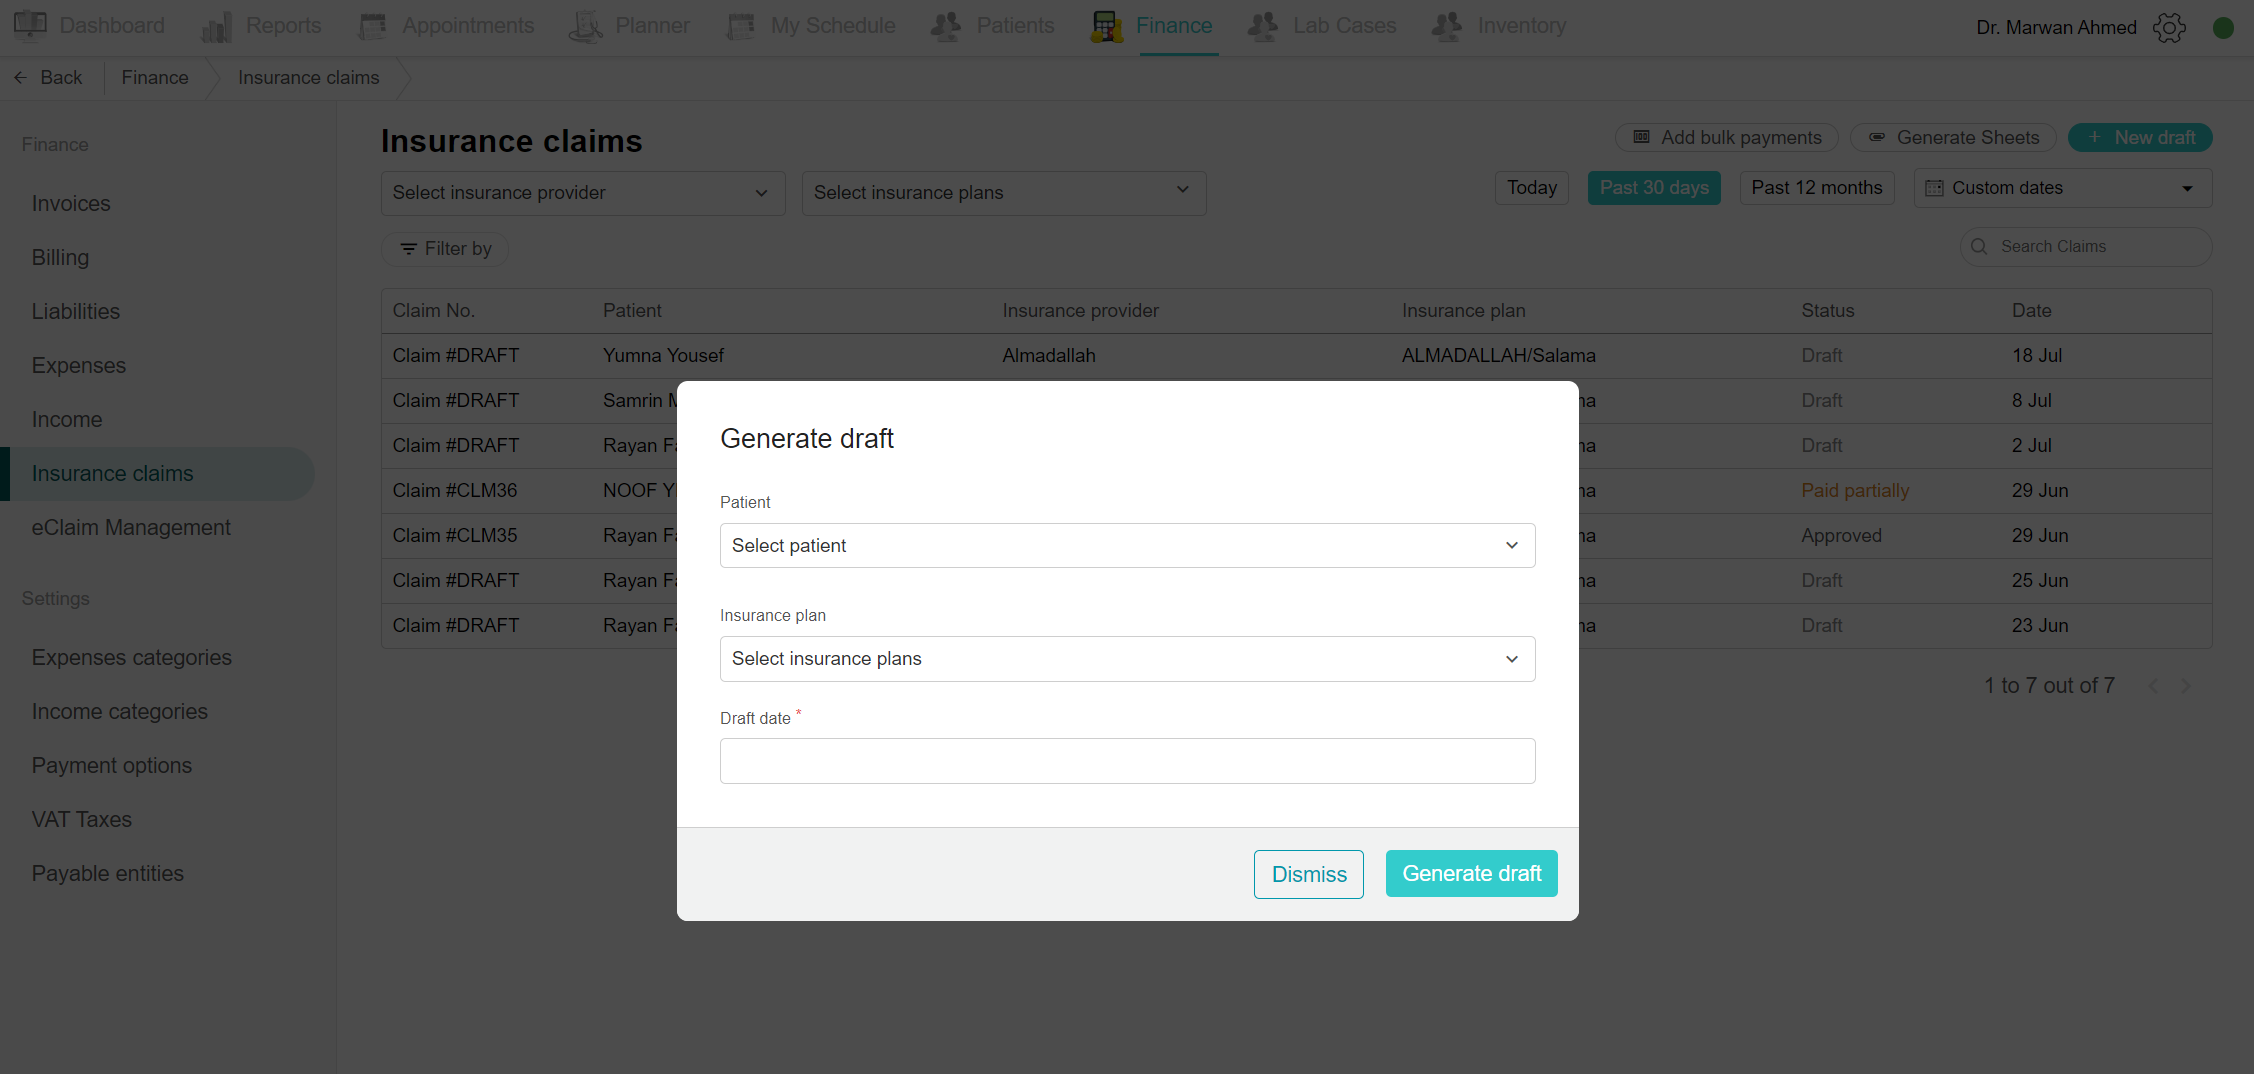
Adding a New Claim Draft
Go to Finance and select Insurance Claims from the side menu. Click "New Draft" to initiate a new claim draft. Search and select the patient's name, insurance plan, and draft date, then click the generate button. Click "Add unclaimed items" to include items in the claim, displaying covered fees, insurance net (amount to be paid by insurance), and patient share (amount to be paid by the patient). Finally, save the draft.
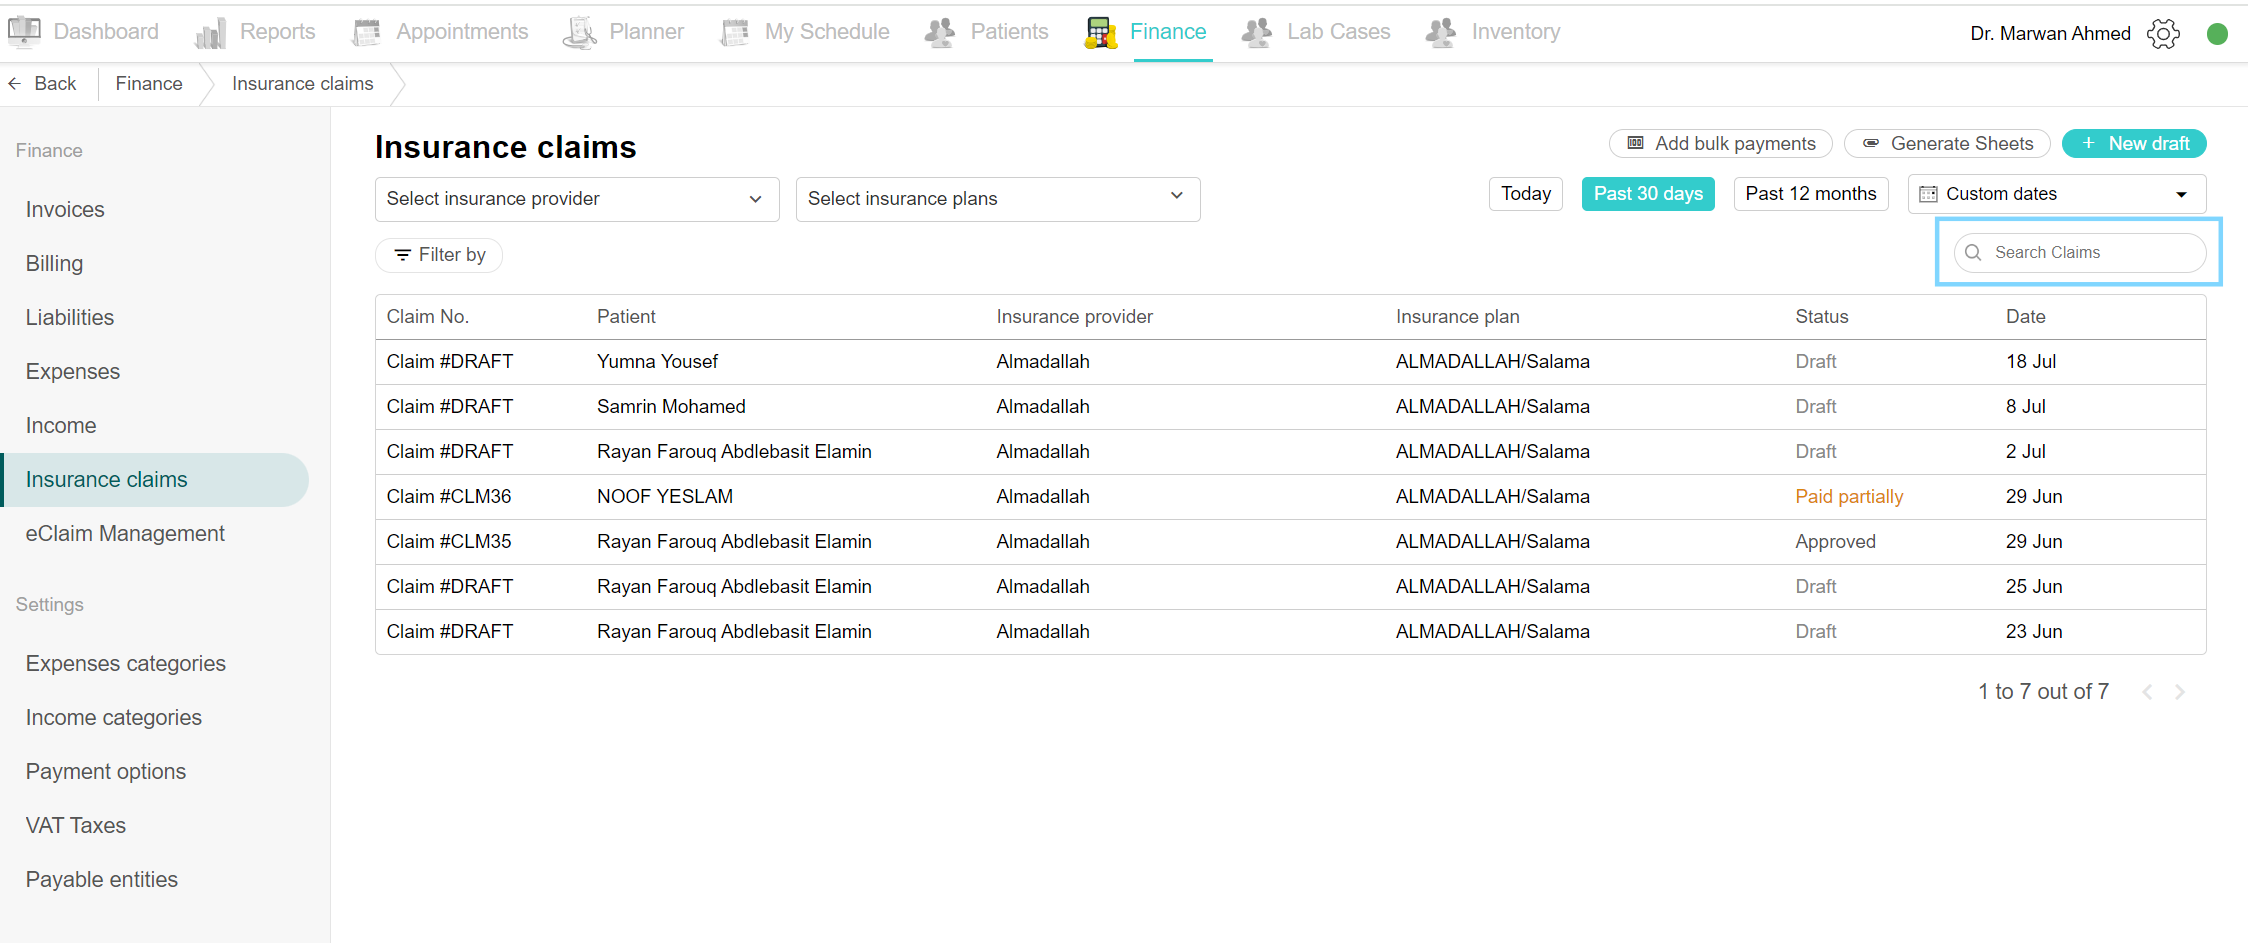
Search for a Claim
Open Insurance Claims from the Finance side menu. You can search for claims by selecting the insurance provider and insurance plans. Type the claim number or patient's name in the search bar to locate the desired claim.
Edit Patient Claim
Open Insurance Claims from the Finance side menu. Select the desired claim to edit. When the claim is in draft status, you can edit the date, add unclaimed items, or delete items using the icon on the right-hand side. Click "Save Draft". Once the claim is generated, an "Edit Claim" button appears at the top. Make necessary changes and click the "Save Draft" and "Generate Claim" buttons.
Note: Pricing cannot be edited from the claim, only from the invoice with the same items.
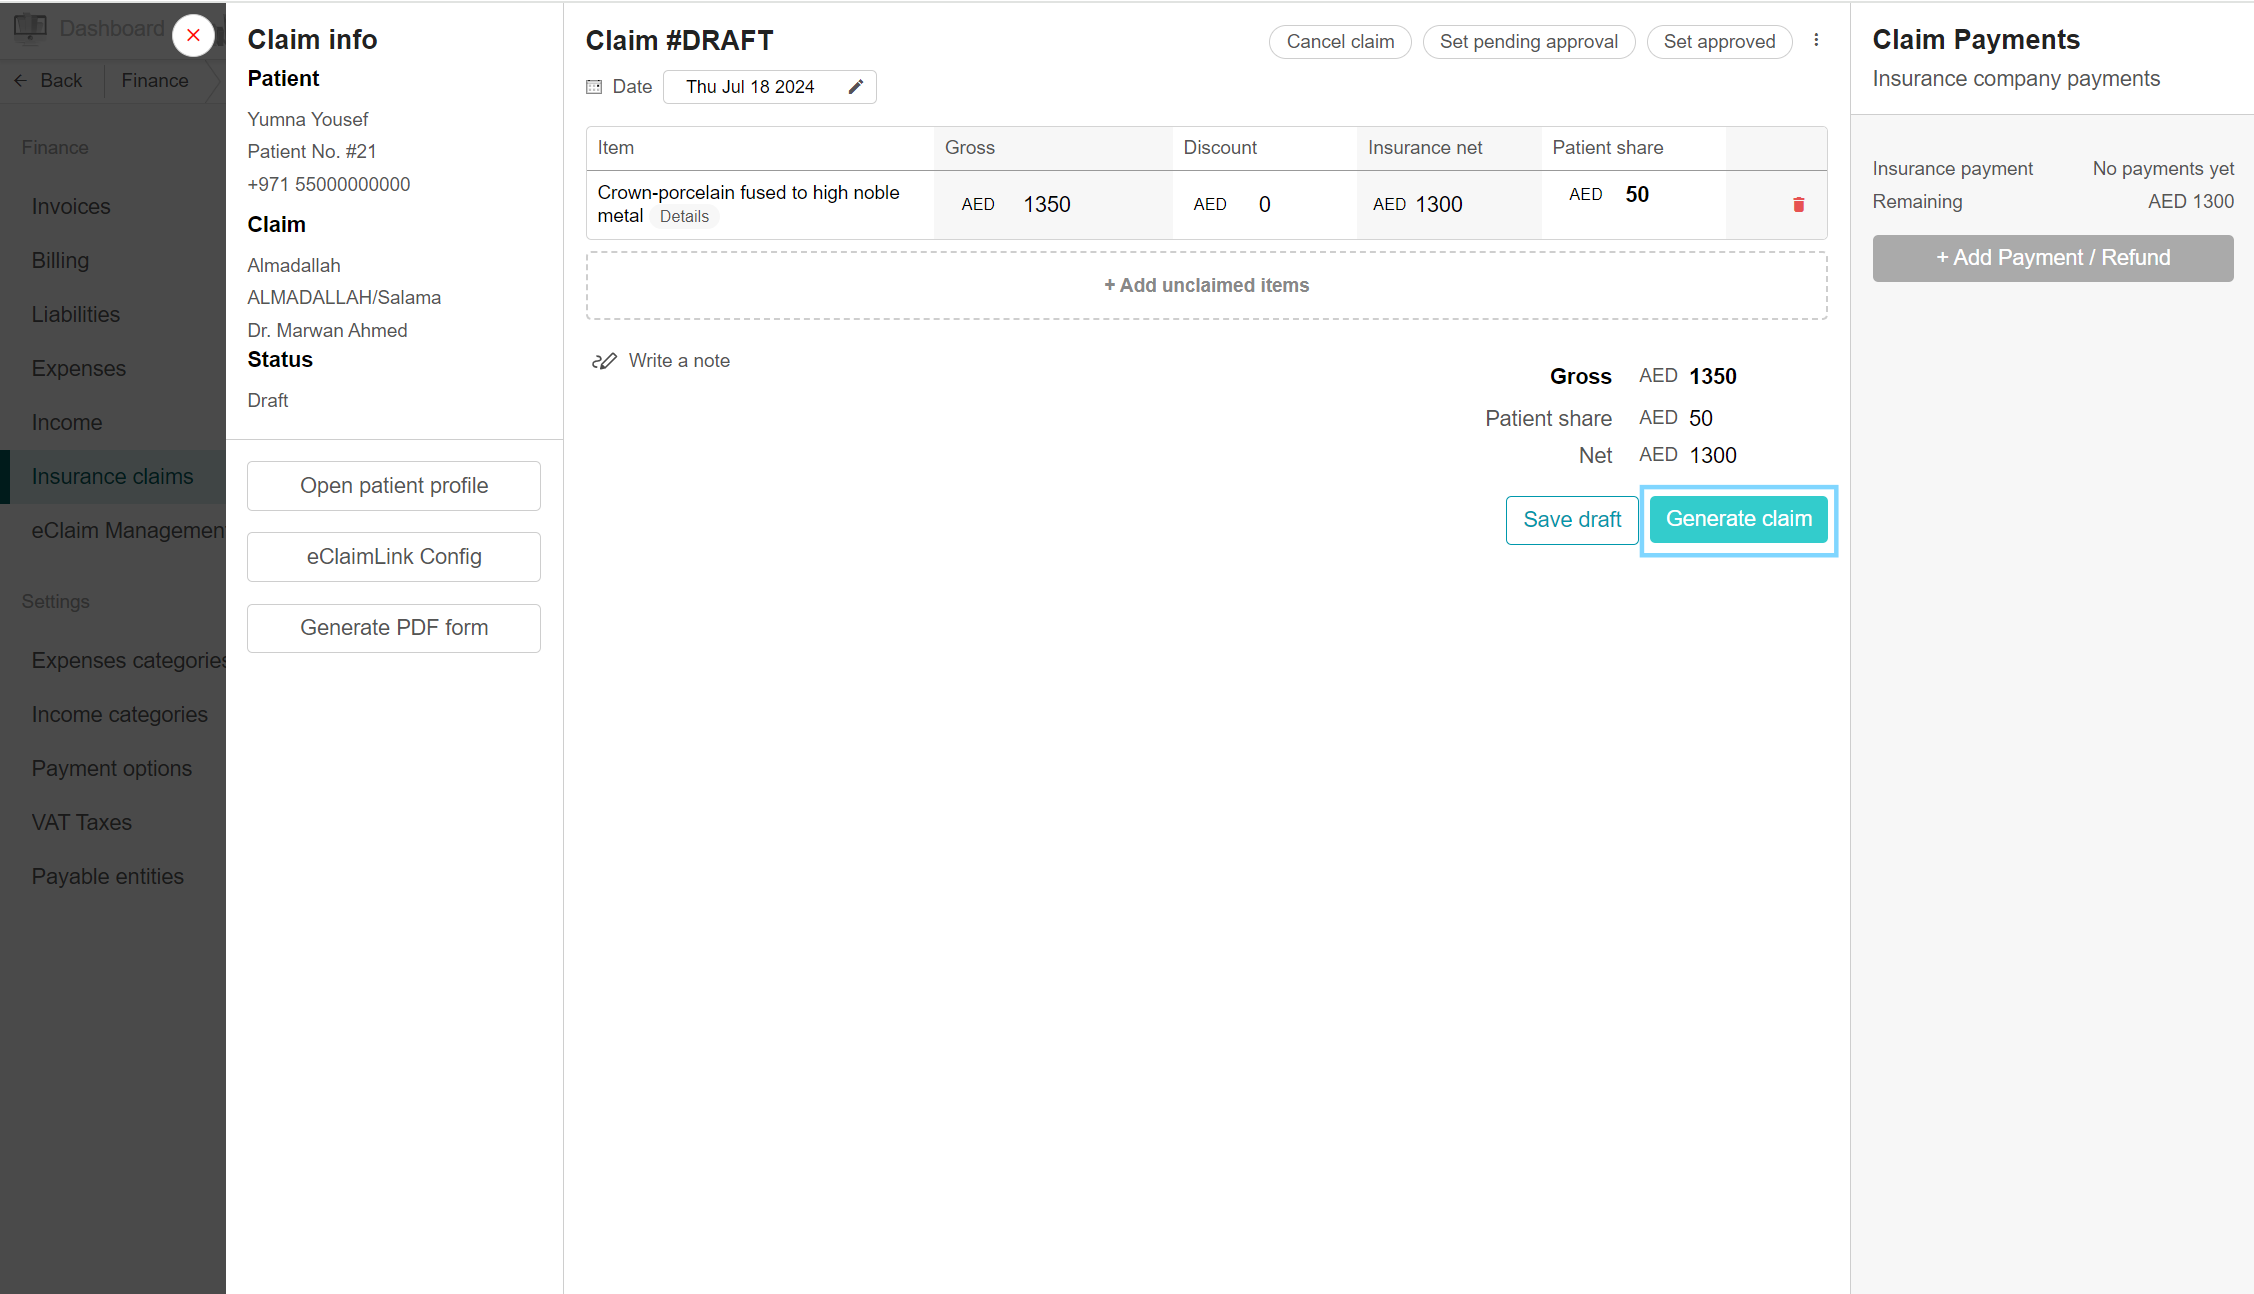
Generate Claim
Generating a claim is crucial before sending it to the insurance provider portal. Open the claim, verify the claim info, and click "Generate Claim". The claim status changes to "Generated". Click "Edit Claim" to modify a generated claim. Now, the claim is ready to be sent to the portal.
Open Patient Profile from Claim
While editing or updating a claim, you can quickly access the patient's profile. Select the desired claim from the claims list. On the left side, under Claim Info, click "Open Patient Profile" to view basic information, recent bills, clinical notes, and treatments. After viewing, click on the Insurance Claims tab to return easily.
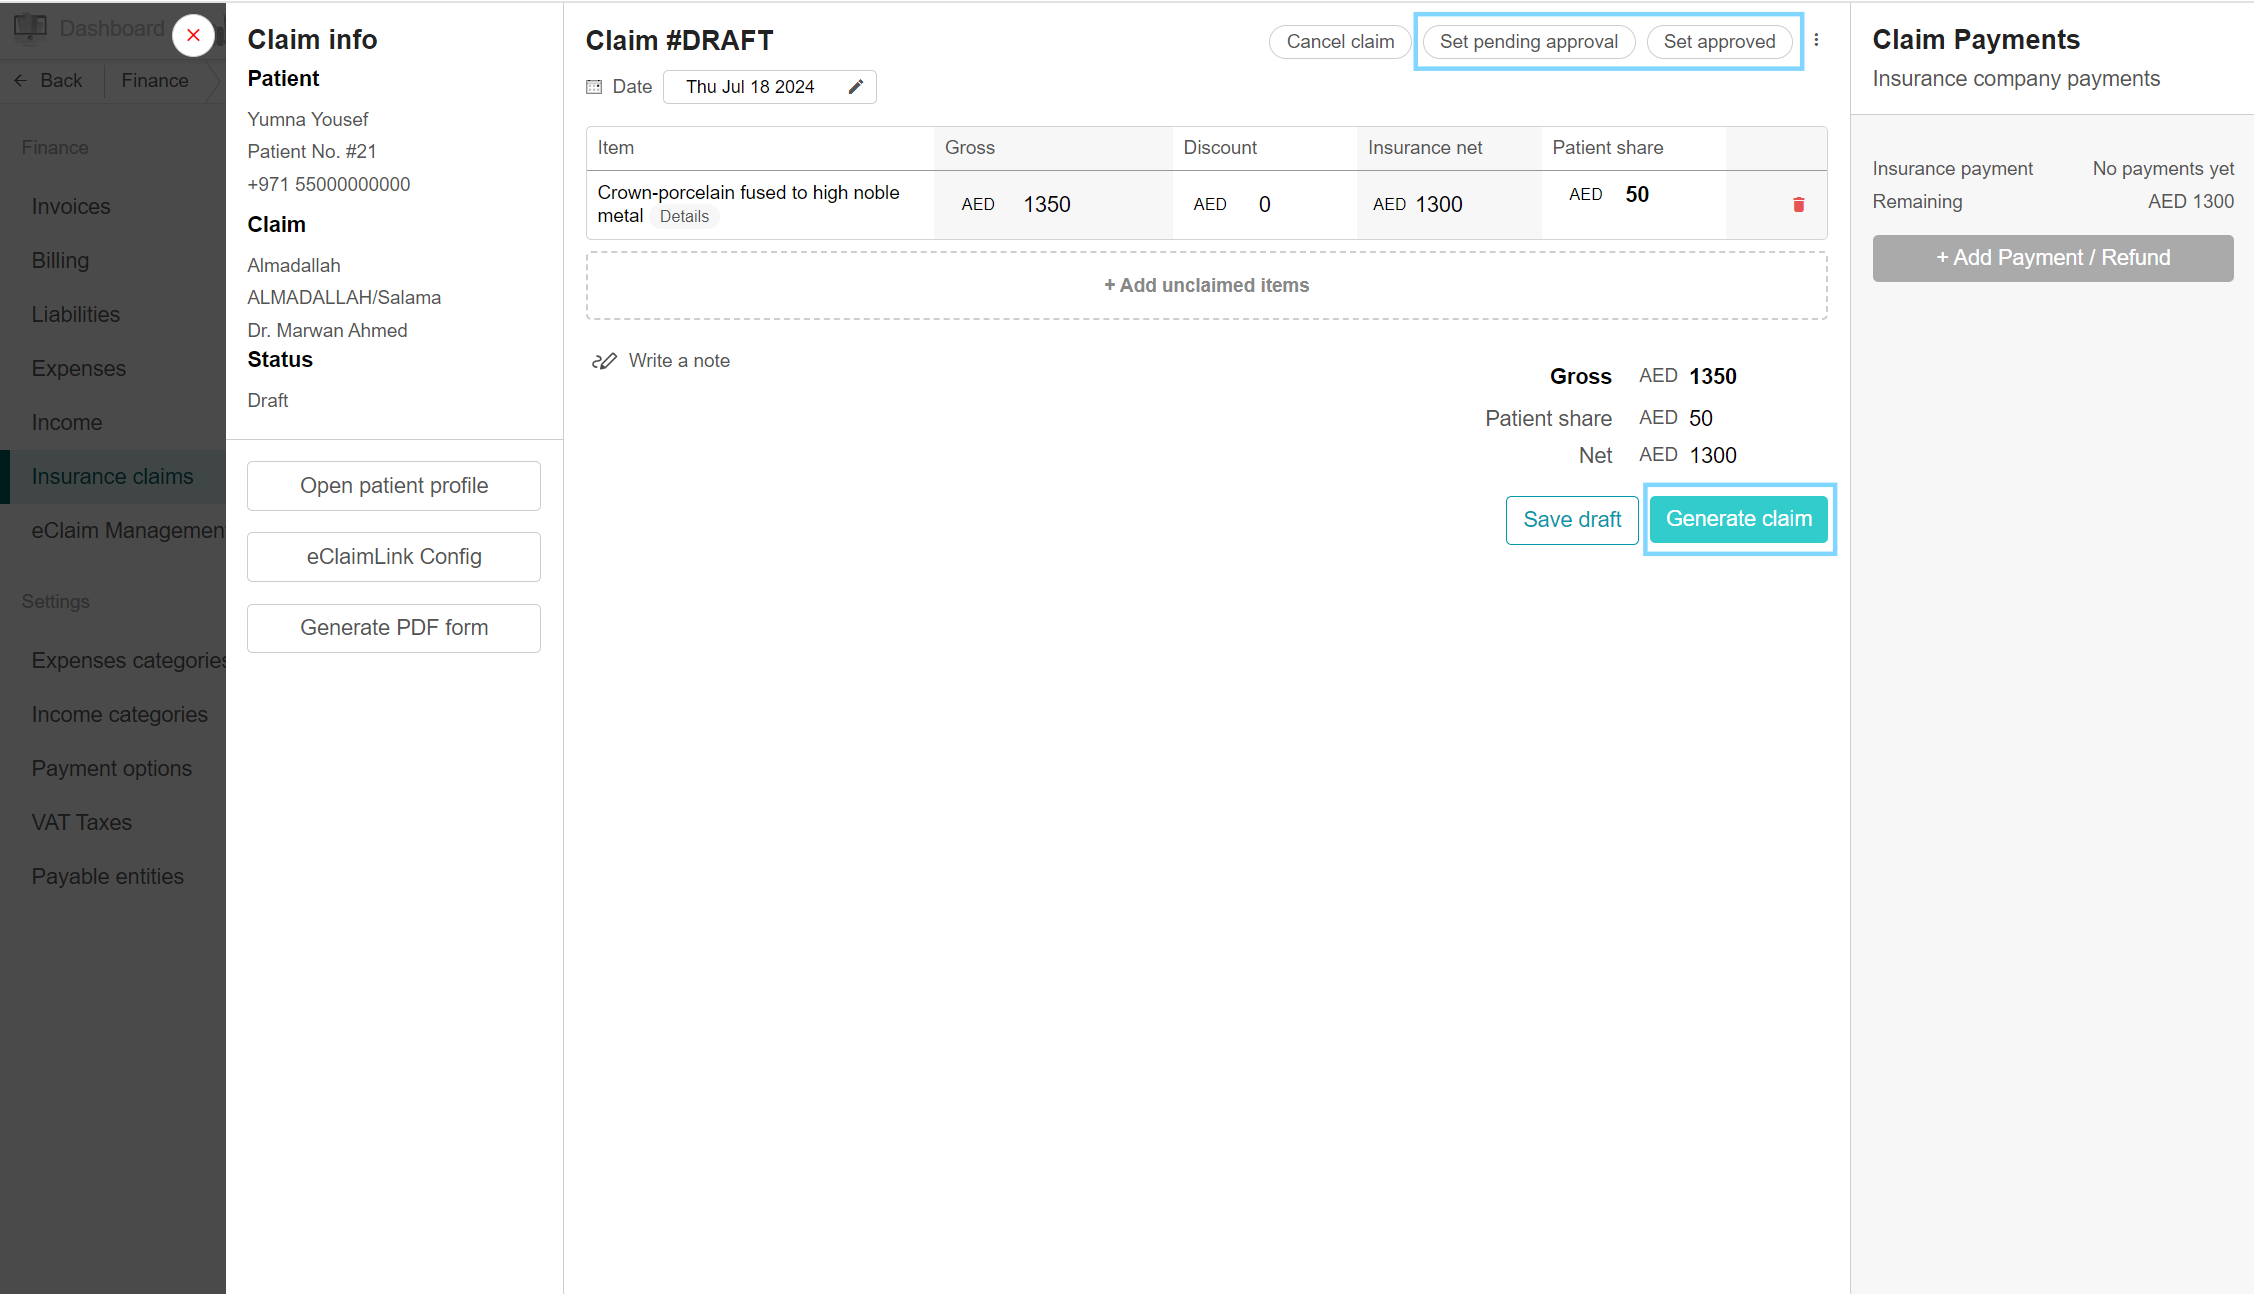
Setting Pending Approval, Approved, and Generated Claims
After completing and saving a claim as a draft, its status is "Draft". After sending it through the portal and awaiting insurance approval, set the claim status by clicking "Set Pending Approval". Notice the status change. When the claim is approved by the insurance provider and treatments can commence, set the claim status by clicking "Set Approved". Finally, click "Generate Claim" to change the status to "Generated". Now, the claim is processed, and payment from the insurance is awaited.
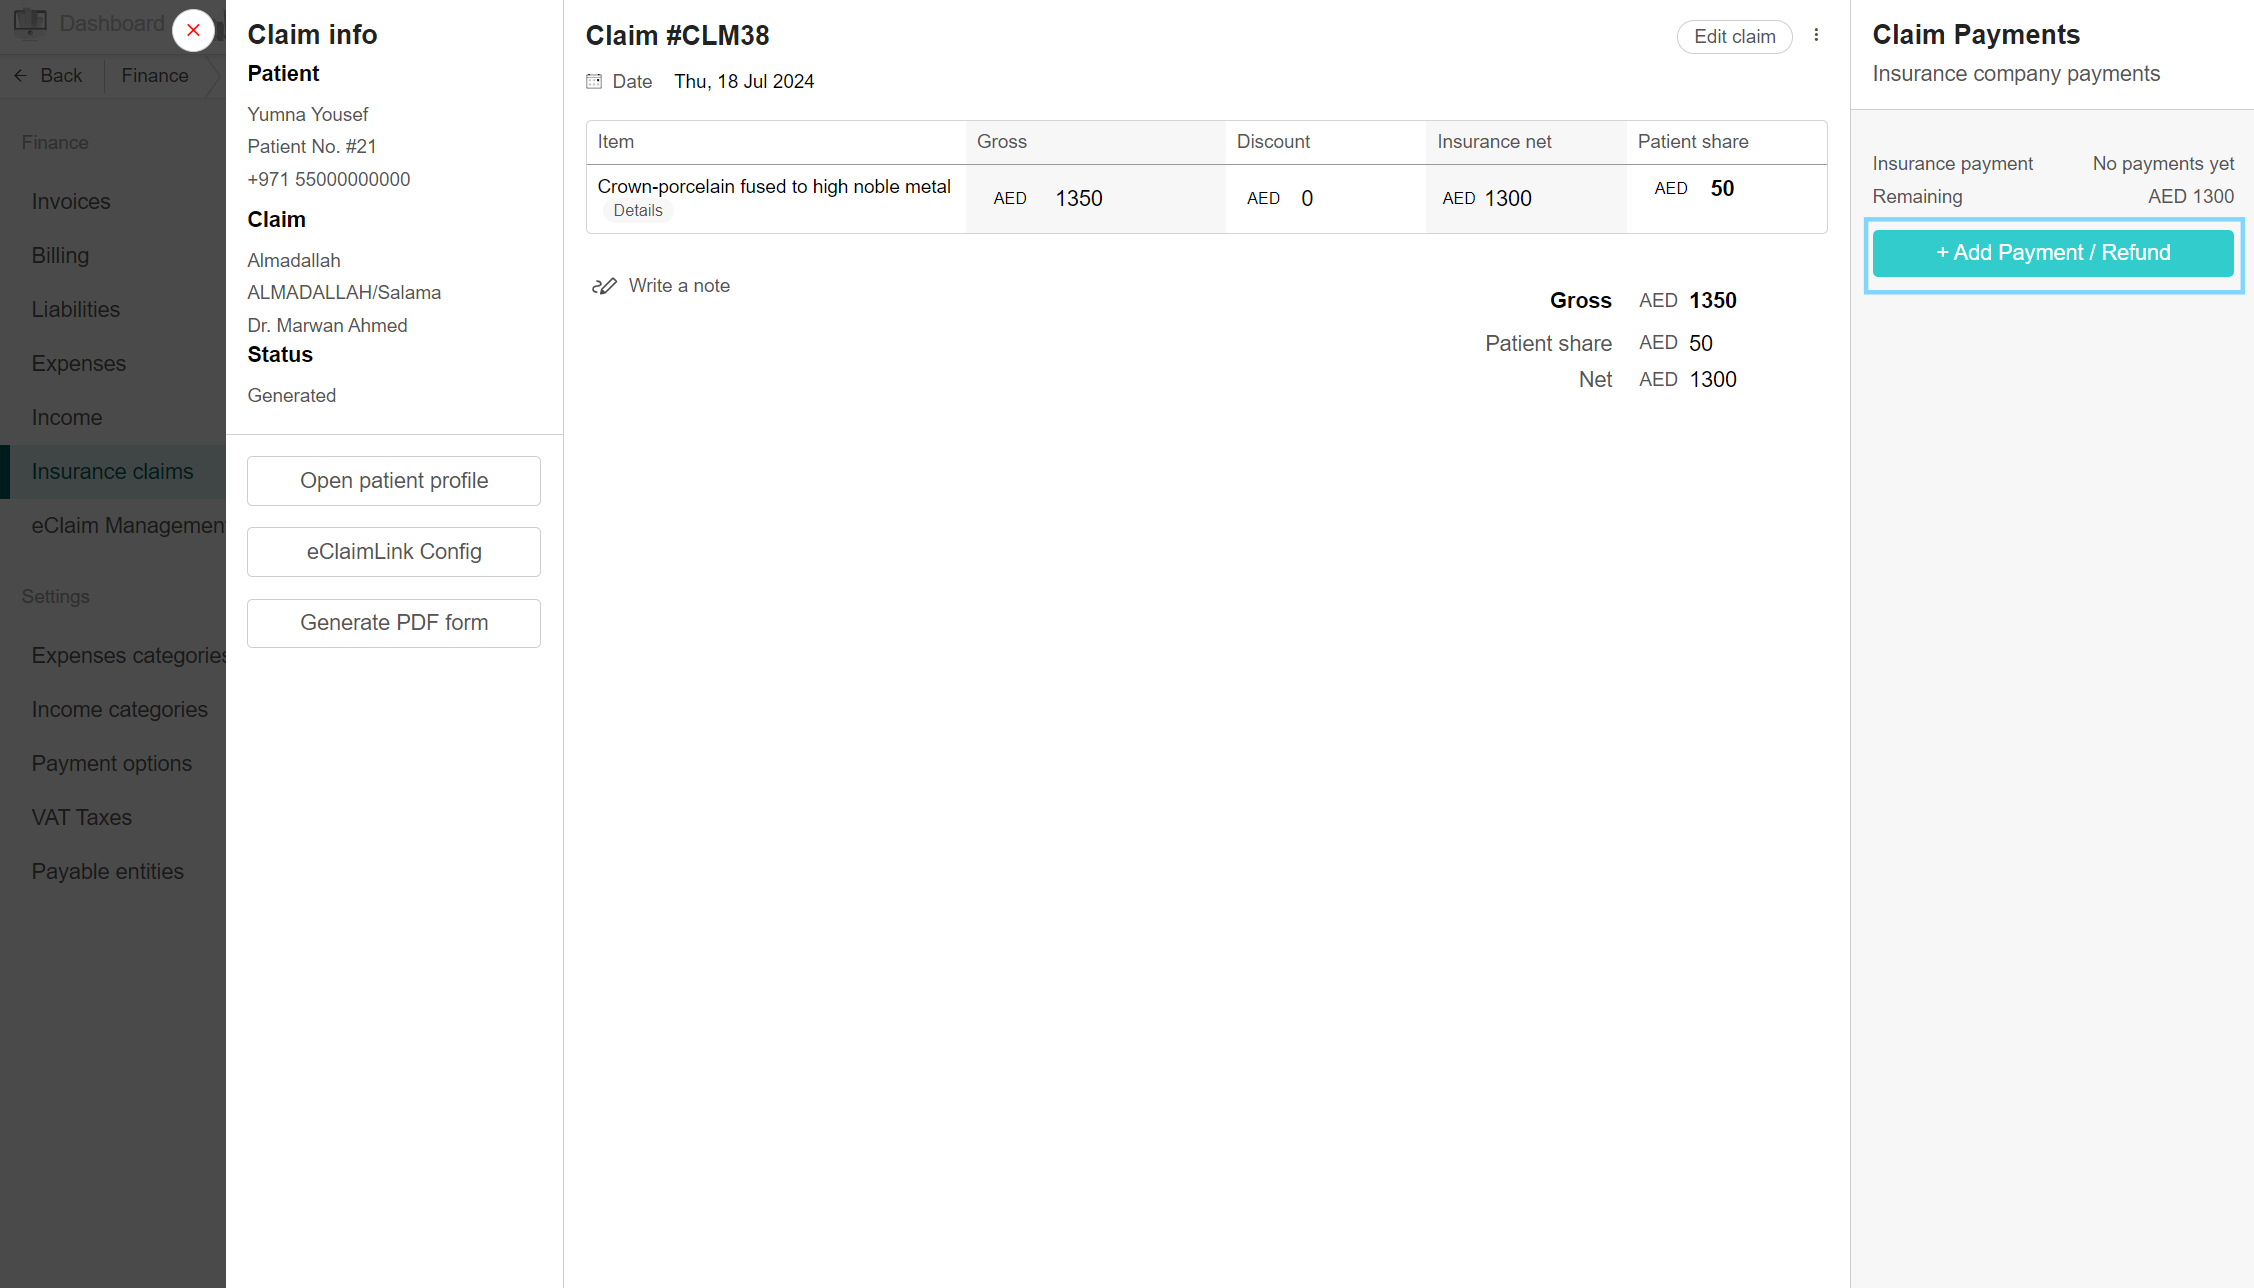
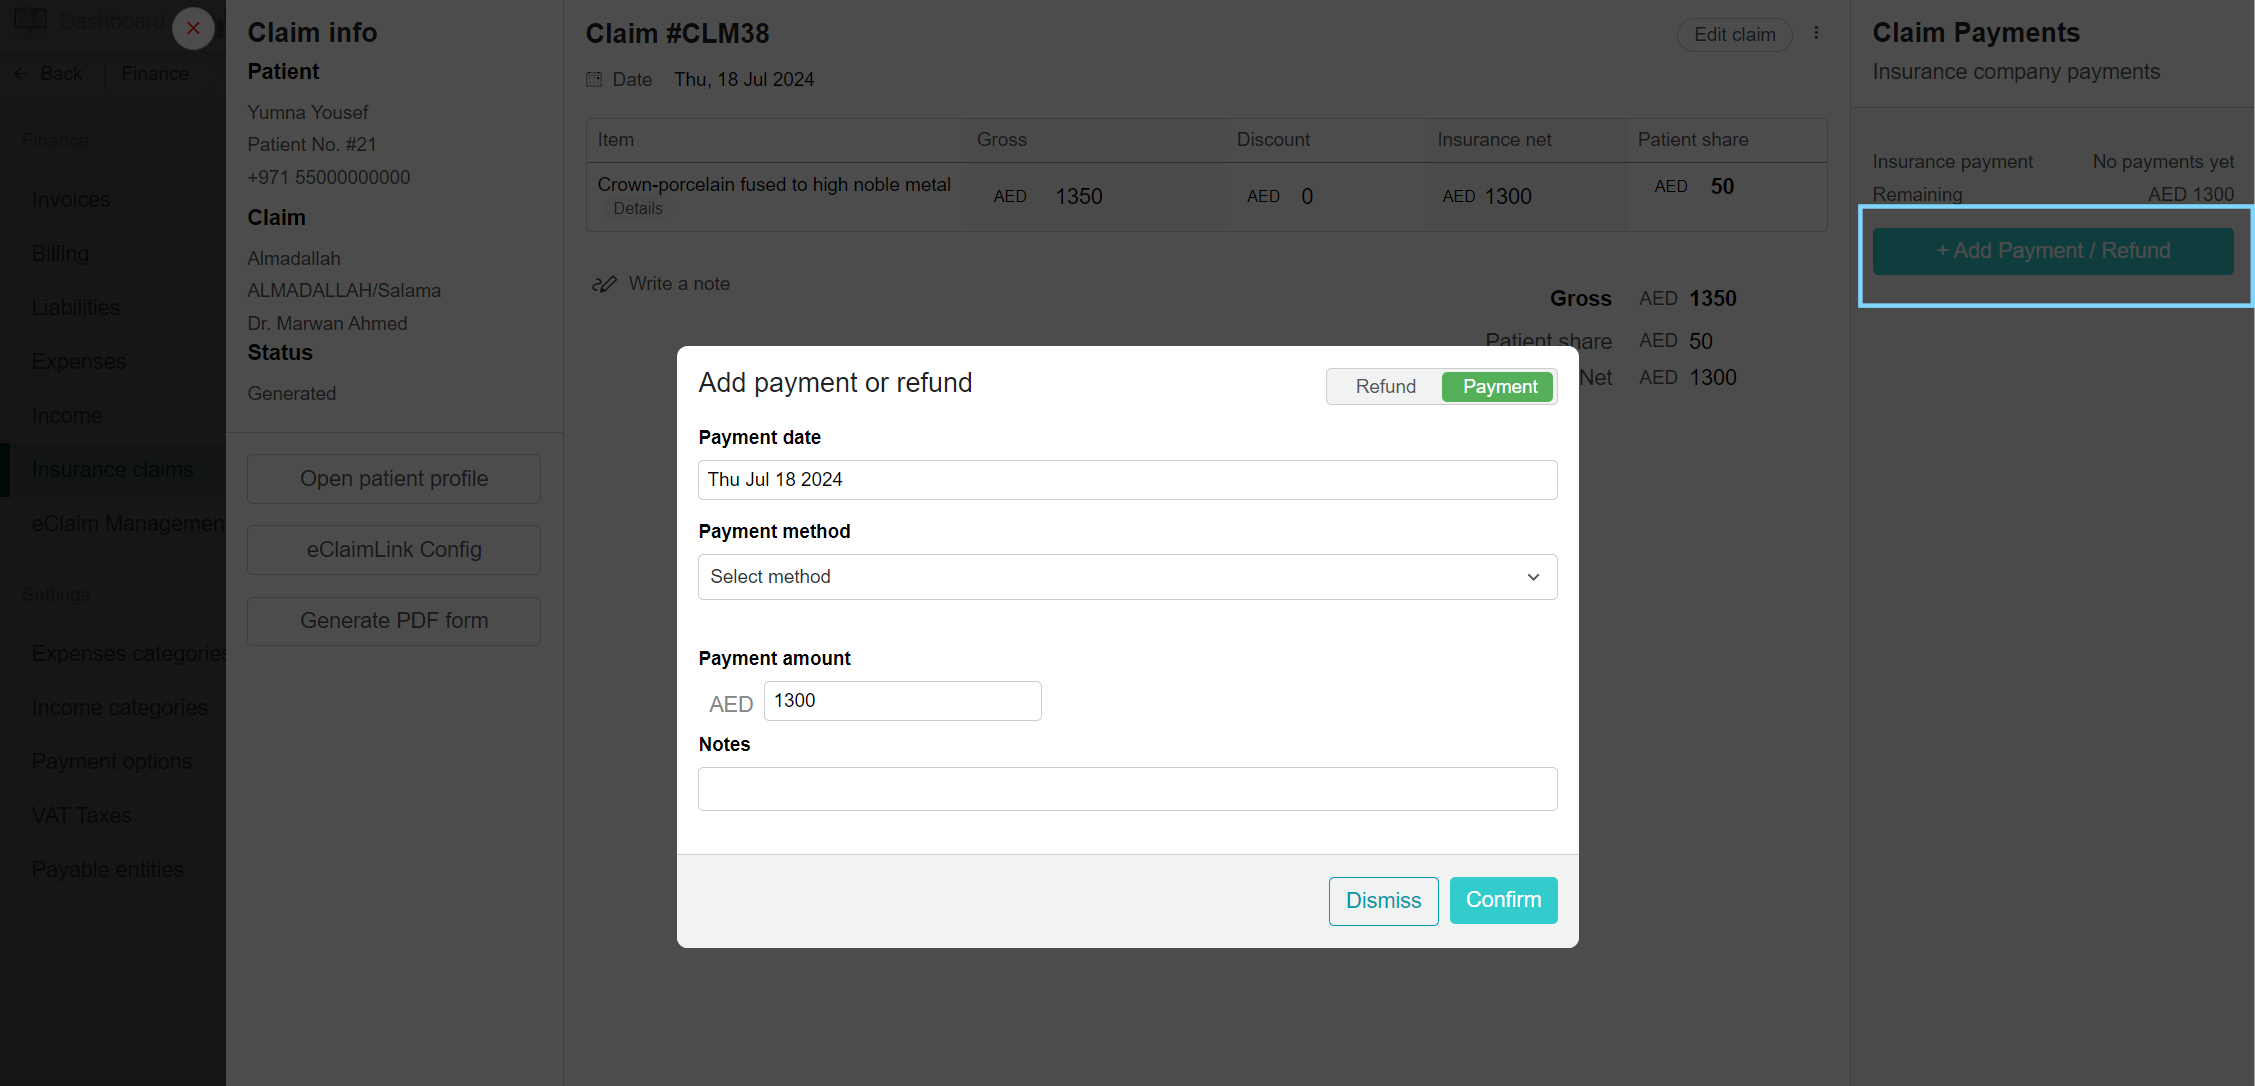
Adding Payment and Refund to Claim
To add any payment made by the insurance provider to the clinic or any refund to be returned, select the desired claim. Payments can be found on the right-hand side under Claim Payments. Click "Add Payment / Refund". In the pop-up box, select Payment, enter the payment date, method, amount, and notes. Click "Confirm". To add a refund, click "Add Refund", choose Refund, enter details, and click "Confirm". Insurance payments and remaining amounts are listed on the right side.
Adding Payment to Individual Patients from Insurance Providers
When the insurance pays for the claim, select the patient's claim with the status "Generated (not paid)". Under Claim Payments on the right side, click "Add Payment". In the pop-up box, enter payment details and click "Confirm". The payment is added to the user who added it.
Adding Bulk Payments from Insurance Providers
Once insurance providers make a payment for several claims, open the insurance claim page. Click "Add Bulk Payments". Select the paying insurance company and insurance plan. A list of unpaid claims appears. Choose the payment method, and payment date, and enter the paid amounts under the payment column. Click "Set Paid" and confirm to add payment. The claims' status changes to "Paid".

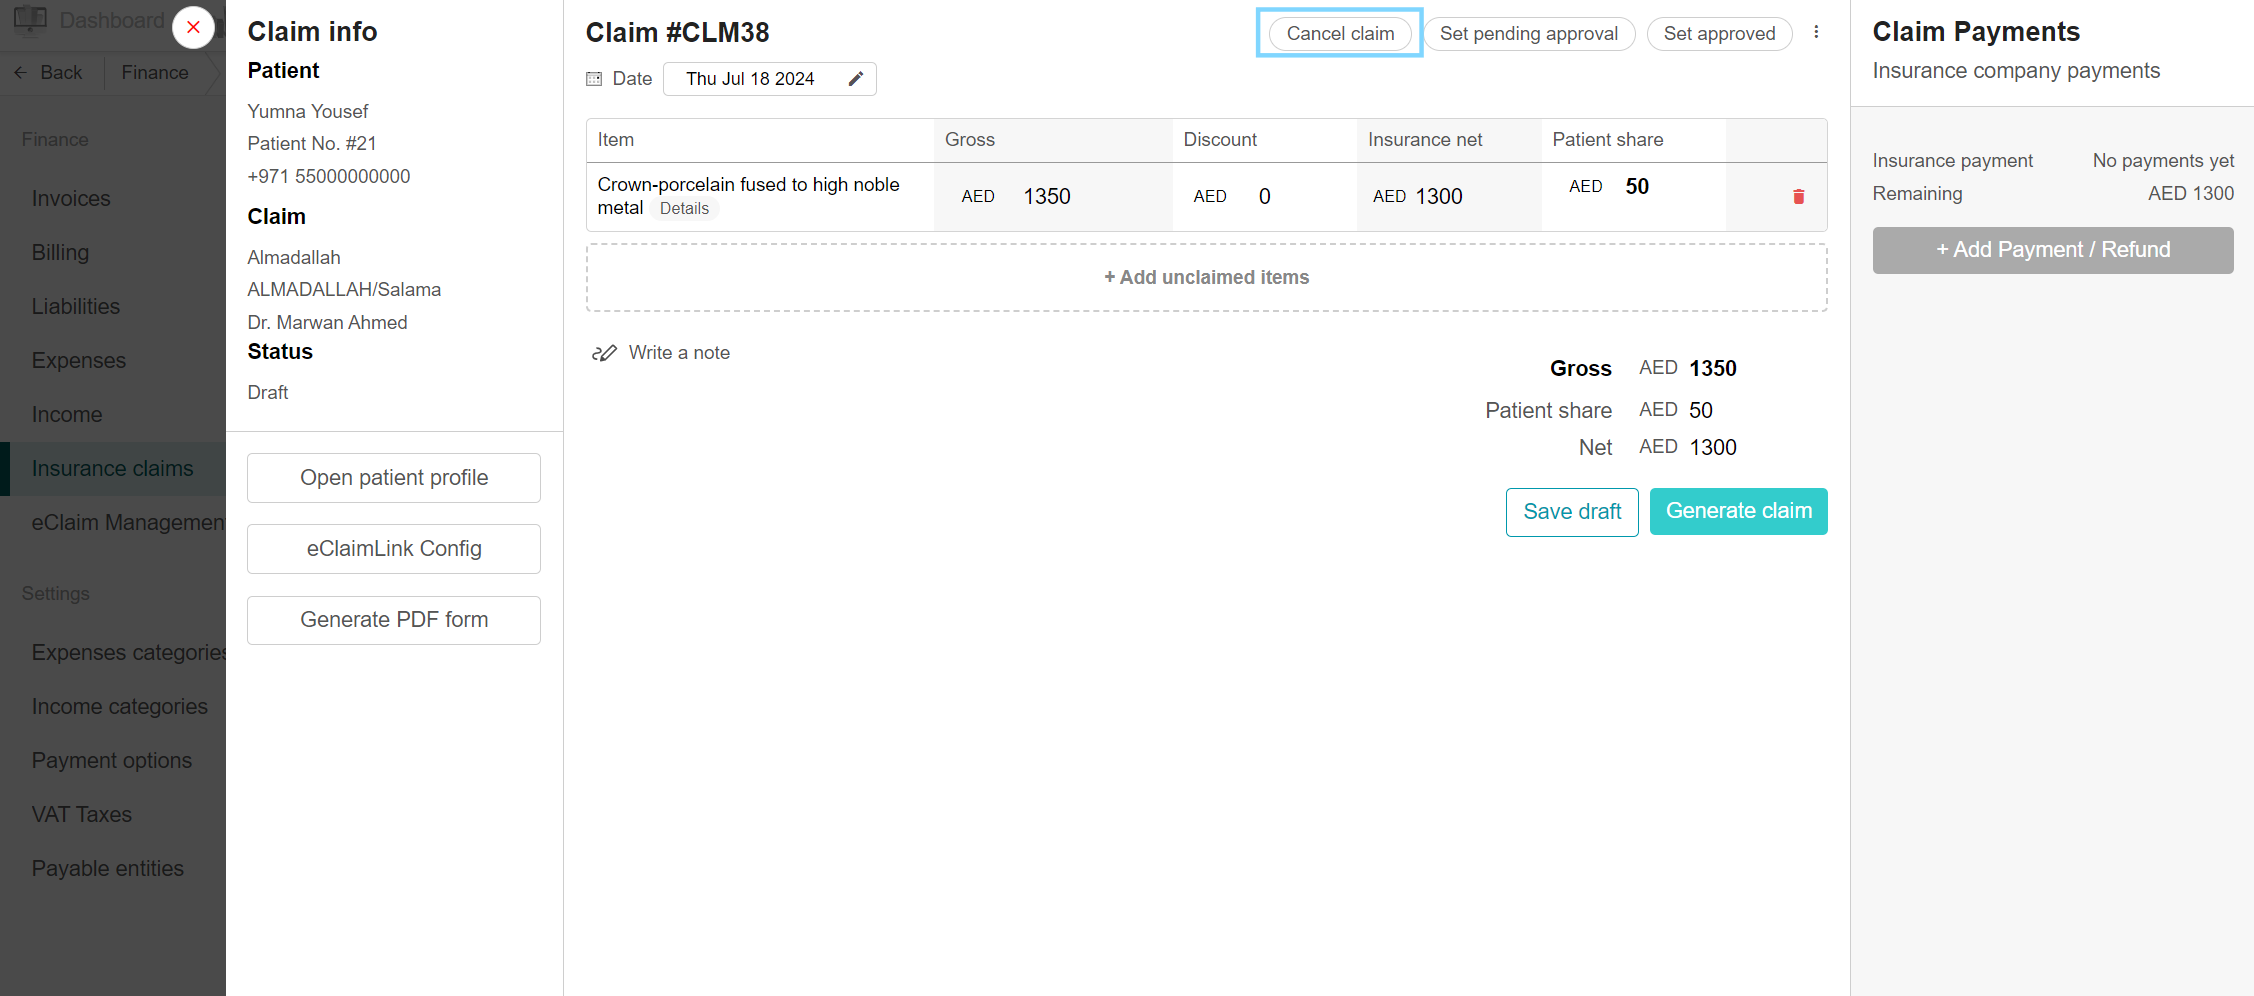
Cancel claim
To cancel any claim, go to the Finance tab and select Insurance Claims from the side. Choose the desired claim from the list, and open the claim info page. At the top is the Cancel claim button, click it and confirm the cancellation. Notice the claim status is changed to Cancelled.
To view all cancelled claims, click Filter by and select the Cancelled claim status.
Download Generated Claims
Export claim data by clicking "Generate Sheets". Choose the download location. After downloading, view the Excel sheet with the clinic name, claim period, insurance provider name, and a list of generated claims with total amounts at the bottom.

Generate claim form
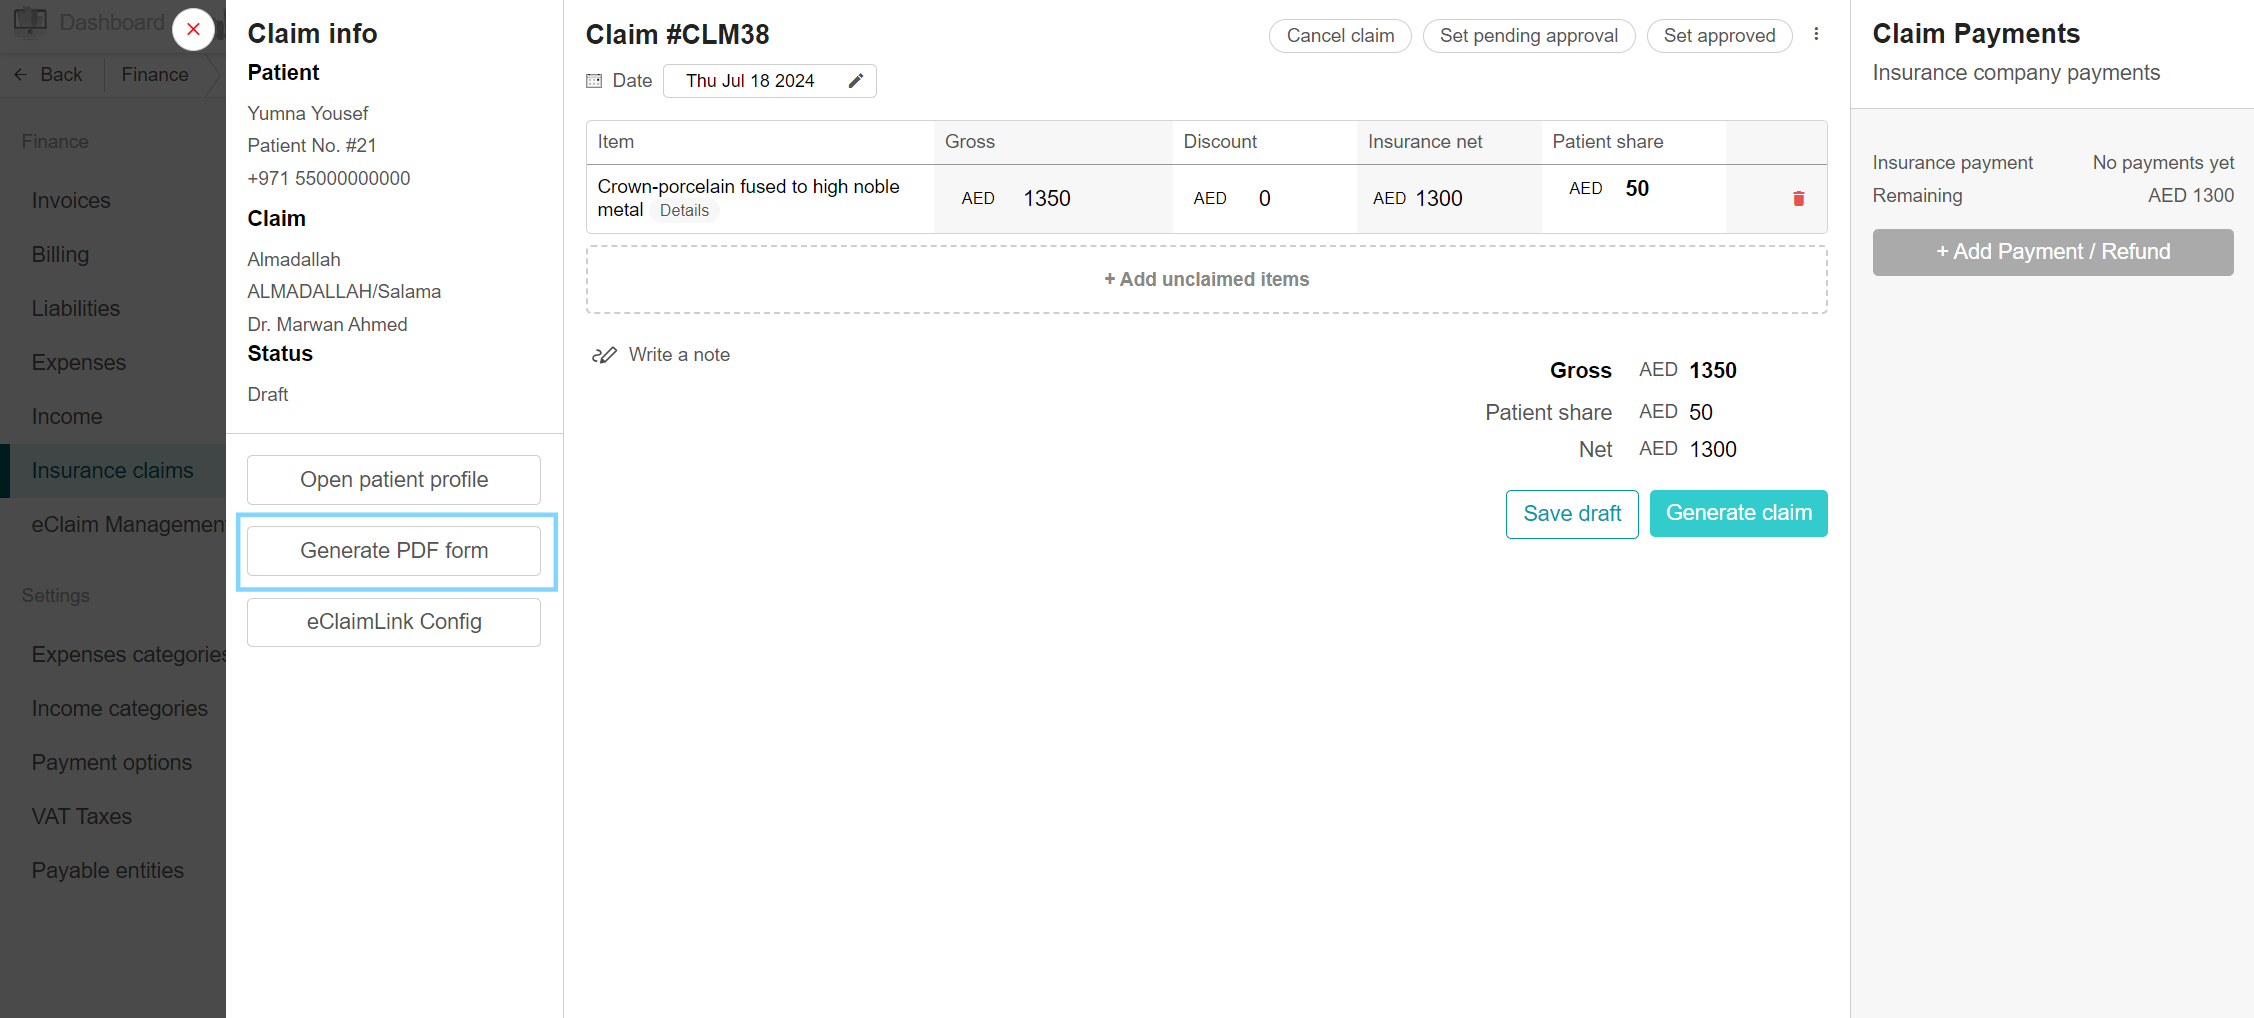
For clinics in Dubai, UAE, all their insurance claims are submitted through the eClaimLink portal. With our eClaimLink integration, all claims can be submitted through Balsam Medico.
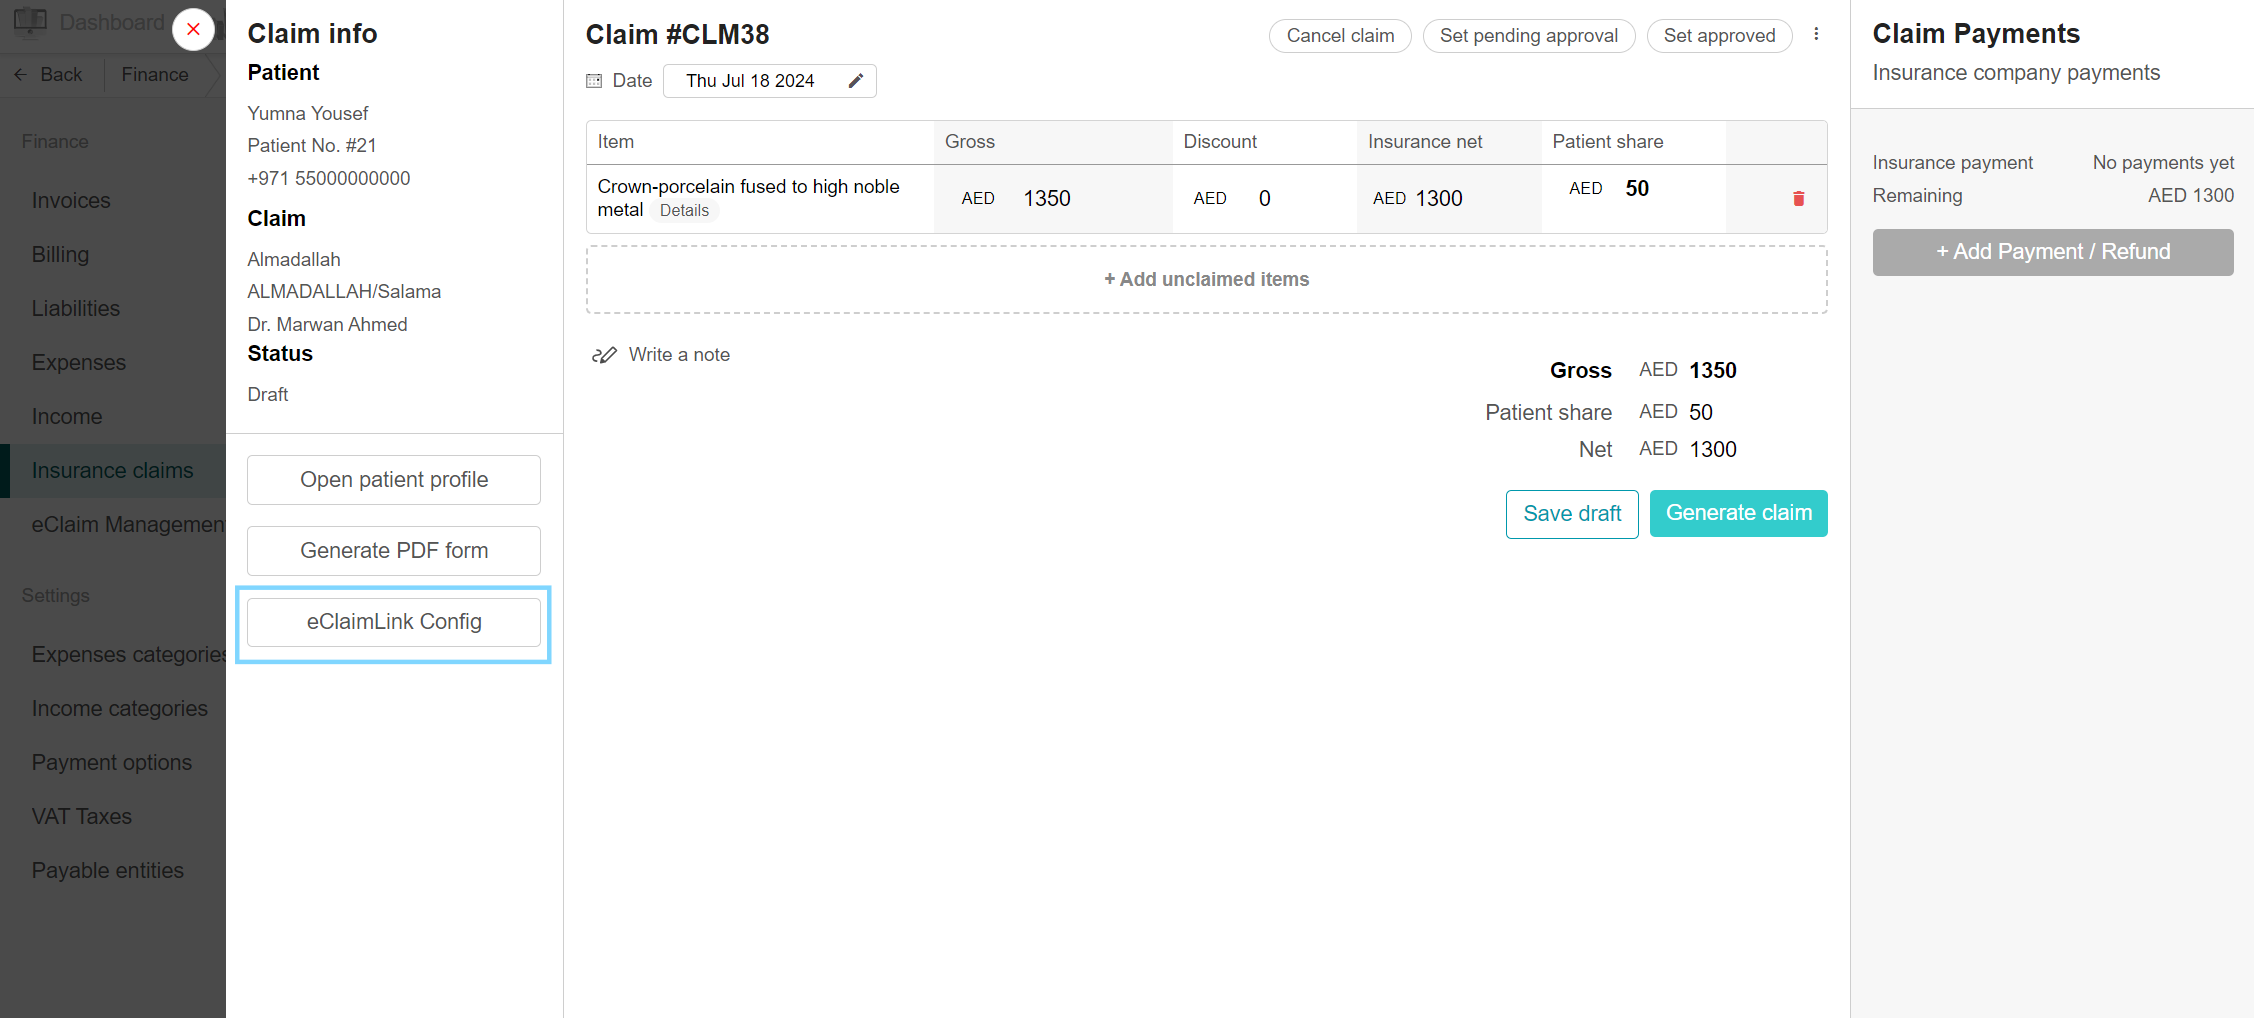
Navigate to eClaimLink Config
To generate any requests, authorizations and submissions, navigate to the eClaimLink Configuration which sends the data to the eClaimLink portal.
Go to the Finance page and select Insurance Claims from the side. Select the claim from the list and open the claim info page. On the left side is the eClaimLink Config button, and there is the insurance claims details page, all actions done on this page get sent to the eClaimLink portal.
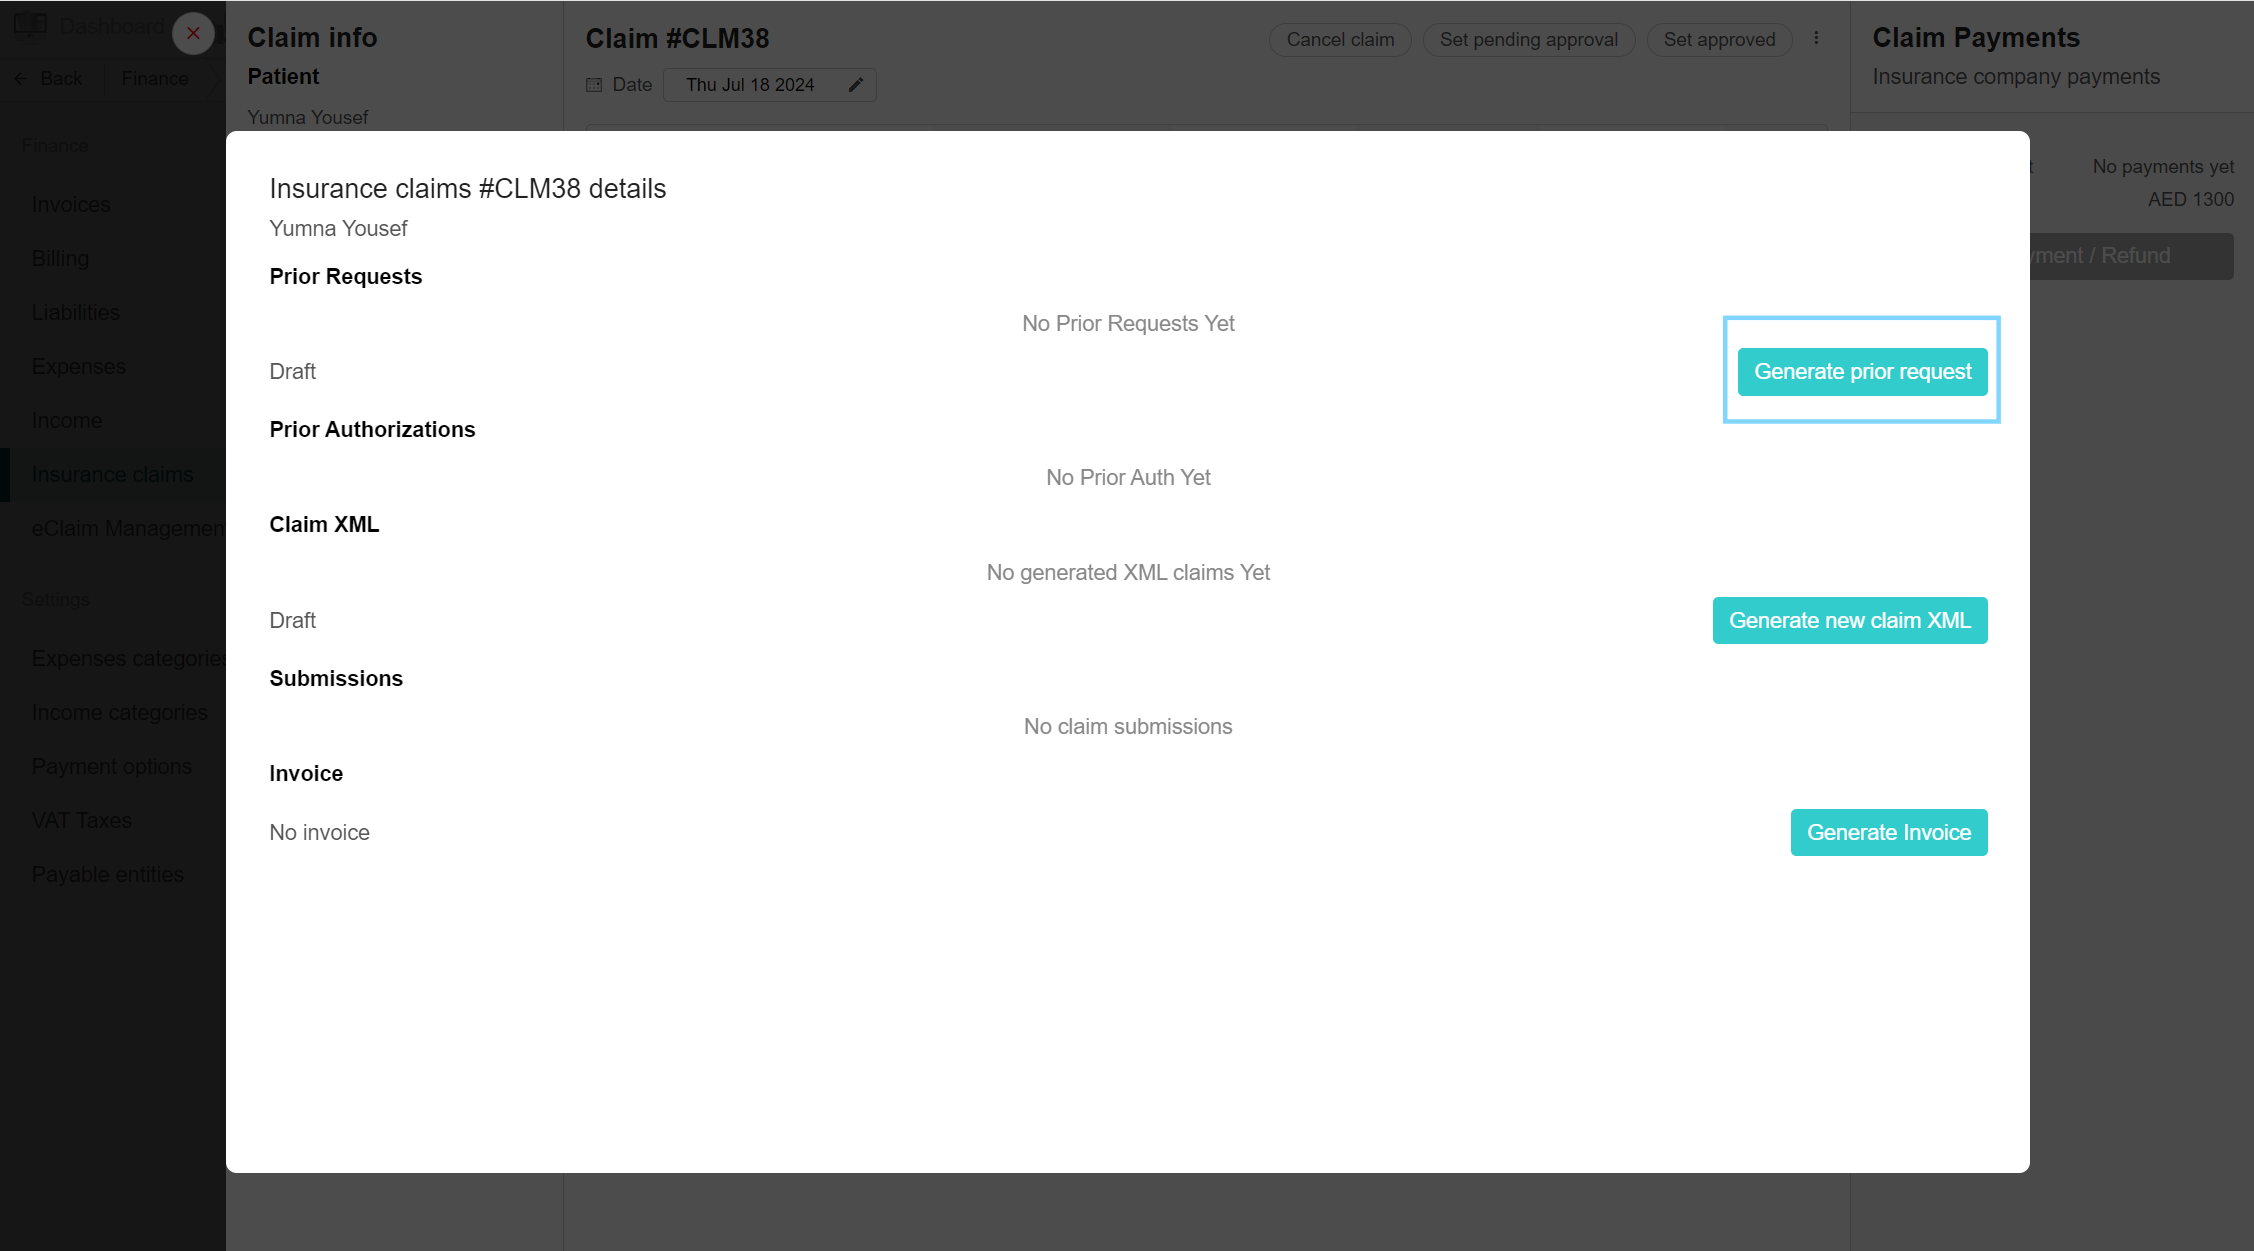
Generate prior request
Prior requests are sent to the portal for qualifications on the treatments performed on patients by doctors. To generate a prior request, select the desired claims and open the eClaimLink Config. In the insurance claims details page you can find Prior Requests, Prior Authorizations, Claim XML, Submissions and Invoice. Make sure the claim is drafted. Click on Generate prior requests button, a prior request page appears, and add the necessary details (such as Authorization Type, Disposition Flag, etc). Finally, click the Save Prior Request XML button and then click the Send to eClaimLink button.
Generate prior authorizations
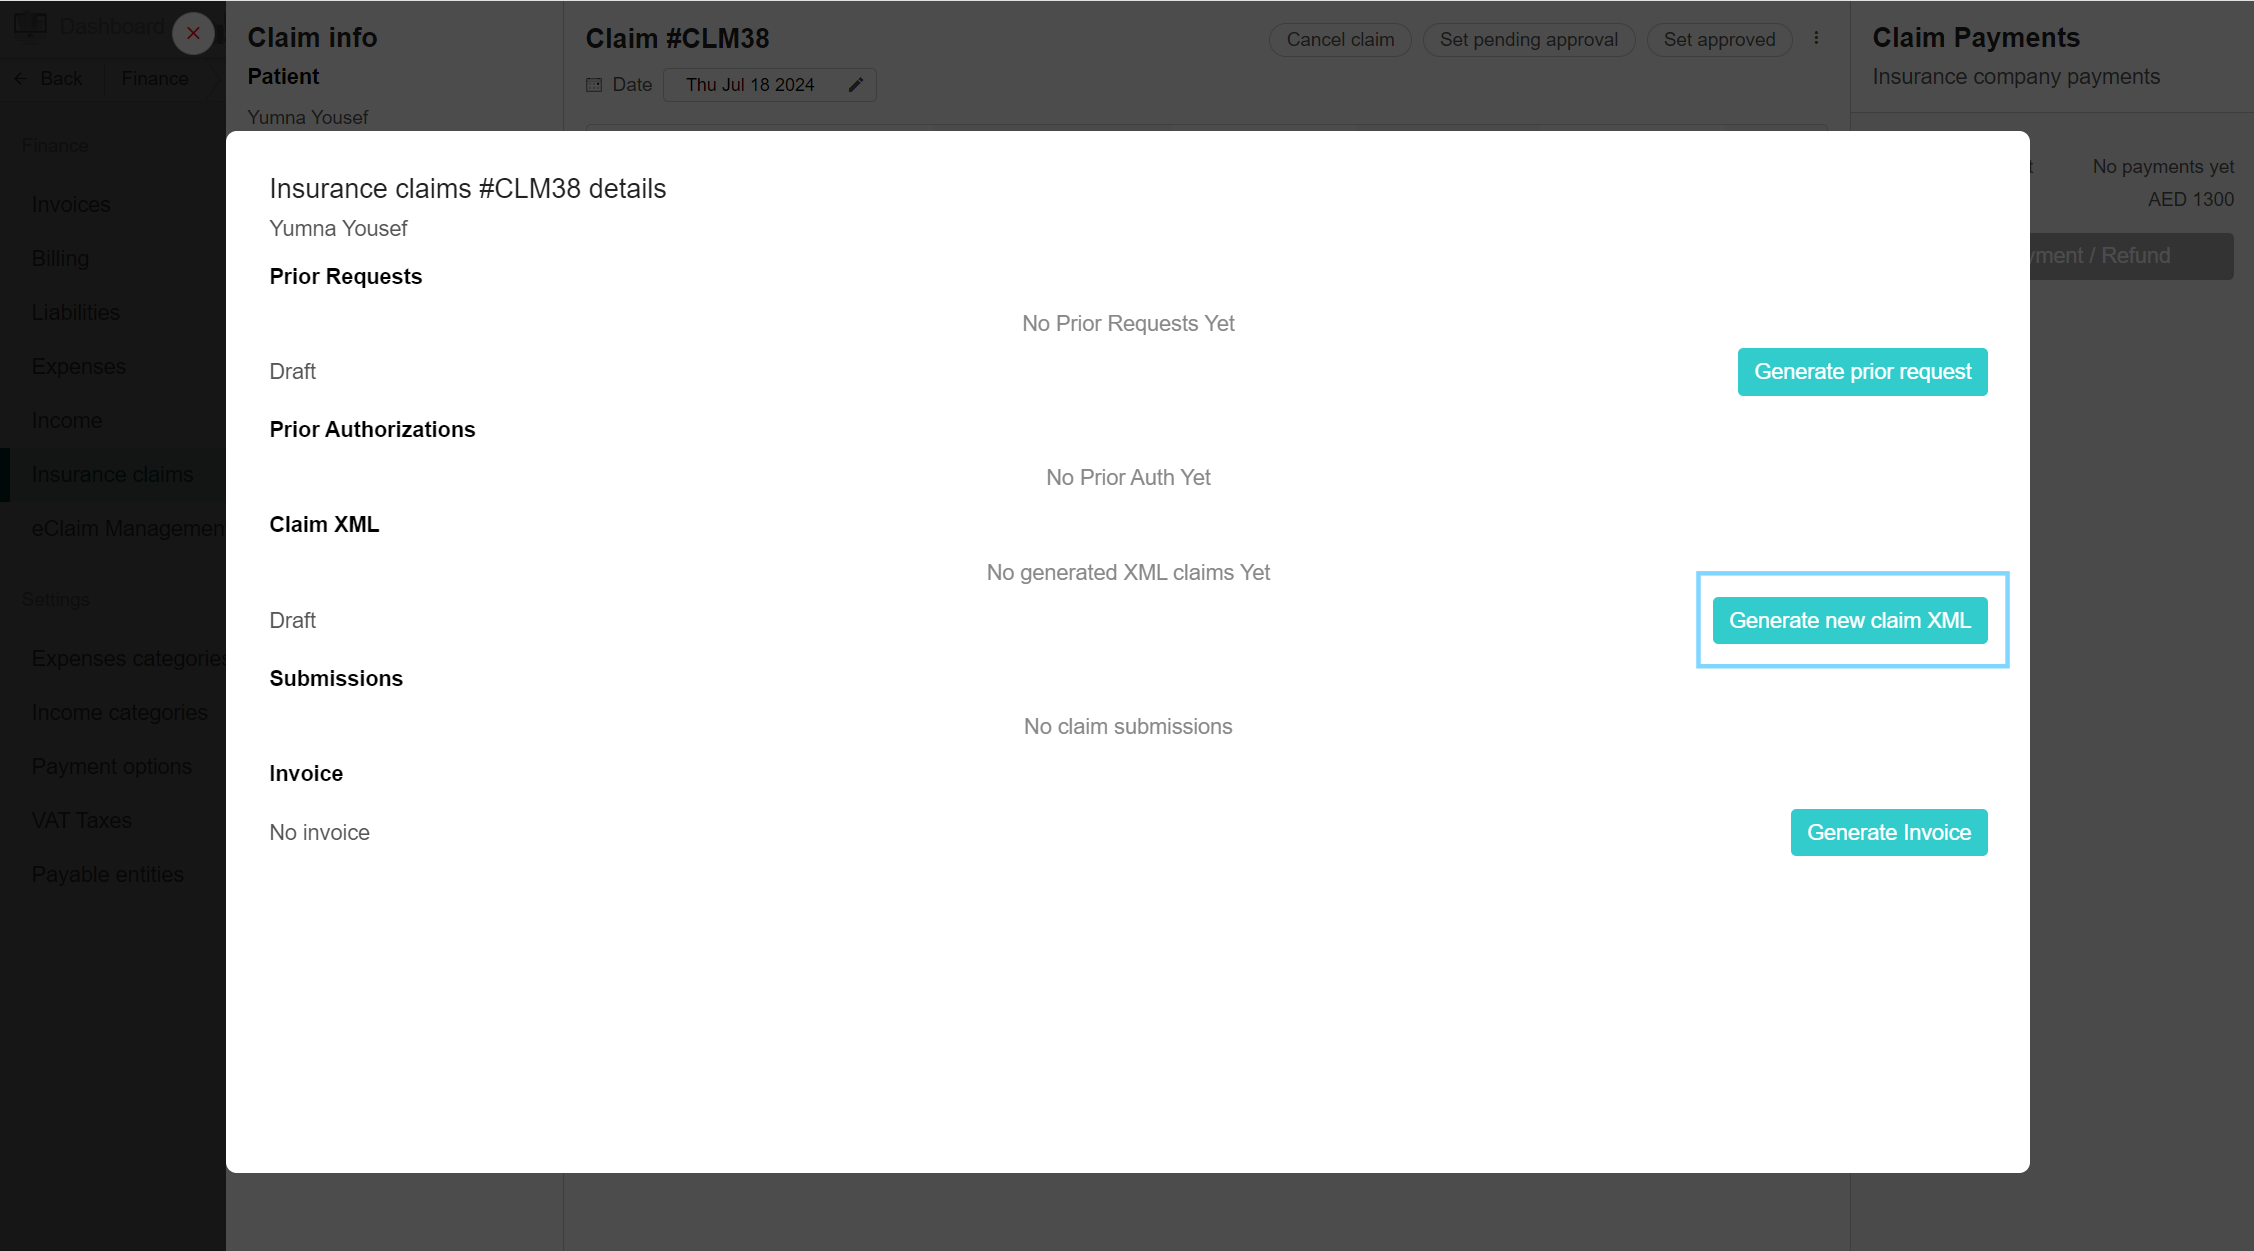
Generate new claim XML
Claims are sent to the portal in XML format. This will contain all the necessary information on the claim, insurance details of the patient, treatment performed with the diagnosis and any additional observers to help with the treatment. This claim XML can be downloaded to review the claim details. To do so, navigate to the claim in the Insurance claim page and open eClaimLink Config. Click on Generate new claim XML, and add the necessary details. Finally, click Save Claim XML. You can download the XML by clicking the link “Download XML file”
Submit claim
The important part of the claim is finally submitting it to the insurance providers to cover the treatment price. Submissions of claims are performed on the eClaim Management page of the Finance tab. You can submit either a singular claim or some claims under the same insurance plan. Tick the claims you want to submit and click the “Select claims to submit to eClaim” button. Choose the Disposition Flag and click Send to E-Claim Link.
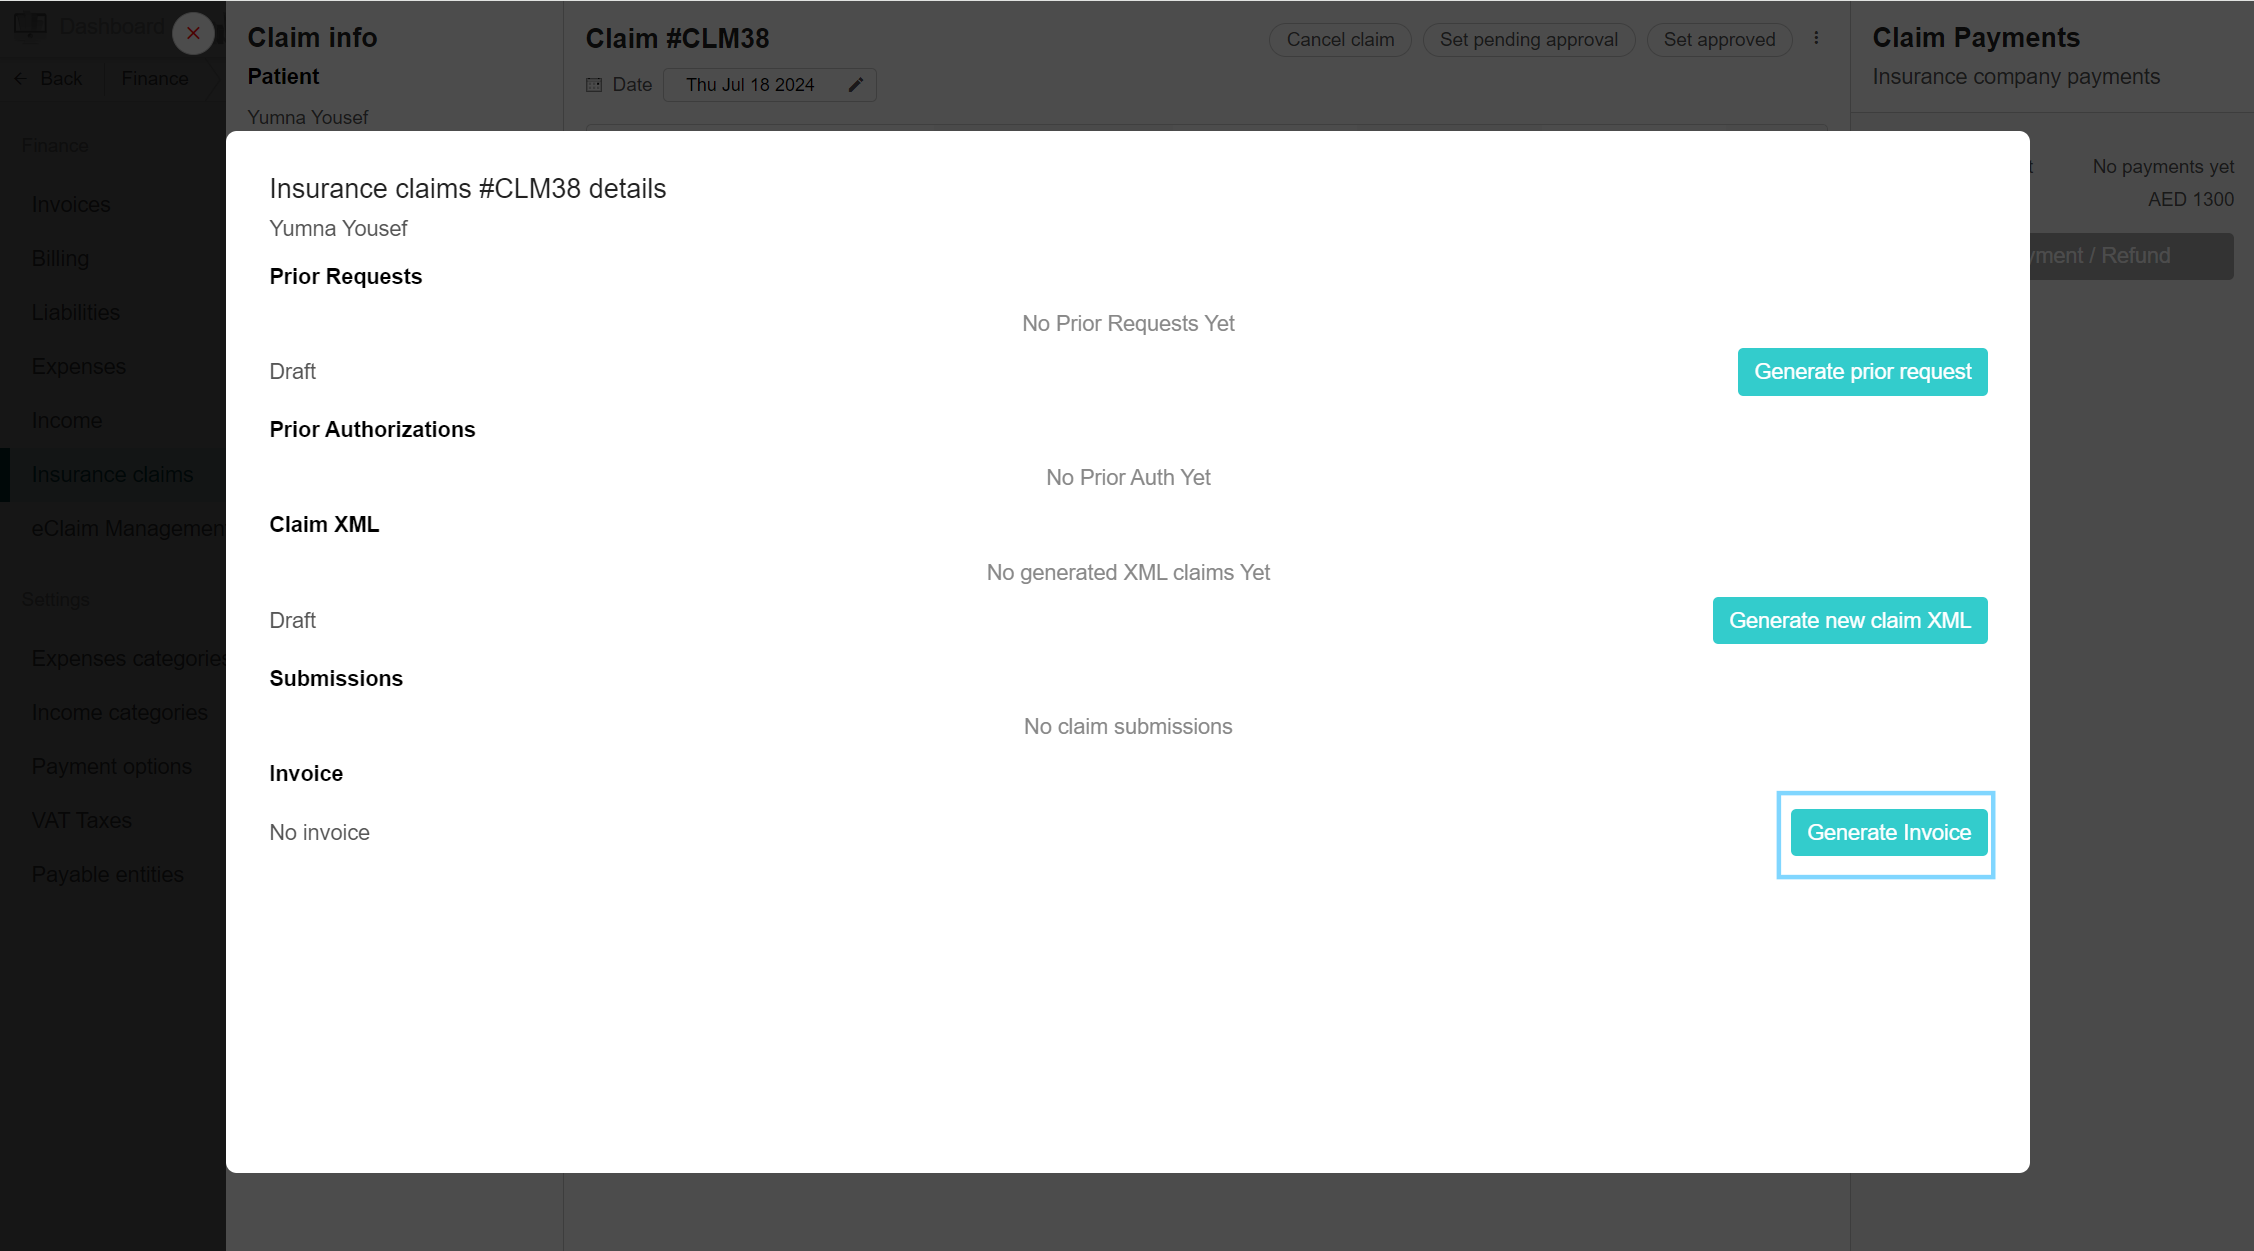
Generate invoices to insurance providers
When the claim is submitted to the portal, the payments are due. Create an invoice for the insurance plans to receive the payment of the claim. Select the desired claim and open the eClaimLink Config. Scroll down to the Invoice section. Click on Generate Invoice. After generation, you can either create a new invoice or download the generated invoice. To download, click on the Download invoice button and the invoice will include the patient details, claim details and the cost of the insurance-covered treatment.
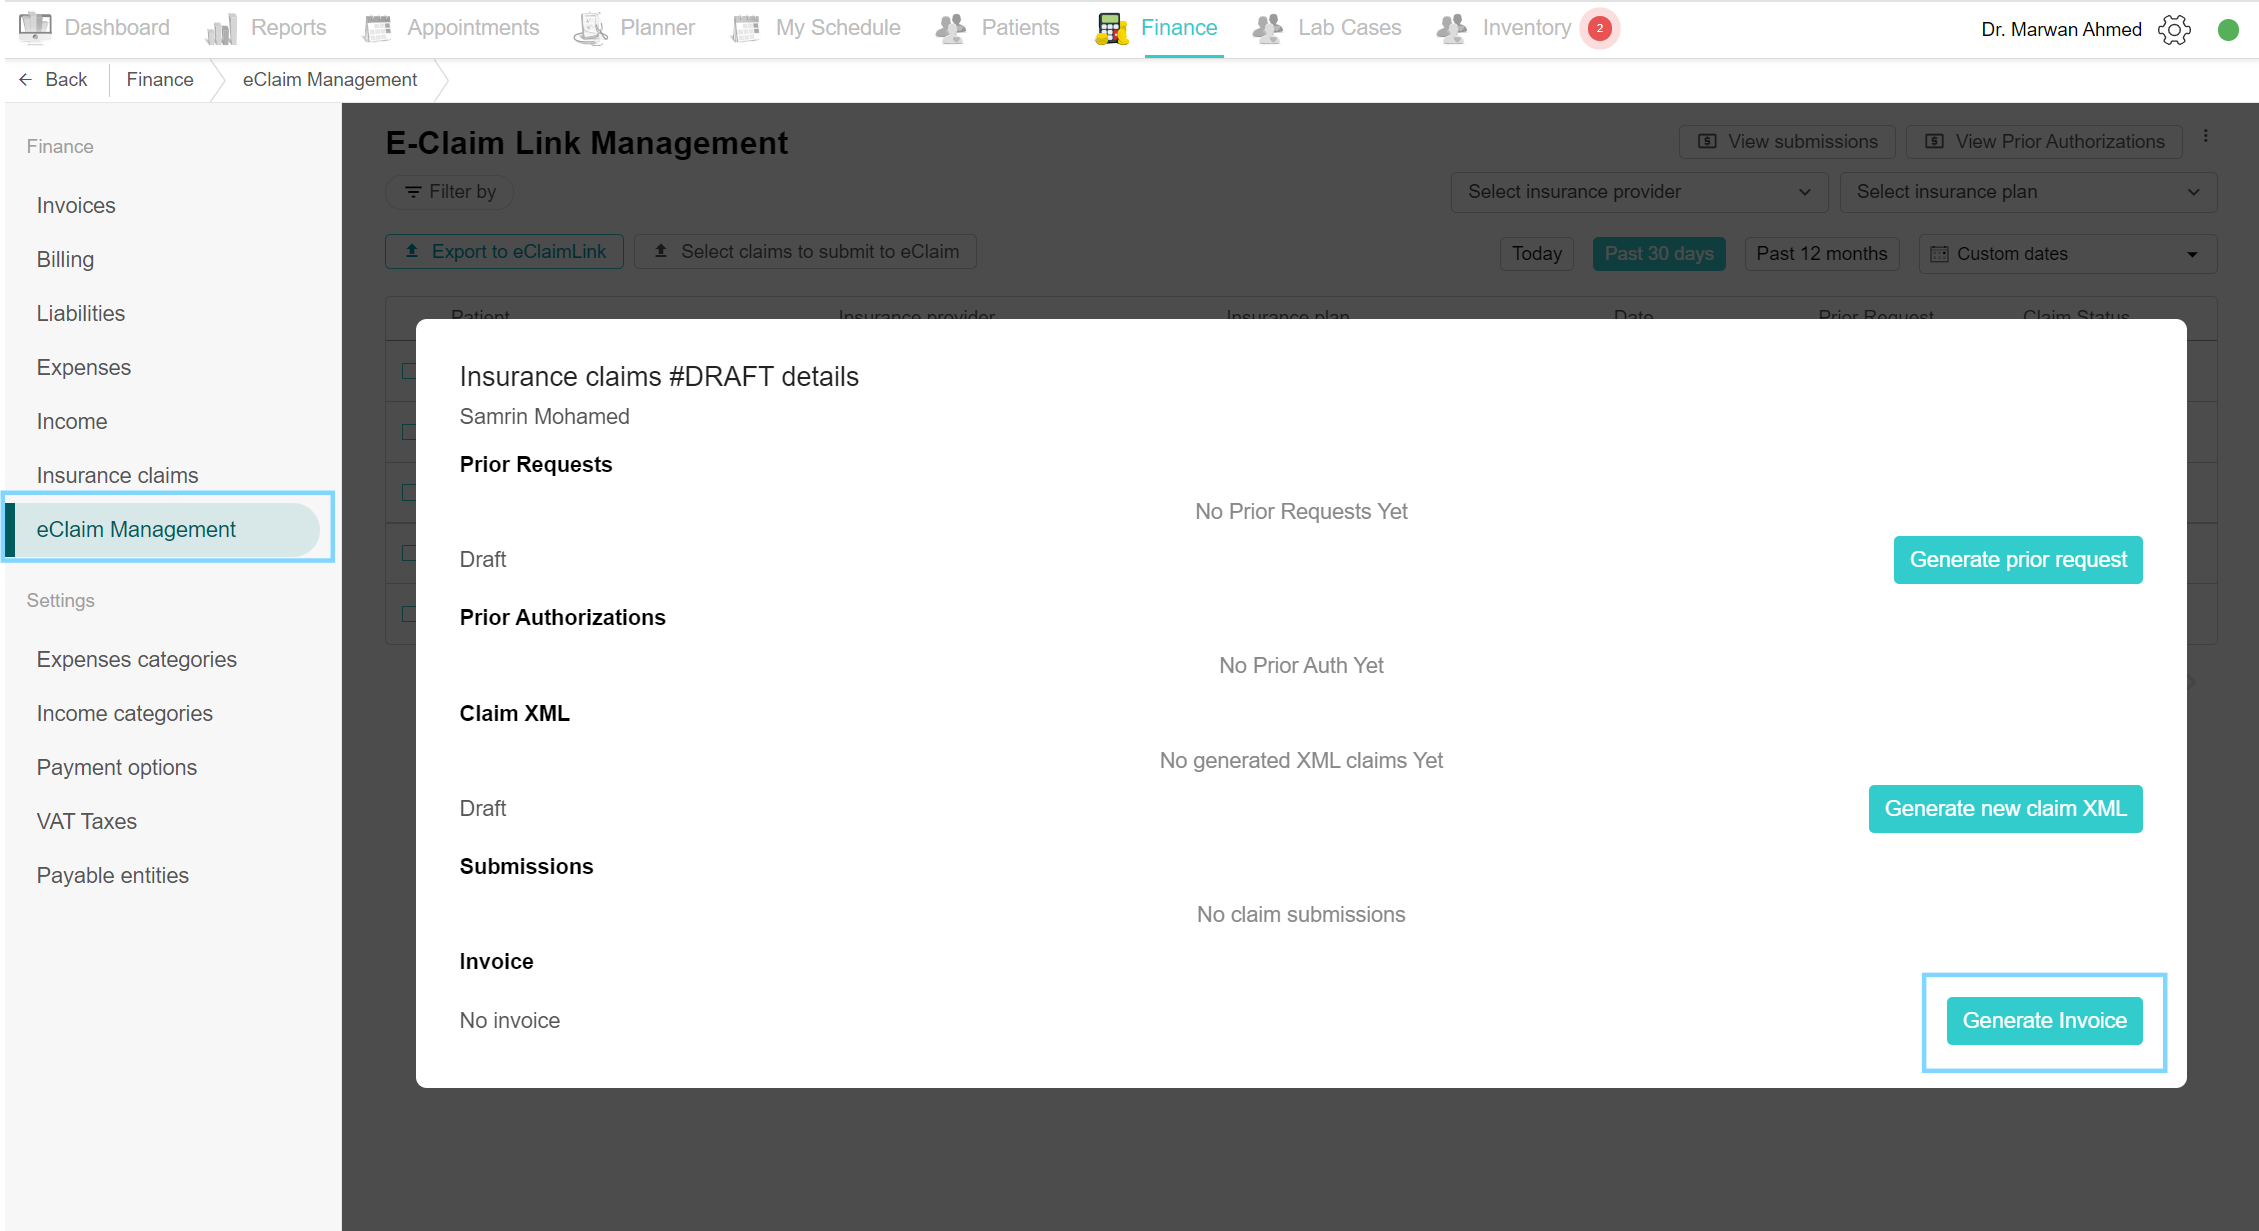
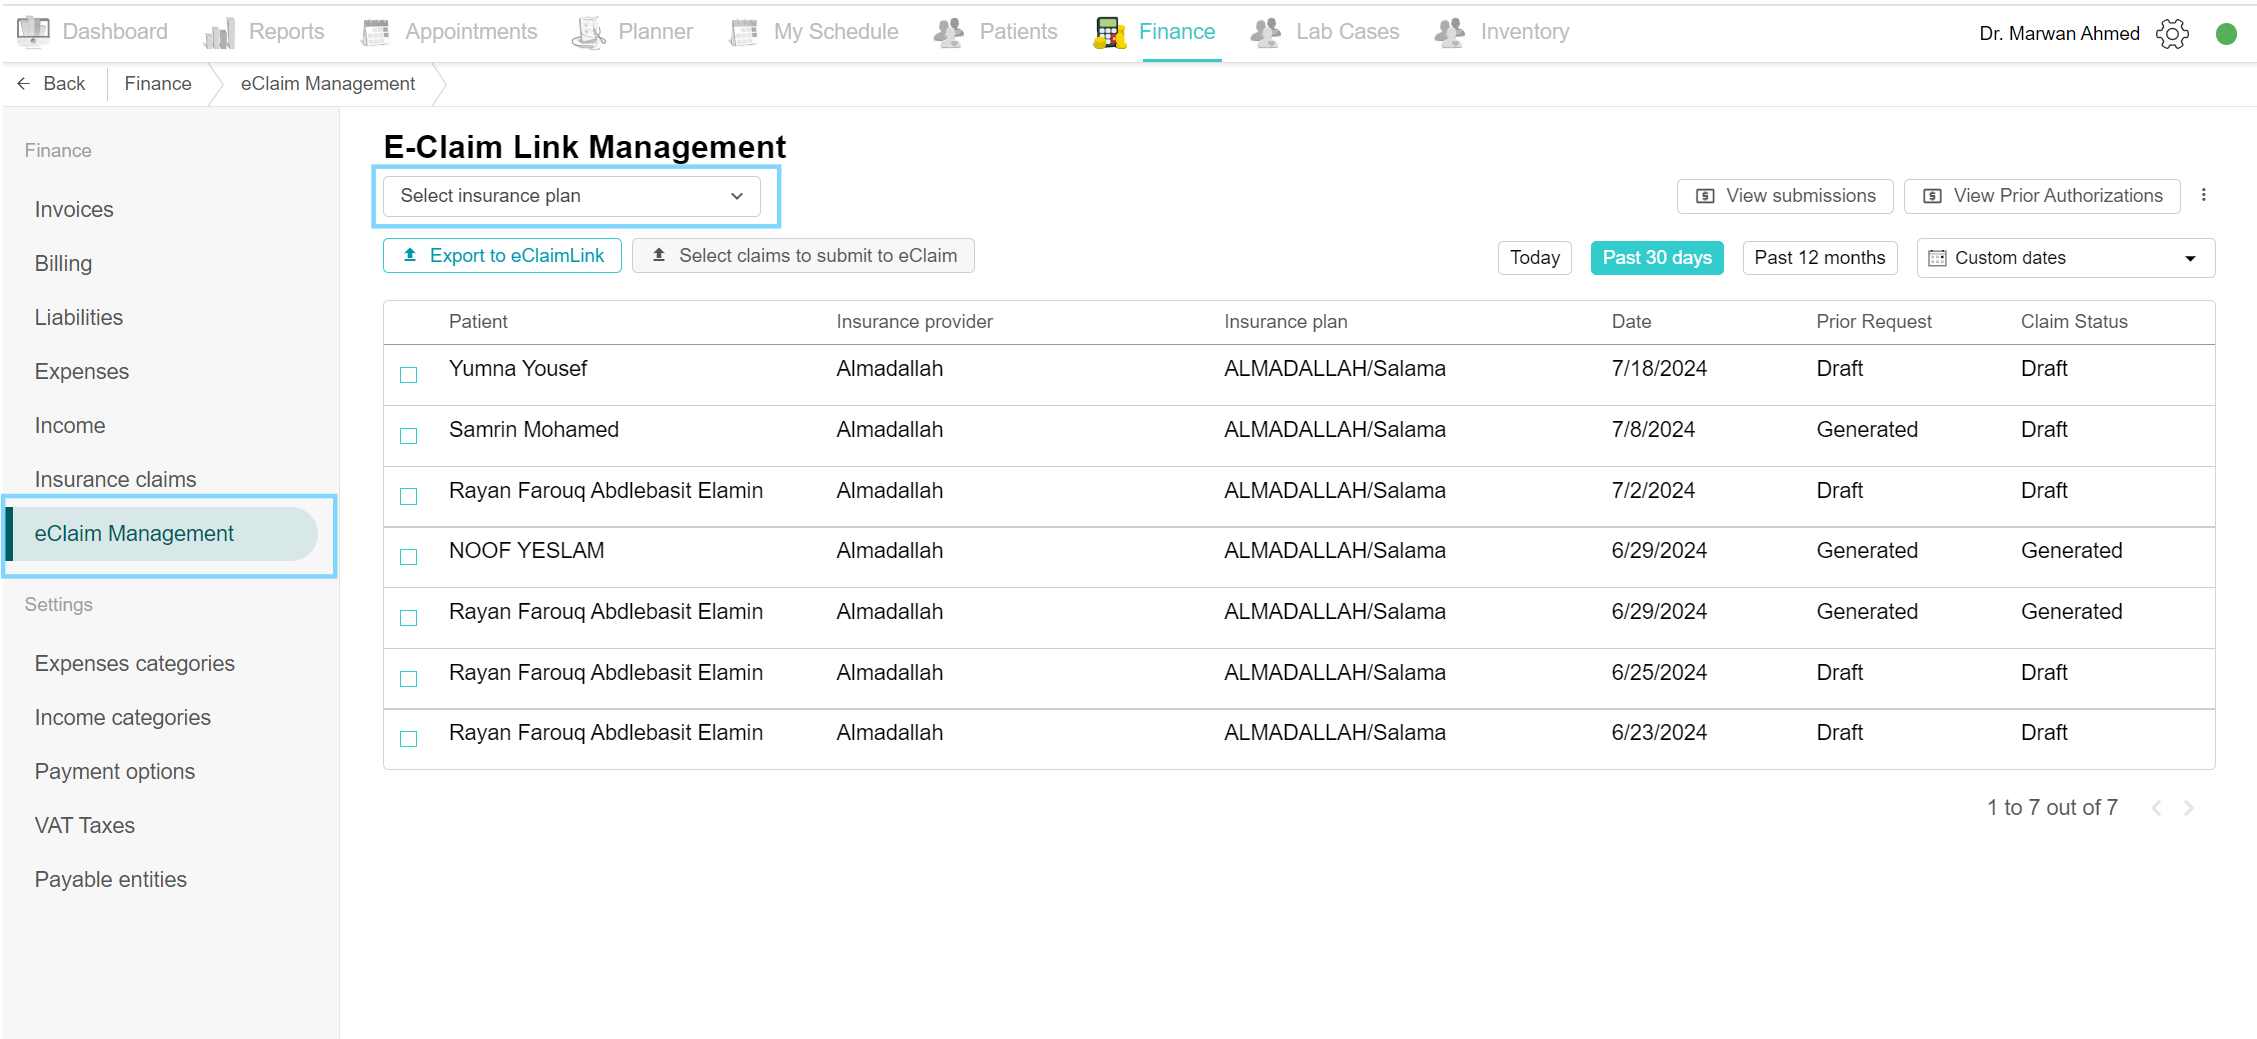
eClaim Management
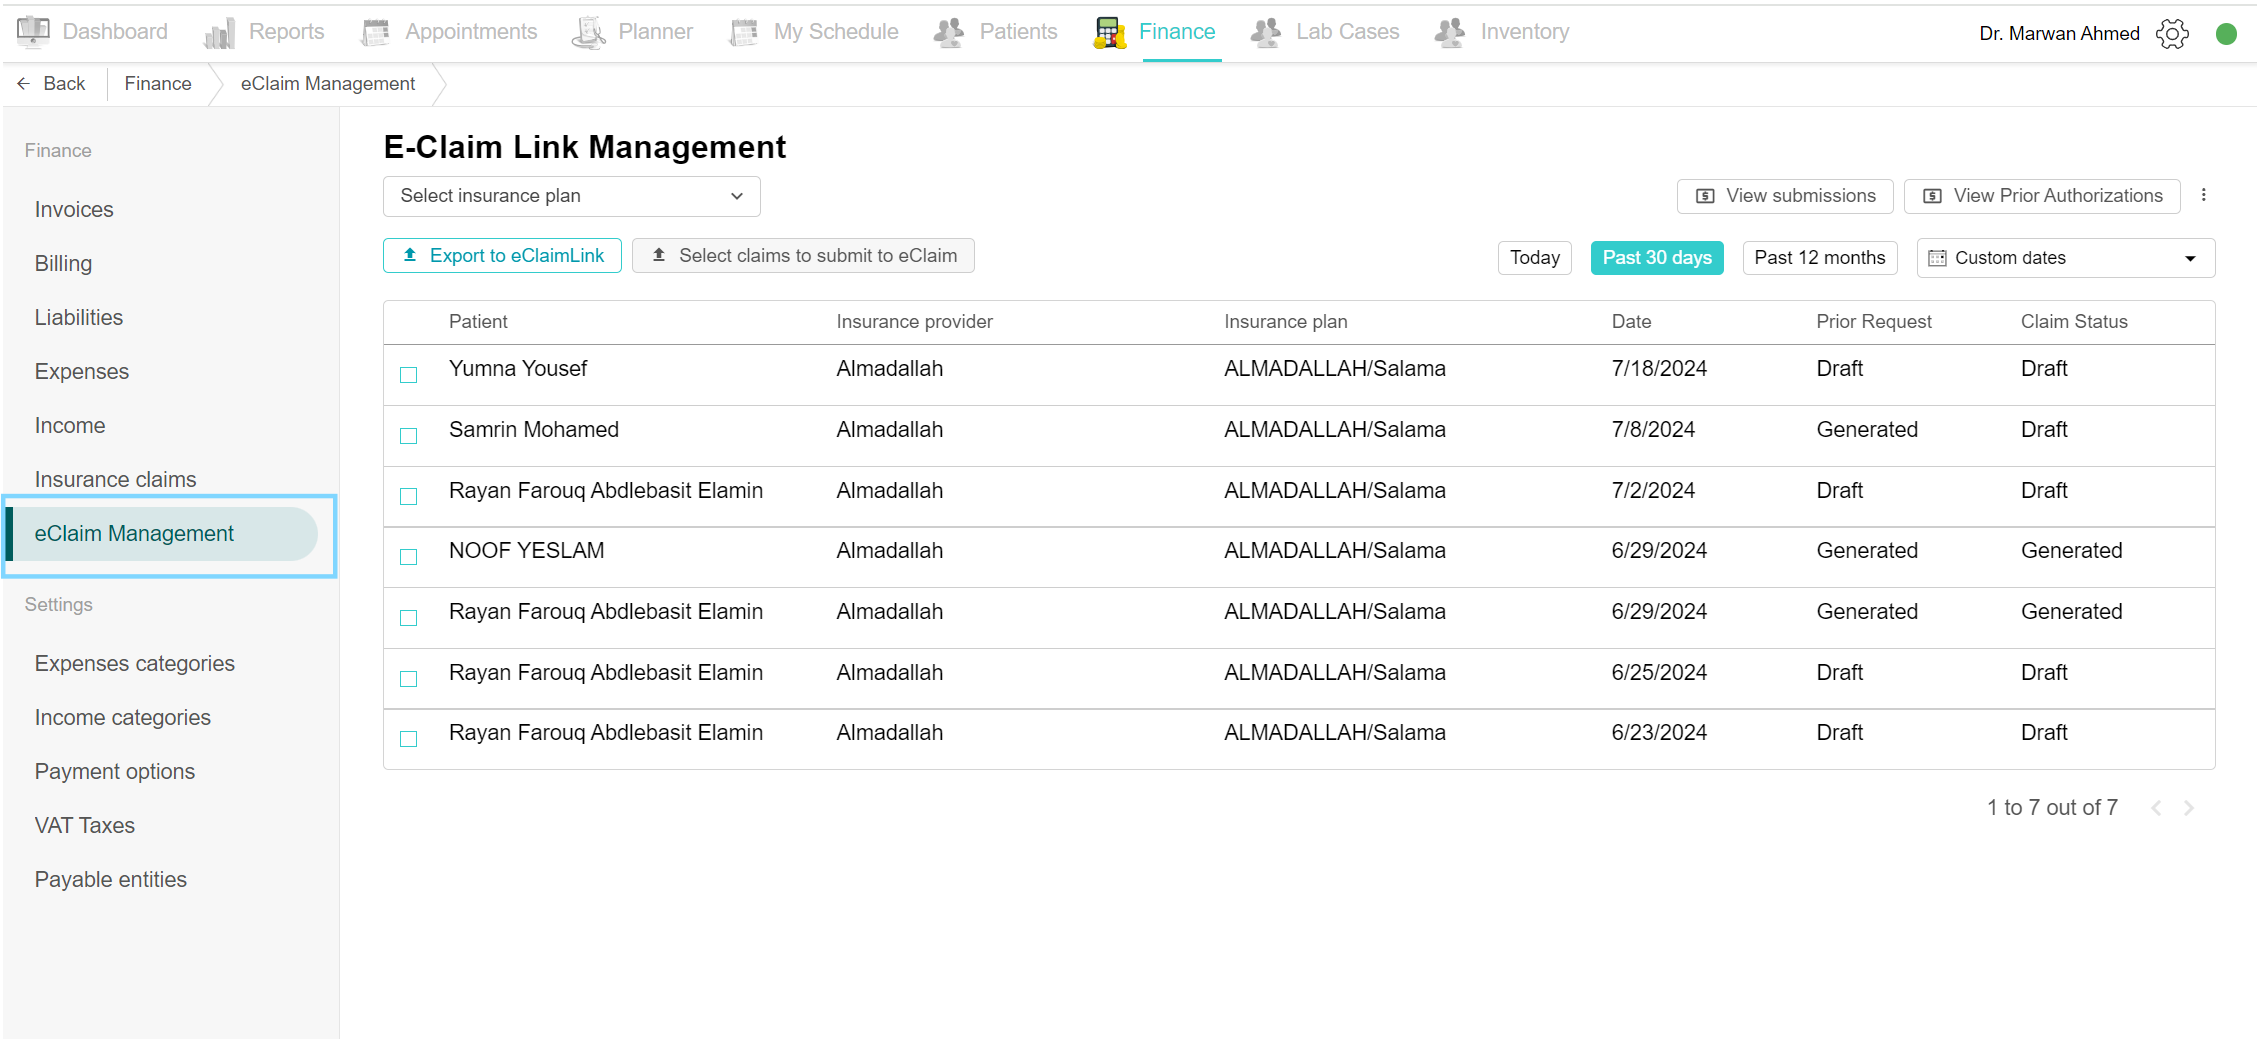
View insurance claims
To view all insurance claims with their details, navigate to the Finance tab and click on the eClaim Management page. A list of all insurance claims is shown, it shows the patient's name, insurance providers and plans, date and the status of the prior request and claim. Click on a claim to edit, update or submit.
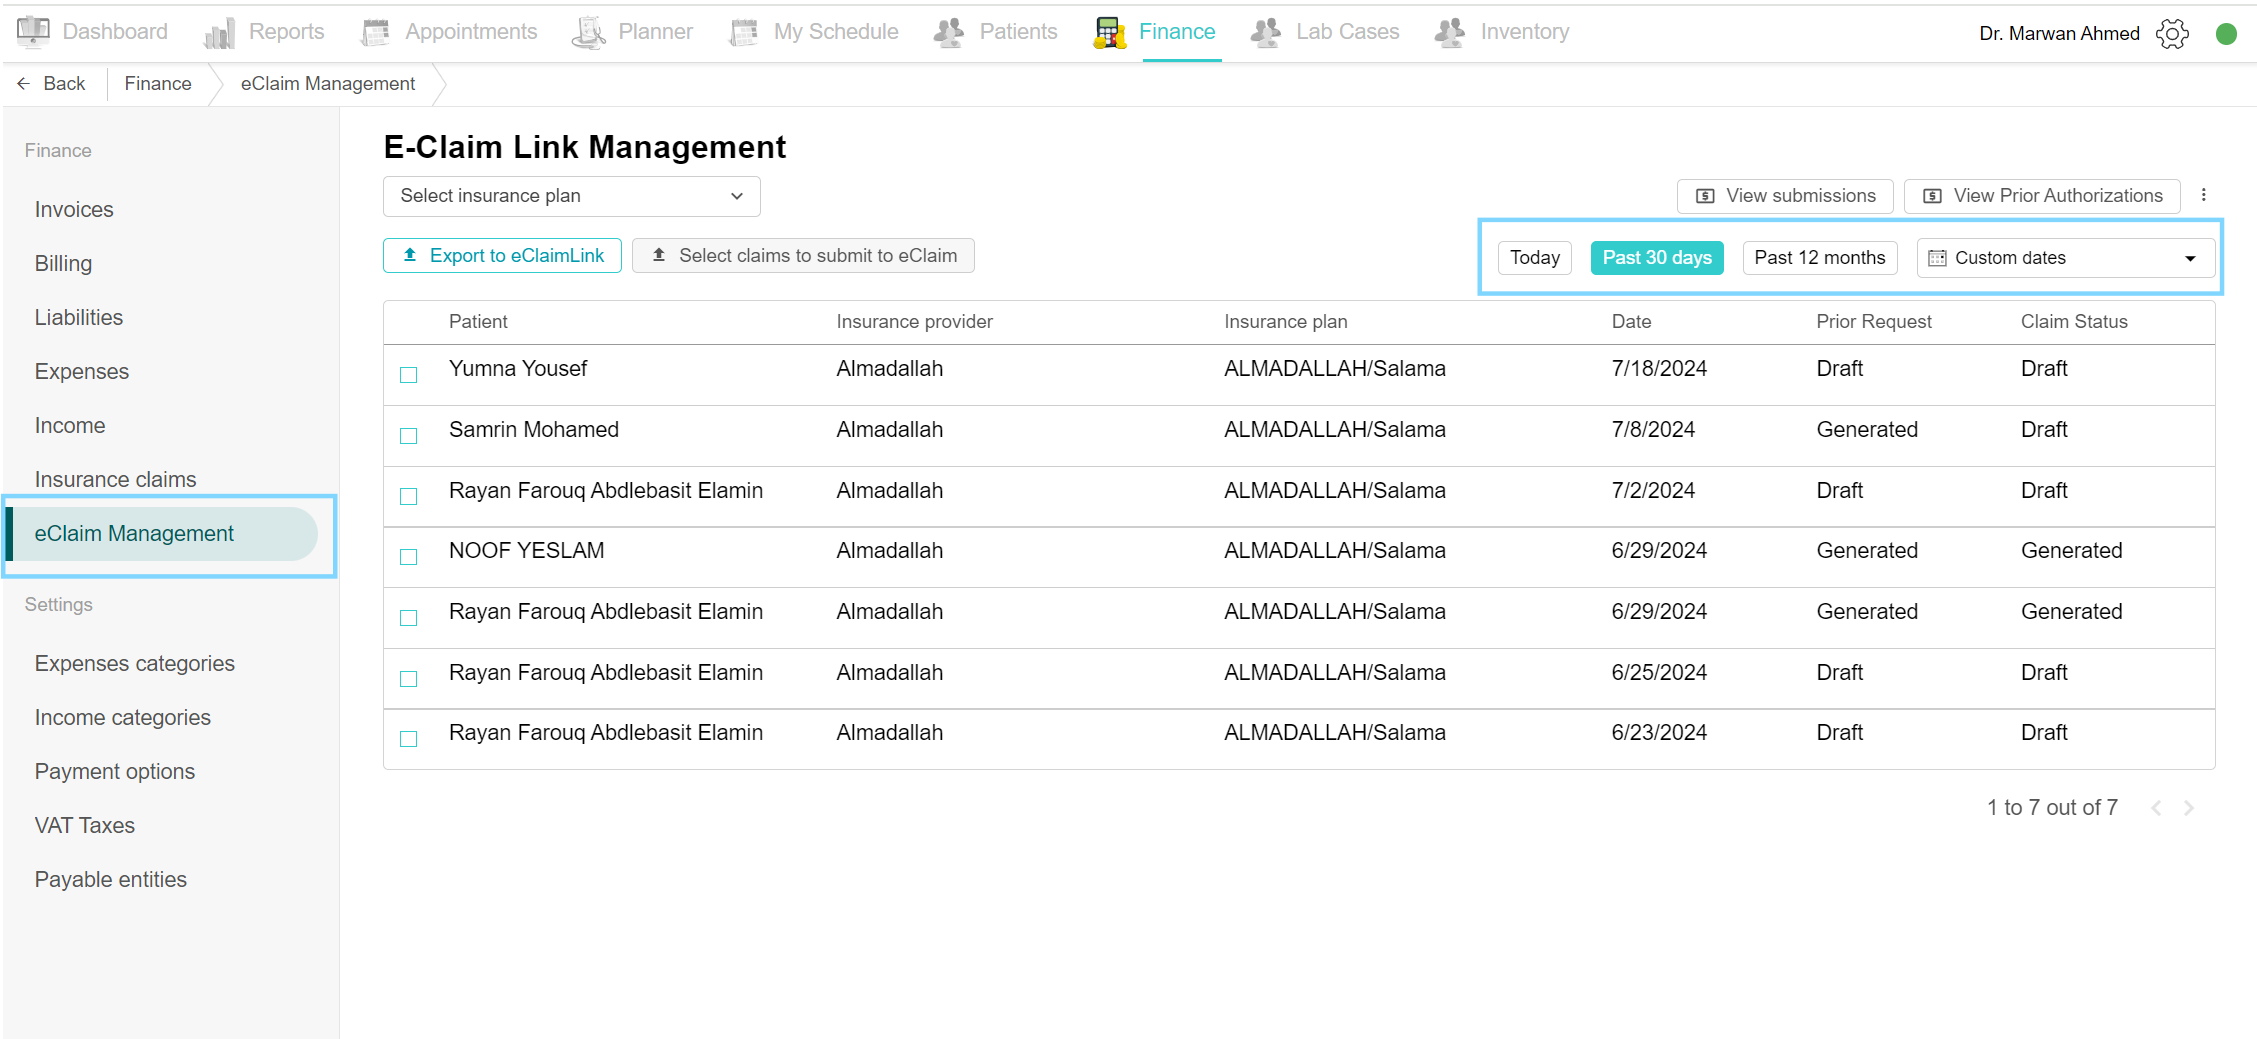
Filter claims by date
Open eClaim Management from the Finance side menu. By default, today's claims are visible. You can view claims by selecting filters like "Past 30 days", or "Past 12 months", or by choosing custom dates. Click on "Custom Dates", select the desired period, and view the claims during that period.
Filter by Insurance plan
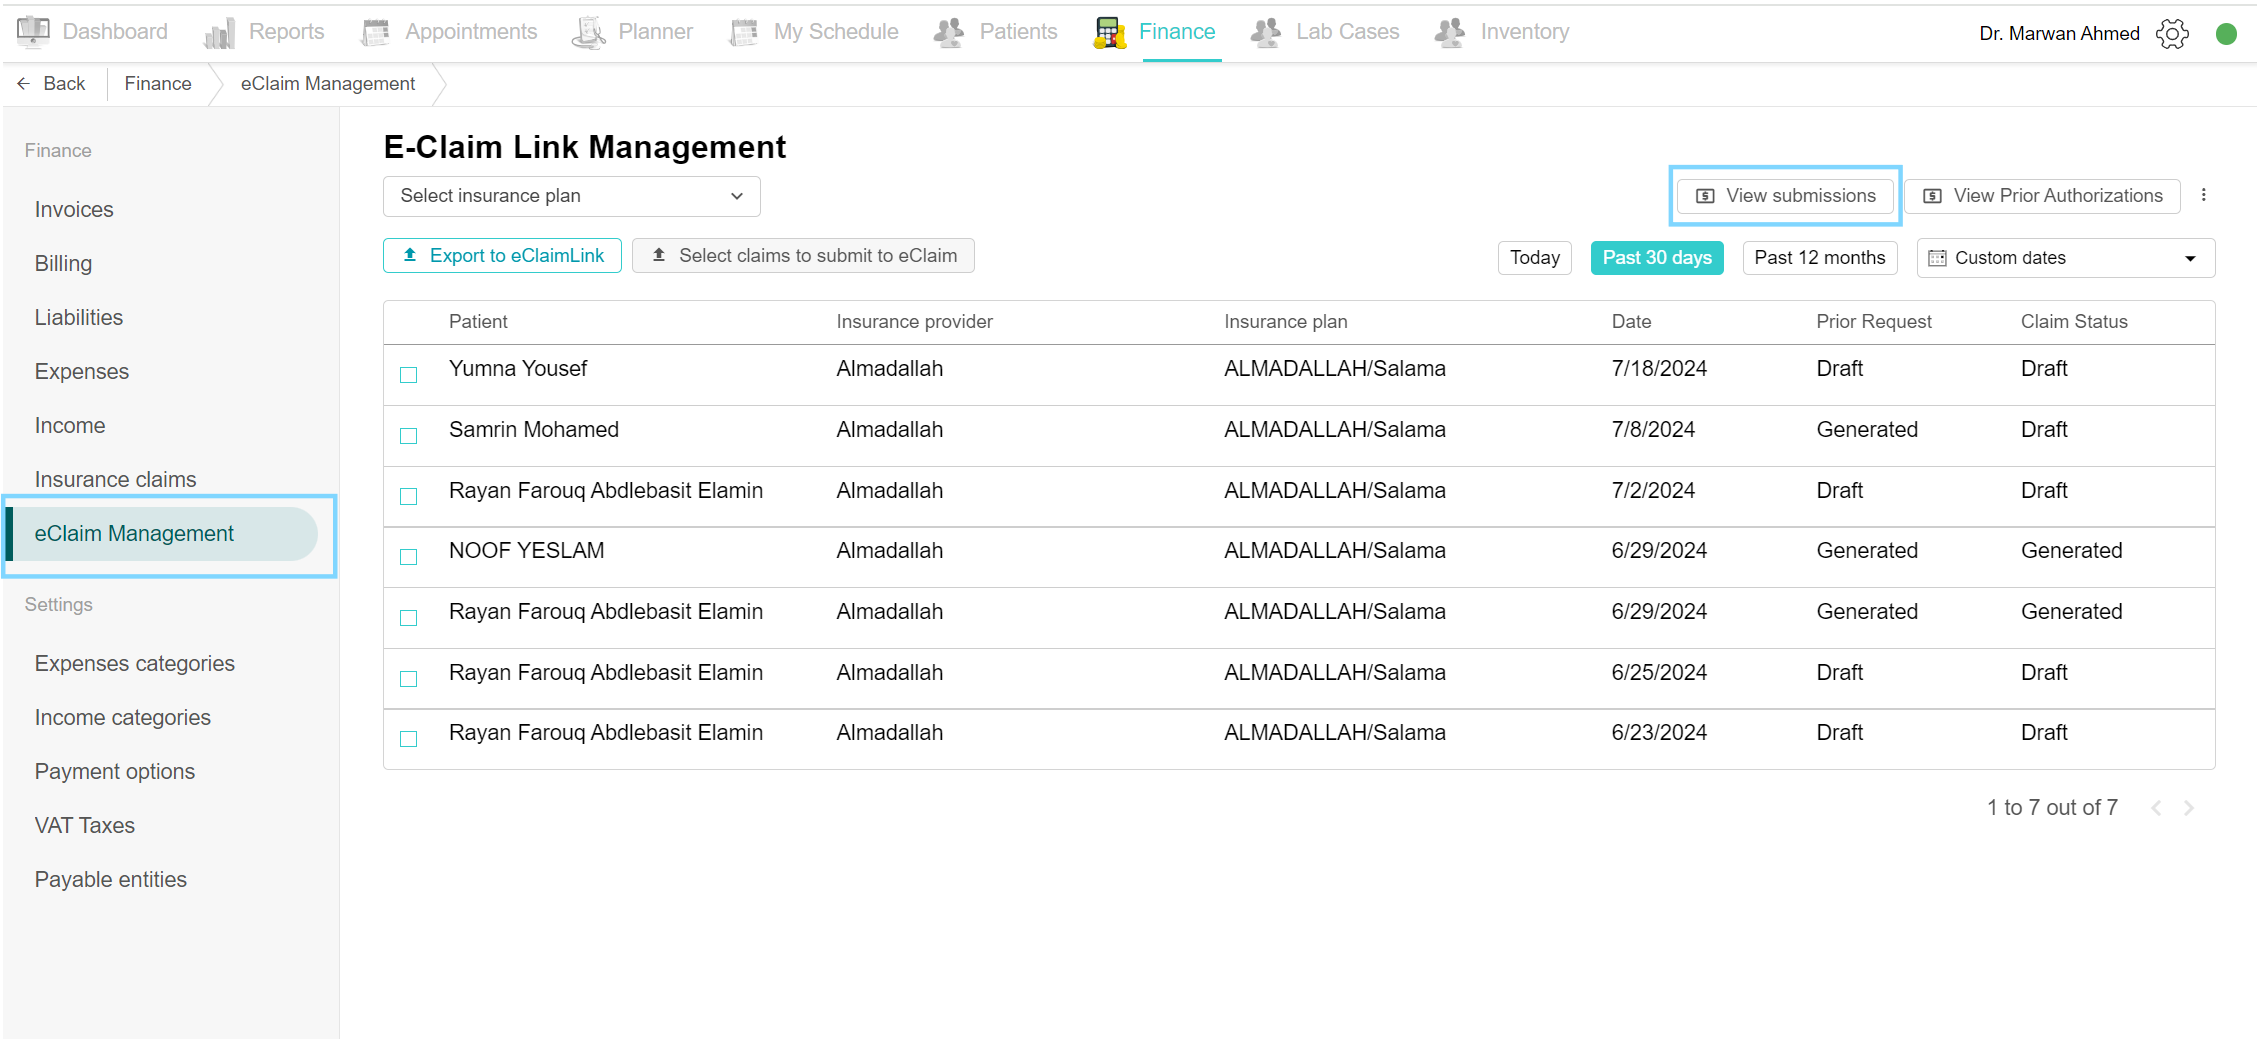
View submissions
It displays previously submitted claims. Go to the Finance tab and click on the eClaim Management page. On the top of the page, click on “View submissions” to view all the submitted claims.
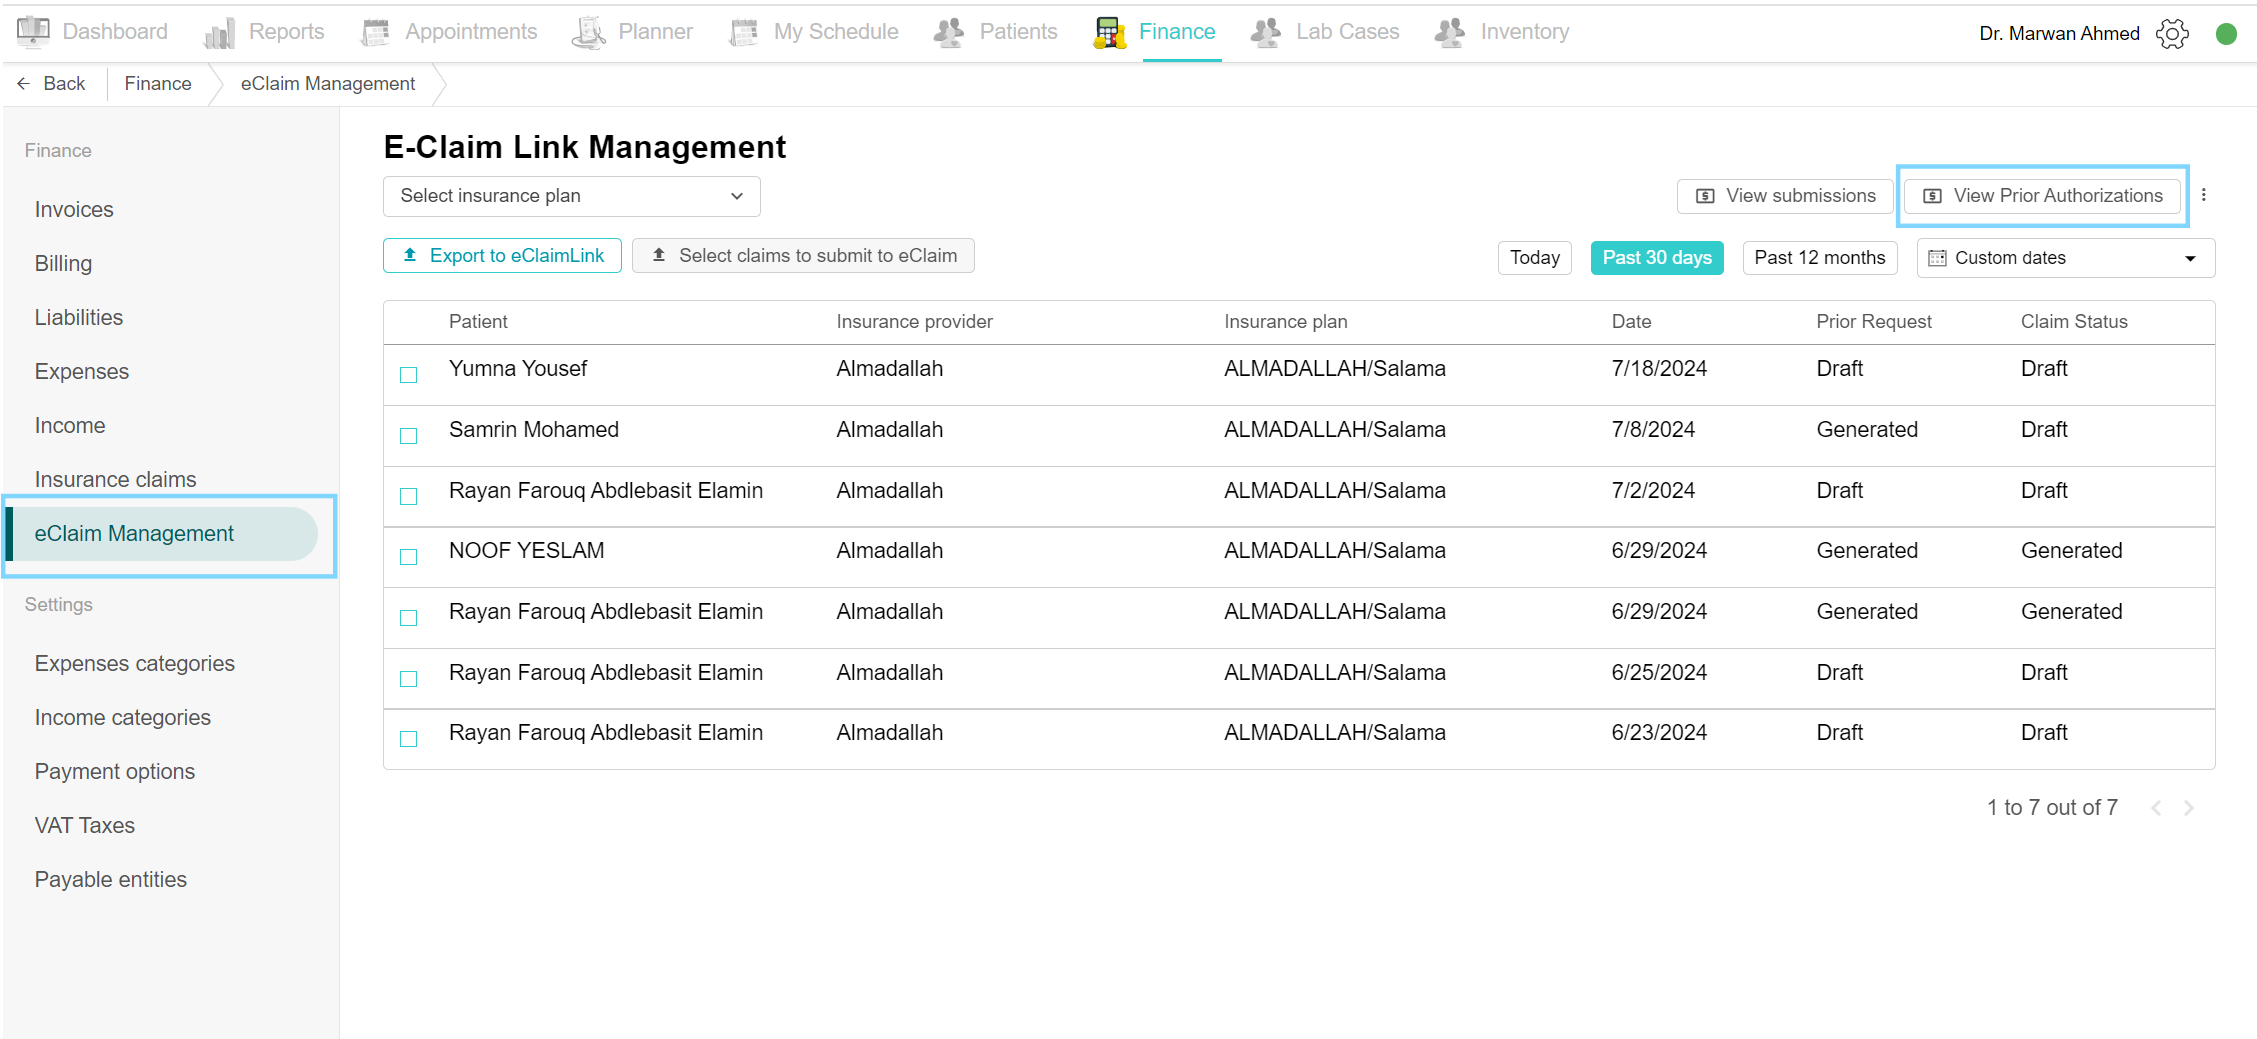
View Prior Authorizations
Go to the Finance tab, and click on eClaim Management to view the list of claims. On the top click the “View Prior Authorizations” button. This shows a list of prior authorizations related to claims.
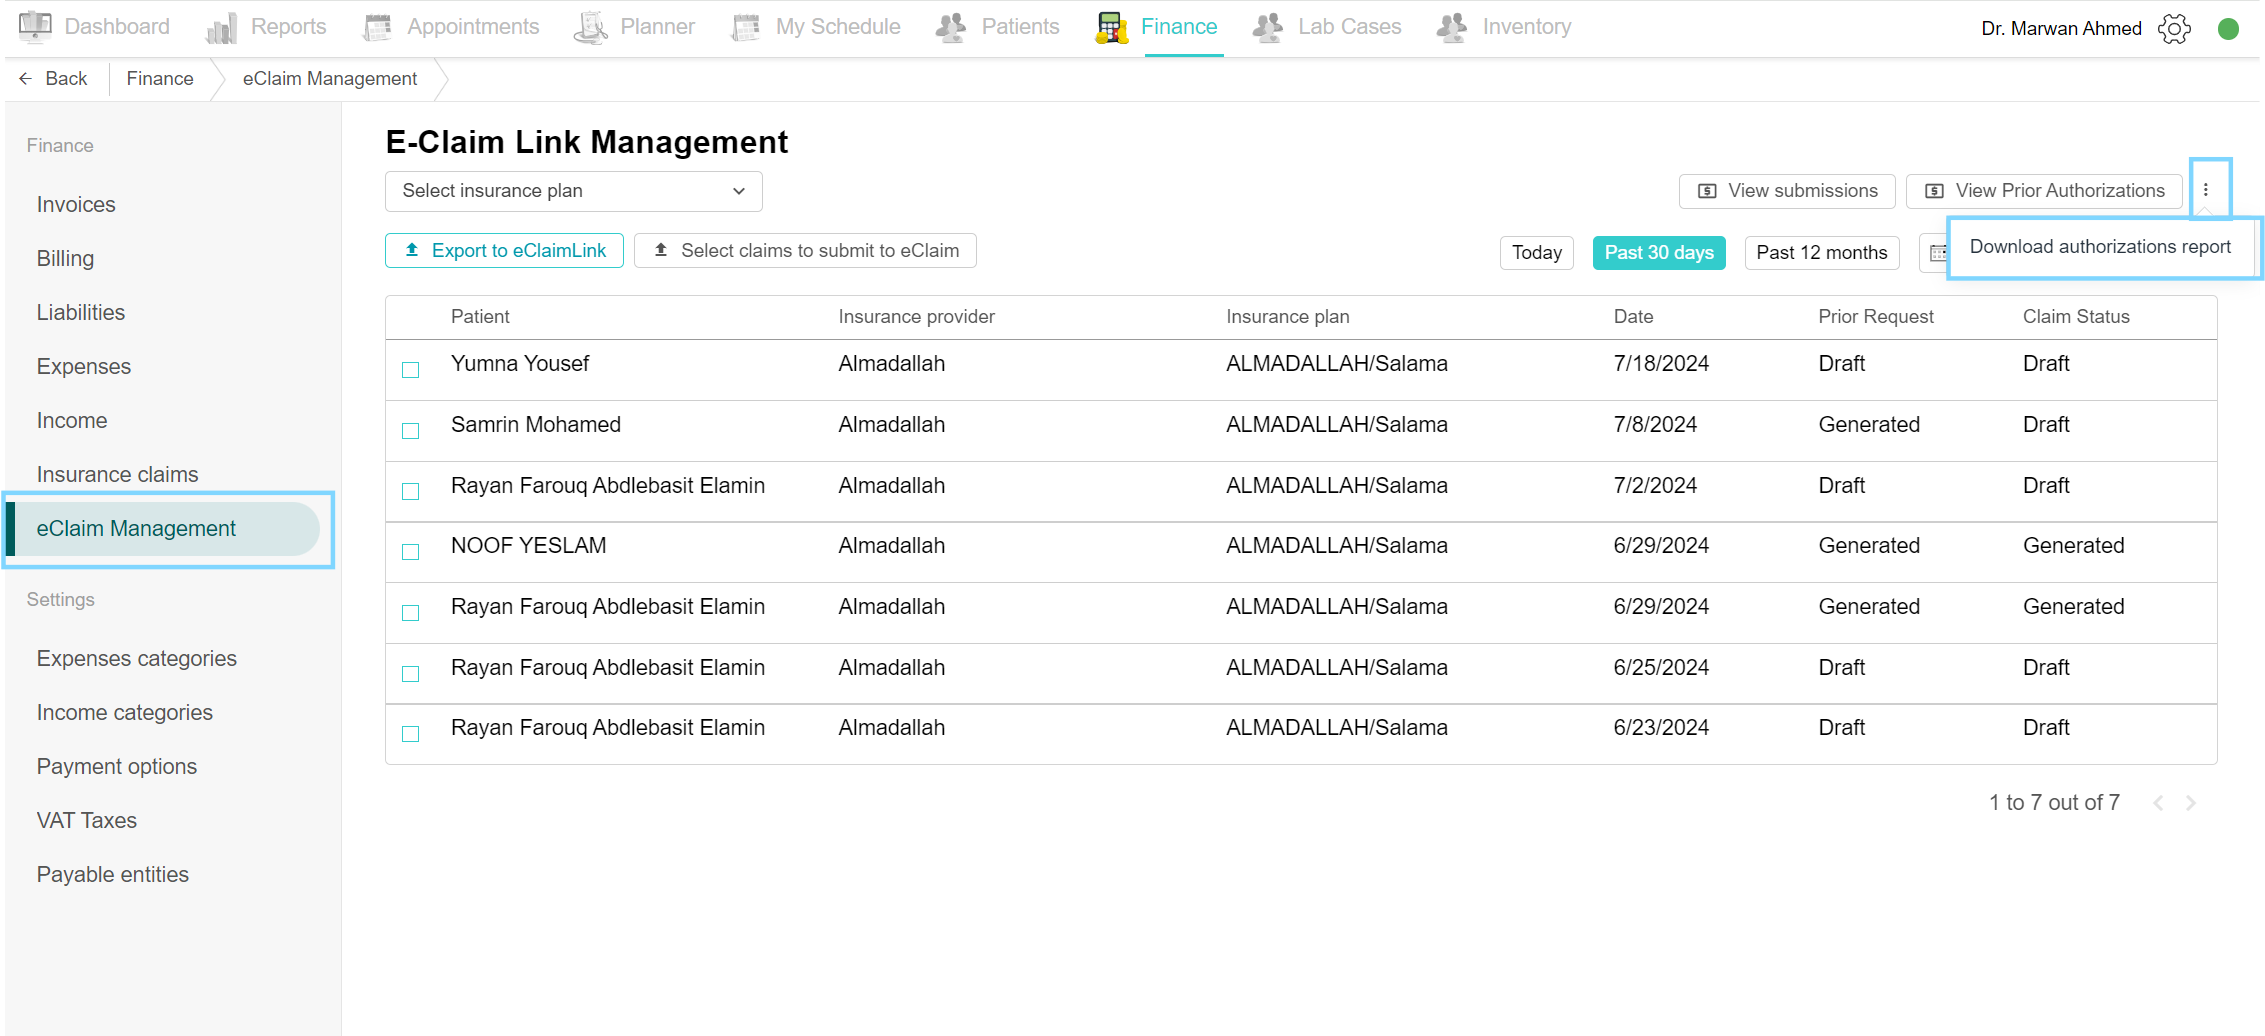
Download authorizations report
You can download the authorization report of all the claims. Go to the Finance tab and click on the eClaim Management page. Click the three-dot option on the side of the “View Prior Authorizations” button. Select “Download authorizations report” from the options. Select the insurance plans and the date range and the report is downloaded.
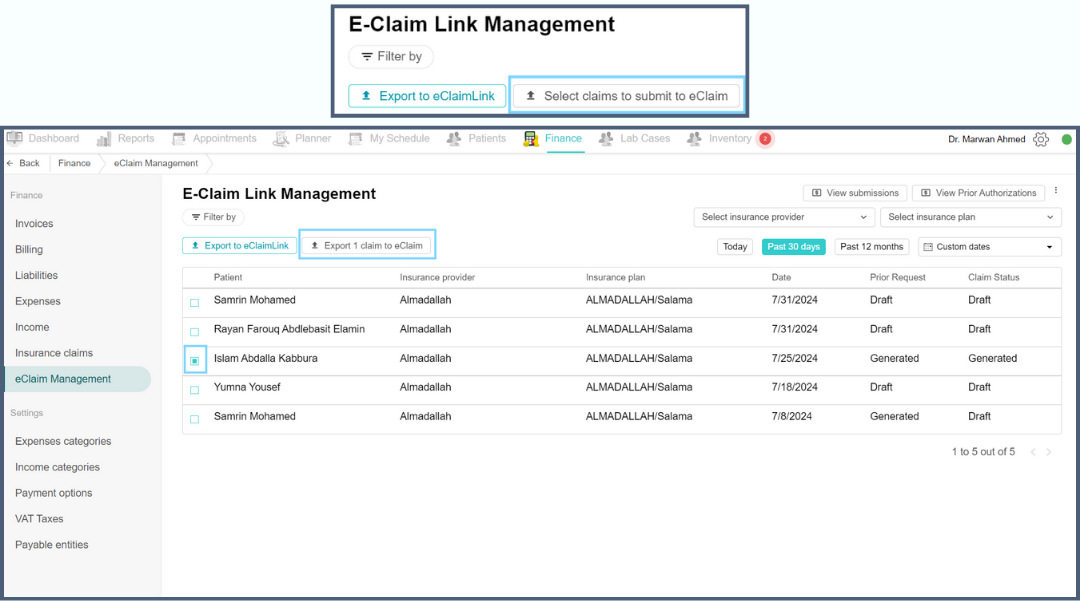
Select claims to submit to eClaim
This feature allows users to select specific claims for submission to the eClaim system. Go to the Finance tab and click on the eClaim Management page. To submit claims, select the claims desired and notice the “select claims to submit to eClaim” button gets turned to the “Export 1 claim to eClaim” button. Click the button, choose the disposition flag and send to E-Claim Link. To view it, click the View Submissions button.
Generate prior request
You can generate prior requests from this page, once a claim is drafted it will appear on the eClaim Management page in the Finance tab. The claim is listed with the patient name, insurance provider name and plan name, the date, prior request status and claim status. Click on the claim to open the insurance claims details page. Click on Generate prior request, a prior request page appears, and add the necessary details (such as Authorization Type, Disposition Flag, etc). Finally, click the Save Prior Request XML button and then click the Send to eClaimLink button.

Generate prior authorizations
To generate prior authorizations, open the eClaim Management page and select the desired claim. Click on the Generate prior request button, and make the necessary edits. In the Authorization Type, select AUTHORIZATION from the drop-down list and select PRODUCTION from the Disposition Flag list. Finally, click the Save Prior Request XML button and then click the Send to eClaimLink button. Make sure to change the status of the claim to “Pending approval” to keep the doctor in the loop of the process. Once the reply from eClaimLink is back, it will show in the response column in the prior request section and in the prior authorization section. If approved, set the claim to “Approved” status.

Generate new claim XML
Claims are sent to the portal in XML format. This will contain all the necessary information on the claim, insurance details of the patient, treatment performed with the diagnosis and any additional observers to help with the treatment. This claim XML can be downloaded to review the claim details. To do so, navigate to the claim on the eClaim Management page and select the claim. Click on Generate new claim XML, and add the necessary details. Finally, click Save Claim XML. You can download the XML by clicking the link “Download XML file”.

Submit claim
The important part of the claim is finally submitting it to the insurance providers to cover the treatment price. Submissions of claims are performed on the eClaim Management page of the Finance tab. You can submit either a singular claim or a number of claims under the same insurance plan. Tick the claims you want to submit and click the “Select claims to submit to eClaim” button. Choose the Disposition Flag and click Send to E-Claim Link.
Generate invoices to insurance providers
When the claim is submitted to the portal, the payments are due. Create an invoice for the insurance plans to receive the payment of the claim. Select the desired claim from the eClaim Management page. Scroll down to the Invoice section. Click on Generate Invoice. After generation, you can either create a new invoice or download the generated invoice. To download, click on the Download invoice button and the invoice will include the patient details, claim details and the cost of the insurance-covered treatment.