
Insurance claims
View insurance claims
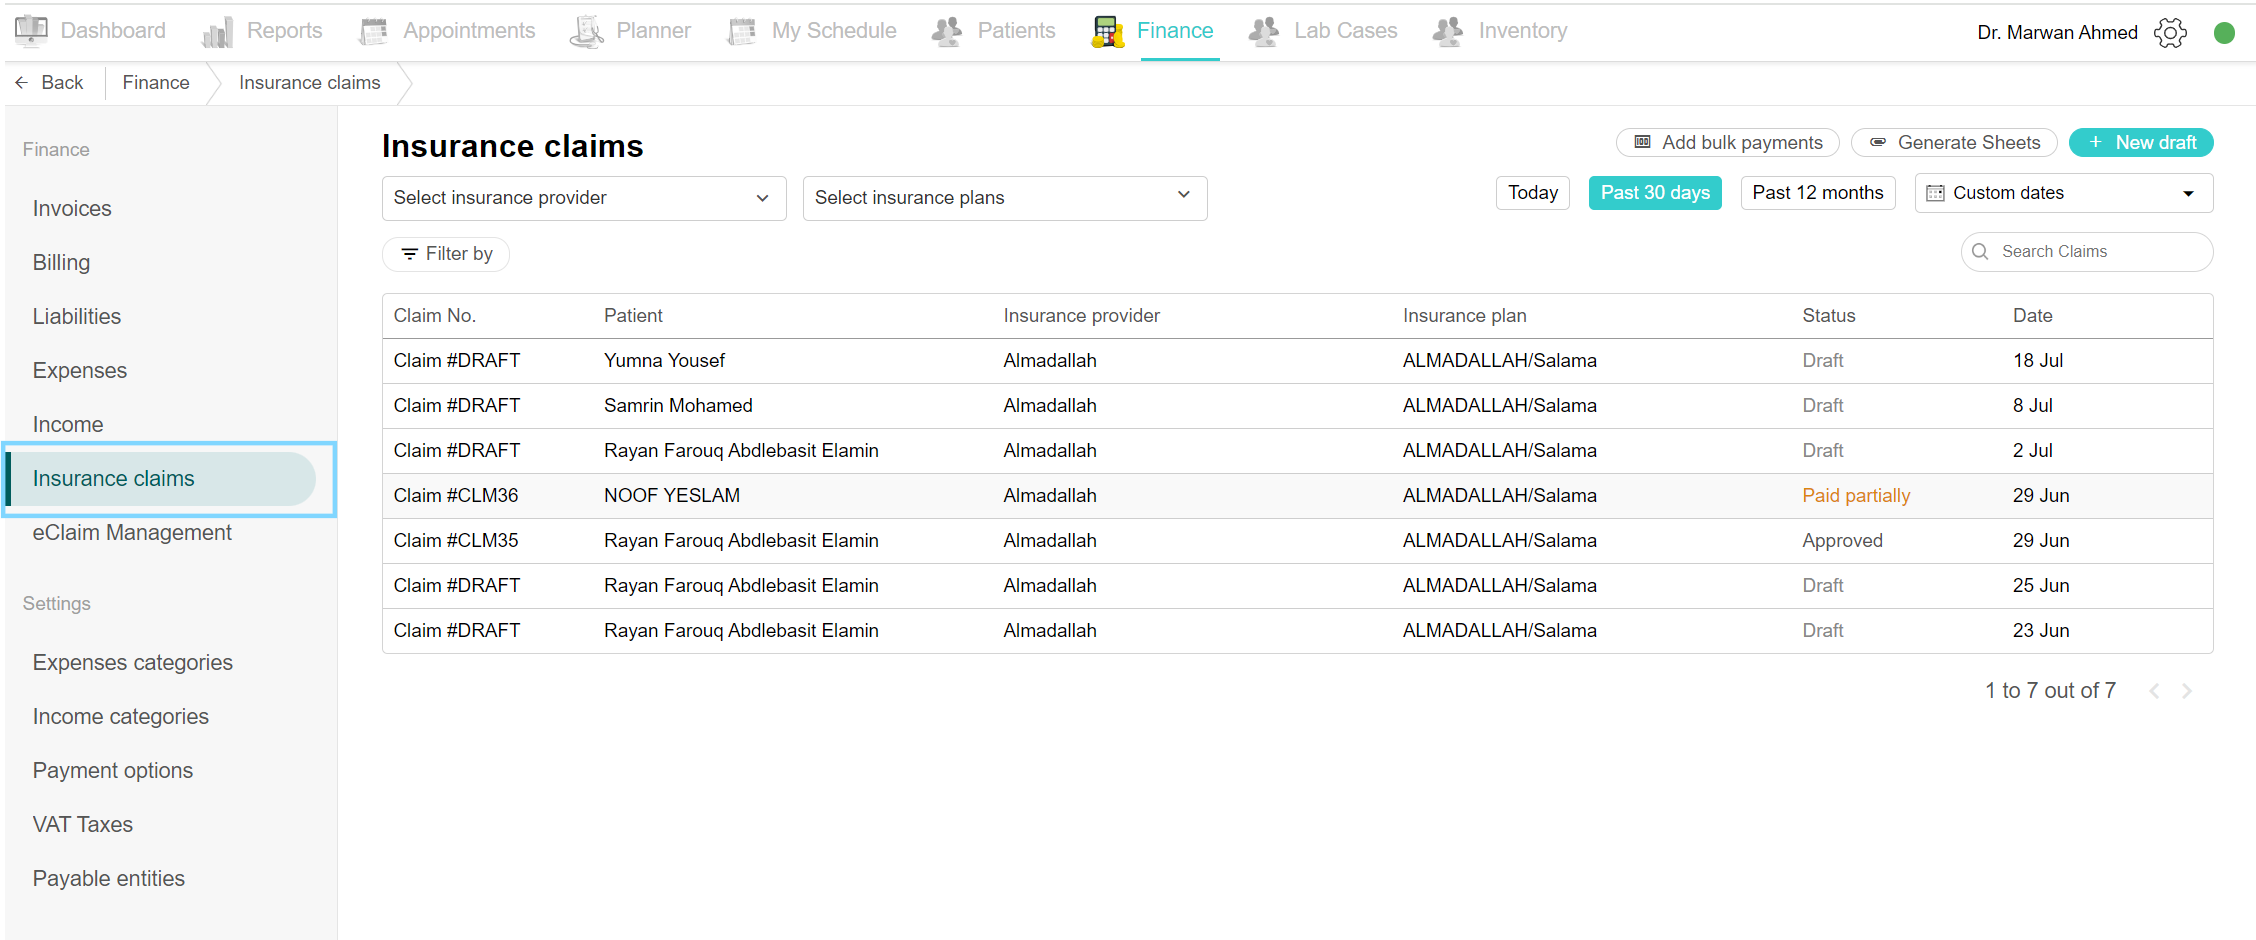
When a treatment being performed on a patient is covered by an insurance company, the clinic has to generate a claim to the insurance provider. To view all insurance claims drafted, generated and submitted, navigate to the Finance tab and click on Insurance claims. A list of all insurance claims is shown. Click on a claim to edit, update or submit.
Automatic Claim Generation after Adding Treatments
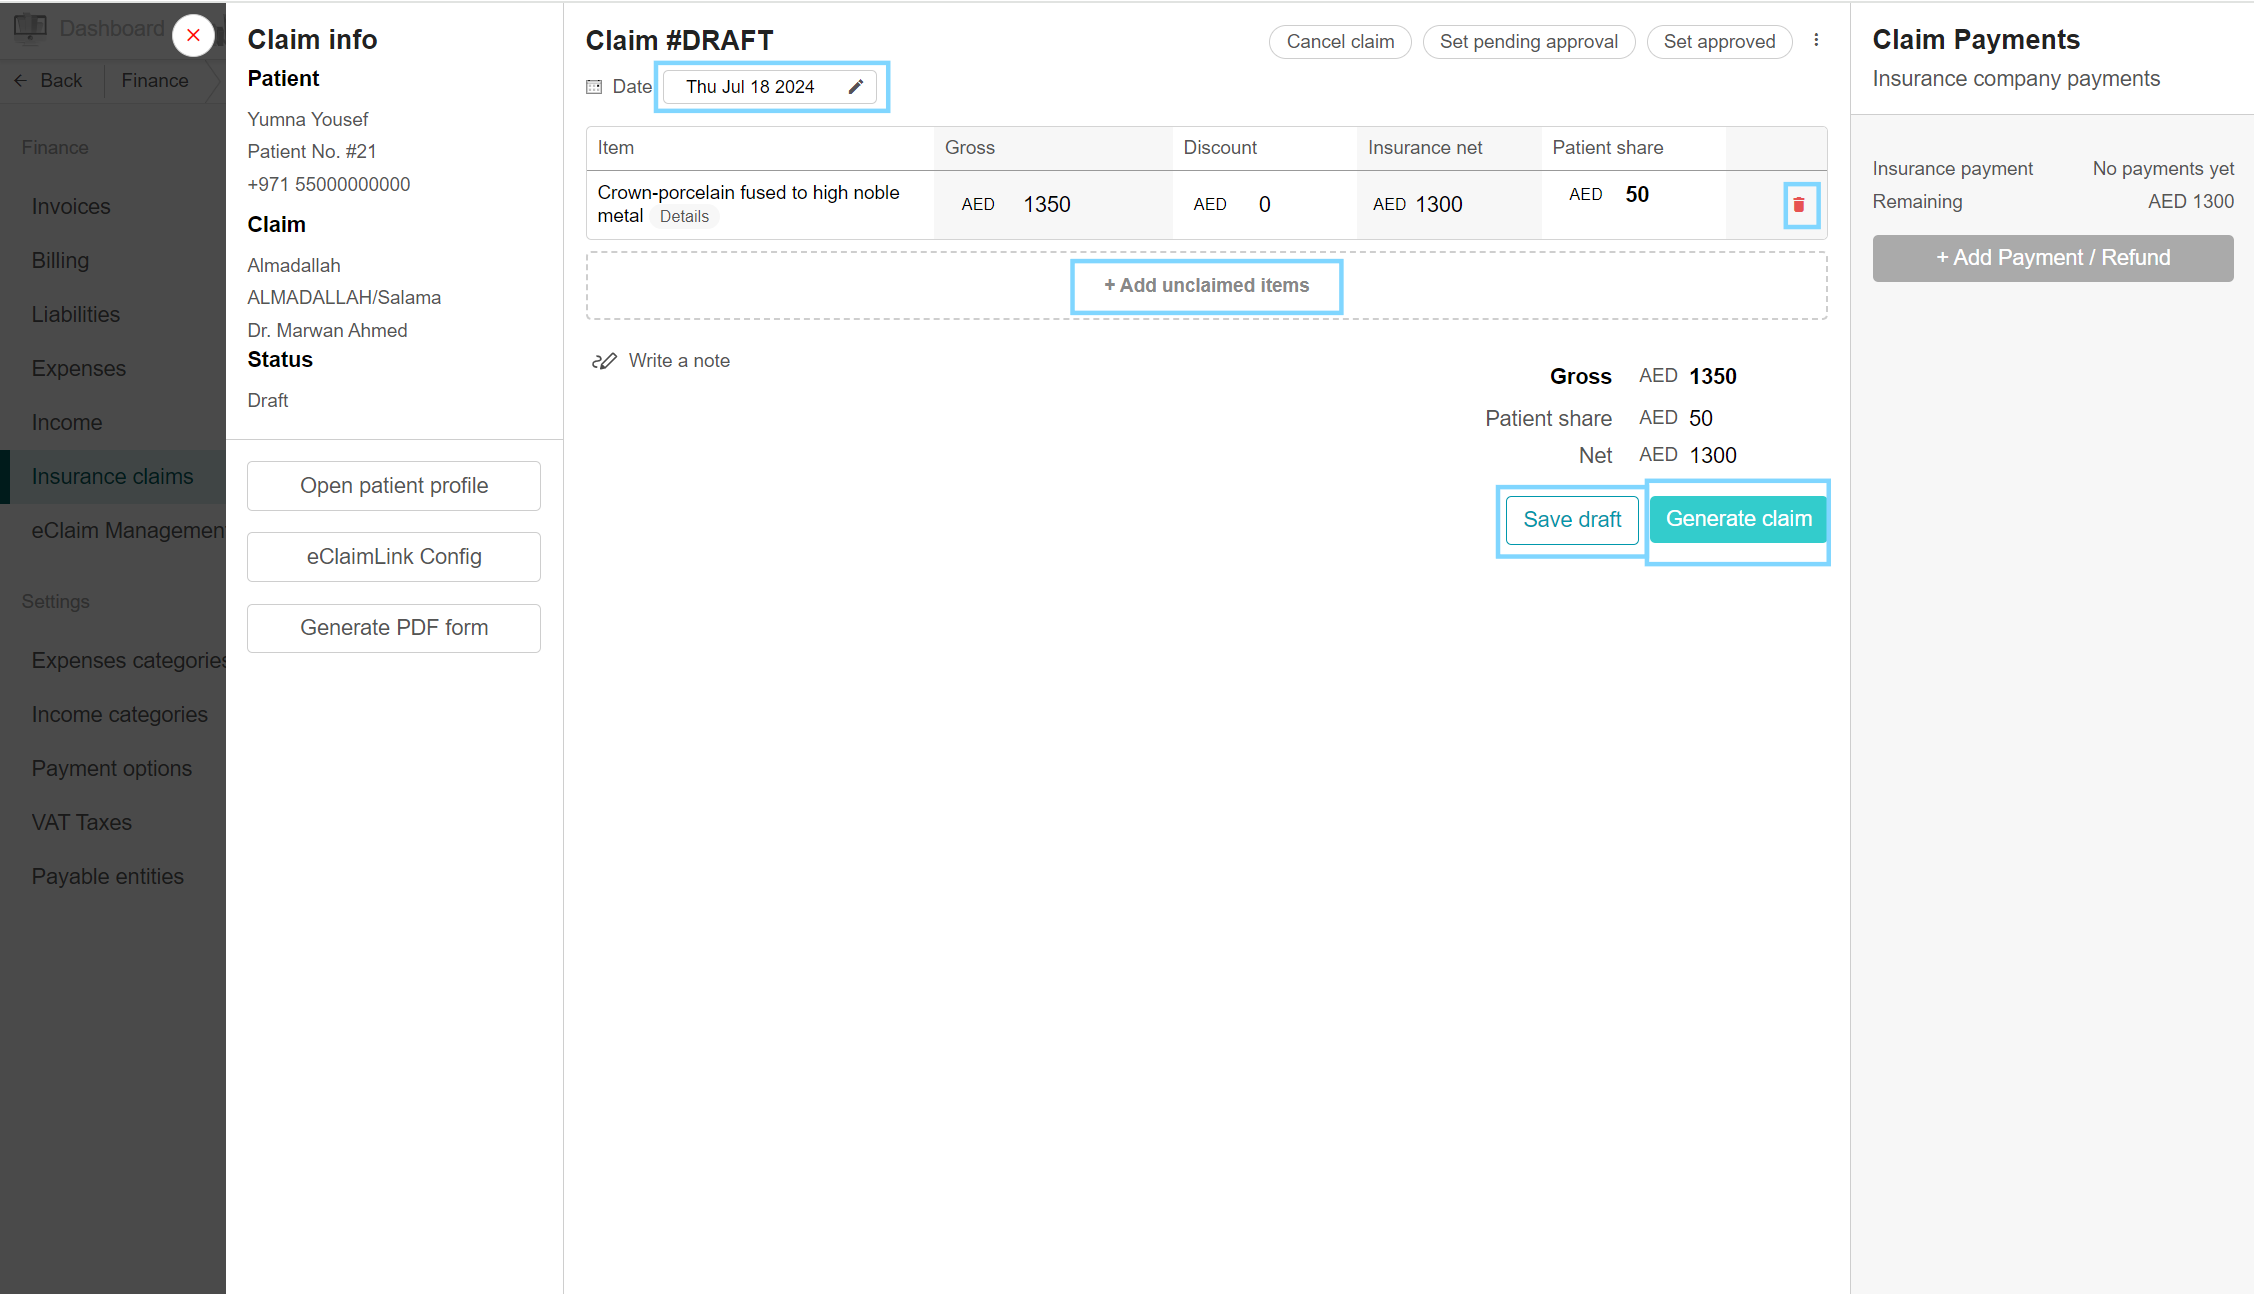
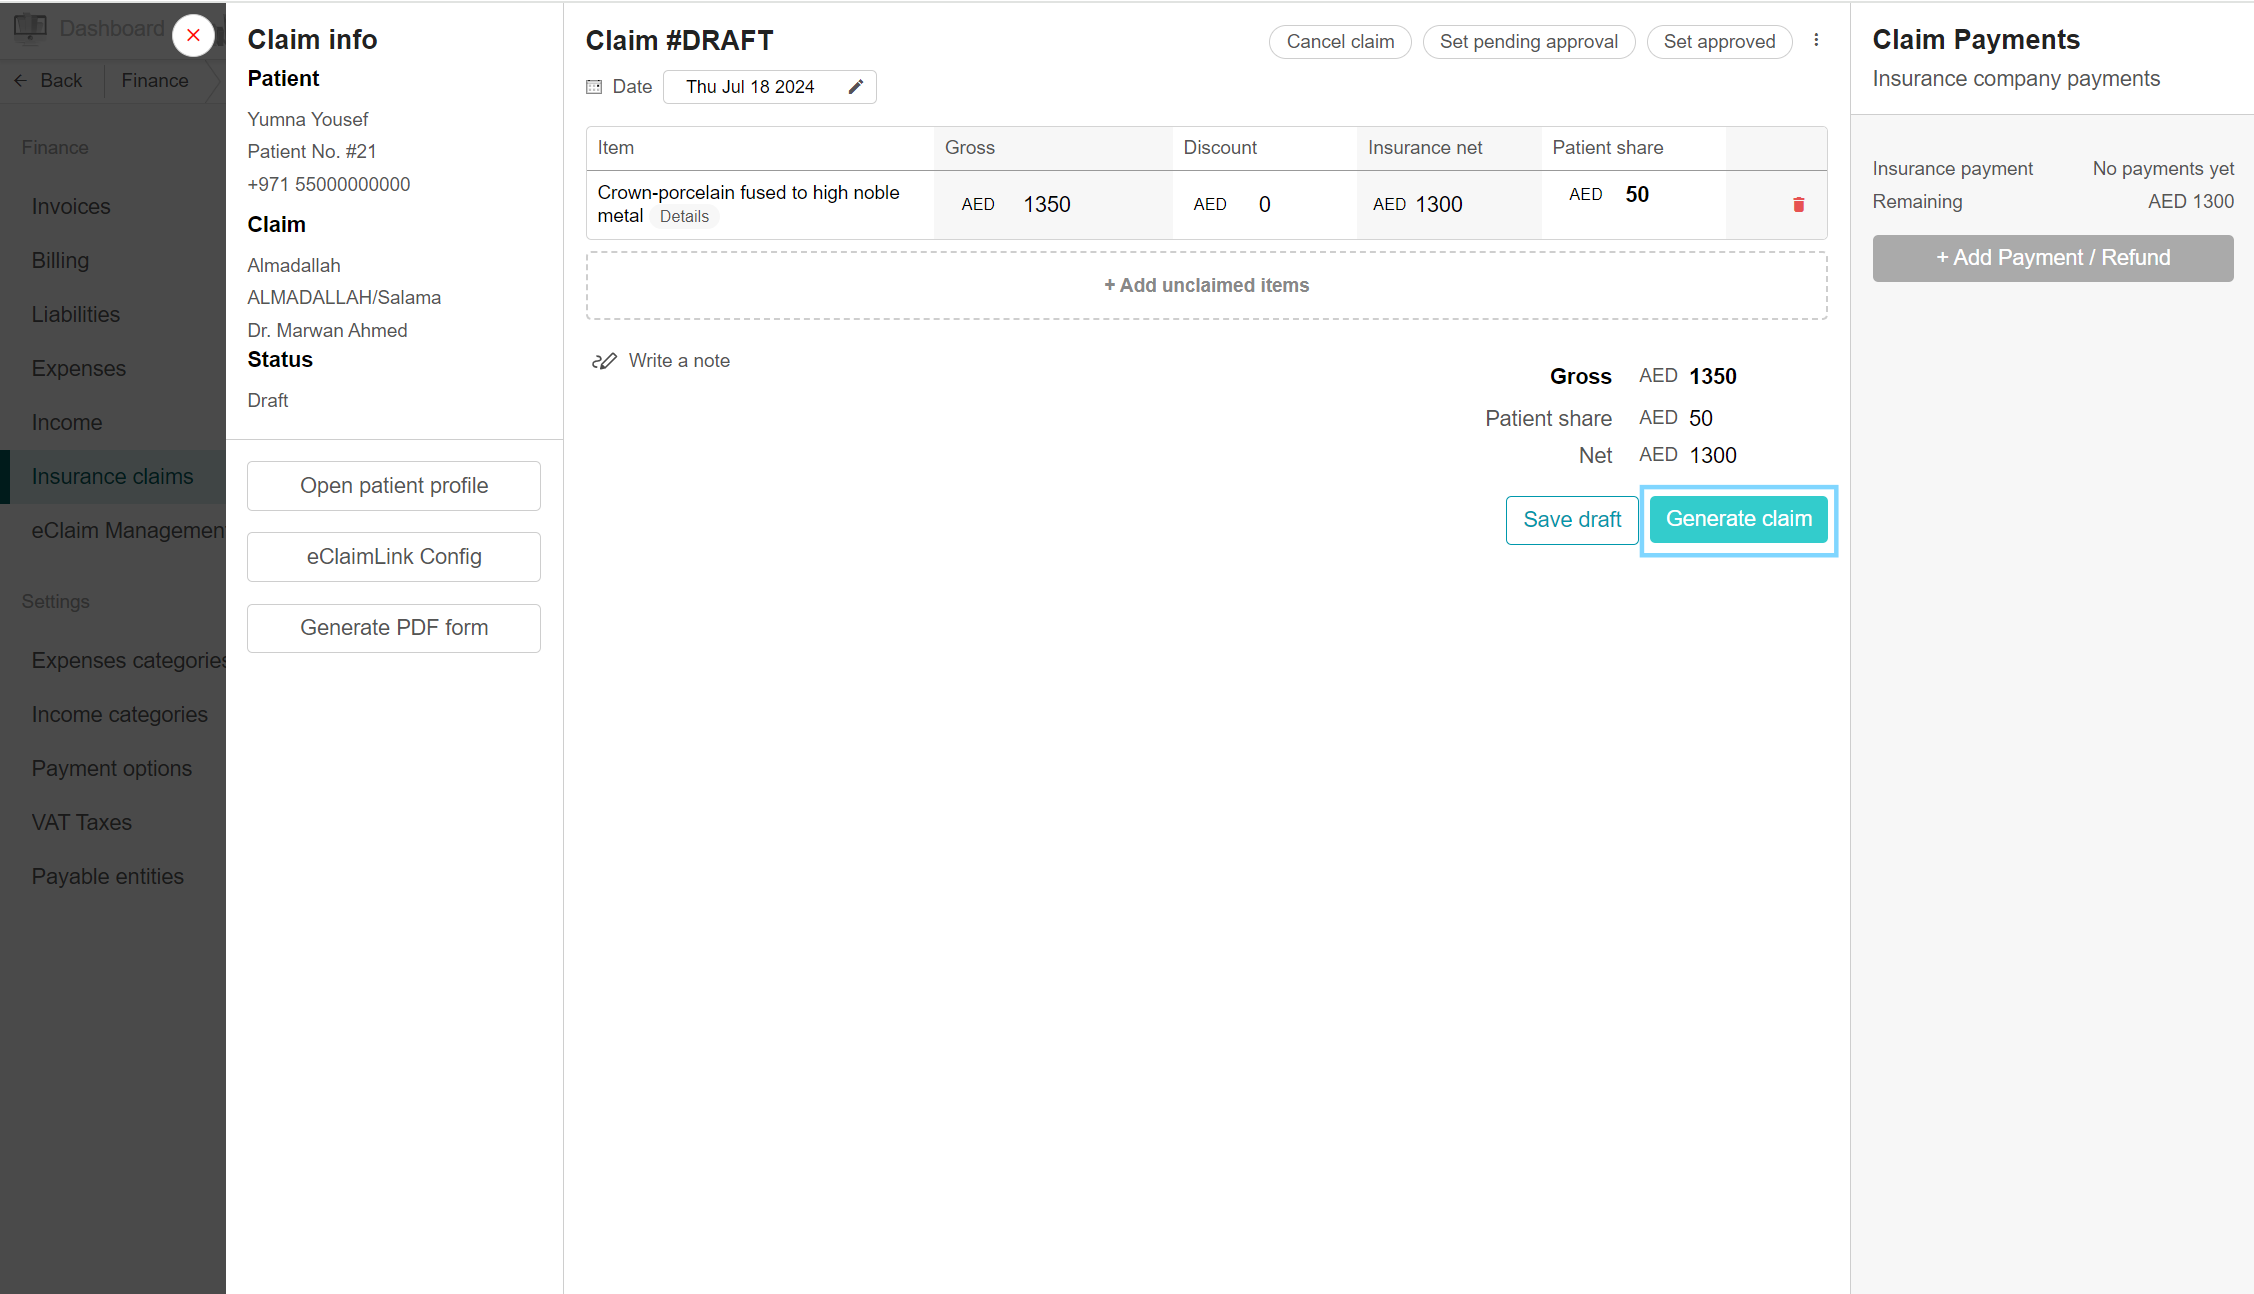
The doctor adds the patient's treatments, insured by the insurance company. After adding them, the claim is automatically generated and found in the Insurance Claims section under the Finance menu. Select the desired claim, and you will notice its status is "Draft". Treatments are listed under Items, showing insurance net and patient share. Click "Add unclaimed items" to include any missing treatments. Choose status changes. Finally, click "Generate claim", and now the claim is generated with the status visible to the doctor.
Filtering Claim Status
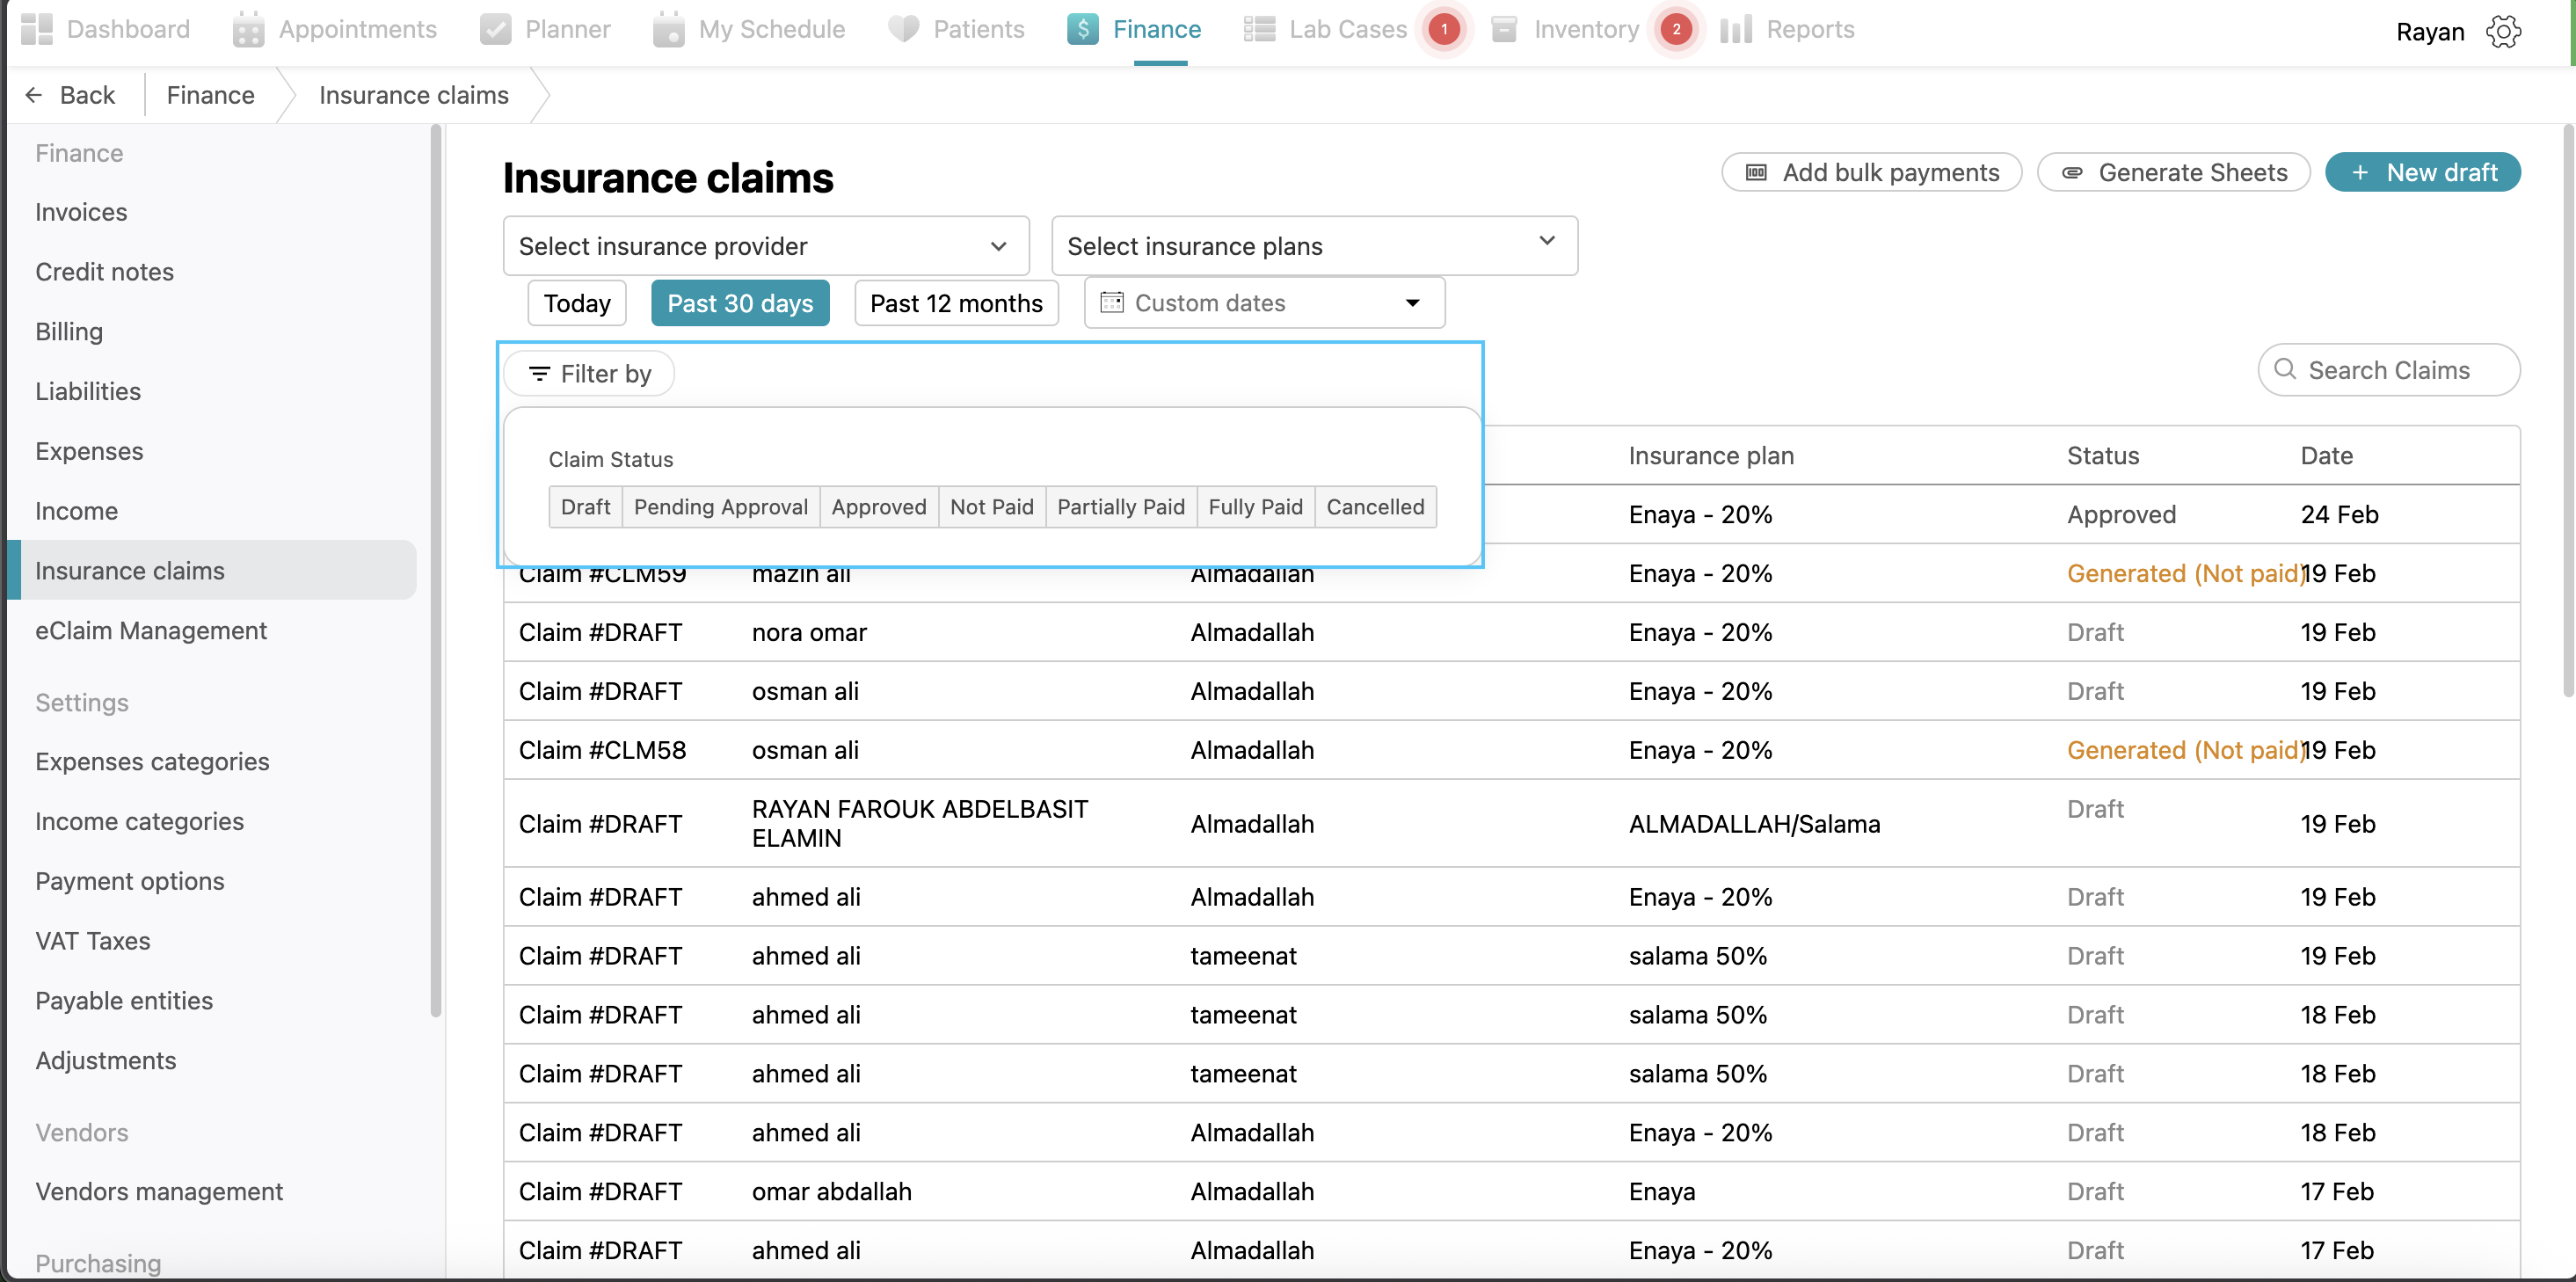
1. Draft: The claim is in progress but has not been submitted or finalized yet. It's still being worked on or prepared.
2. Cancelled: The claim has been terminated or withdrawn before a decision was made.
3. Pending Approval: The claim has been submitted and is awaiting a decision from the insurance company or relevant authority.
4. Approved: The claim has been reviewed and accepted by the insurance company. Compensation or benefits will be provided according to the policy terms.
5. Not Paid: The claim has not been paid by the insurance company yet
6. Paid Partially: You didn’t receive your full amount and the claim has been paid partially by the insurance company
7. Fully Paid: You received all your money and the claim has been paid fully by the insurance company
Filter by Insurance providers and plans
View Claims by Custom Dates
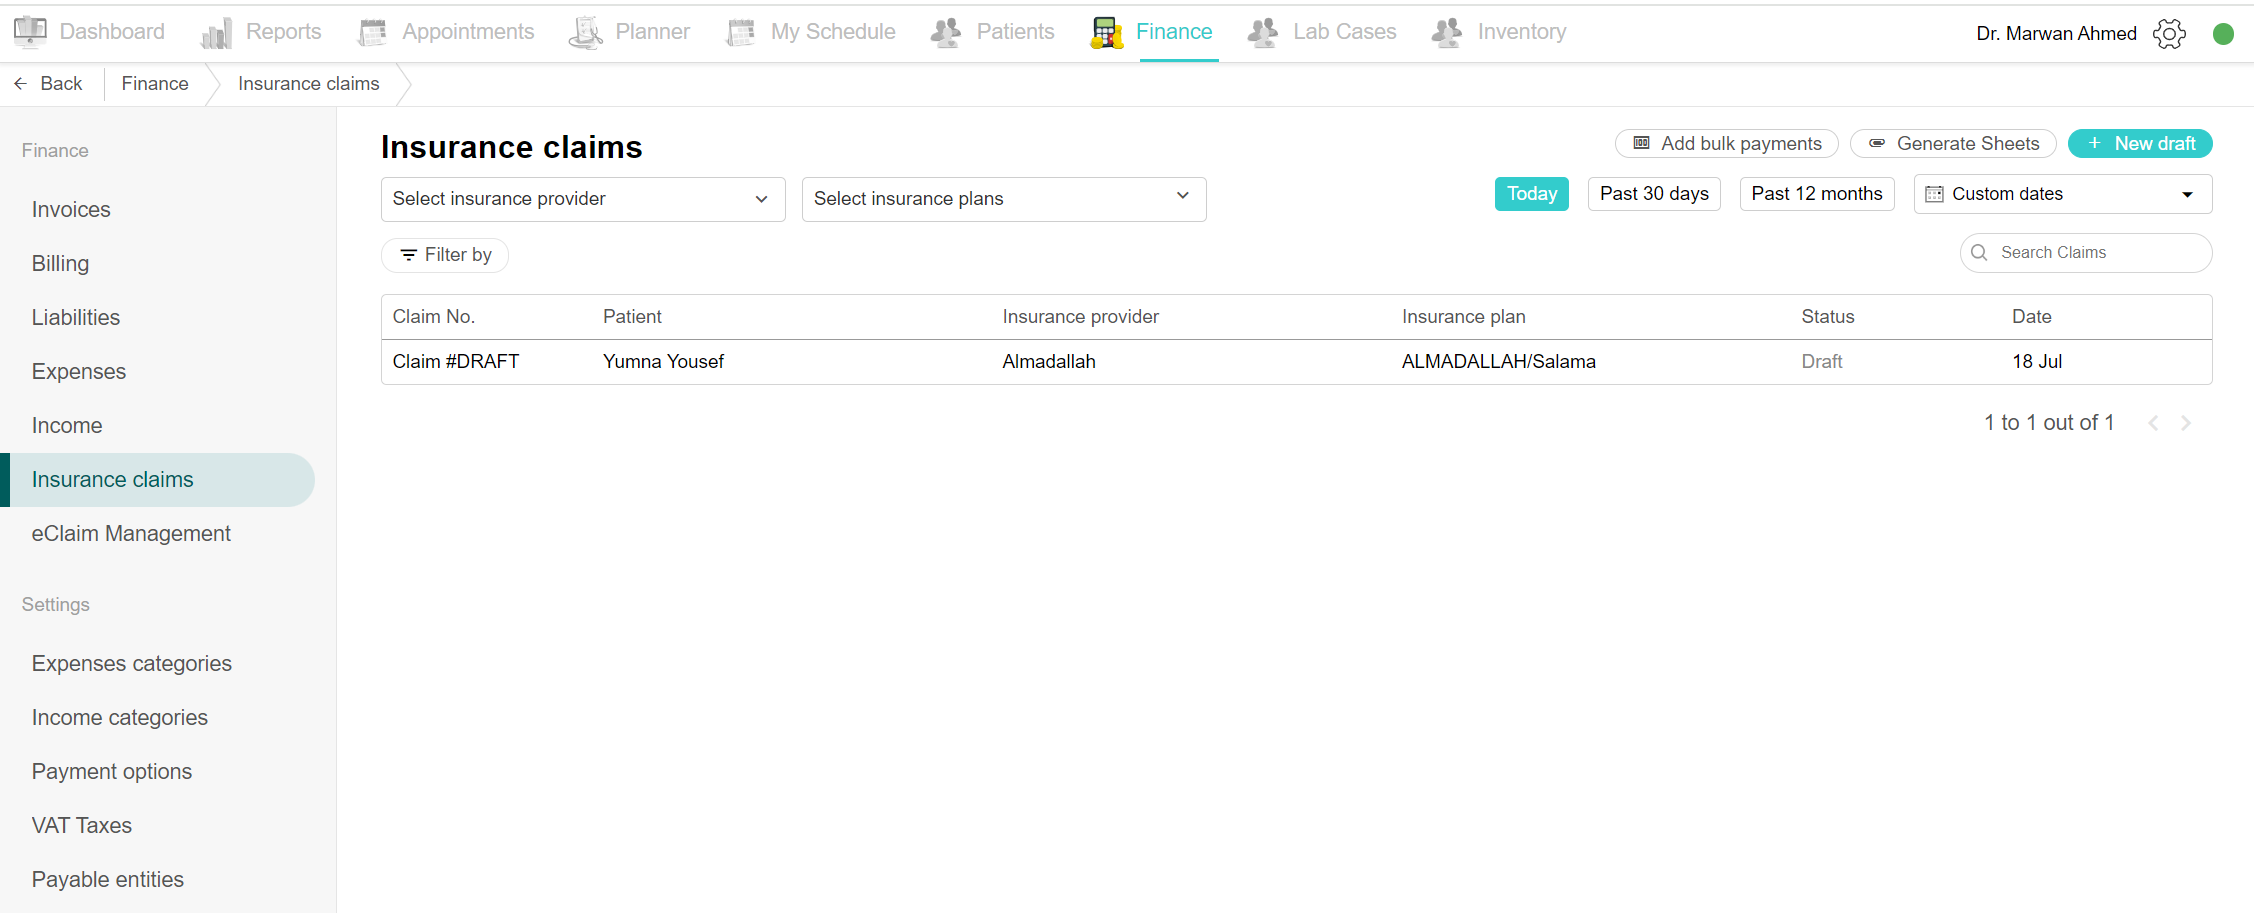
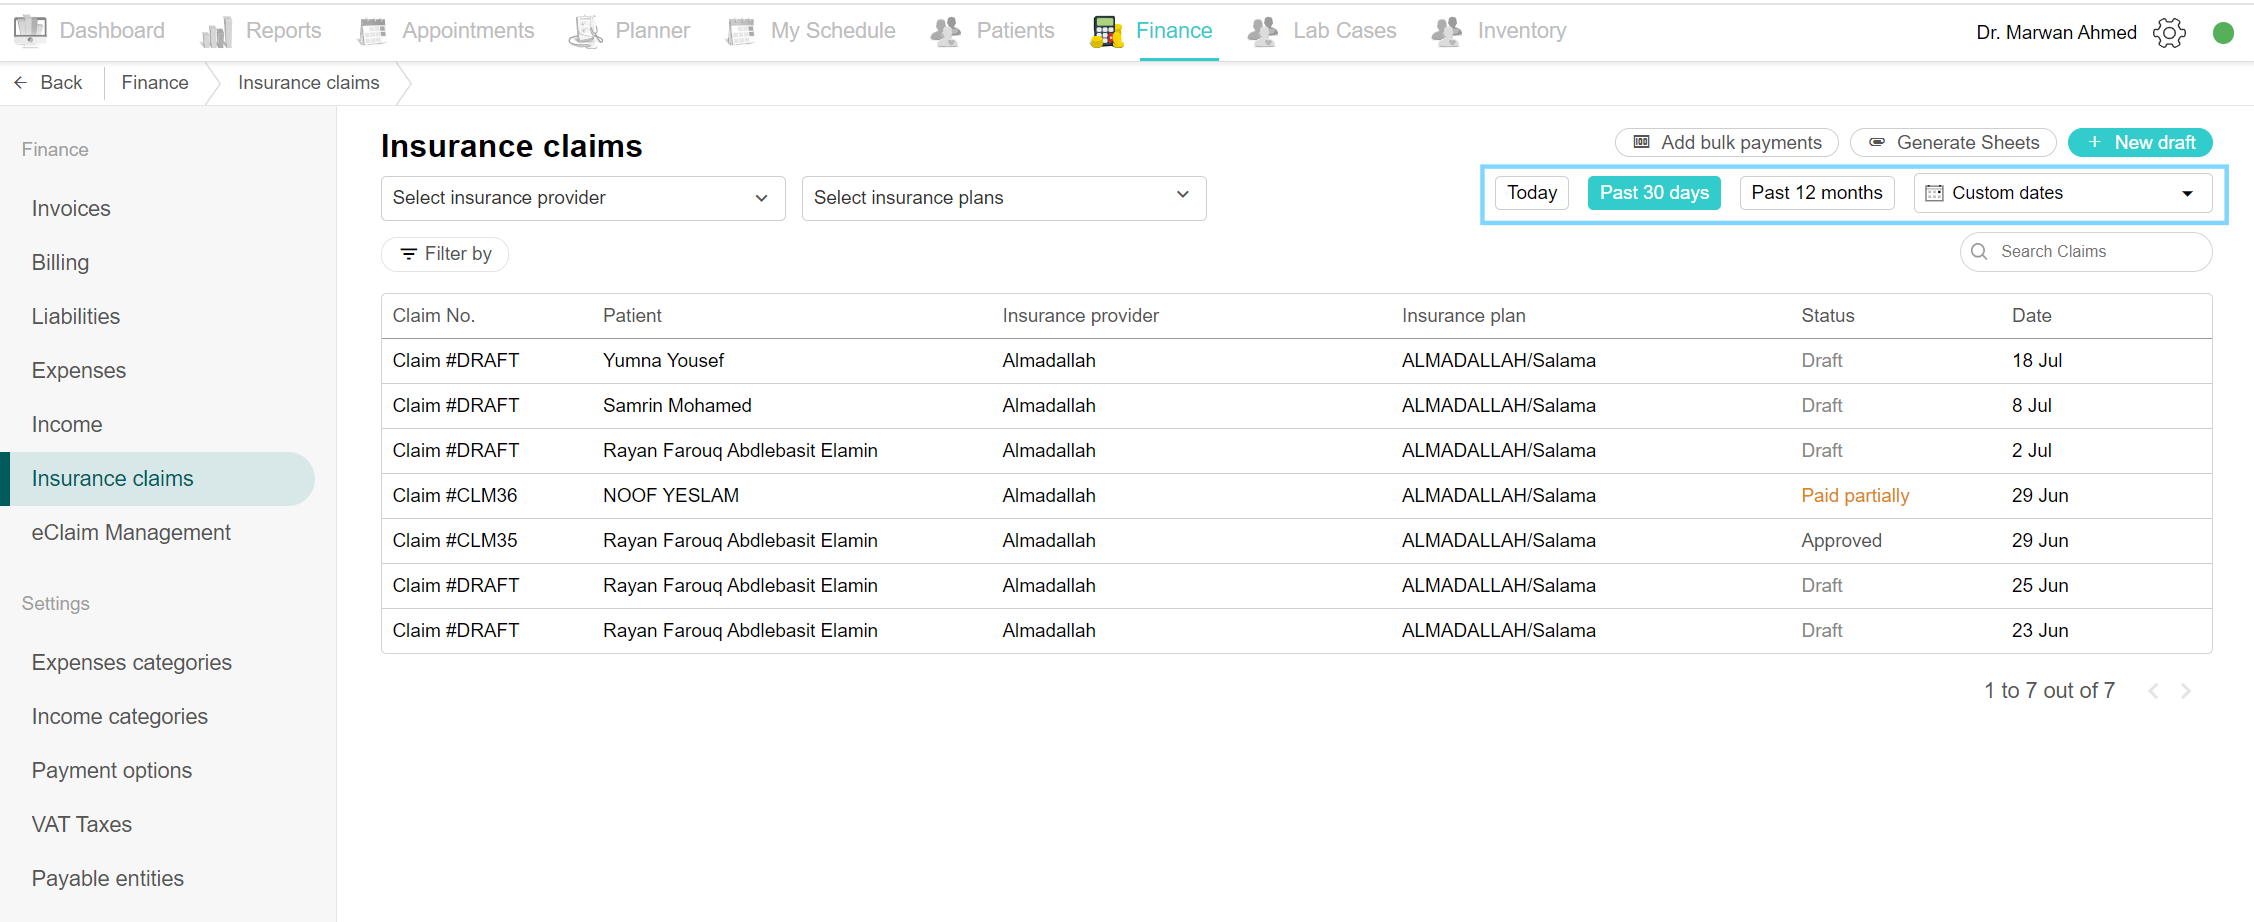
Open Insurance Claims from the Finance side menu. By default, today's claims are visible. You can view claims by selecting filters like "Past 30 days", or "Past 12 months", or by choosing custom dates. Click on "Custom Dates", select the desired period, and view the claims during that period.
Adding a New Claim Draft
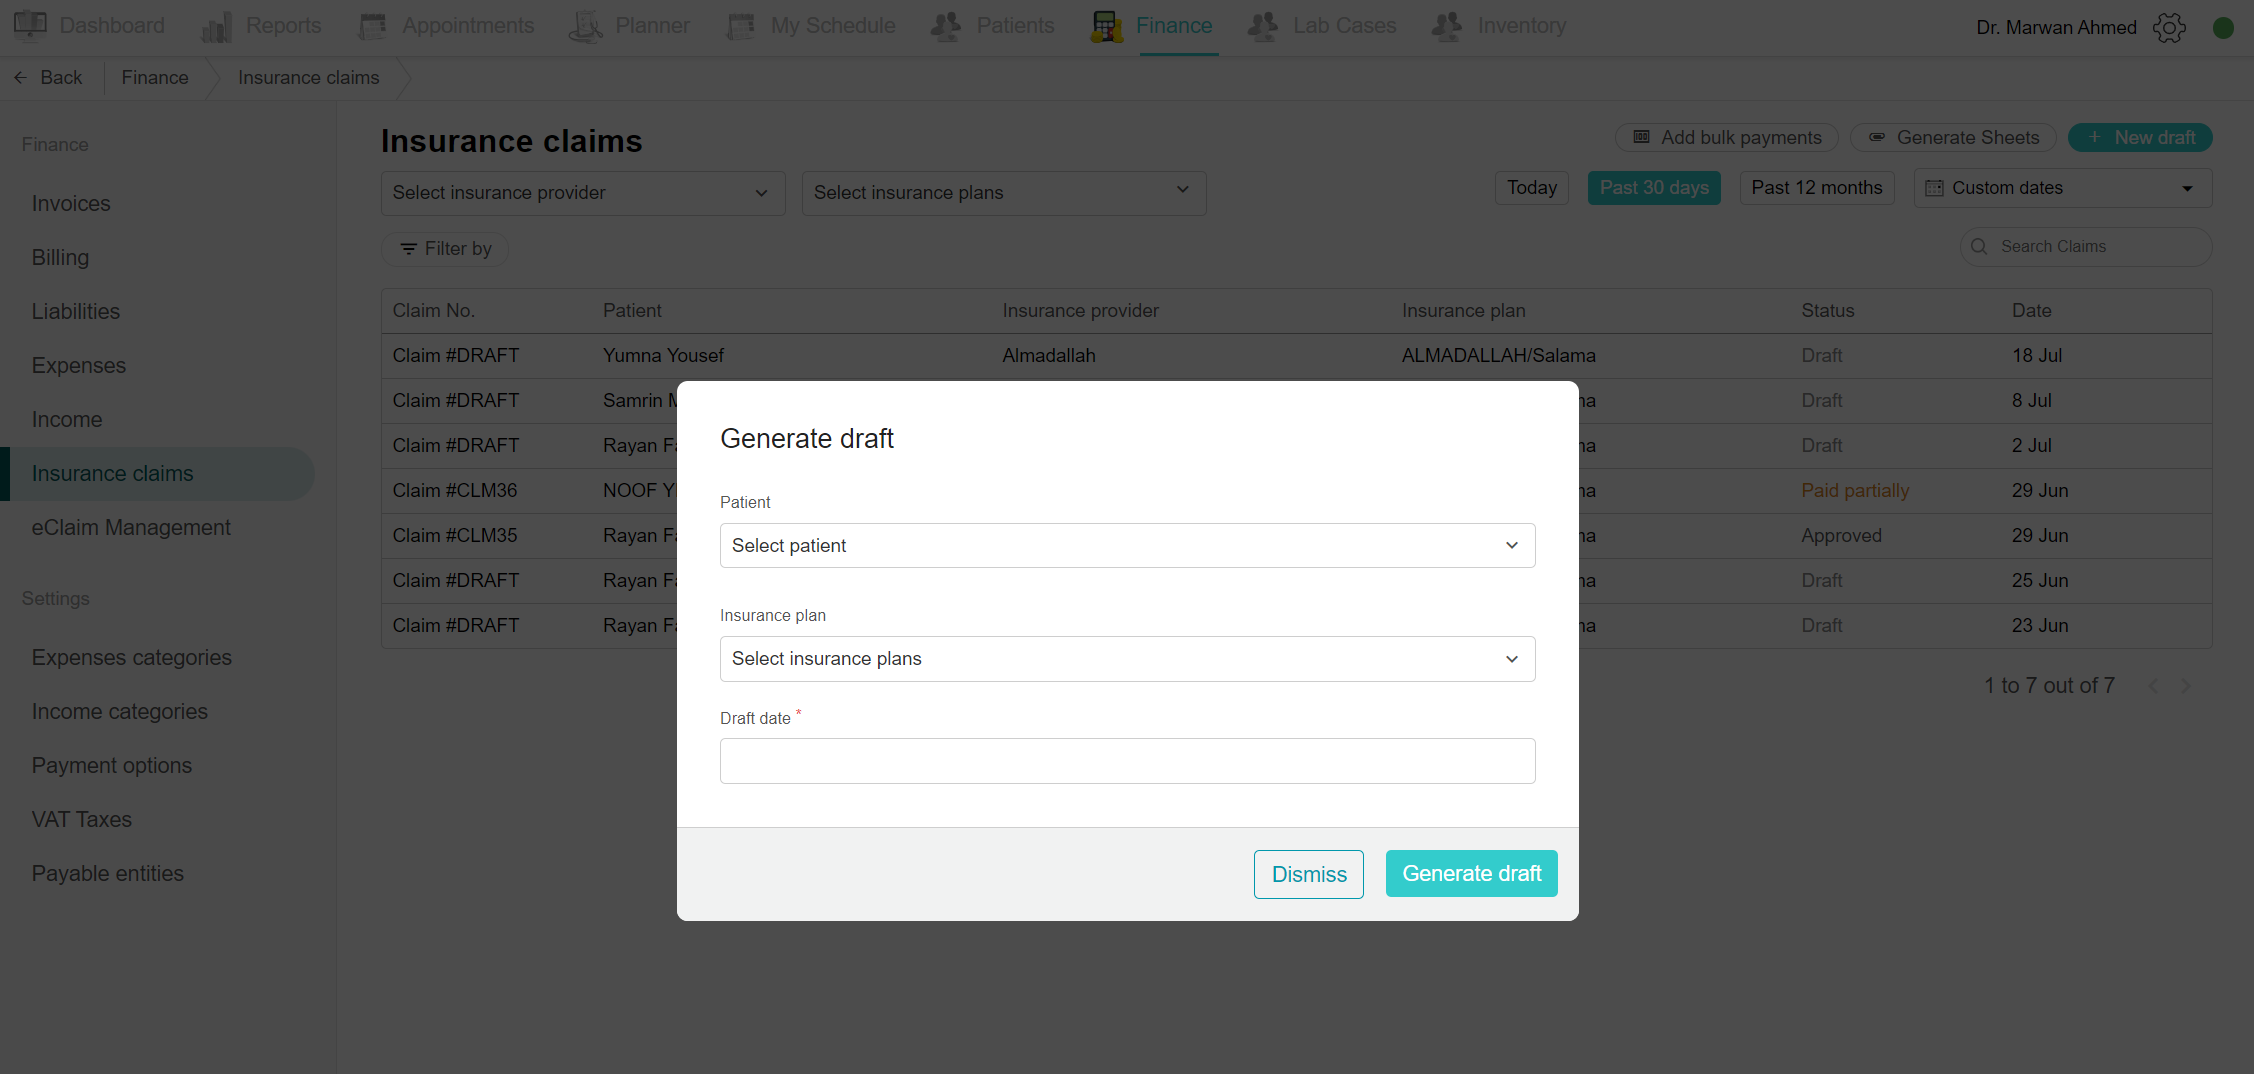
Go to Finance and select Insurance Claims from the side menu. Click "New Draft" to initiate a new claim draft. Search and select the patient's name, insurance plan, and draft date, then click the generate button. Click "Add unclaimed items" to include items in the claim, displaying covered fees, insurance net (amount to be paid by insurance), and patient share (amount to be paid by the patient). Finally, save the draft.
Search for a Claim
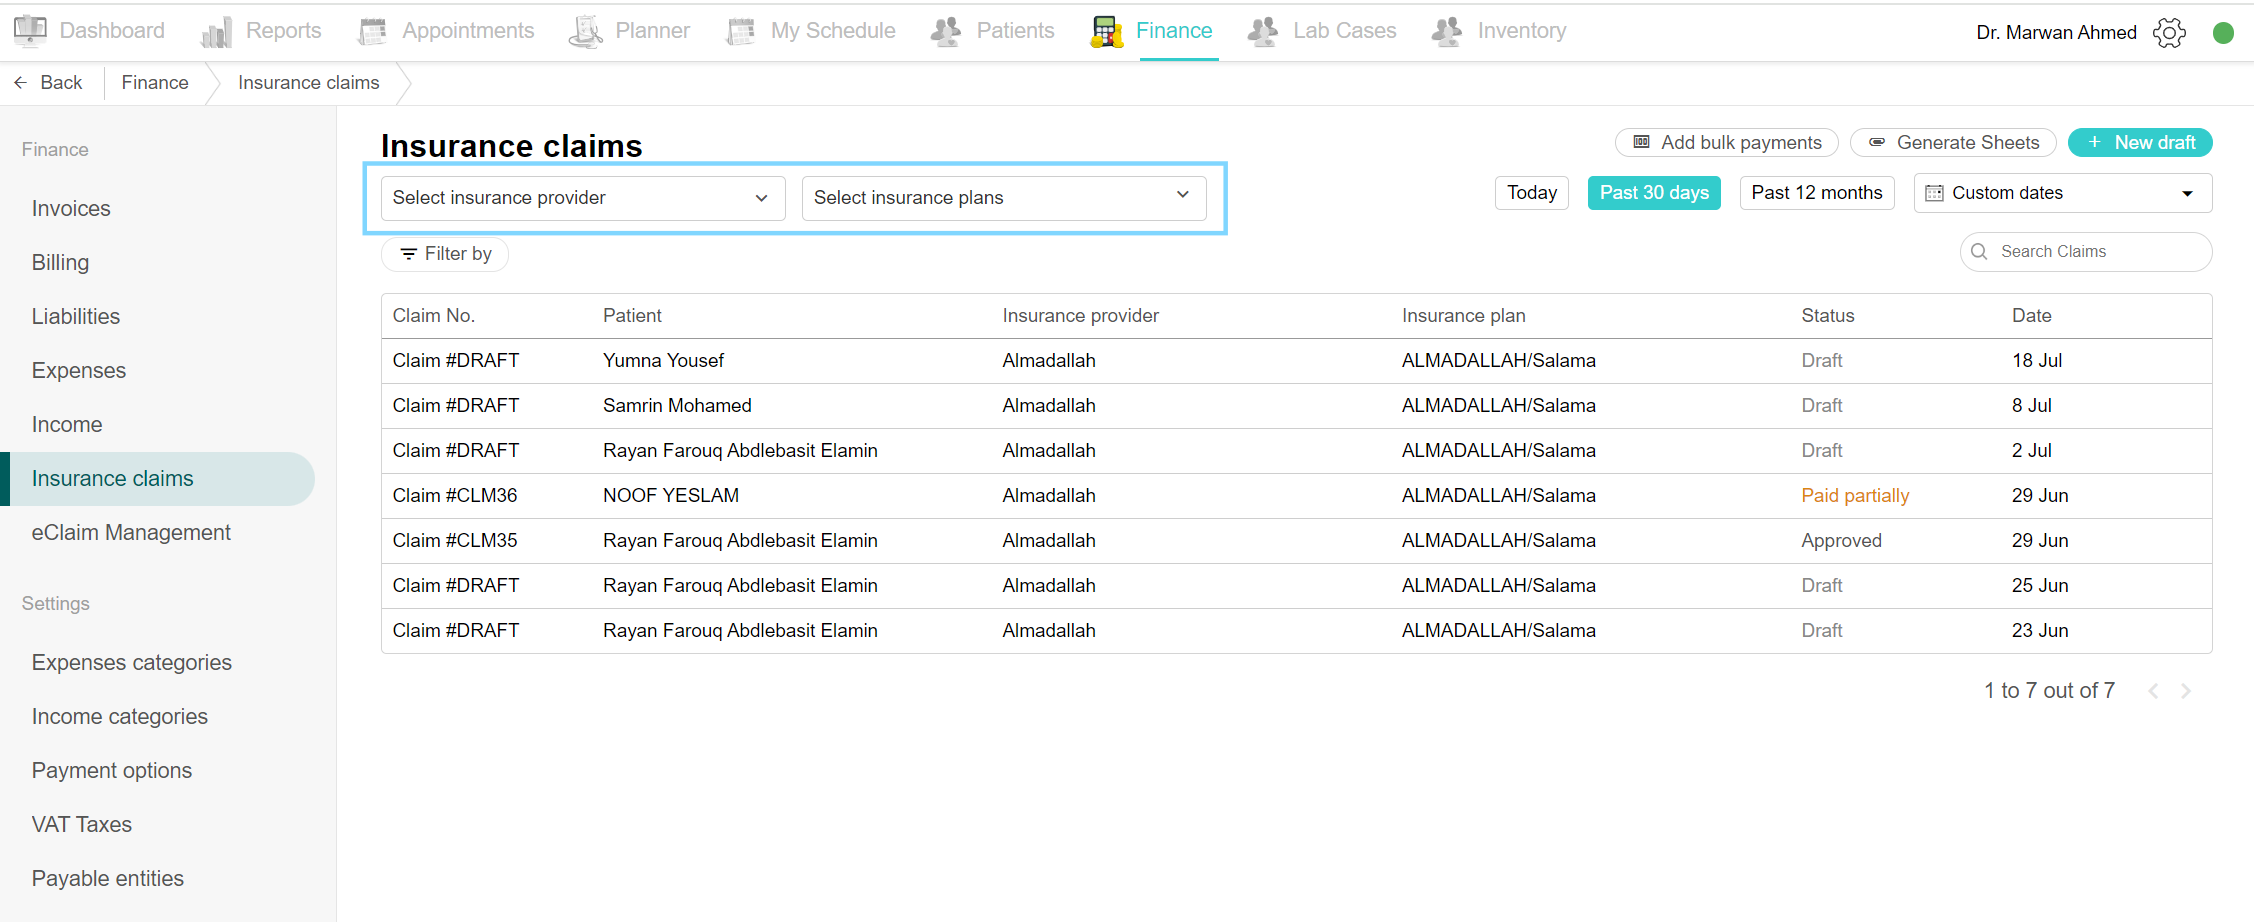
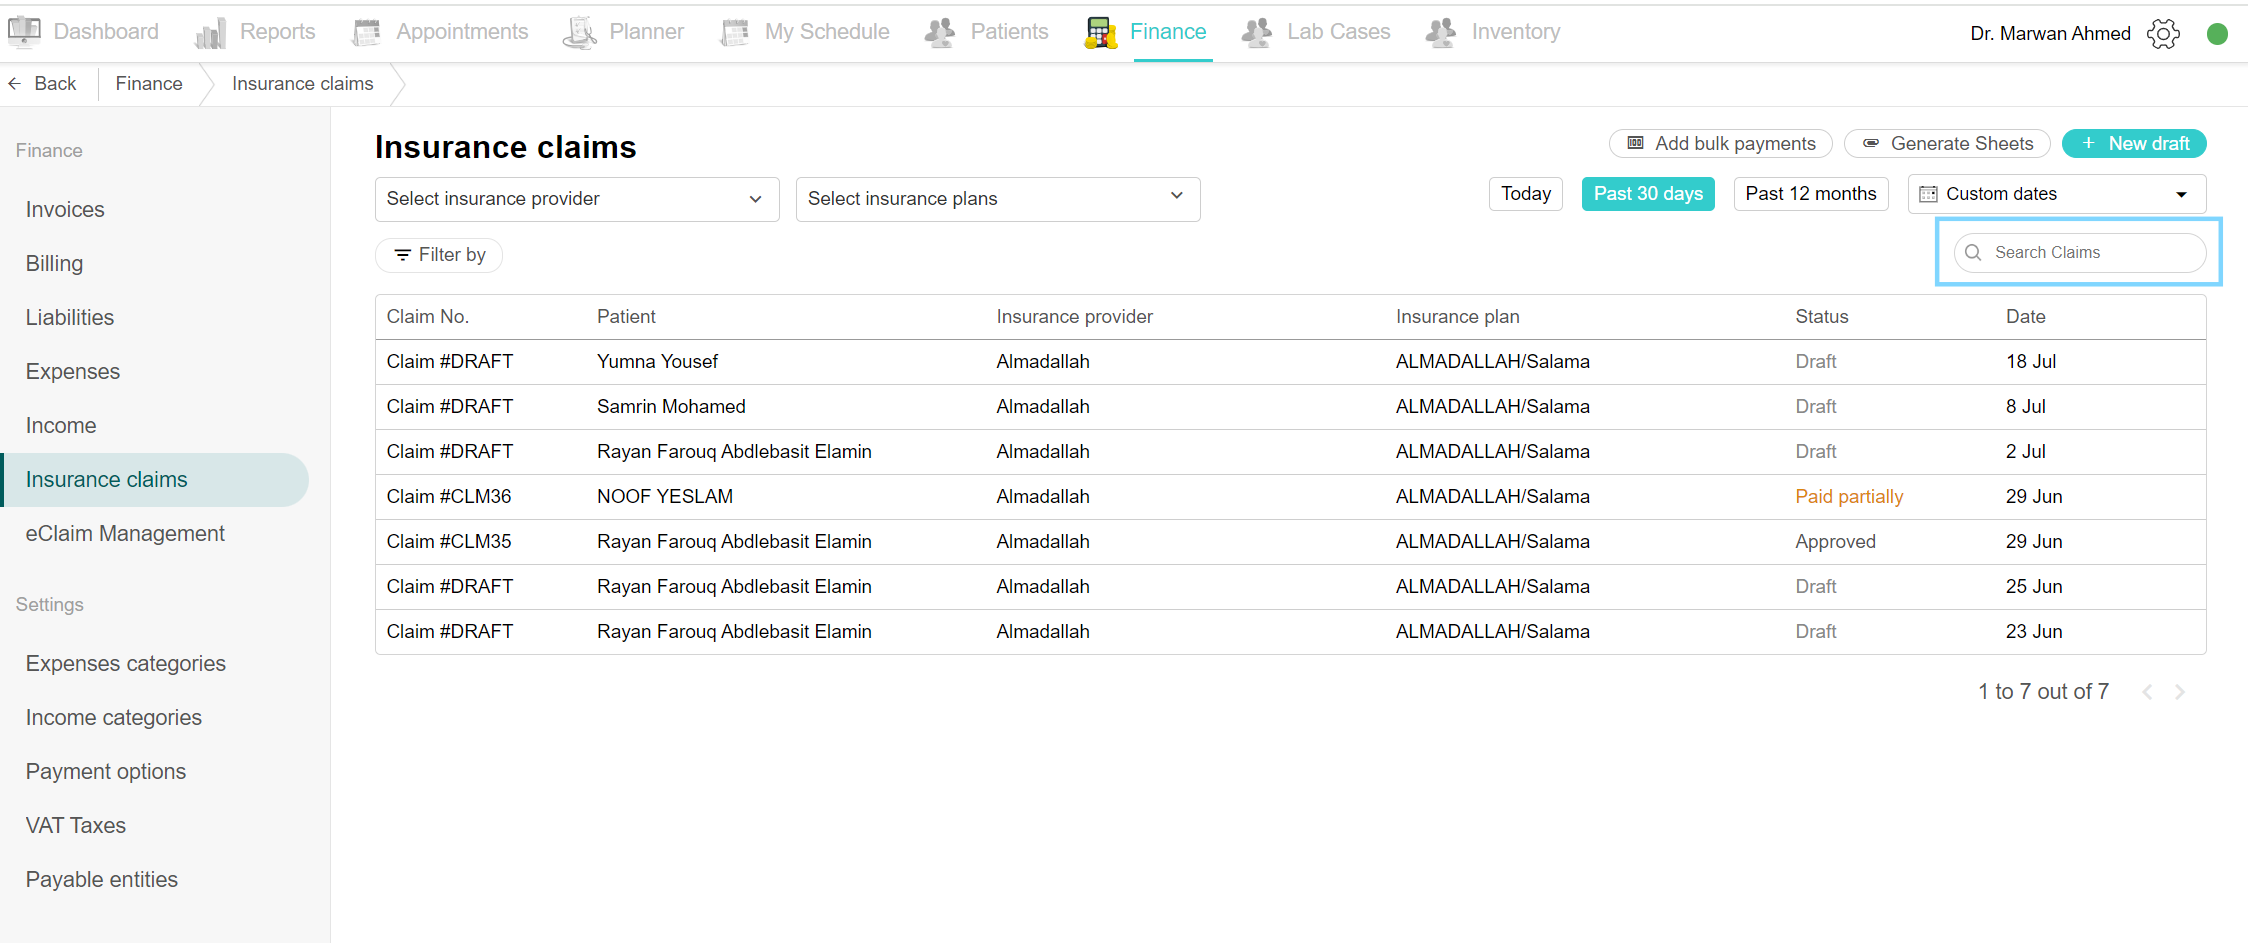
Open Insurance Claims from the Finance side menu. You can search for claims by selecting the insurance provider and insurance plans. Type the claim number or patient's name in the search bar to locate the desired claim.
Edit Patient Claim
Open Insurance Claims from the Finance side menu. Select the desired claim to edit. When the claim is in draft status, you can edit the date, add unclaimed items, or delete items using the icon on the right-hand side. Click "Save Draft". Once the claim is generated, an "Edit Claim" button appears at the top. Make necessary changes and click the "Save Draft" and "Generate Claim" buttons.
Note: Pricing cannot be edited from the claim, only from the invoice with the same items.
Generate Claim
Generating a claim is crucial before sending it to the insurance provider portal. Open the claim, verify the claim info, and click "Generate Claim". The claim status changes to "Generated". Click "Edit Claim" to modify a generated claim. Now, the claim is ready to be sent to the portal.
Open Patient Profile from Claim
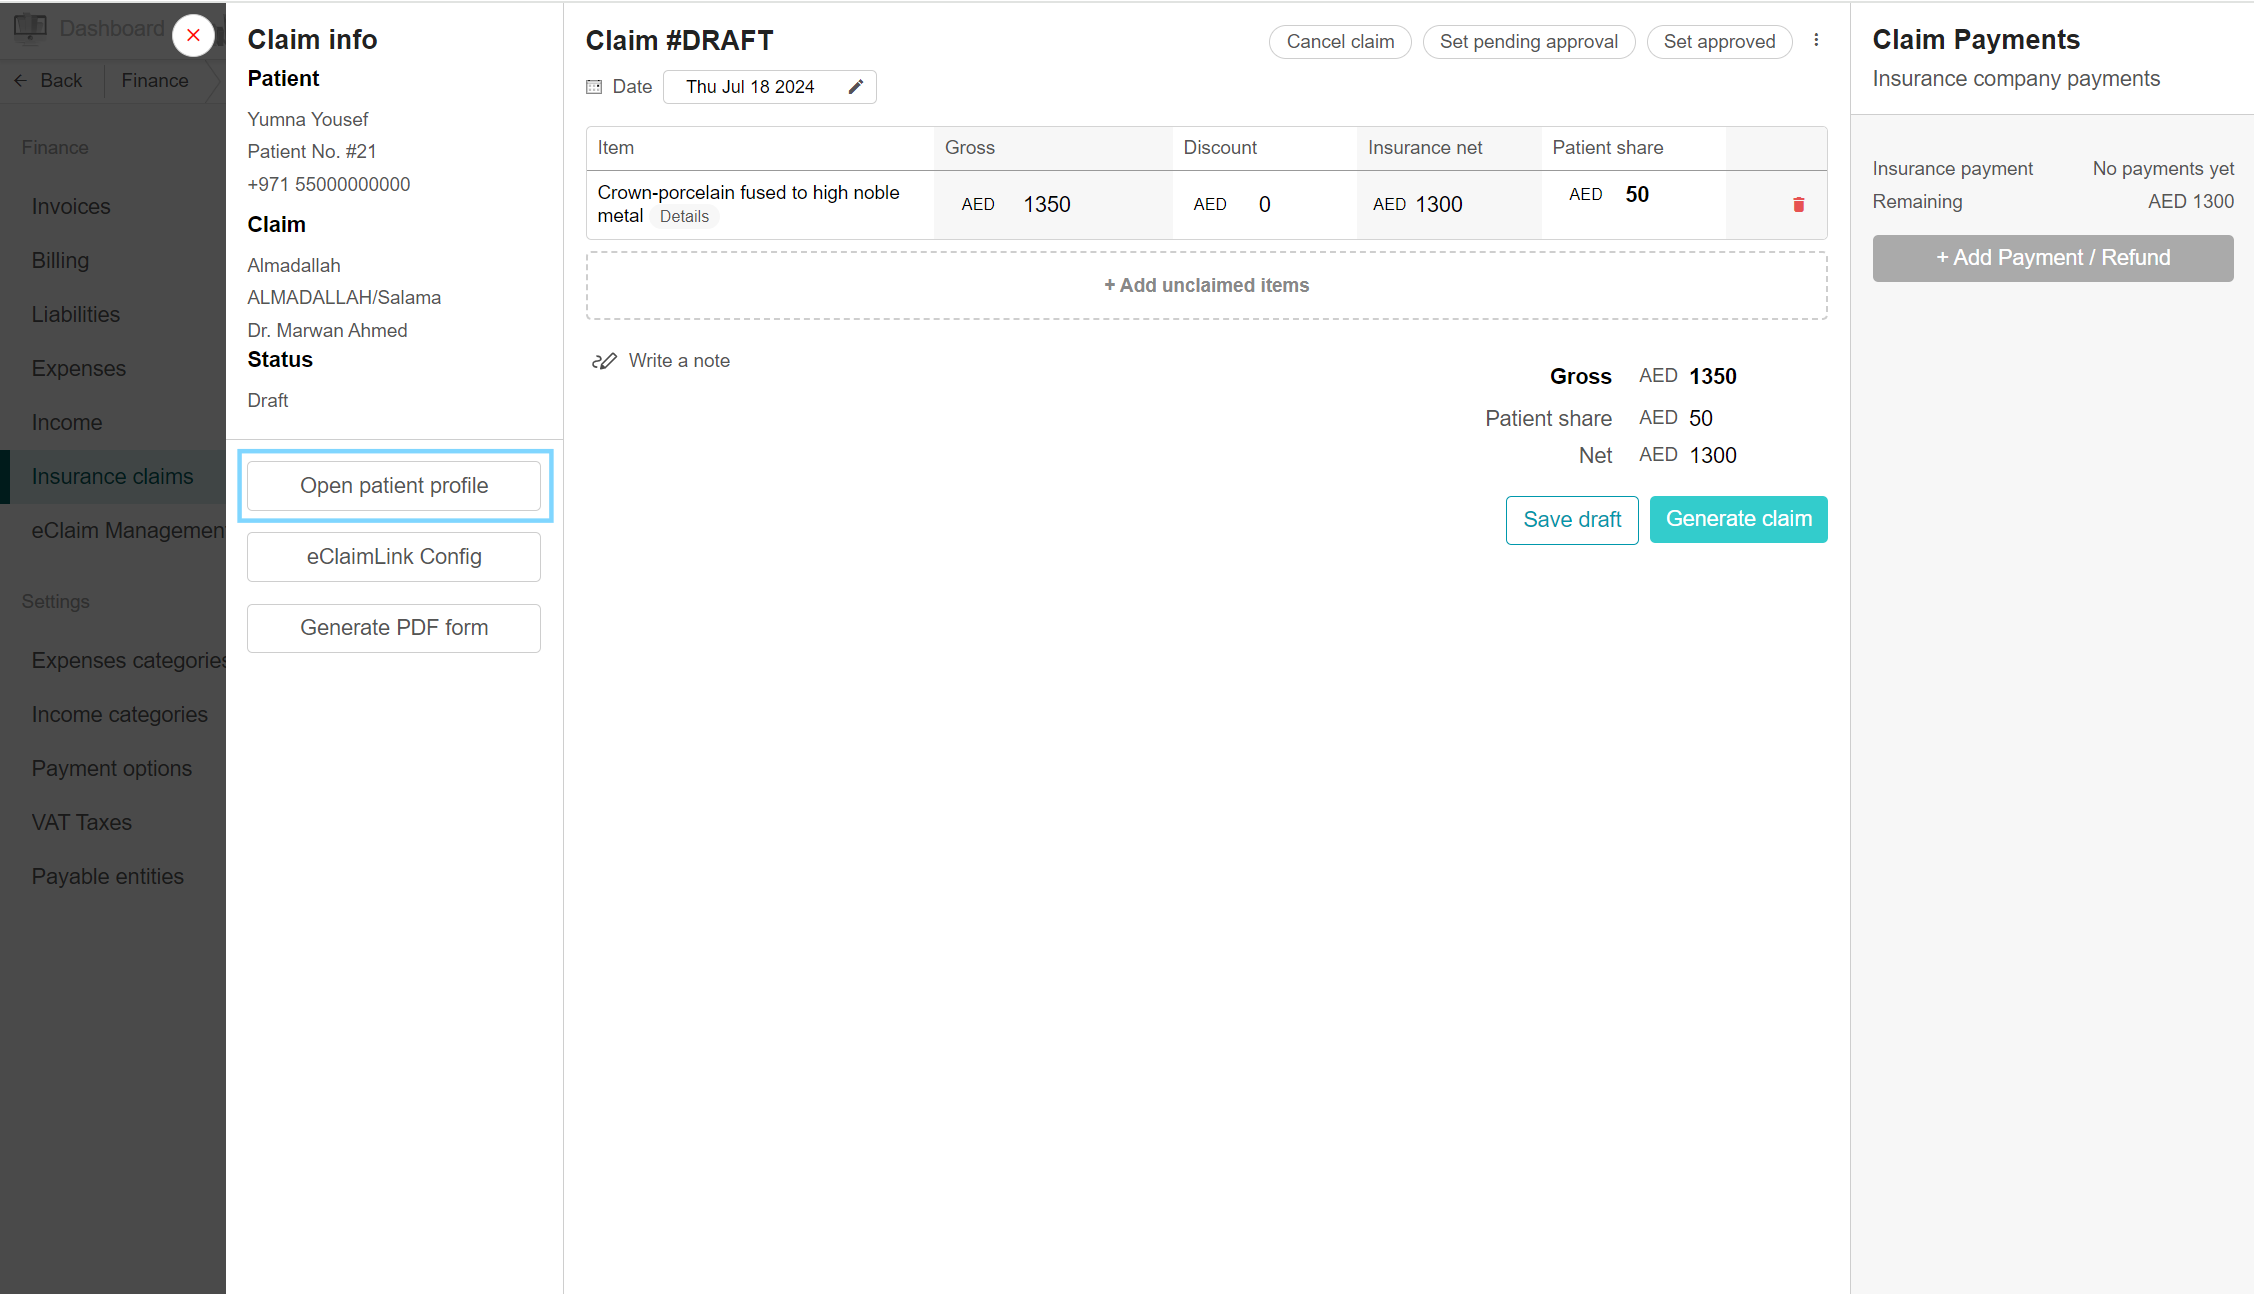
While editing or updating a claim, you can quickly access the patient's profile. Select the desired claim from the claims list. On the left side, under Claim Info, click "Open Patient Profile" to view basic information, recent bills, clinical notes, and treatments. After viewing, click on the Insurance Claims tab to return easily.
Setting Pending Approval, Approved, and Generated Claims
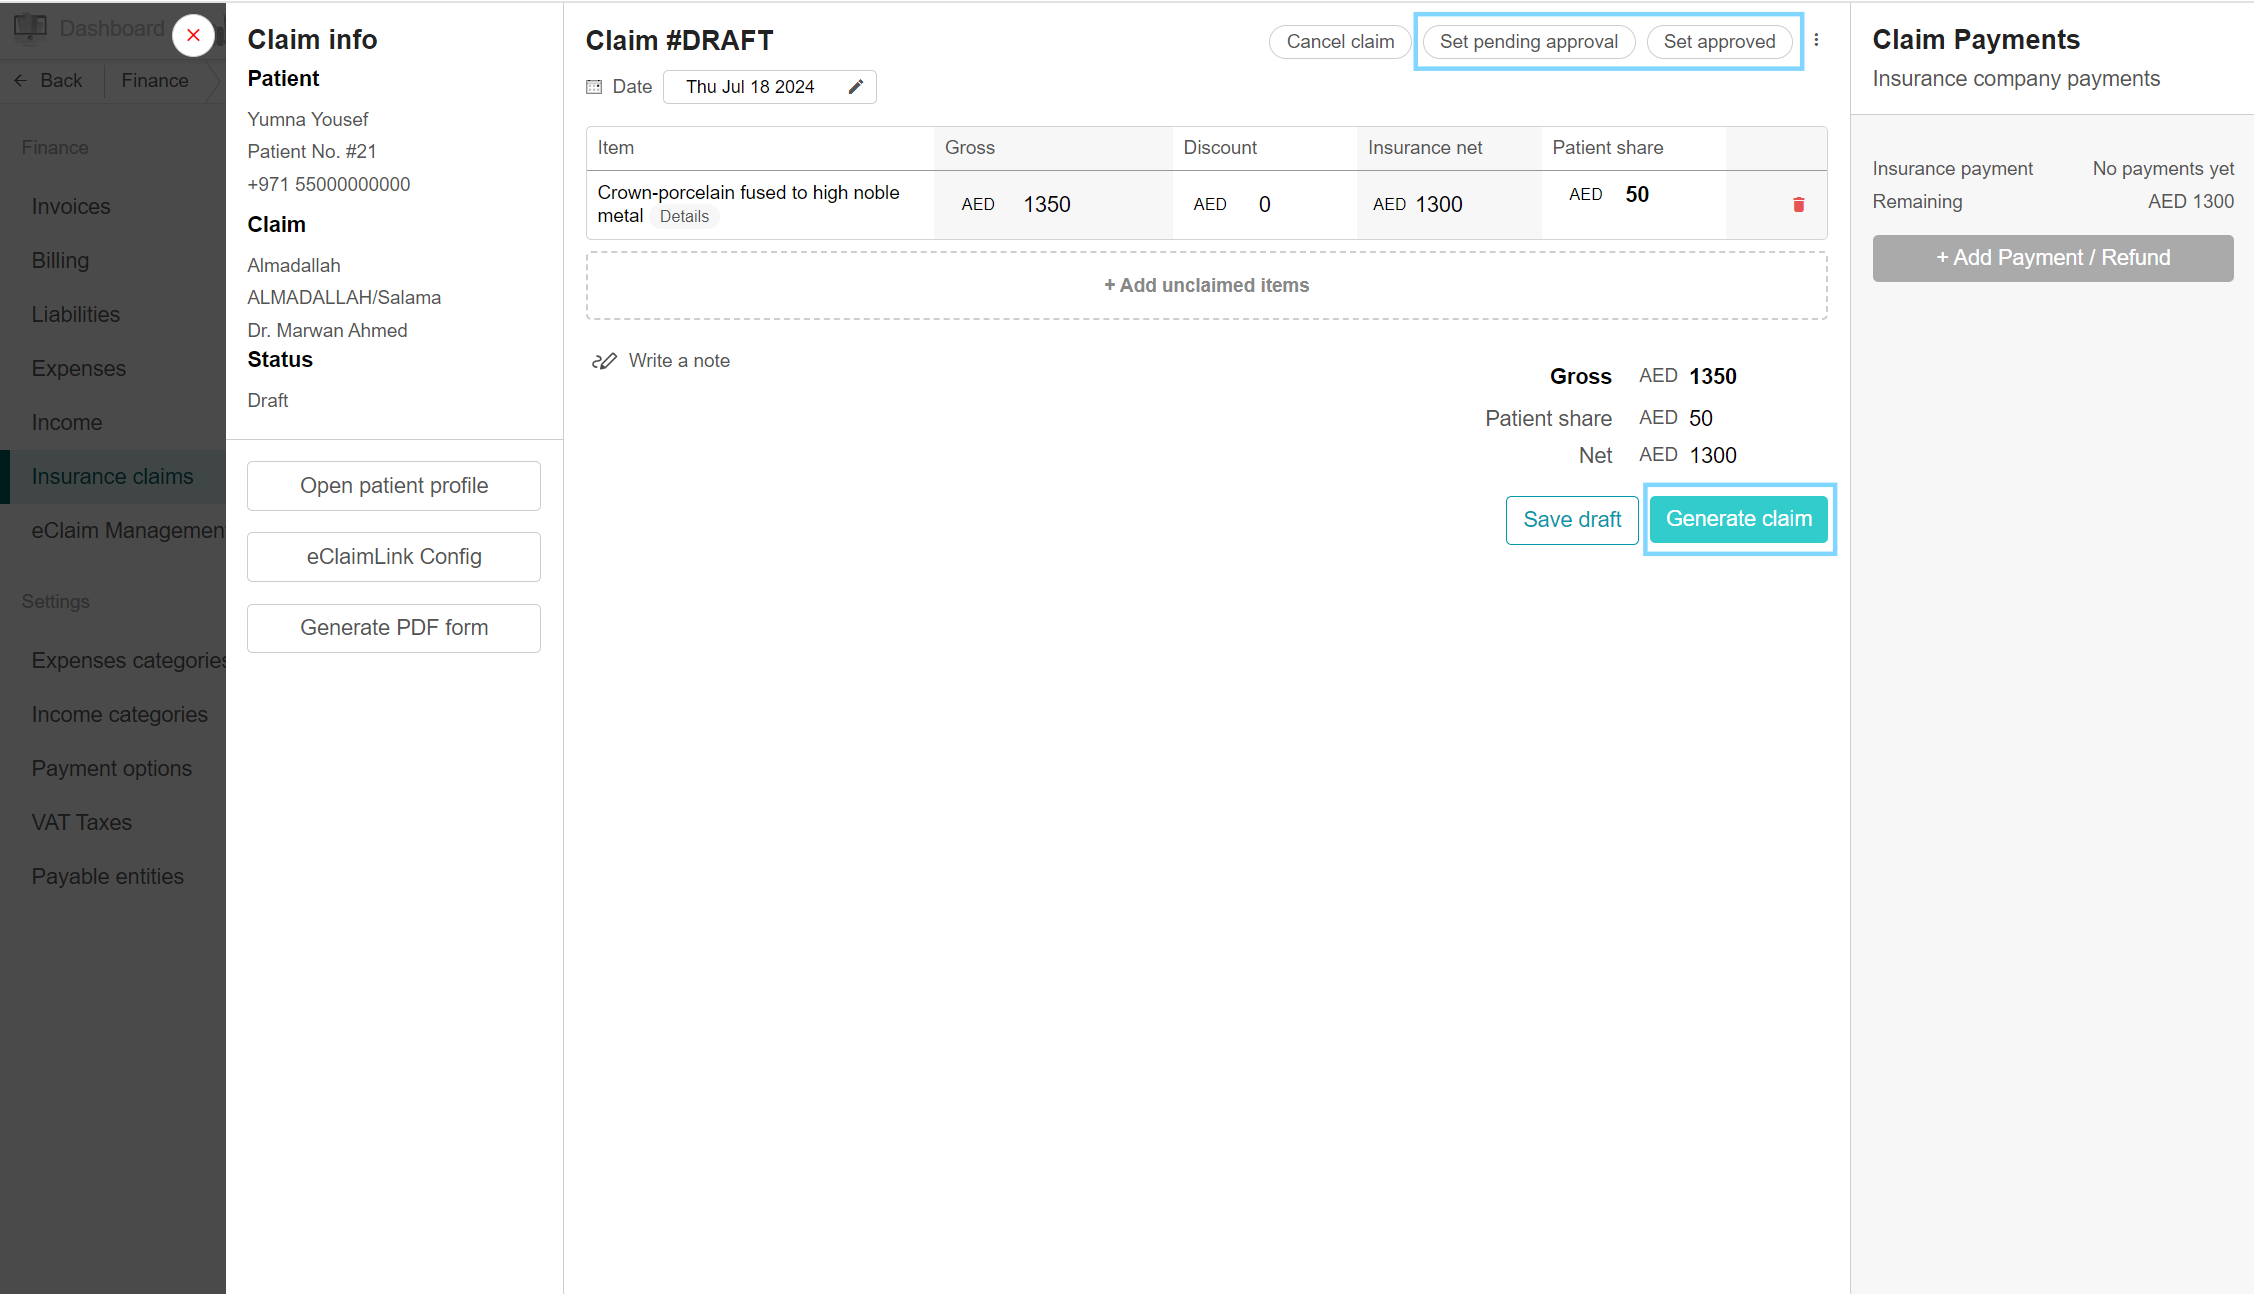
After completing and saving a claim as a draft, its status is "Draft". After sending it through the portal and awaiting insurance approval, set the claim status by clicking "Set Pending Approval". Notice the status change. When the claim is approved by the insurance provider and treatments can commence, set the claim status by clicking "Set Approved". Finally, click "Generate Claim" to change the status to "Generated". Now, the claim is processed, and payment from the insurance is awaited.
Adding Payment and Refund to Claim
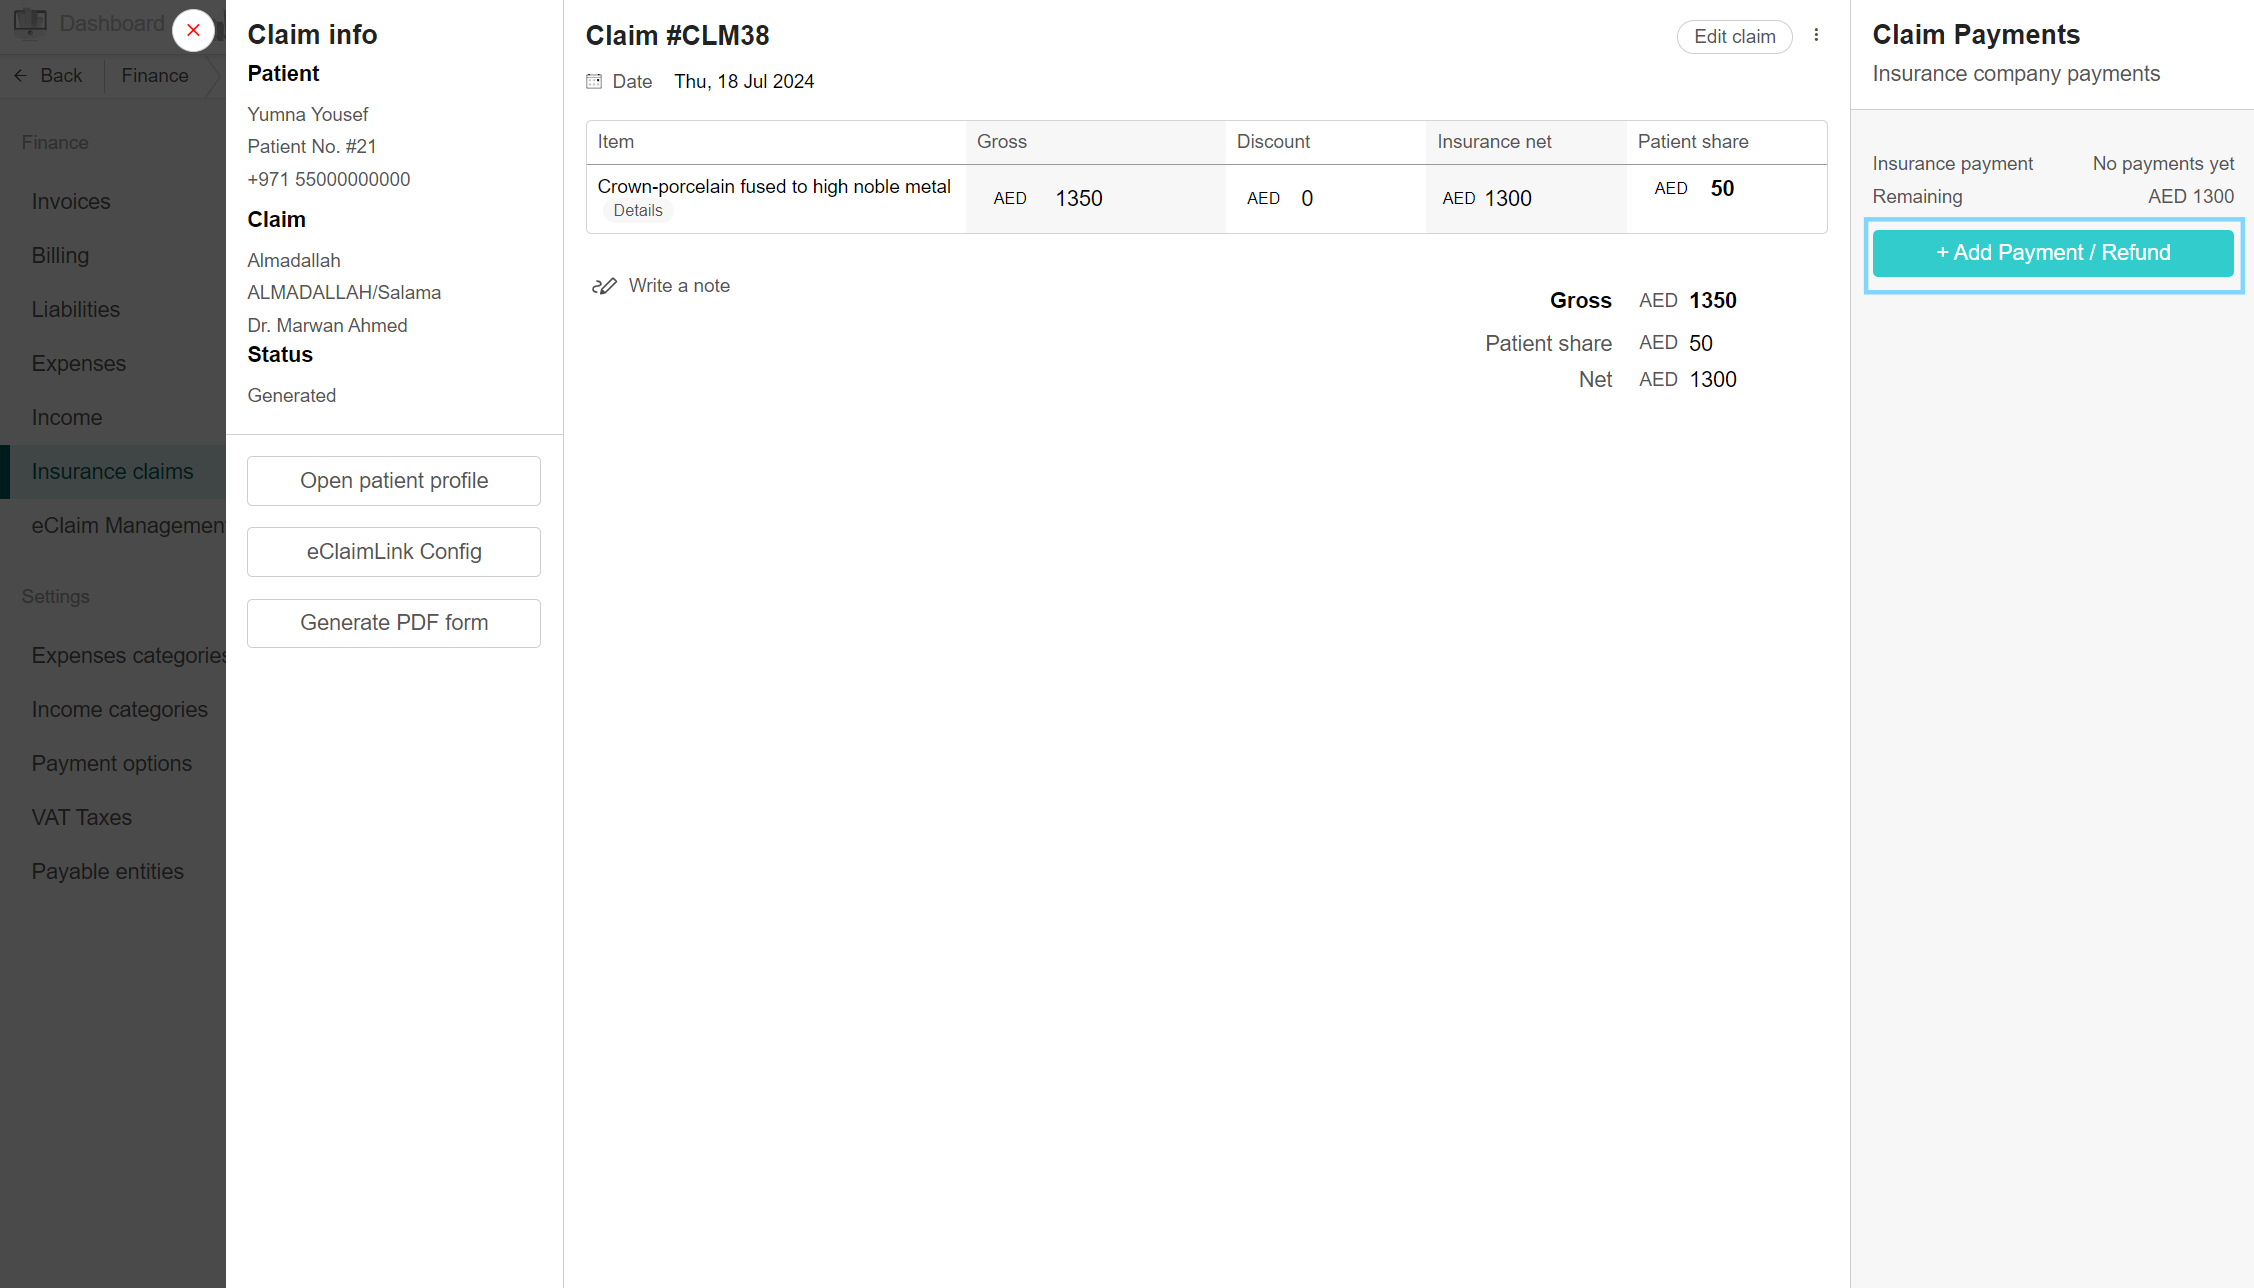
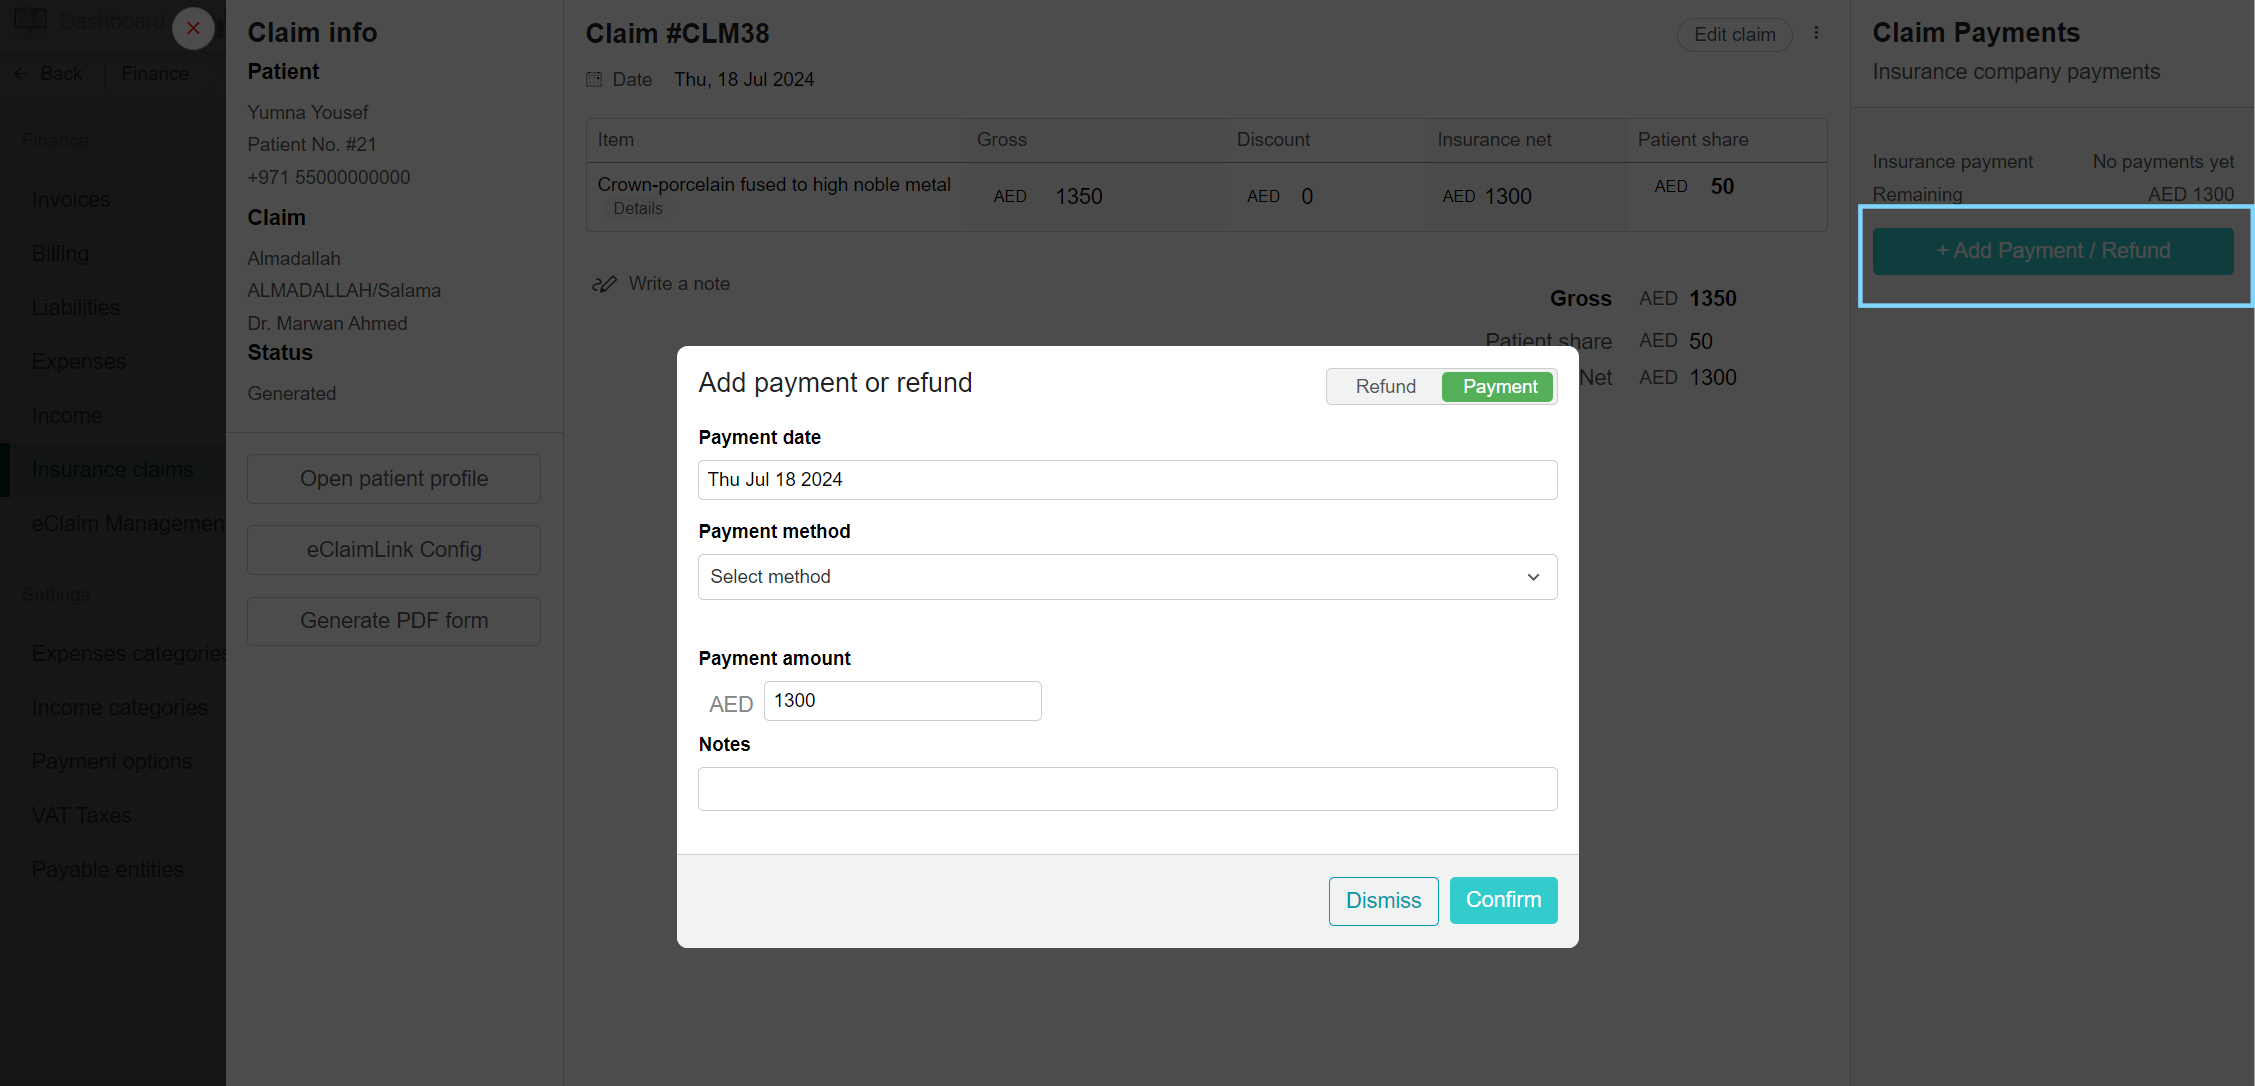
To add any payment made by the insurance provider to the clinic or any refund to be returned, select the desired claim. Payments can be found on the right-hand side under Claim Payments. Click "Add Payment / Refund". In the pop-up box, select Payment, enter the payment date, method, amount, and notes. Click "Confirm". To add a refund, click "Add Refund", choose Refund, enter details, and click "Confirm". Insurance payments and remaining amounts are listed on the right side.
Adding Payment to Individual Patients from Insurance Providers
When the insurance pays for the claim, select the patient's claim with the status "Generated (not paid)". Under Claim Payments on the right side, click "Add Payment". In the pop-up box, enter payment details and click "Confirm". The payment is added to the user who added it.
Adding Bulk Payments from Insurance Providers
Once insurance providers make a payment for several claims, open the insurance claim page. Click "Add Bulk Payments". Select the paying insurance company and insurance plan. A list of unpaid claims appears. Choose the payment method, and payment date, and enter the paid amounts under the payment column. Click "Set Paid" and confirm to add payment. The claims' status changes to "Paid".

Cancel claim
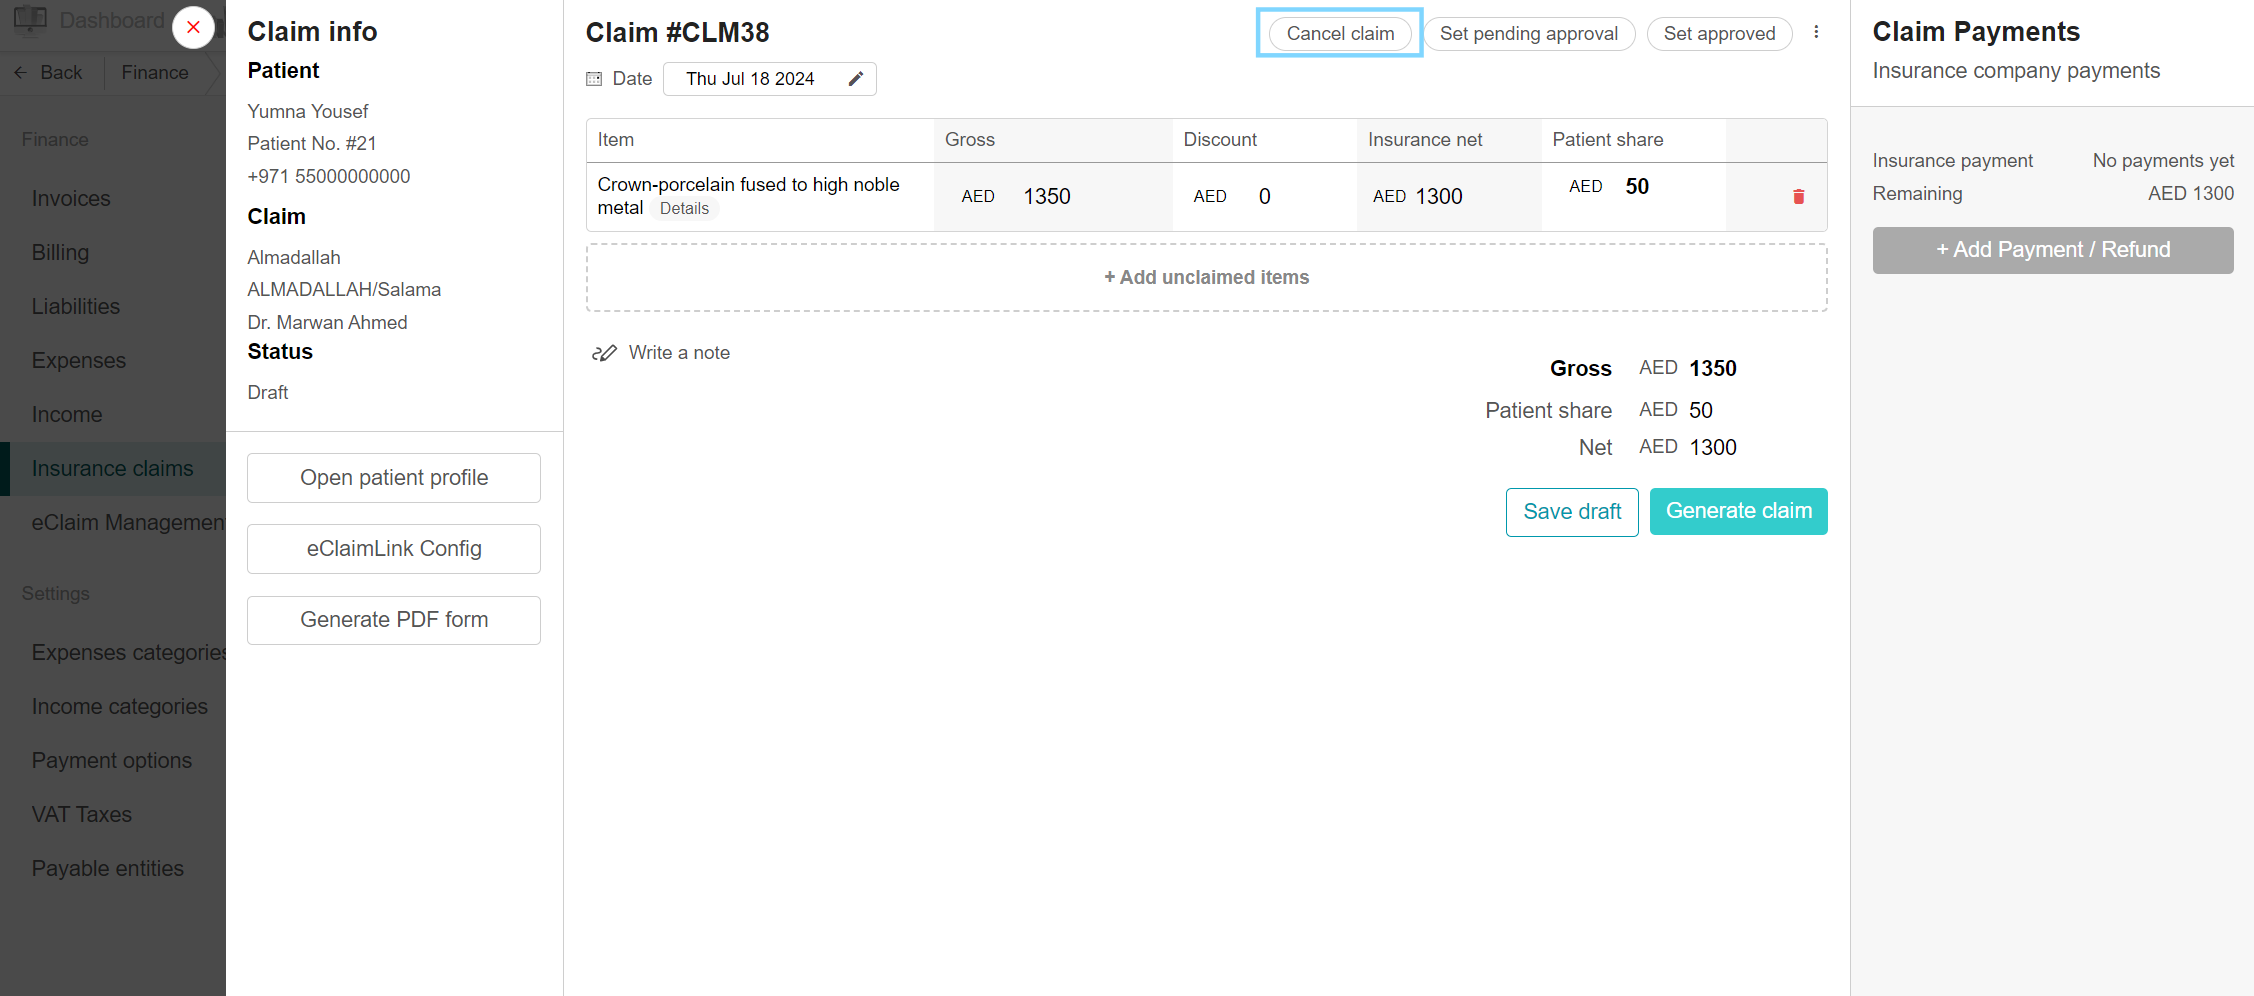
To cancel any claim, go to the Finance tab and select Insurance Claims from the side. Choose the desired claim from the list, and open the claim info page. At the top is the Cancel claim button, click it and confirm the cancellation. Notice the claim status is changed to Cancelled.
To view all cancelled claims, click Filter by and select the Cancelled claim status.
Download Generated Claims
Export claim data by clicking "Generate Sheets". Choose the download location. After downloading, view the Excel sheet with the clinic name, claim period, insurance provider name, and a list of generated claims with total amounts at the bottom.

Generate claim form
For clinics in Dubai, UAE, all their insurance claims are submitted through the eClaimLink portal. With our eClaimLink integration, all claims can be submitted through Balsam Medico.
Generate Claim (manual):
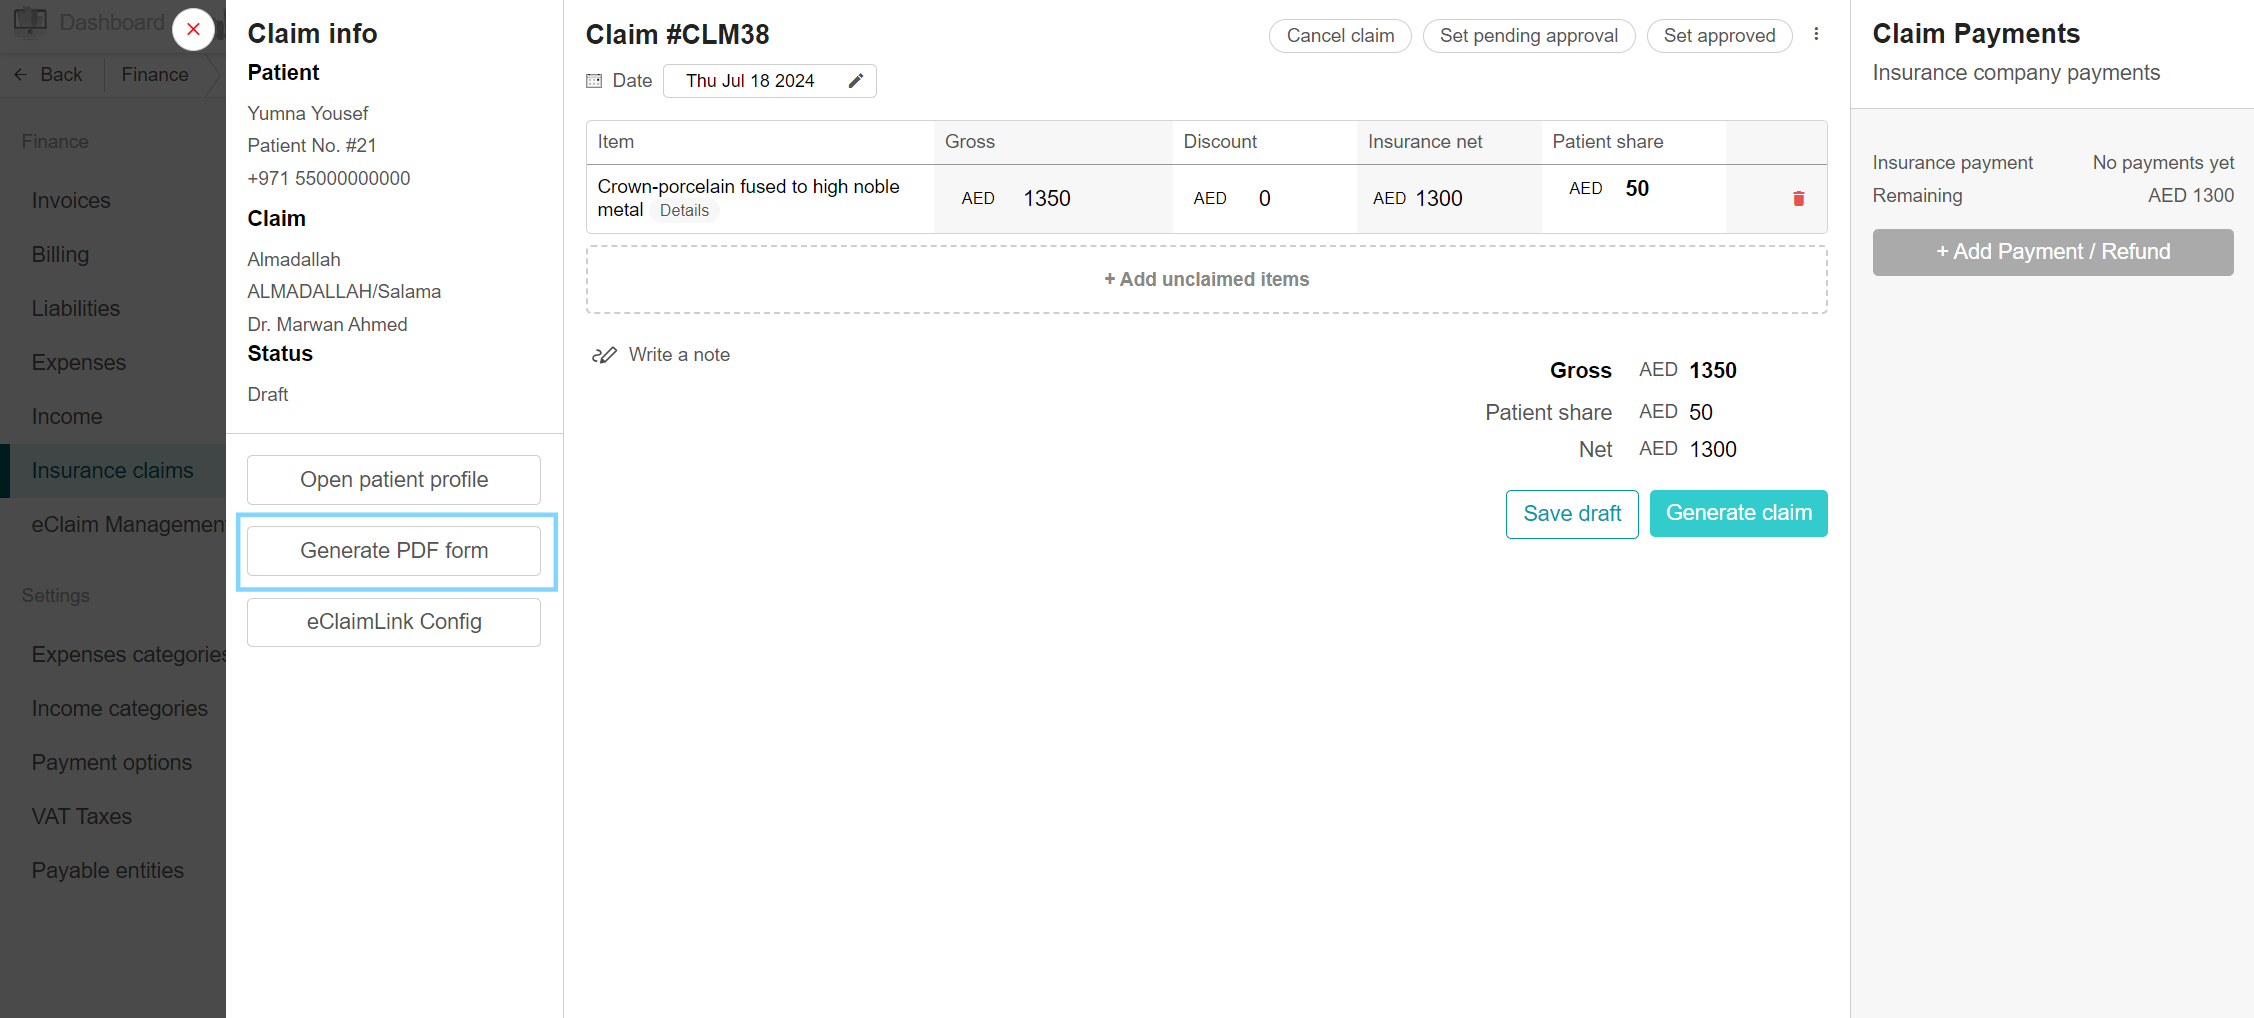
Normally, the Generate PDF form button automatically creates a document based on the patient's insurance company and linked treatments, but the system also allows for a manual creation process. To create a claim form manually, click the Generate claim (manual) button and select the appropriate insurance company claim form from the provided list. You must then choose the specific treatments you wish to include in the insurance claim before clicking Generate form to finalize the form.
Once the form is created, the patient can access it for signing by scanning a QR code with their phone that will appear automatically once you generate the form. After the patient submits their signature via their device, it is automatically added to the form. Alternatively, if your clinic utilizes a tablet, with an installed webform that’s integrated with Balsam Medico, the form will be sent to the tablet and ready to be signed by the patient. The patient will sign in the tablet and it’s done.
Navigate to eClaimLink Config
To generate any requests, authorizations and submissions, navigate to the eClaimLink Configuration which sends the data to the eClaimLink portal.
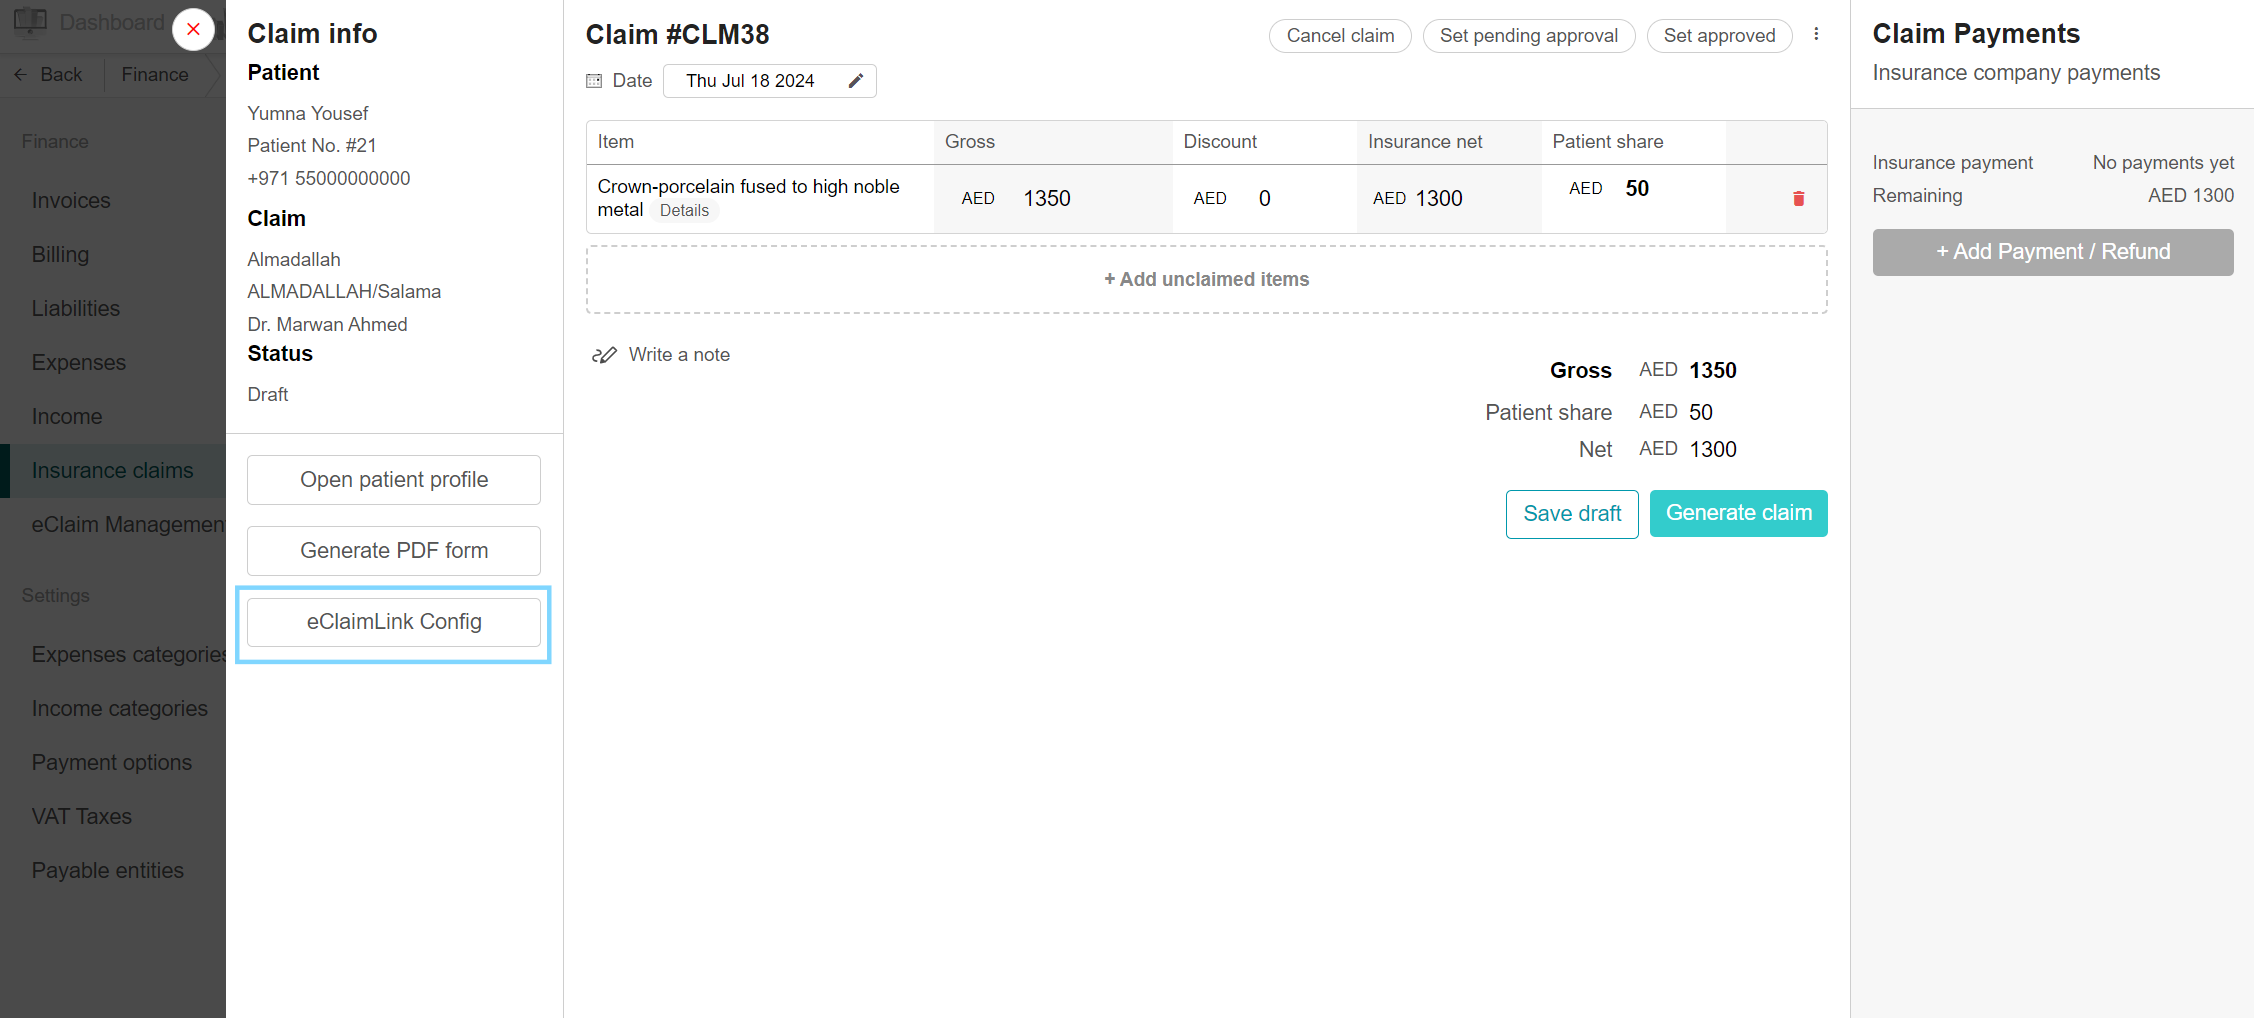
Go to the Finance page and select Insurance Claims from the side. Select the claim from the list and open the claim info page. On the left side is the eClaimLink Config button, and there is the insurance claims details page, all actions done on this page get sent to the eClaimLink portal.
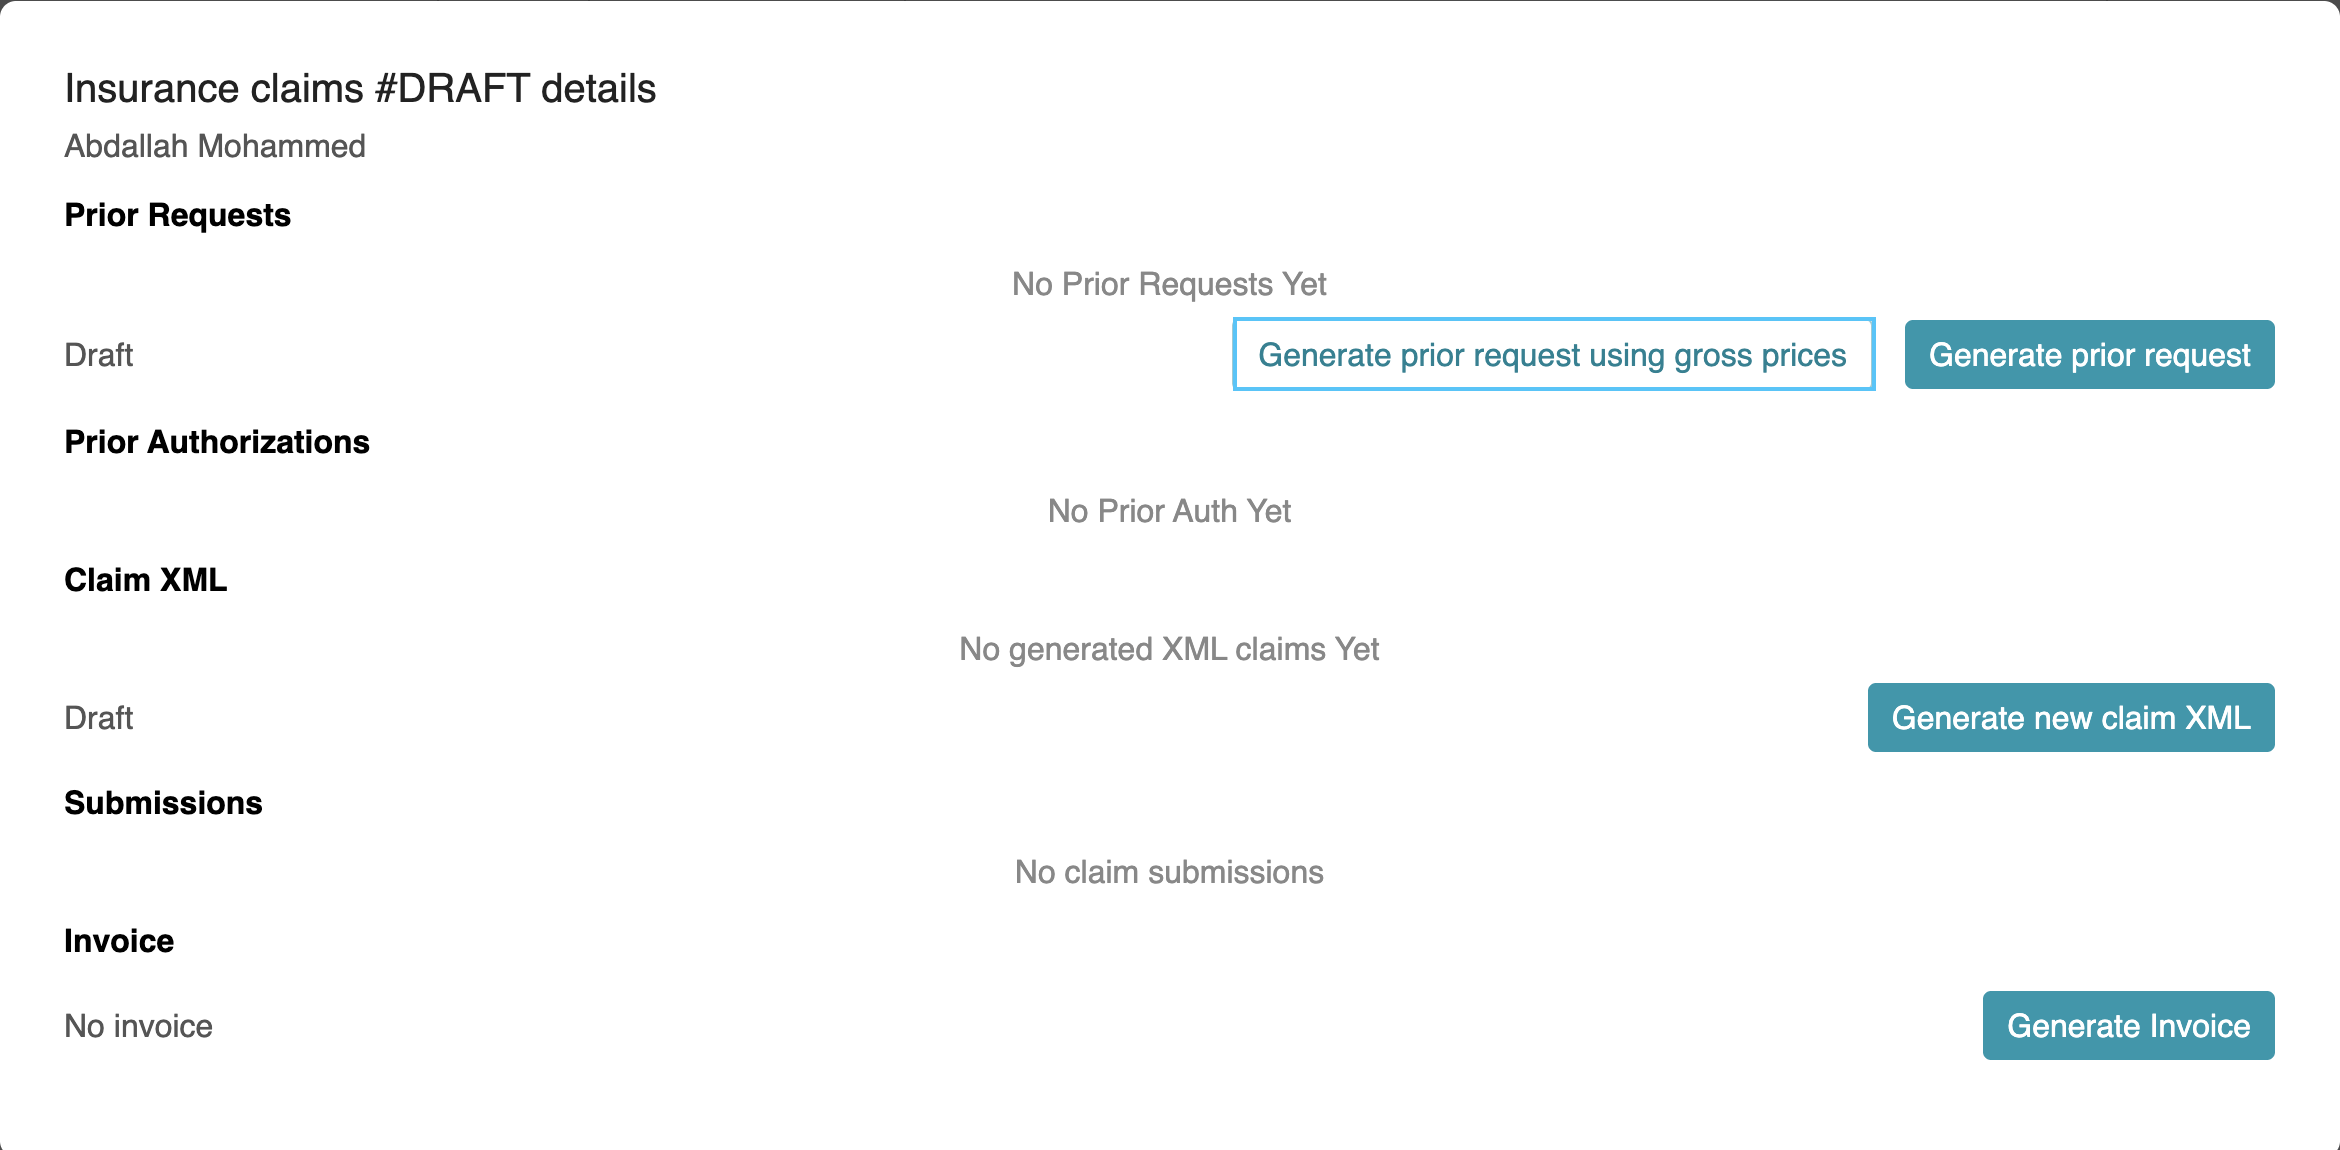
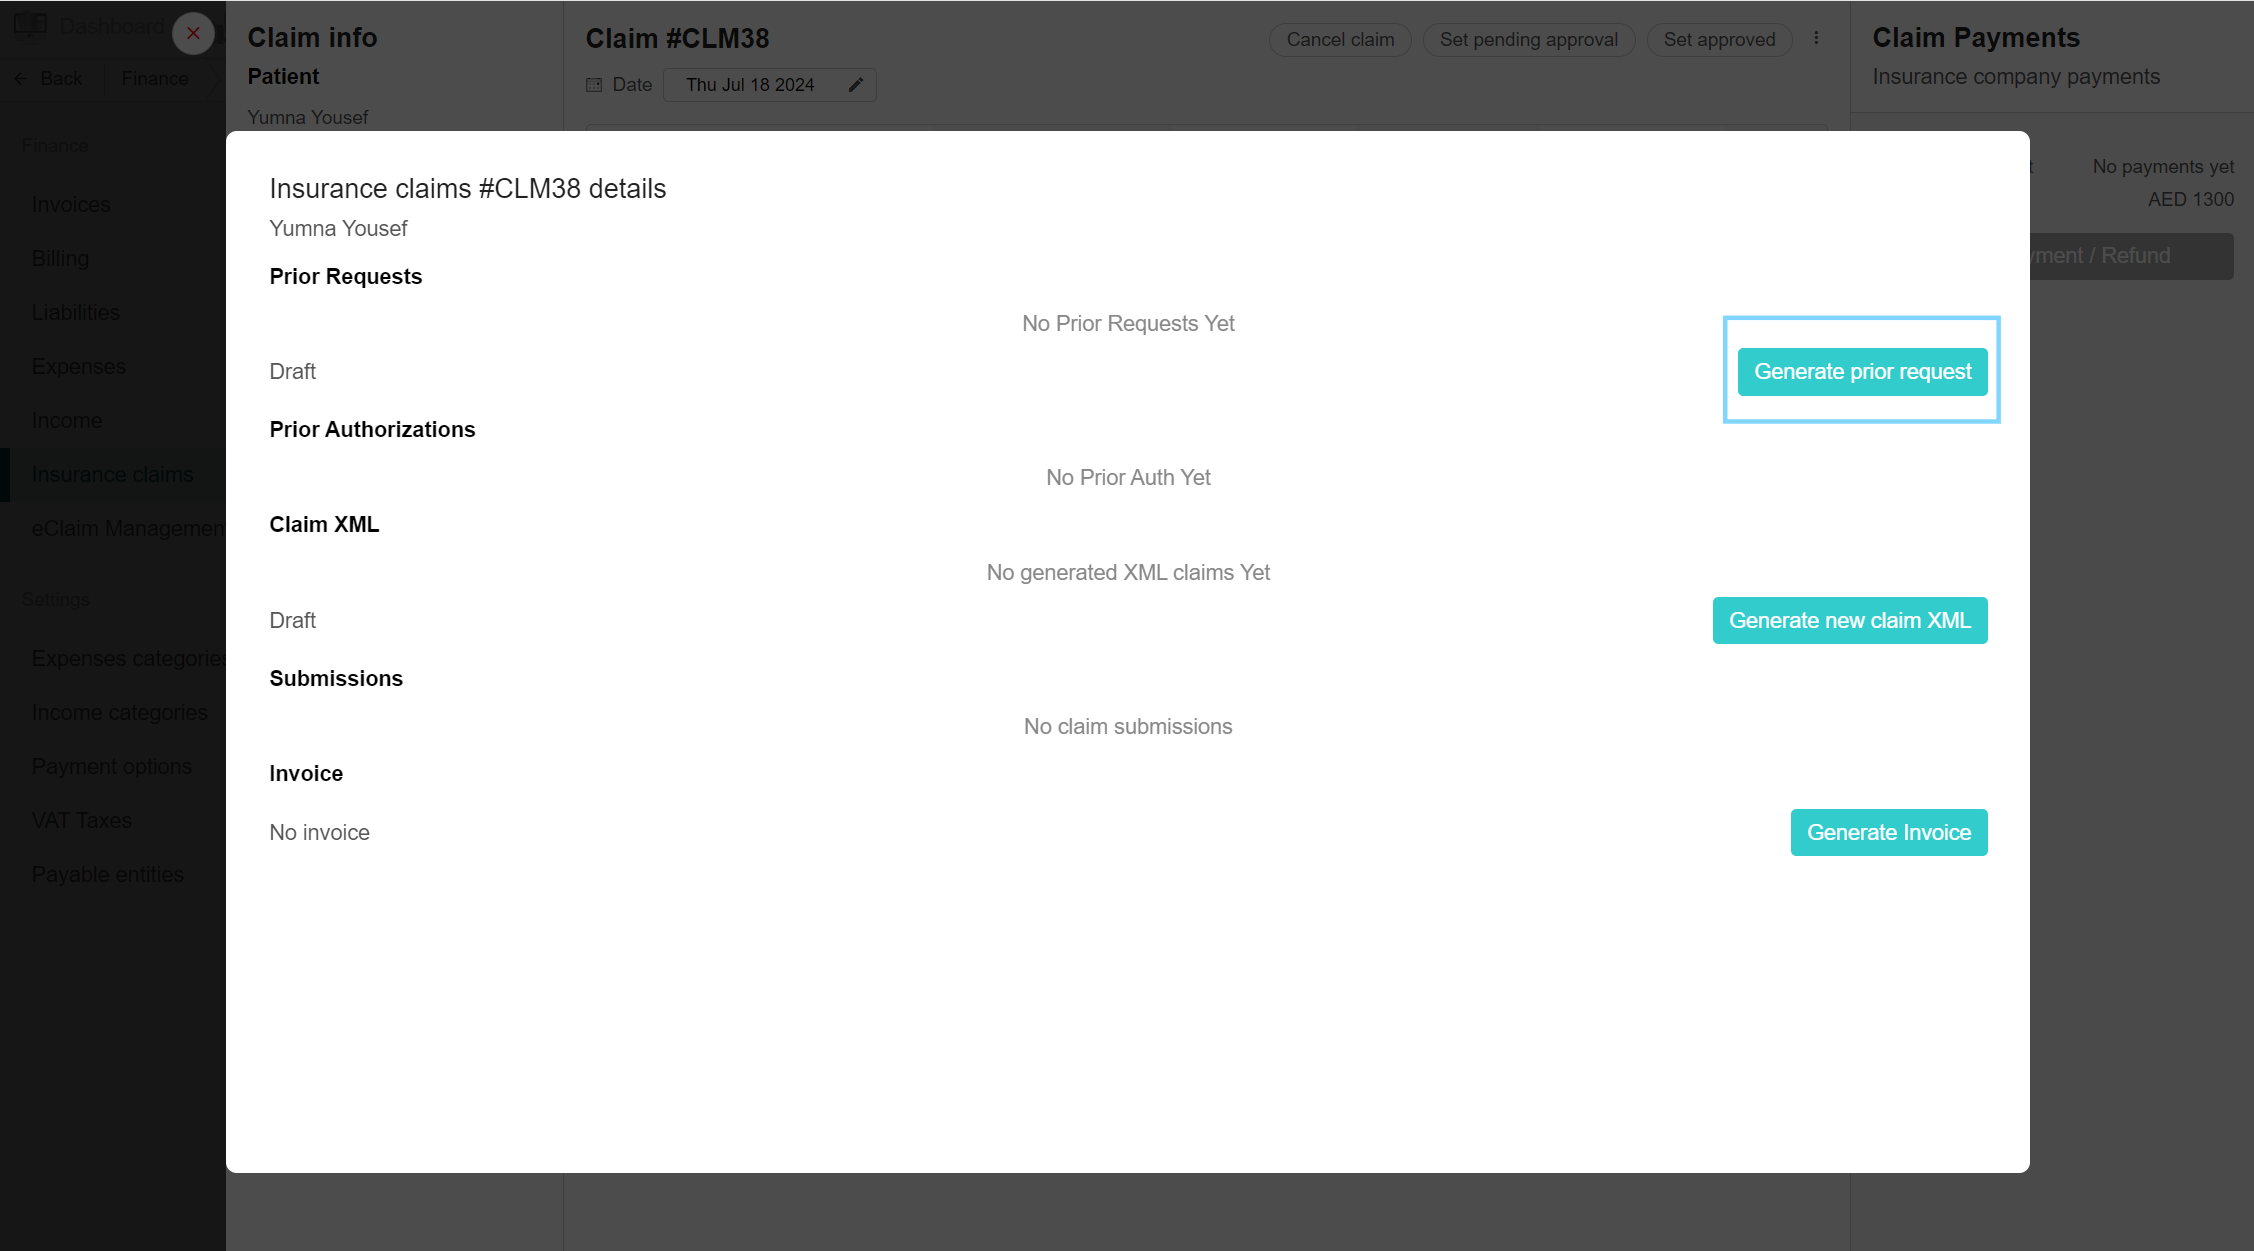
Generate prior request
Prior requests are sent to the portal for qualifications on the treatments performed on patients by doctors. To generate a prior request, select the desired claims and open the eClaimLink Config. In the insurance claims details page you can find Prior Requests, Prior Authorizations, Claim XML, Submissions and Invoice. Make sure the claim is drafted. Click on Generate prior requests using gross prices button, a prior request page appears, and add the necessary details (such as Authorization Type, Disposition Flag, etc). Finally, click the Save Prior Request XML button and then click the Send to eClaimLink button.
Generate prior authorizations
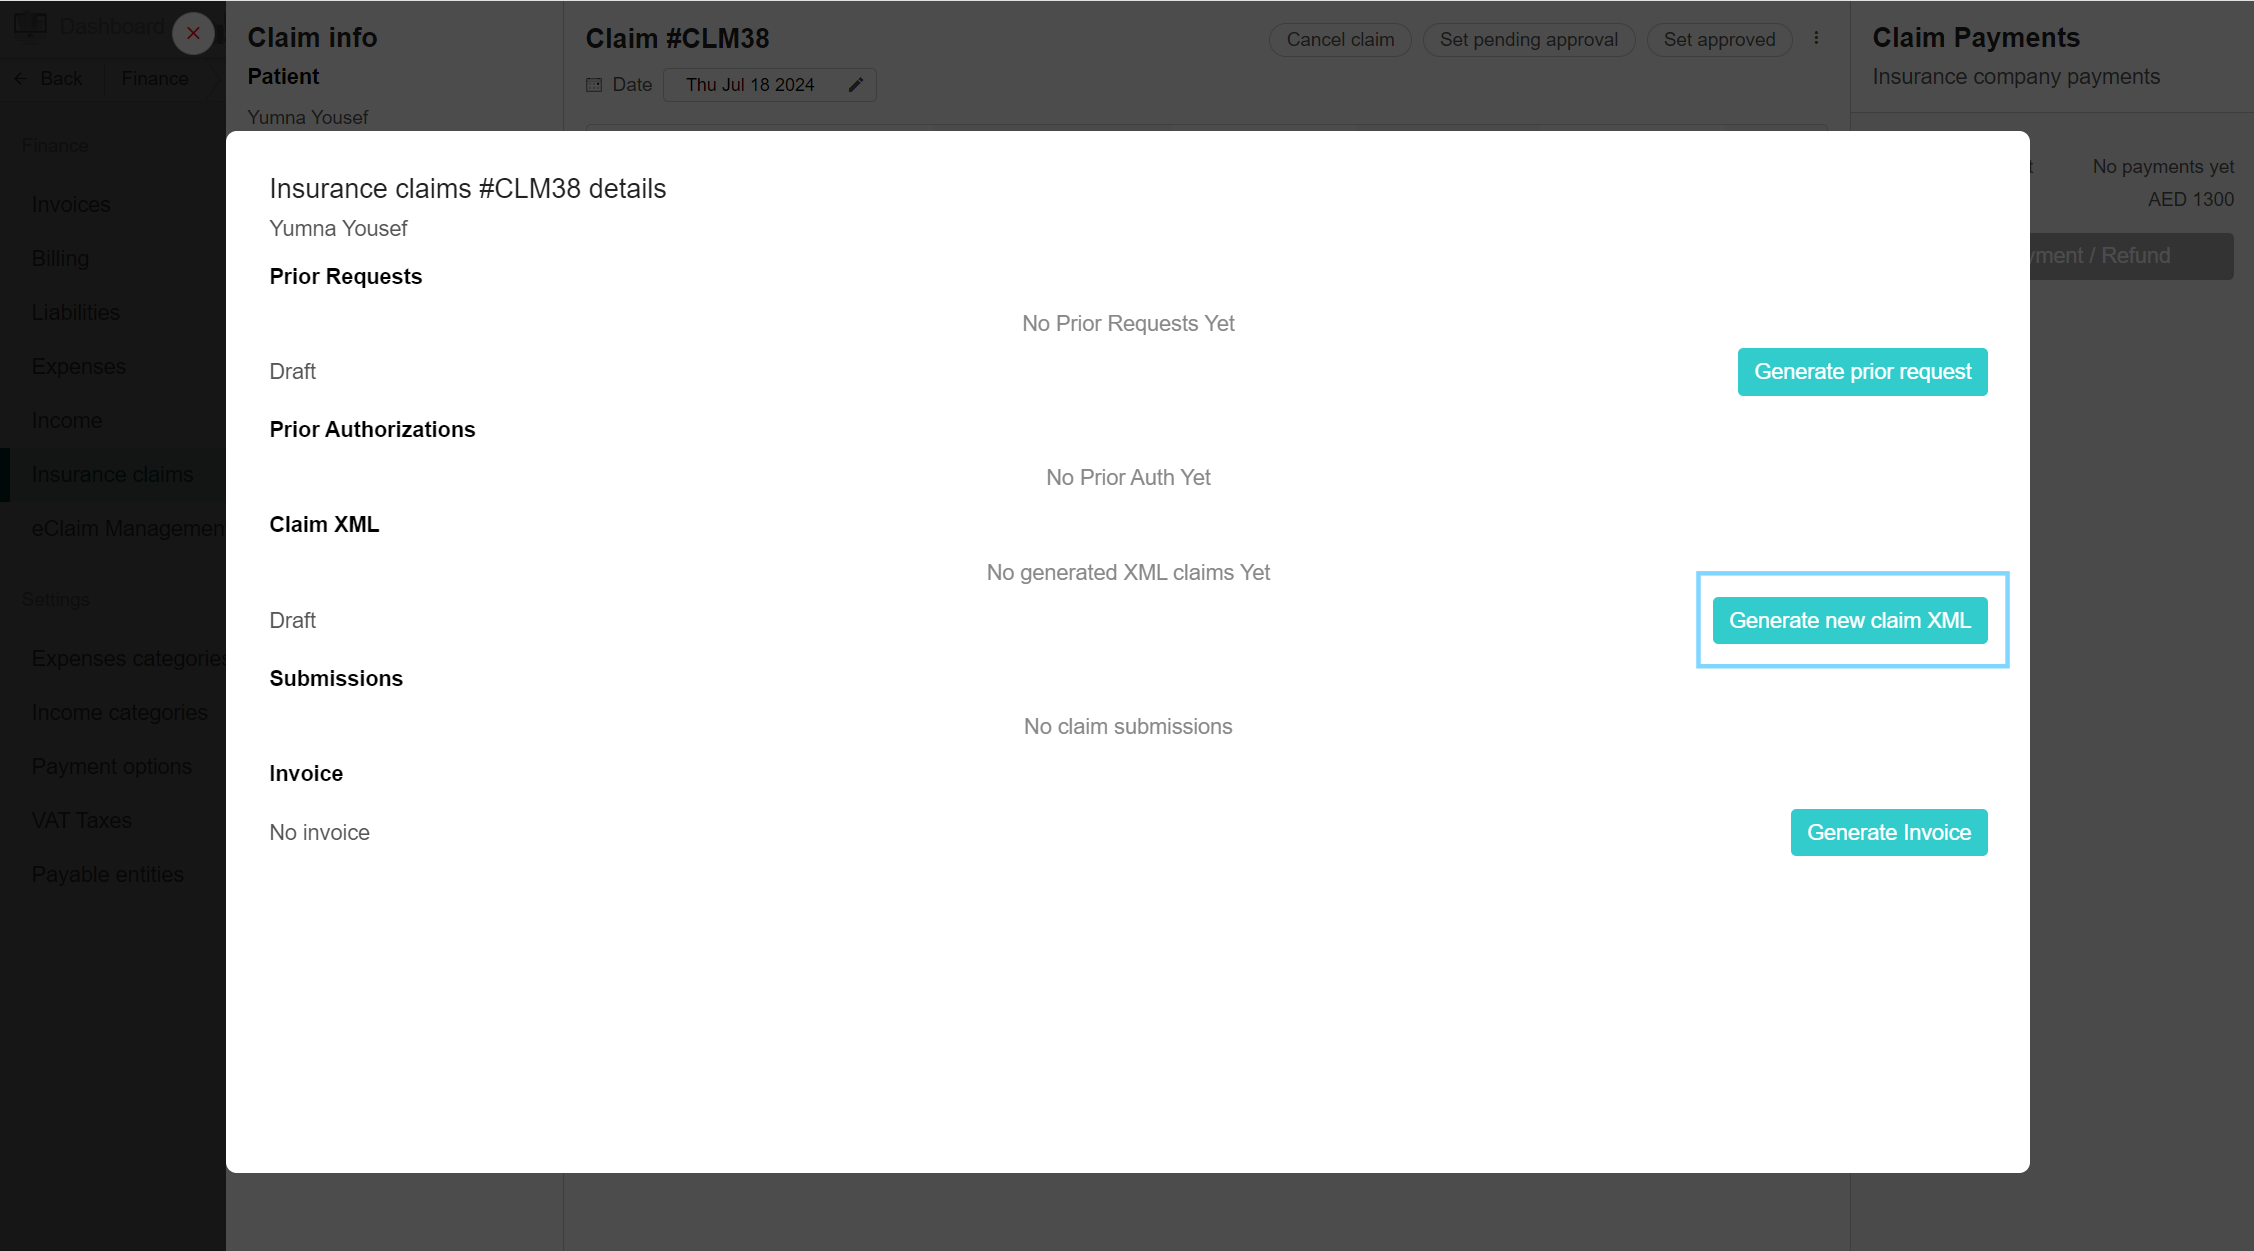
Generate new claim XML
Claims are sent to the portal in XML format. This will contain all the necessary information on the claim, insurance details of the patient, treatment performed with the diagnosis and any additional observers to help with the treatment. This claim XML can be downloaded to review the claim details. To do so, navigate to the claim in the Insurance claim page and open eClaimLink Config. Click on Generate new claim XML, and add the necessary details. Finally, click Save Claim XML. You can download the XML by clicking the link “Download XML file”
Submit claim
The important part of the claim is finally submitting it to the insurance providers to cover the treatment price. Submissions of claims are performed on the eClaim Management page of the Finance tab. You can submit either a singular claim or some claims under the same insurance plan. Tick the claims you want to submit and click the “Select claims to submit to eClaim” button. Choose the Disposition Flag and click Send to E-Claim Link.
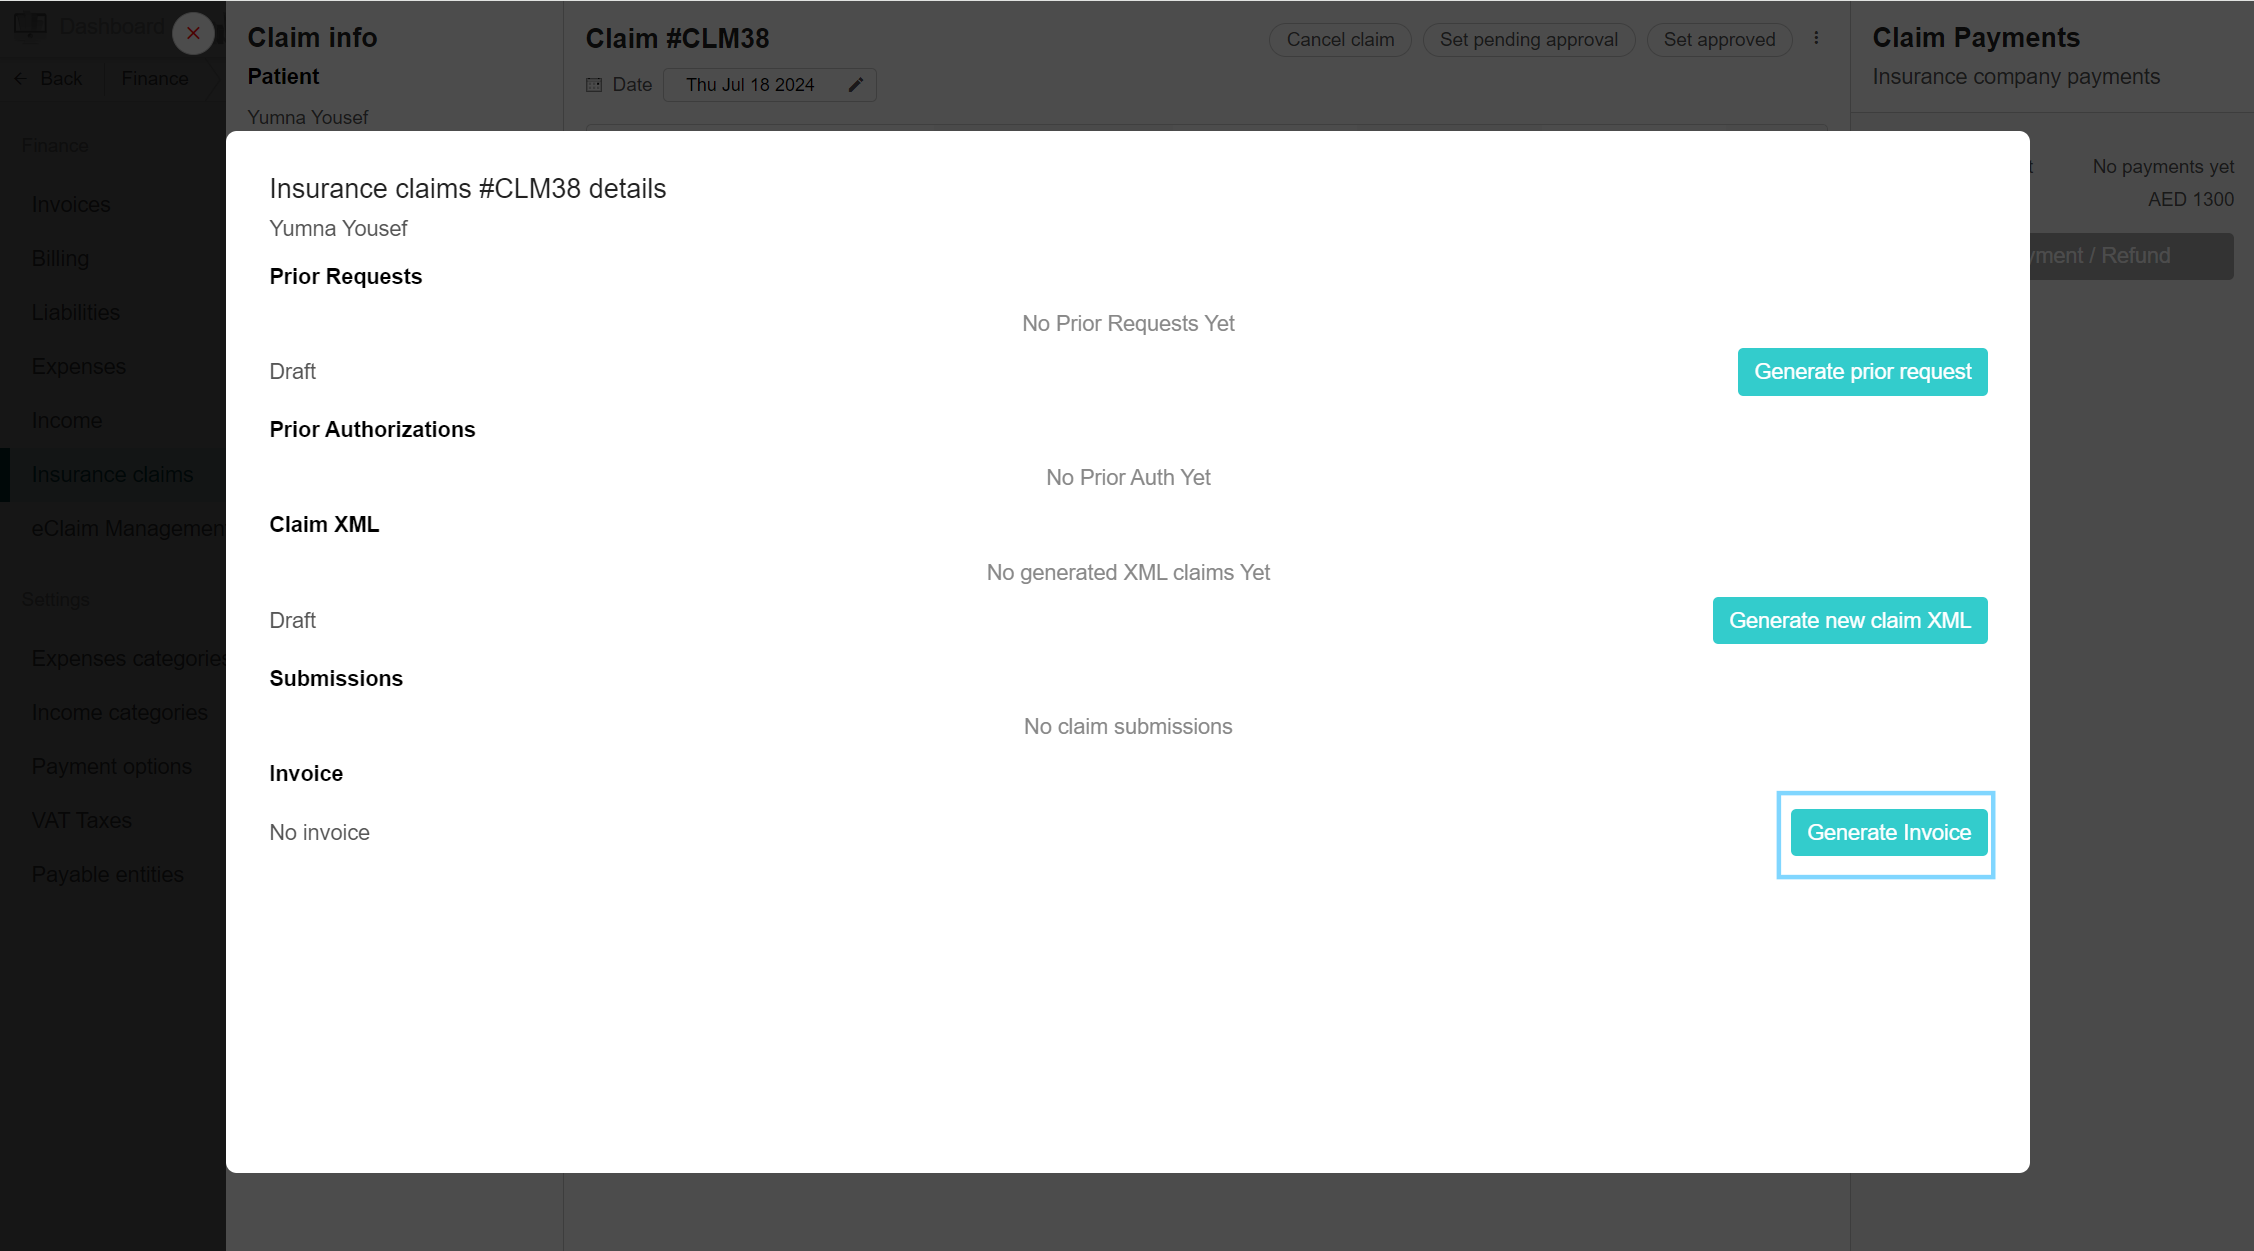
Generate invoices to insurance providers
When the claim is submitted to the portal, the payments are due. Create an invoice for the insurance plans to receive the payment of the claim. Select the desired claim and open the eClaimLink Config. Scroll down to the Invoice section. Click on Generate Invoice. After generation, you can either create a new invoice or download the generated invoice. To download, click on the Download invoice button and the invoice will include the patient details, claim details and the cost of the insurance-covered treatment.
No Comments